Windows |
| |
|
|
|
Macintosh |
| Click this icon in Mac OS X. |
|
|
|
Linux |
| Click this icon in Linux. |
|
|
|
Or, if you are a Windows user, you can launch it from the Start menu, select Programs or All Programs > Samsung Printers > your machine name > Smart Panel.
•If you have already installed more than one Samsung machine, first select the correct machine model you want in order to access the corresponding Smart Panel.
•The Smart Panel window and its contents shown in this user’s guide may differ depending on the machine or operating system in use.
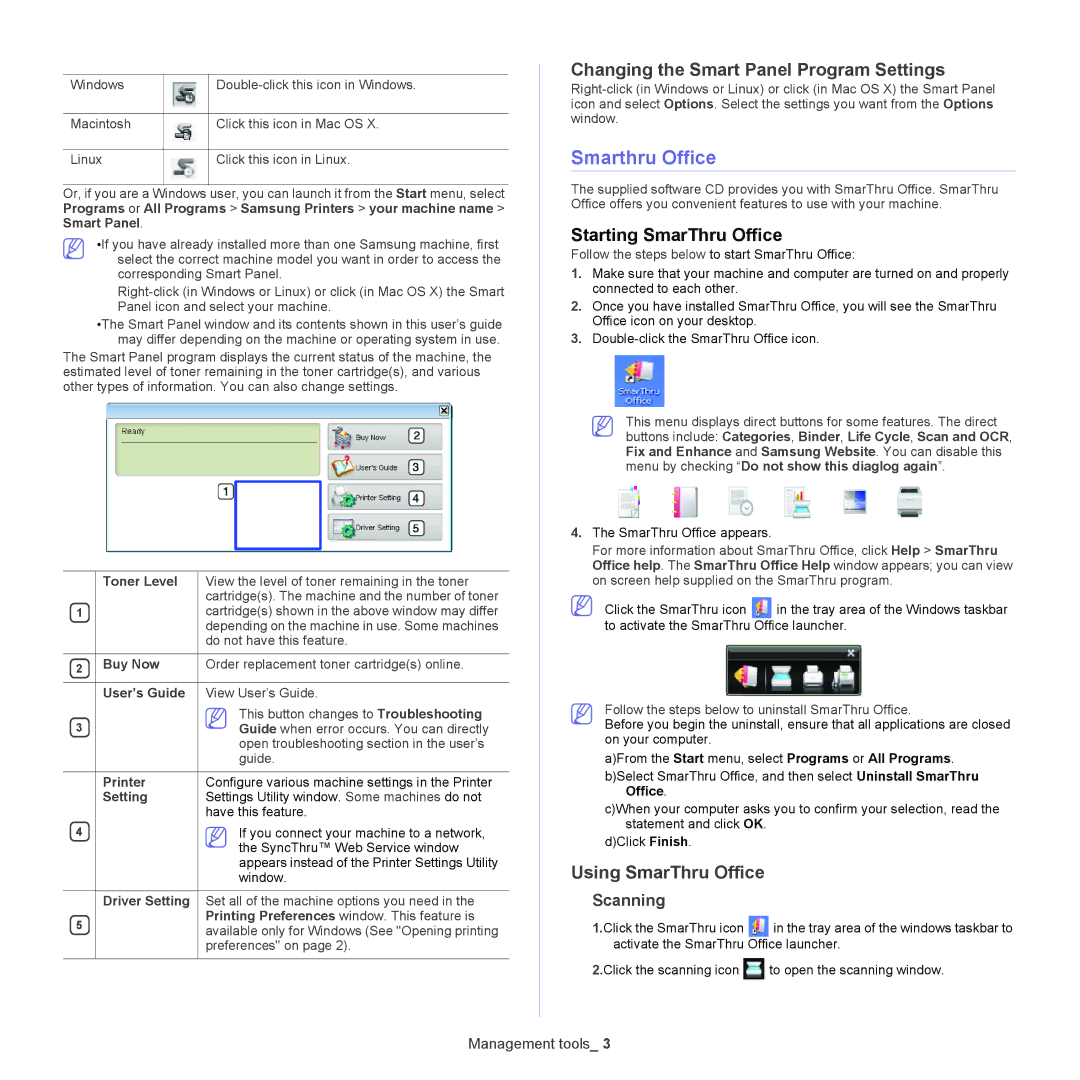
The Smart Panel program displays the current status of the machine, the estimated level of toner remaining in the toner cartridge(s), and various other types of information. You can also change settings.
| Toner Level | View the level of toner remaining in the toner |
|
| cartridge(s). The machine and the number of toner |
1 |
| cartridge(s) shown in the above window may differ |
|
| depending on the machine in use. Some machines |
|
| do not have this feature. |
|
|
|
2 | Buy Now | Order replacement toner cartridge(s) online. |
|
|
|
| User’s Guide | View User’s Guide. |
3 |
| This button changes to Troubleshooting |
| Guide when error occurs. You can directly | |
|
| open troubleshooting section in the user’s |
|
| guide. |
|
|
|
| Printer | Configure various machine settings in the Printer |
| Setting | Settings Utility window. Some machines do not |
|
| have this feature. |
4 |
| If you connect your machine to a network, |
|
| the SyncThru™ Web Service window |
|
| appears instead of the Printer Settings Utility |
|
| window. |
|
|
|
| Driver Setting | Set all of the machine options you need in the |
5 |
| Printing Preferences window. This feature is |
| available only for Windows (See "Opening printing | |
|
| |
|
| preferences" on page 2). |
|
|
|
Changing the Smart Panel Program Settings
Smarthru Office
The supplied software CD provides you with SmarThru Office. SmarThru Office offers you convenient features to use with your machine.
Starting SmarThru Office
Follow the steps below to start SmarThru Office:
1.Make sure that your machine and computer are turned on and properly connected to each other.
2.Once you have installed SmarThru Office, you will see the SmarThru Office icon on your desktop.
3.
This menu displays direct buttons for some features. The direct buttons include: Categories, Binder, Life Cycle, Scan and OCR, Fix and Enhance and Samsung Website. You can disable this menu by checking “Do not show this diaglog again”.
4.The SmarThru Office appears.
For more information about SmarThru Office, click Help > SmarThru Office help. The SmarThru Office Help window appears; you can view on screen help supplied on the SmarThru program.
Click the SmarThru icon | in the tray area of the Windows taskbar |
to activate the SmarThru Office launcher.
Follow the steps below to uninstall SmarThru Office.
Before you begin the uninstall, ensure that all applications are closed on your computer.
a)From the Start menu, select Programs or All Programs.
b)Select SmarThru Office, and then select Uninstall SmarThru Office.
c)When your computer asks you to confirm your selection, read the statement and click OK.
d)Click Finish.
Using SmarThru Office
Scanning
1.Click the SmarThru icon | in the tray area of the windows taskbar to |
activate the SmarThru Office launcher.
2.Click the scanning icon ![]() to open the scanning window.
to open the scanning window.
Management tools_ 3