OK.
a. Press OK when
b. Press the up/down arrow to select TKIP or AES in Encryption and press OK. If you select
c. Enter the WPA Key using number keypad and press OK.
5.When you have finished, press Stop/Clear to return to the ready mode. If you do not know about your wireless environment, please ask the network administrator.
Disconnect the network cable (standard or crossover). Your machine should then start communicating wirelessly with the network. In case of
Now go to "Installing network connected machine’s driver" on page 3.
Using SyncThru™ Web Service
For information about configuring and using the machine on a wireless network environment, refer to the Wireless network install guide provided with the wireless network interface card. You can also configure the network parameters on the SyncThru™ Web Service.
Installing a hard disk
Installing the hard disk allows the data from your computer to be sent to the print queue of the printer hard disk. This decreases the workload of the computer. You can also use various print features, such as storing a job in the hard disk, proofing a job, and printing private documents.
The order information is provided for optional hard disk (See "Available accessories" on page 2).
Installing a hard disk
1.Turn the machine off and unplug all cables from the machine.
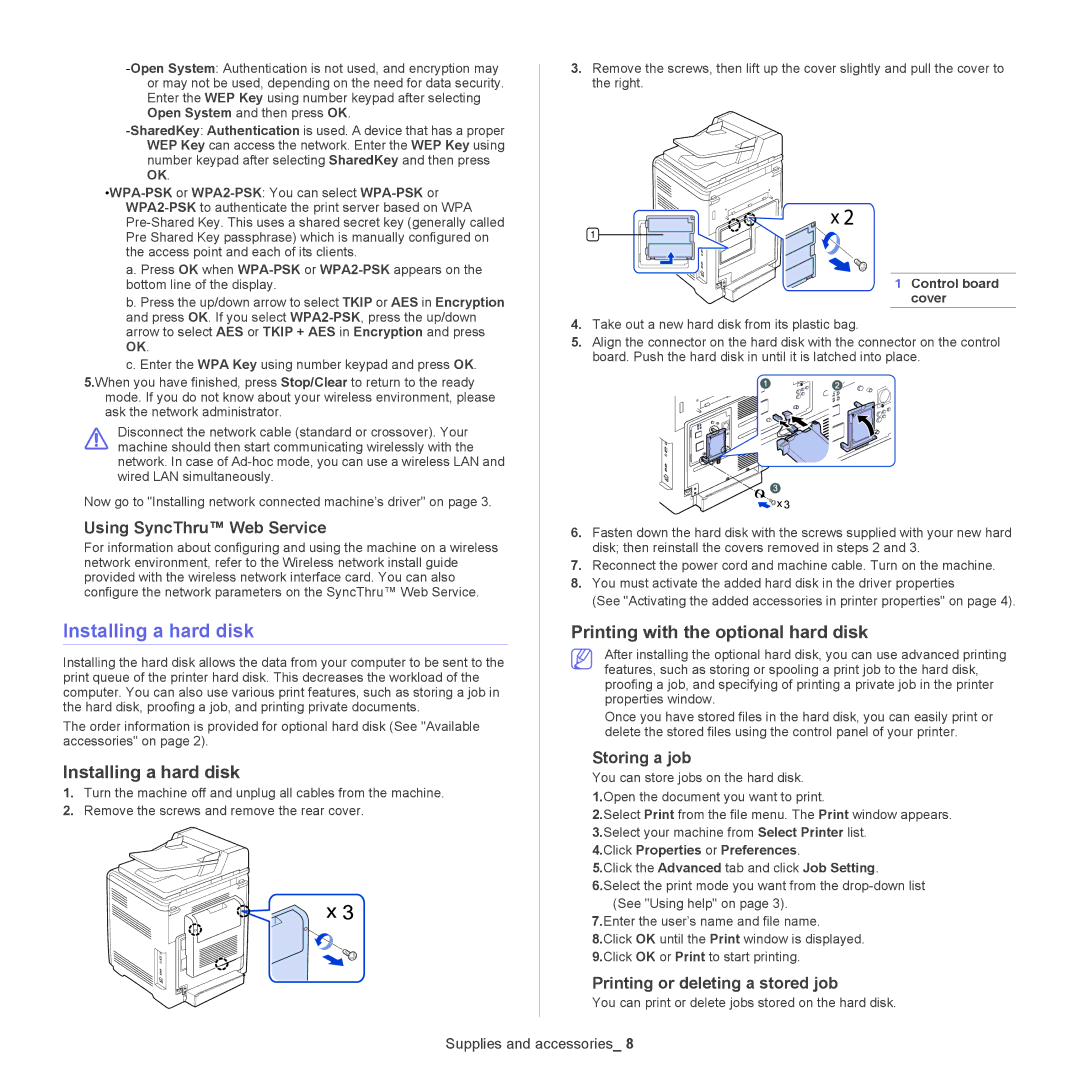
2.Remove the screws and remove the rear cover.
3.Remove the screws, then lift up the cover slightly and pull the cover to the right.
1 Control board cover
4.Take out a new hard disk from its plastic bag.
5.Align the connector on the hard disk with the connector on the control board. Push the hard disk in until it is latched into place.
6.Fasten down the hard disk with the screws supplied with your new hard disk; then reinstall the covers removed in steps 2 and 3.
7.Reconnect the power cord and machine cable. Turn on the machine.
8.You must activate the added hard disk in the driver properties
(See "Activating the added accessories in printer properties" on page 4).
Printing with the optional hard disk
After installing the optional hard disk, you can use advanced printing features, such as storing or spooling a print job to the hard disk, proofing a job, and specifying of printing a private job in the printer properties window.
Once you have stored files in the hard disk, you can easily print or delete the stored files using the control panel of your printer.
Storing a job
You can store jobs on the hard disk.
1.Open the document you want to print.
2.Select Print from the file menu. The Print window appears.
3.Select your machine from Select Printer list.
4.Click Properties or Preferences.
5.Click the Advanced tab and click Job Setting.
6.Select the print mode you want from the
7.Enter the user’s name and file name.
8.Click OK until the Print window is displayed.
9.Click OK or Print to start printing.
Printing or deleting a stored job
You can print or delete jobs stored on the hard disk.