Manuals
/
Speco Technologies
/
Photography
/
Camcorder
Speco Technologies
DVR-16TS, DVR-4TN, DVR-8TN, DVR-16TN, DVR-16TT Incoming connection is established
Models:
DVR-16TN
DVR-16TT
DVR-4TN
DVR-8TN
DVR-16TS
1
122
139
139
Download
139 pages
54.78 Kb
119
120
121
122
123
124
125
126
Install
Product Application Diagram
Alarm I/O & RS485 Port
Password
Load Factory Default
Connecting Devices to the Unit
Preset Record Configuration
Set / Go Preset
General System Setup
Screen Center Adjust
Page 122
Image 122
User’s Manual
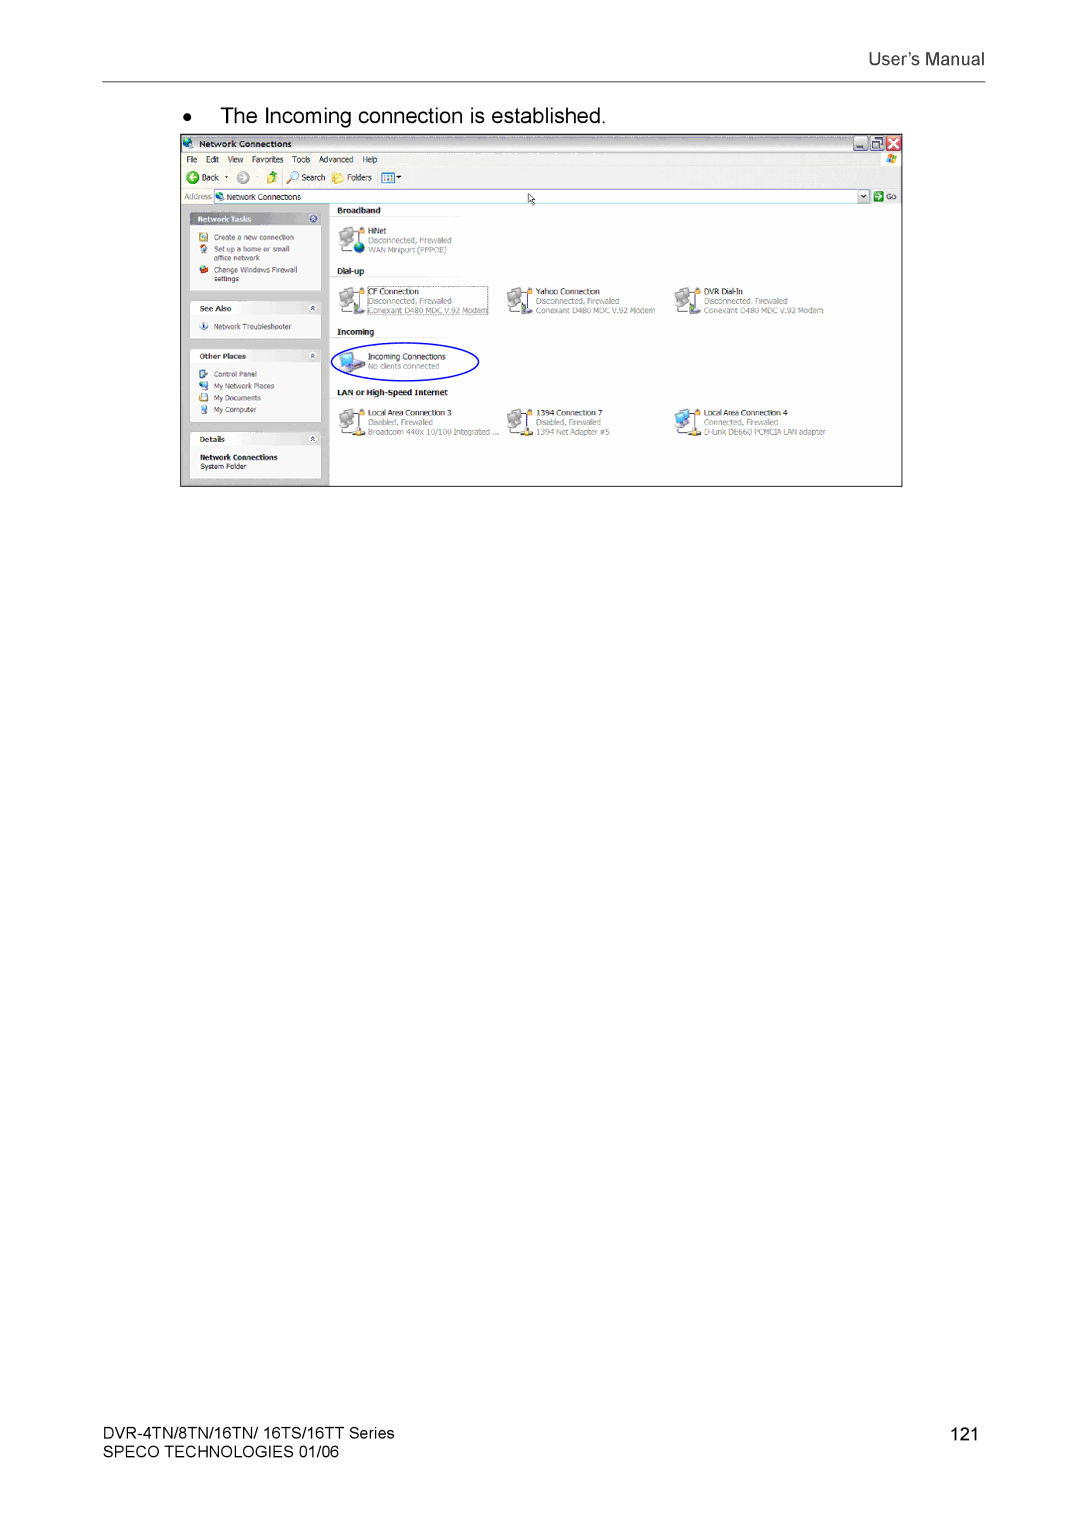
•
The Incoming connection is established.
DVR-4TN/8TN/16TN/
16TS/16TT Series
121
SPECO TECHNOLOGIES 01/06
Page 121
Page 123
Page 122
Image 122
Page 121
Page 123
Contents
DVR-4TN DVR-8TN DVR-16TN DVR-16TS DVR-16TT
User’s Manual
DVR-4TN/8TN/16TN/16TS/16TT Series
Important Information
Rack Mounting
Table of Contents
Sequence on Main Monitor Call Monitor Control
3.8
6.6
2.2
103
Overview
PAL
Product Key Features
DVR-16TN/16TS/16TT
Product Application Diagram
System Setup
Selecting Video Format
Connecting Devices to the Unit
Position the Unit
Rear Panel of DVR-4TN/8TN/16TN
Connecting Short-term Device
Rear Panel Connections
RS-232C
Alarm I/O & RS485 Port
Rear panel of DVR-16TS/16-TT Main Monitor S-Video/ BNC/ VGA
IEEE1394 for DVR-4TN/8Tn/16TN only
Audio In / Out
Power Supply
Power Switch
USB 2.0
Camera Looping
General System Setup
Front Panel Introduction
LED Definition
Functional Keys
Direction Keys
Mode
SEQ Sequence
Channel
Install HDD to the Unit
Power Off
Power Up / Down the Unit
To Power Up the Unit
Reboot
Entering OSD Setup Menu
Administrator Passwords User Passwords
Set Date / Time
System Date / Time Setting
Set Date / Time
Date / Time Display
Daylight Saving Time
Record Schedule / Quality Setting
Record Mode
Normal PPS Normal Quality Event PPS Event Quality
Schedule Setup
Preset Record Configuration
Per Camera Configuration
DVR-4TS
Viewing Live / Playback Video
To Record Event Video Only
Basic Operation
Viewing Modes
Digital Zoom
Viewing Live Cameras
Viewing Recorded Video
Key Usage in Playback
Dual Main Output For DVR-16TT Only
Pause Playback and Single Step Forward
Call Monitor Control
Sequence Setup
Sequence on Main Monitor
Searching Recorded Video
Searching by Time
Searching by Event
Export from OSD Setup Menu
Video Export
Available
Select the External Device
Device Name
Select
From / To Time
Select Video for Exporting
Select Channel
Select Events
Quick Video Export through Front Panel
Digital Signature
Erase Disc
EzBurn Introduction
To Export Normal Video
To Export Event Video
Purge All Event Data
Deleting Recorded Video
Purge All Data
Purge Event Before
Dome Control
Dome Connection
Dome Protocol Setup
3 RS485 Setup
Set / Go Preset
Dome Controlling Key
Focus Near
Toggle Hint Screen
Iris Open
Zoom
Setting Preset Points
Calling Preset Points
Advanced System Configuration
Key Usage in OSD Menu
Key Usage in Virtual Keyboard
To delete previous character
To input characters
To move the cursor in title entry
To delete current character
Model Name & Version
Software Upgrade via Local Device
Version
Software Upgrade via Internet
Language
Date / Time Display
Date / Time Setting
Date / Time
Date/Time Order
Date Display Mode
Time Display Mode
DST Start / End
DST Bias
Unit Name
Enable Password
Password
Admin / User Passwords
Load Factory Password
Network Setup
LAN Setup
LAN Select
Netmask
Gateway
DNS
PPPoE Account
Dial-in Setup
PPPoE Password
Connect At Booting
PPPoE Max Idle
Dial-in Service
Dial-in Account
Dial-in Password
Server IP
Dial-in Idle Time
Dial-out Setup
Client IP
Dial-in Max Time
Dial-out Dhcp
Dial-out IP
Dial-out DNS
Dial-out Netmask
Dial-out Gateway
Phone Number
Dial-out Password
Dial-out Account
Connect
Dial-out Idle Time
Dial-out Max Time
Trigger Port
Smtp Setup
Email via Smtp
Smtp Server
Smtp Port
Smtp Account
Smtp Password
Ddns Setup
Enable Ddns
Host Name
Ddns Port
Submit/Update
7 RS485 Setup
Unit ID
Parity
Bits
Stop
Audio Output
Monitor Brightness
Monitor Setup
Show Camera Title
Monitor Contrast
Show Color Bar
Screen Center Adjust
VGA Resolution
Dome Protocol
Camera Setup
Camera Select
Dome ID
Camera Title
Covert
Contrast
Termination
Brightness
Saturation
Record Setup
Audio Association
Weekend Start Fri Weekend End Mon
Weekend Start / End
Day / Night Time Start / End
Weekend Schedule
Normal PPS
Normal Qlty
Event Qlty
EzRecord Setup
Event Max PPS
Event Active
Data Lifetime
Audio Recording
Pre-Alarm Recording
Circular Recording
Purge All Event Data
Purge Data
Purge All Data
Purge Event Before
Main / Call Monitor Dwell
Main / Call Monitor Schedule
Event Icon
Event Setup
Internal Buzzer
Event Full Screen
Per Channel Config
Email Notice
Event Duration
Video Loss Detect
Detection Config
Channel Select
Motion Detect
Area Threshold
Detected Area Setup
Sensitivity
Detected Area Percentage
Database Setup
Alarm
Alarm Out
Internal / External Disks
Total / Free Size of HDD
Avail. REC Time
Active
Import Configuration
Configuration
Load Factory Default
Copy Destination
Export Configuration
Configuration Name
Begin Export
Sel
Select Device
Select Channel
Data Type
From / To Time
Select Events
Shutdown
102
Appendix a Technical Specifications
All specifications are subject to change without notice
User’s Manual
Appendix B Record Configuration
OFF
Record Mode CIF mode Ntsc 360×240@120PPS PAL 360×288@100PPS
Record Mode CIF mode Ntsc 360×240@240PPS PAL 360×288@200PPS
Record Mode CIF mode Ntsc 360×240@480PPS PAL 360×288@400PPS
Appendix C Record Duration
Recording Rate Recording Picture Quality Mode
111
Appendix D Dial-up Connections via Modem
DVR Configuration
PC Configuration
Establishing Dial-in Connection
113
114
115
Establishing Dial-out Connection
117
118
119
120
Incoming connection is established
To verify the exported recorded video
Appendix E Verifying Digital Signature
To export recorded video with digital signature
123
124
Appendix F Alarm I/O Pin Definition
DVR-4TN/8TN/16TN/16TS/16TT series unit DVR-4TN Alarm I/O
DVR-16TN/16TS/16TT Alarm I/O
RS485 D+ Alarm Ground Normal Close Common Node Normal Open
Appendix G Hard Disk Installation
External appearance of DVR-4TN/8TN/16TN/16TS/16TT
Components
Attach the HDD to the bracket
Install the HDD on your unit First HDD
Wiring the two sets of HDD’s
Hitachi
Below lists the table of recommended HDDs Maxtor
Seagate
Using EXT2IFS on Your PC
Appendix H HDD PC Player Tool Introduction
132
Start Playing the *.drv file
Select the file you want to use
Appendix I IR Remote
Appendix J ezRecord Diagram Sample
137
138
Top
Page
Image
Contents