Page
Page
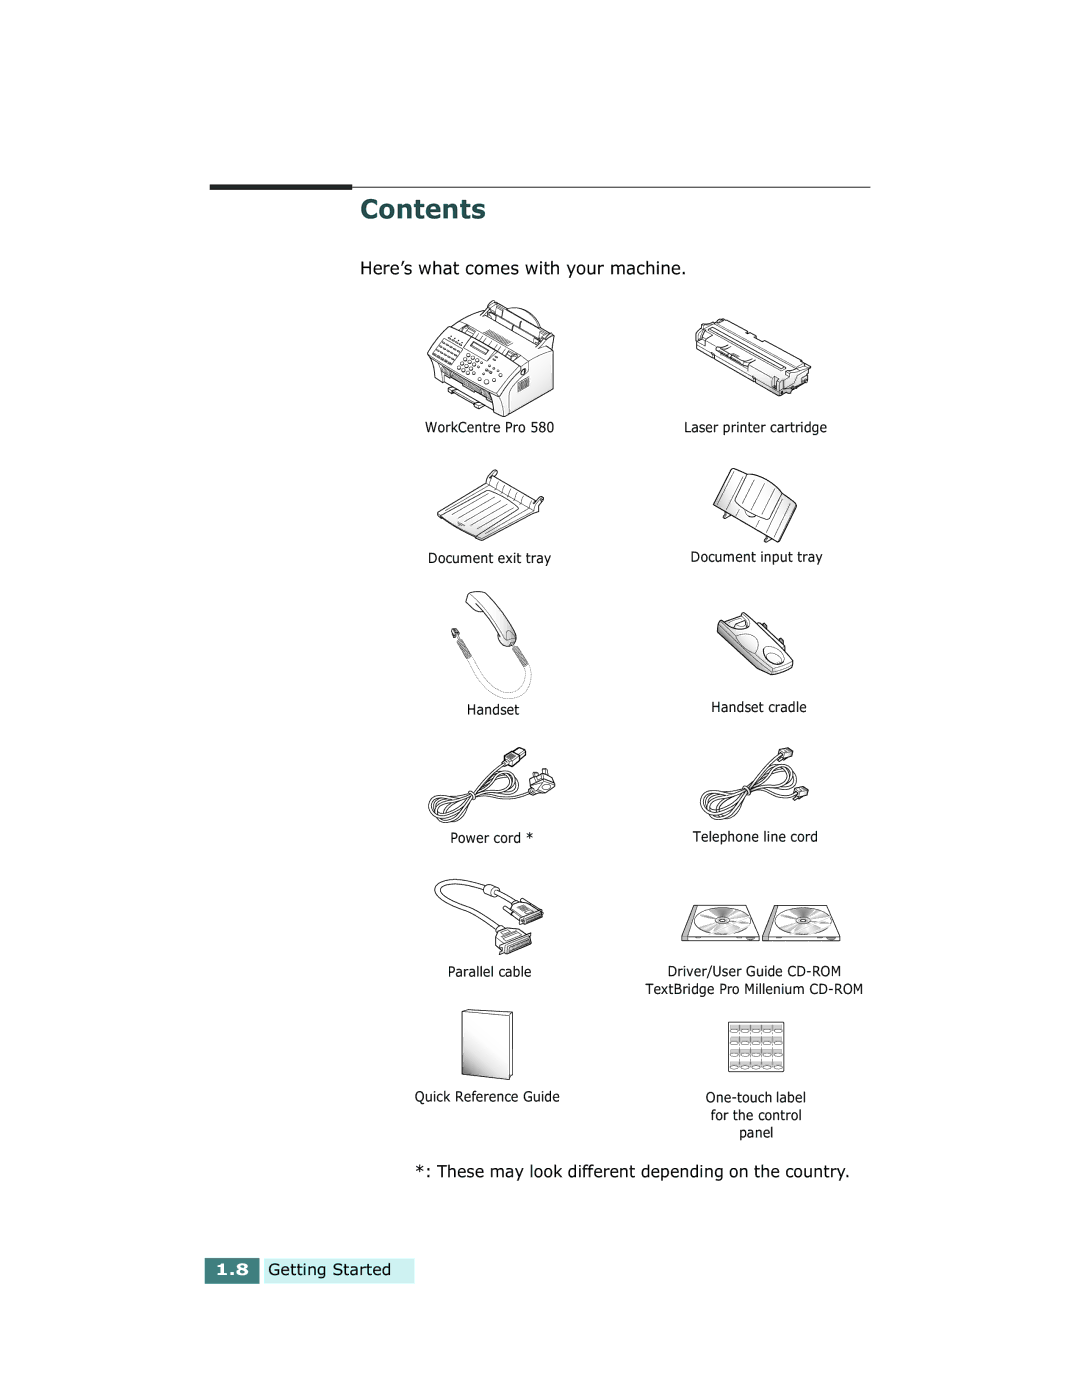
Contents
Setting up the WorkCentre Pro
Fax and Copy Operations
Print Media
Maintenance
Printing
Troubleshooting
Appendix
Installing the WorkCentre Pro
Getting Started
Select 2-up Paper save output
Welcome
Make up to 99 copies of a 20-page document on
Information and Service
Product Code
Supplies
Safety Notes
Getting Started
Page
Contents
Aligns documents
Main Components and Functions
Scanner Components
Automatic document feeder Document exit tray
Paper guides
Printer Path Components
Automatic paper feeder extension tray Paper Exit tray
Automatic paper feeder
Laser printer cartridge Front cover
Rear View
Inside View
Control Panel Components
Twenty One-Touch Buttons Store frequently dialed fax numbers
Flash/Status
Redial/Pause
Choosing a Location
Preparing Your Machine for Use
Document Exit Tray
Attaching the Trays
Document Input Tray
Fold out the extender if necessary
Handset and Handset Cradle
Connecting to the Phone Line
Telephone Line
Connecting to the Computer
Plugging In the AC Power Cord
Loading Paper
Getting Started
Installing the Laser Printer Cartridge
Getting Started
Setting the Date and Time
Setting Your Fax Number and Name System ID
Following order MONTH, DATE, YEAR, HOUR,
Getting Started
Entering Alphanumeric Characters
Letter appears on the display as shown below
Keypad Character Assignments
Key
Power Save Mode
Using Save Modes
Toner Save Mode
Editing Name
Page
Paper Save Mode 2-up
Toll Save Mode
Installing Software
Topics included in this chapter are
Memory 32 MB
System Requirements
Minimal requirements
Recommended
Installing the Software
Installing Software
Un-installing Software
Installing Software
FAX and Copy Operations
Setting Volume
Ringer Volume
Setting Alert Tones
Speaker Volume
Fax and Copy Operations
Setting User-Selectable Features
Setting a Feature
Selectable Options
Language
Sending Confirm
Discard Size
Stamp RCV. Name
Start/Enter button
Junk FAX Barrier
Fax and Copy Operations
Sending a Fax
Preparing Documents for Faxing or Copying
Setting Document Resolution Contrast
Acceptable Documents for ADF
Contrast
Resolution
Resolution to Fine
WorkCentre Pro 580 automatically sets
Loading Documents
Confirming a Transmission
Canceling a Transmission
Sending a Fax Automatically
Last Number Redialing
Sending a Fax After Talking
Automatic Redialing
Replace the handset and the call will end automatically
Voice Request
Sending a Voice Request
Answering a Voice Request
Receiving a Fax
About Reception Modes
JUL-21 1530 FAX Current reception mode
Receiving Automatically in FAX Mode
Receiving in Auto Mode
Fax and Copy Operations
Receiving Automatically in ANS/ FAX Mode
Answer an incoming call by picking up the handset
Receiving Manually in TEL Mode
Receiving Manually Using an Extension Telephone
Fax and Copy Operations
Making a Copy
Copying Overview
Making a Quick Copy
Using Advanced Copy Features
Press the Start/Enter button to begin copying
Automatic Dialing
Inserting a Pause
Or, you can skip assigning a name
One-Touch Dialing
Storing a Number for One-Touch dialing
Or, to return to Standby mode, press the Stop button
Sending a Fax Using a One-Touch Number
Editing a Number for One-Touch Dialing
Using Address Label
Speed Dialing
Storing a Number for Speed Dialing
Press and hold the Speed# button for about 2 seconds
Sending a Fax Using a Speed Number
Editing a Number for Speed Dialing
Group Dialing for Multi-Address Transmission
Storing One-Touch or Speed Dial Numbers for Group Dialing
If you do not want to assign a name, skip this procedure
Editing Group Dial Numbers
Page
ControlCentre Lite
ControlCentre Lite dialog box appears
Fax and Copy Operations
Saving and Using Phonebooks
Choose Save Phonebook
Searching Sequentially through the Memory
Press the Search/Delete button on the front panel
Searching by the First Letter
Chain Dialing
Advanced Fax
Broadcasting
Start/Enter button. The stored number appears on the display
Delayed Fax
Current time
Priority Fax
Fax and Copy Operations
Polling Transmission
What is Polling?
Polling
Display prompts you to enter a 4-digit poll code
Fax and Copy Operations
Polling Reception
Adding Documents To a Scheduled Operation
Canceling a Scheduled Operation
Additional Functions
Sending a Flash
Forwarding Received Faxes
Setting Time and Destination for Forwarding Faxes
Monitoring a Dual Job Status
Turning Fax Forwarding On or Off
Editing Fax Forwarding
Sending a Toll Save Fax
Setting Time for Toll Save Fax
Toll Save Faxing
Fax and Copy Operations
Printing Reports
To Print Lists
Callback Message
Printing
Printing
Selecting Print Media
Selecting Media Types
Selecting Media Sizes
Get the Right Paper
Using the Automatic Paper Feeder
Other Custom Size
Load paper with the print side facing forward
Prepare the print material for loading
For paper
Print Side Up
Using the Manual Paper Feeder
Printing
Start/Enter
Specialty Paper Guidelines
Printing
Printing a Document
Printing
Toner on each
Canceling a Print Job
Select the WorkCentre Pro
Printing Help
Printing Several Pages Per Sheet
Enter the desired scaling rate in the Scale input field
Scaling Your Document
Click OK, then start printing
Fitting Your Document To a Selected Paper Size
You can also click the or buttons
Select the paper size
Printing Posters
Overlap=0Overlap=5
Printing Watermarks
To use an existing watermark
To create or edit a watermark
To add a new watermark to the list, click Add
To delete a watermark
Using Page Overlay
What is an Overlay?
Click Delete Click OK
Creating a New Page Overlay
Using Page Overlay
Create or open the document you want to print
Printing
Deleting a Page Overlay
Click Delete Overlay
Setting Up Host Computer
Printing in a Network Environment
Setting Up Client PC
Printing
Maintenance
Guidelines for Maintenance
Clearing Memory
Cleaning the OPC Drum
Adjusting Shading
Setting the Machine to be Checked by Phone
Auto Supply Ordering
Maintenance
Cleaning the Inside
Cleaning the Machine
Cleaning the Outside
Cleaning the Document Scanner
Maintenance
Maintenance
Replacing the Laser Printer Cartridge
Caring for the Laser Printer Cartridge
Expected Cartridge Life
Maintenance
Maintenance
Automatic Document Feeder Rubber Pad Replacement
Troubleshooting
Clearing Jams
Document Jams While Sending a Fax
Paper Jams While the Machine is Printing
Close the control panel firmly until it clicks into place
Paper Jams Inside the WorkCentre Pro
If Paper Jams in the Paper Exit Area
Troubleshooting
Tips for Avoiding Paper Jams
LCD Error Messages
One-touch or speed Dial the number manually
WorkCentre Pro Unplug the power cord, wait Has overheated
Xerox service
Back in. If you cannot solve
Interval to automatically
Machine is waiting You can press the Start
Enter button to immediately
WorkCentre Pro
Another phone
Fax Problems
Check the phone wall jack by plugging
Make sure the telephone numbers are stored
Incoming faxes
Memory, then restore the document
Quality appear
Dirty scan glass
General Printing Problems
Scaling setting in the Printer Properties
Properties or Print Setup dialog box
Size settings in the Print Setup dialog box
Printer cable specifications may be
Print Quality Problems
Try installing a new laser printer cartridge
Install a new laser printer cartridge
Clean the inside of the printer. See Cleaning
If faded areas, generally rounded, occur randomly on
On seams can cause this problem
Fusing assembly may be damaged. Contact a
Service representative
If you need service, contact a service
Skew
Curl or wave Wrinkles or creases Back of printouts Dirty
Clean the inside of the printer
Replacing. Install a new laser printer cartridge
Printer may require repairs. Contact a service
Require repairs. Contact a service representative
Resetting the Machine
This page intentionally left blank
Appendix
General
Specifications
Power
Print
Scan
Copy
Telephone
Fax
Paper Feeder
Automatic
Type
Document Feeder
Paper Weight 12.5 28 lbs
Input Capacity Sheets
Consumables
Appendix A.7
Appendix
Appendix A.9
Specialty Paper Guidelines
Safety Information
FCC Regulations
Data Coupler Information
Appendix A.13
Canadian Certification
Appendix A.15
Radio Frequency Emissions
Laser Safety
This page intentionally left blank
Index
Scheduled operation 3-56 Caution
Manual paper feeder 4-7selecting 4-2, A-7
General problems, solving 6-12 help
Problem, solving error messages 6-7 fax
Uninstall