PR-620
Important Safety Instructions
For Users in the UK, EIRE, Malta and Cyprus only
Page
Thank YOU for Choosing OUR Machine
License Agreement
Label locations
Precautions
Concerning optional embroidery cards
Concerning USB media
Machine Structure and Features
Six-needle machine embroidering
Viii
Differences with single-needle machines
Machine Structure and Features
Wide selection of built-in thread color information
Other features
Safety mechanism
Easy-to-read and easy-to-use LCD
Available features
Various built-in patterns
Embroidery pattern editing
Searching for information
Read when additional information is required
Manual Structure
Read before use
Contents
Xiv
Using the Settings Key
Temporary Needle Bar Setting Reserved Needle Bar Settings
Embroidery Data Precautions
Editing the Embroidery Pattern Embroidering Settings Screen
Xvi
Accessories
Setup location
Front view Right-side/rear view Operation panel
Front view
Names of Machine Parts and Their Functions
Names of Machine Parts and Their Functions
USB Type a host port connector
Right-side/rear view
Operation panel
Accessories
Included Accessories
Embroidery card
Optional Accessories
Optional Accessories
Following are available as optional accessories
Setup and transporting precautions
Setting Up the Machine
Setting Up the Machine
Setup location
Foot can be turned
Setting up the machine
Loosen 2 thumb screws to bring the operation panel forward
Adjusting the operation panel position
Preparing the thread guide assembly
Positioning the spool stand
Attaching the embroidery frame holder
Remove the two thumb screws of the embroidery frame holder
This completes the preparation of the machine
Embroidering Tutorial
Power supply precautions
Operating Precautions
Checking the needle
Needle precautions
Bobbin precautions
Operating Precautions
Upper thread recommendations
Fabric recommendations
Display recommendations
Following pages
Basic Procedures
Basic Procedures
Embroidering settings
Removing the bobbin case
Installing the Bobbin
Installing the bobbin
Installing the bobbin case
Installing the Bobbin
Turning on the Machine
Buzzer beeps once and the LCD screen comes on
Carriage moves to its initial position
Turning on the Machine
Understanding the screens
Screen overview
Upper threads.Touch the unlock key so
Basic operation flow is shown below
Selecting an Embroidery Pattern
Selecting an Embroidery Pattern
Checking a preview image from the pattern selection screen
Is displayed
Selecting an embroidery pattern
1Touch to select the embroidery patterns category
2Touch
1Press
Editing the Embroidery Pattern
Editing the Embroidery Pattern
When
Specifying Embroidering Setting
1Touch
Previewing the Image
Checking a preview image
Previewing the Image
Embroidery frame types
Hooping the Fabric in the Embroidery Frame
Hooping the fabric in the embroidery frame
Select an embroidery frame
Hooping the Fabric in the Embroidery Frame
2Loosen the screw on the outer frame
4Press the inner frame into the outer frame
Attaching the embroidery frame
Attaching the Embroidery Frame to the Machine
Inner frame should be on top Incorrect frame positioning
Attaching the Embroidery Frame to the Machine
Loosen the two thumb screws on the embroidery frame holder
For this example, align with mark
Embroidering screen appears
Checking the Embroidery Area
Continuing to the embroidering screen
Embroidery frame stops moving, and the next screen appears
Thread colors in this screen
Upper Threading
Checking the needle bars and thread colors
Upper Threading
Screen indicating that the spools be changed is closed
Touch
Upper threading
As indicated
#50 in Japan
Make sure that the spool stand is opened in the shape of a
Make sure that the thread is securely caught
4 3 2
Middle thread guide Thread guide pin
Press the automatic needle-threading button
Threading the needle
Selected needle bar moves to the embroidery position
Moving the needle bar to be threaded to the sewing position
Using the spool net
Touch to unlock the embroidery machine
Sewing the Embroidery
Starting embroidering
Locking mechanism
Sewing the Embroidery
Following screen appears
Continuing embroidering
2Press the thread trimming button
Temporarily pausing Press the start/stop button
Set the main power switch to
Stopping embroidering
Checking the Thread Tension
Checking the Thread Tension
Correct thread tension
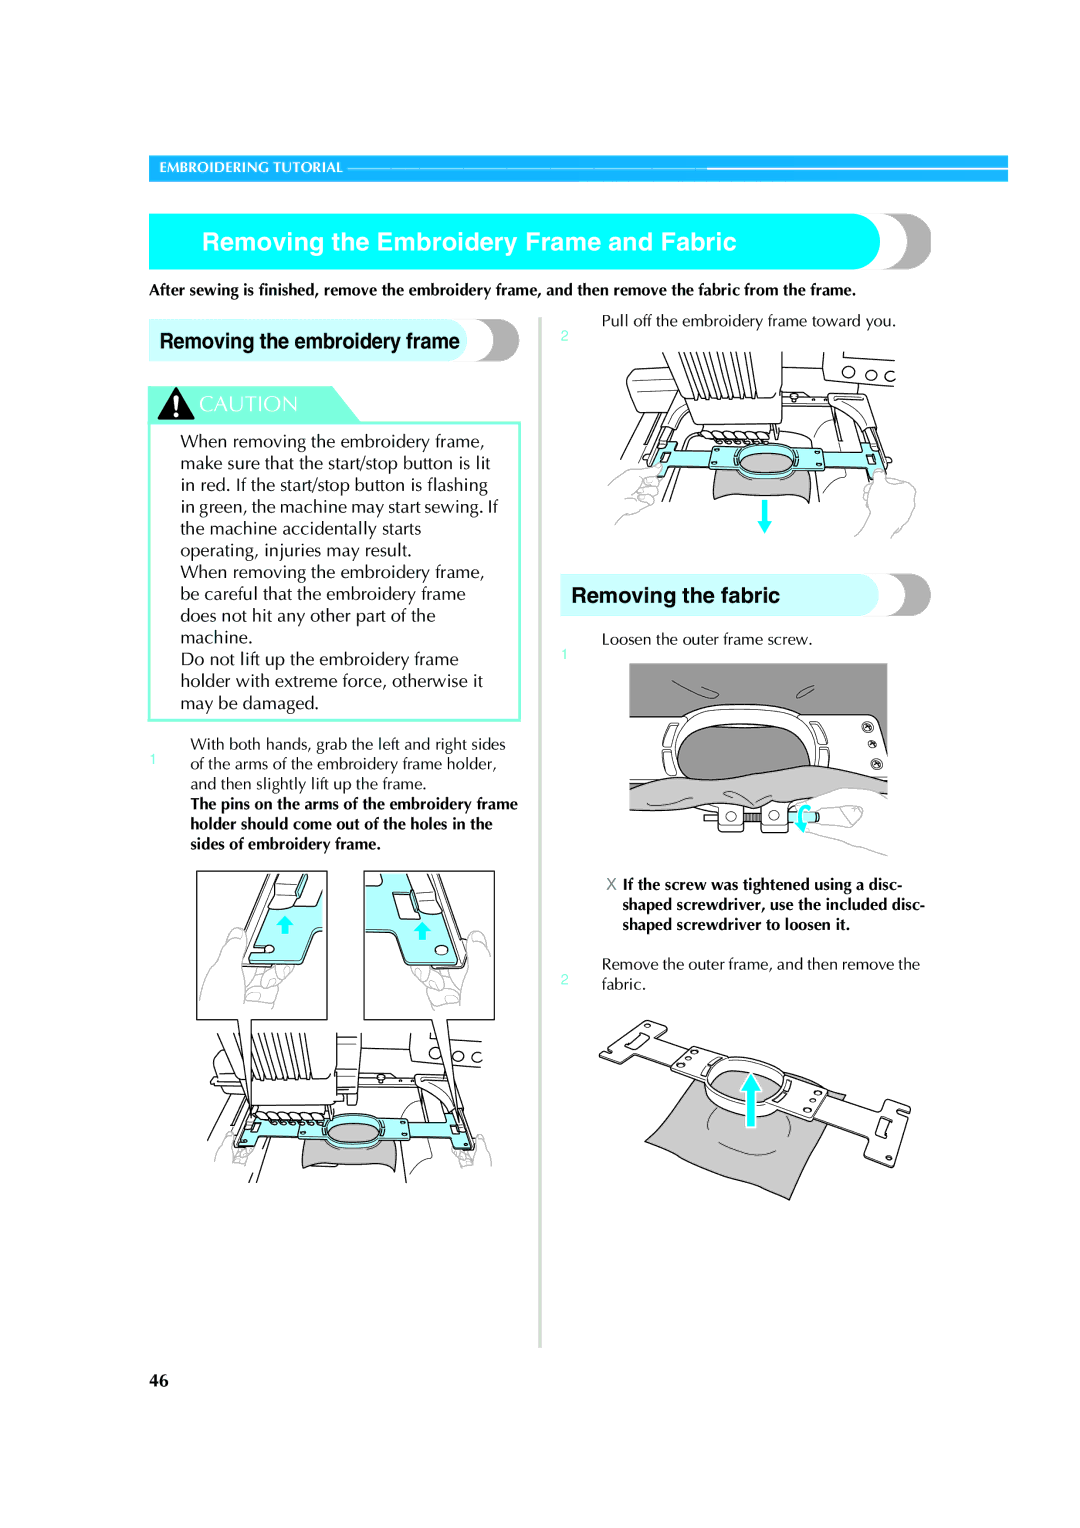
Removing the Embroidery Frame and Fabric
Removing the embroidery frame
Removing the fabric
Turning OFF the Machine
2Unplug the power supply cord from the electrical outlet
Grasp the plug when unplugging the power supply cord
Turning OFF the Machine
Turned off either before or after embroidering Turned on
Screen Quick Reference Guide
Screen Quick Reference Guide
Key displays
Common screen controls
Understanding the pattern type selection screen
Understanding the pattern list screen
Understanding the pattern editing screen
Sewing position is moved to the center
Selects the pattern that is being edited when
Have been combined
Edited in the direction of the arrow If Is touched
Repeat sewing is selected
Understanding the embroidering settings screen
Sewing is selected
Shows the horizontal distance between patterns when
Color key Moves the sewing position of the whole pattern
Functions Rotates the entire embroidery pattern when it
Consists of multiple patterns that have been Combined
Repeatedly sews the pattern
Understanding the embroidering screen
Stitching. Use this key in the following situations
Enables the needle bar settings to manually be specified
Key Stop as the next color begins
Moves the needle forward or backward through
Needle at the embroidering position
When You Have a Question, This May Help You
USB Type a host and USB Type B function
Needle number
Thread tension changed suddenly
When You Have a Question, This May Help You
Getting false thread breakage error
Customize the embroidery colors
Embroidering Tutorial
Other Basic Procedures
To select a pattern and start a new operation 3Touch
If the operation in the pattern editing screen is finished
If the machine was turned off while embroidering
Turn off the embroidery machine
Changing the Needle
Replacing the needle
Changing the Needle
Other Basic Procedures
Correctly Using the Embroidery Frames
Correctly Using the Embroidery Frames
Embroidery frame types and applications
Attaching Iron-On Stabilizer Backing to Fabric
Hooping the Fabric
Hooping the Fabric
Using the embroidery sheet
Embroidering the corner of fabric
Large/small pieces of fabric
Embroidering large pieces of fabric or heavy clothing
Embroidering small pieces of fabric
Embroidery Frame Position and Movement
Embroidery frames that cannot be used for embroidering
Moving to the correct position
Embroidery Frame Position and Movement
Needle and presser foot are locked in the down position
Touch Embroidering settings screen
Changing the Embroidering Position
Finding the sewing position
Screen shown below appears Example Original angle
Adjusting the angle
Changing the Embroidering Position
Needle bar is unlocked
2Touch the keys to adjust the pattern to the desired angle
4If necessary, touch to check the embroidering area
After making the desired changes, touch
Embroidering a Pattern Containing Seven or More Colors
Embroidering a Pattern Containing Seven or More Colors
Checking if thread spool
Changes are necessary
3Check the position
Spool change indicator
1Touch in the embroidering screen
Stitch navigating screen appears
Change thread spools message
For details, refer to Reserved Needle Bar Settings on
Easily changing the thread spools
Repage-thread35.the upper thread. Refer to Touch
If the upper thread breaks
1Touch , and then press the thread trimming button
If the bobbin thread breaks or runs out
Touch To start sewing from the beginning
Embroidering From the Beginning or Middle of the Pattern
Embroidering From the Beginning or Middle of the Pattern
1Pressmachine.the start/stop button to stop
Embroidering begins from the specified point
4After selecting the stitch from where
Resume Embroidering After Turning OFF the Machine
Resume Embroidering After Turning OFF the Machine
Embroidering screen displayed before
Sewn
Machine can be stopped at any time
Weight S is included with the optional bobbin winder
Adjusting the Thread Tension
Adjusting the tension of the bobbin thread
Adjusting the Thread Tension
Upper thread is too loose
Adjusting the tension of the upper thread
Turn the thread tension knobs
Upper thread is too tight
Embroidering Settings
Automatic Lock Stitch Setting
Setting turned on Setting turned off
1Touch So that it changes to
Starting/Ending Position Settings
Starting/Ending Position Settings
Starting/ending position settings screen appears
Repeatedly sewing a pattern along a diagonal
2Sew the first embroidery pattern
4Repeat steps 2 and 3 three times
Maximum Sewing Speed Setting
Maximum Sewing Speed Setting
Setting the Machine to Stop at Color Changes
Stopping the machine at the next color change
Specifying pause locations before embroidering
3Touch so that it changes to
Setting the Machine to Stop at Color Changes
Mark appears to indicate where the machine will stop
After specifying the desired settings, touch
Temporary Needle Bar Setting
Temporary Needle Bar Setting
Reserved Needle Bar Settings
3Selectbar. the color to be assigned to the needle
Color selected in is specified
This cancels the manual needle bar setting
Reserved Needle Bar Settings
Cancelling the setting
Wish to cancel
Embroidering Settings
Machine’s Memory If the Embroidery Pattern Cannot Be Saved
General pattern selection Embroidery patterns
Embroidery cards optional Computer USB
Rotating the entire pattern Creating a repeating pattern
100
Embroidery Data Precautions
Embroidery Data Precautions
Precautions on using the computer to create data
General pattern selection
102
Please refer to page 5 for a list of compatible cards
Off
Embroidery patterns
104
3If necessary, edit the pattern
Renaissance Alphabet Patterns
List of renaissance alphabet patterns appears
2Select an embroidery pattern. Touch the desired pattern
Floral alphabet patterns
106
4Touch Select an embroidery pattern
4If necessary, edit the pattern
Appliqué alphabet
2Select the text size
3Select an embroidery pattern. Touch the desired pattern
Frame patterns
108
List of frame patterns appears
2Select a character font
Alphabet patterns
There are 13 built-in character fonts
Font selection screen appears
Selected characters appear in the pattern display area
110
Changing the size
Size of the two small fonts Cannot be changed
8After entering all of the text as desired, touch
Embroidery patterns stored in the machine
Changing the text arrangement
Touch to return to the text input screen
Embroidery cards optional
112
Deleting embroidery data
List of patterns on the embroidery card appears
Connecting
Computer USB
114
List of patterns is displayed
116
Insert the USB media into the machine’s USB Type a host port
USB media Commercially Available
118
2Select an embroidery pattern
Editing the Embroidery Pattern Pattern Editing Screen
Combining patterns
Editing the Embroidery Pattern Pattern Editing Screen
Touch or
Selecting the pattern to be edited
Moving a pattern
120
Screen shown below appears Example Original size
Flipping a pattern horizontally
Flipping a pattern vertically
Changing the size of a pattern
4After making the desired changes, touch
2Touch the keys to adjust the pattern to the desired size
Rotating a pattern
122
Screen shown below appears
Changing the text arrangement of a character
124
Changing the character spacing
Selects a more thread density
Changing the thread density
Trimming the threads between characters
Selects a less thread density
3After making the desired changes, touch
Specifying multi-color text
126
2Touchdensity.the keys to select the desired thread
Changing the colors of the pattern
128
Deleting a pattern
If necessary, touch
Editing the Embroidery Pattern Embroidering Settings Screen
Editing the Embroidery Pattern Embroidering Settings Screen
Rotating the entire pattern
3Touch , , or to
Creating a repeating pattern
130
2Touch , , or to
2Forpagedetails127. on changing the colors, refer to
4If necessary, touch the arrow keys to adjust
After specifying the desired repeat settings Touch
5embroidering area
1Touch 2Select
Editing a Combined Pattern
132
Will then edit
8After selecting the characters, touch
9Touch and adjust the position of the letters
Editing a Combined Pattern
Touch 7Type ood
Example To reduce
134
BTouch to select the same font, and then type Luck
To select the pattern to be edited
JAfter finishing all editing, touch
136
Saving Embroidery Patterns
Machine’s Memory
If the Embroidery Pattern Cannot Be Saved
Recalling stored patterns
Saving Embroidery Patterns
4To delete the data, press
Saving the data takes approximately 10 seconds
3Press
138
Changing the display guides
Basic Settings and Help Feature
Using the Settings Key
Understanding the settings screen
140
Reserved Needle
Using the Settings Key
142
Adjusting the brightness of the LCD
1Touch or and select the desired setting
Turning the buzzer on or off
Changing the language
Changing the units of measurements
Changing the display guides
Centerpoint marker and grid are displayed as specified
144
Embroidering area of the large embroidery frame
Centerpoint marker and grid
Sample displays
Changing the thread color information
Center Cursor
1Touch and to select the desired thread color display
Original Thread
Display expanded thread color
146
Thread color number Robison-Anton Time
Touchdesired thread. or to select
Custom thread table settings
2Touch and to select the thread
Creating a custom thread
148
3Select the thread color number type
4Type in the thread color number
Changing the color thread table
150
1Touch and to select the setting
Deleting short stitches
Specifying the remaining length of thread
Procedure for threading the upper thread appears
Using the Machine Operations Guide Key
Using the Machine Operations Guide Key
Touch Troubleshooting Maintenance
Screen that was displayed before was touched appears
After checking the procedure, touch Touch
152
4Touch to display the next
Using the Help Key
Using the Help Key
Example Viewing help on the function keys
154
Precautions
Sewing appliqué patterns
Additional digitizing information
156
Procedure for sewing appliqués
Appliqué Sewing
Sewing appliqué patterns
Using a frame pattern to create appliqués
Appliqué Sewing
7Finish sewing the embroidery
158
Select the satin-stitched frame pattern with the same shape
3Touch 1Touch 4Touch 2Touch 1 times, and then touch 5Touch
Helpful Tips for the Operation of the Machine
Checking the thread tension of built-in patterns
160
Helpful Tips for the Operation of the Machine
Sewing a pattern aligned with a mark on the fabric
162
3Withfabric.a fabric marker, mark this point on
Withfabric.a fabric marker, mark this point on
Colors of Tajima .dst embroidery data
Color thread table
Creating Beautiful Embroidery
Threads
164
Stabilizers Backing
Creating Beautiful Embroidery
Backing must not be visible in the finished Product.7
Hooping Techniques
166
Frame Basics
Fabric/stabilizer compatibility chart
168
Optional Accessories
Using the Optional Cap Frame
Cap frame and its accessories
Using the Optional Cap Frame
170
Types of caps
Cap fabric not recommended for embroidering
Fabric precautions
Installing the cap frame driver
Preparing to use the cap frame
172
This completes the installation of the cap frame driver
Do not loosen them too far
Adjusting the cap frame driver
Preparing the mounting jig
174
Firmly tighten the screws
Attach the needle plate spacer to the needle plate
Check that there is no looseness
2Tighten the two screws
176
For the standard type
Attach the standard cap frame to the mounting jig
3Placing a sheet of stabilizer
Check for the following conditions
178
Make sure the notch comes out
180
BRemove the standard cap frame from the mounting jig
Attach the advanced cap frame to the mounting jig
3Secureframe. the stabilizer with the pins on the cap
182
Remove the advanced cap frame from the mounting jig
DAdjustshape. the brim so that it maintains a rounded
184
Attaching the cap frame to the embroidery machine
Removing the cap frame
2Loosen the two lower thumb screws
Installing the embroidery frame holder
4Remove the cap frame driver
Remove the needle plate spacer
186
Additional digitizing information
Don’t sew more than four overlapping layers
For precautions concerning the power supply, refer to
Using the Optional Bobbin Winder
Precautions
Optional bobbin winder and its accessories
2Insert the thread guide
Setting up the optional bobbin winder
Connecting the AC adapter
Using the Optional Bobbin Winder
Winding the bobbin
190
2Set the thread spool on the spool pin
8Slideplace.the bobbin holder, until it clicks into
Press the main power switch to start winding the bobbin
ARemove the bobbin
192
Cleaning the hook
Maintenance
Cleaning the LCD
Cleaning the machine surface
194
Cleaning around the needle plate
Cleaning the bobbin case
196
Oiling the machine
Put a drop of oil onto the hook
Be sure to rotate the handwheel counterclockwise
Troubleshooting
On-screen troubleshooting
198
Dealer Presser foot
Troubleshooting
Troubleshooting
Breaks
Upper thread is catching
200
Needle is touching the needle plate Upper thread
202
Area
Upper or middle thread guide
Needle plate or in the hook Plate
Clean the hook and the needle Skipped
204
Thread Embroidering Short Begins
Dealer Bent
Be read
206
Fabrics. Use stabilizer on top
Is incorrect
Error messages
Installed embroidery frame is too small
Bobbin thread was broken or ran out
208
Thread color that was specified is incorrect
Patterns stored in the machines memory cannot be recalled
USB media is write-pro- tected
Machine couldnt save the data
Embroidery data may be damaged
USB media error
210
Embroidery data cannot be detected
Troubleshooting
212
If the LCD cannot be read
Adjustments screen appears
214
Specification
Specifications
Embroidery machine specifications
Specifications
216
Index
LCD
Index
218
Index
English