Part Number S000256
Persona→ C25 Card Printer User Guide Rev
Revision Control Date Document Title Number
Refer to Printer Setup as needed Manual Description
How to use the guide
To prevent equipment or media damage, always remove
Safety Messages review carefully
Exposed to static electricity discharges
To prevent equipment or media damage, always wear an
Table of Contents
Printer Adjustments
Cleaning
Fargo Technical Support
Term Description
Regulatory Compliances
Agency Listings
Technical Specifications
Technical Specifications
Function Description
Functional Specifications
Component Description
Printer Components Top Cover to Power Port
Resume
Printer Components Top Cover to Power Port
On / Cancel
Pause
Printer Components Top Cover to Power Port
Printer Components Centronics-Type Parallel Interface
Printer Components Print Ribbons
Type Description
Printer Components Resin-Only Print Ribbons
Ymcbo
Printer Components Dye-Sublimation-Only Print Ribbons
Ymcko
Printer Components Dye-Sublimation/Resin Ribbons
Printer Components Blank Cards
General Troubleshooting
Reviewing the Top Line LCD Messages
Message Cause Solution
LCD and SmartGuard Messages
Reviewing the Top Line LCD Messages
Reviewing the Top Line LCD Messages
Reviewing the Top Line LCD Messages
Reviewing the Top Line LCD Messages
Press the Pause / Resume
Reviewing the Bottom Line LCD Error / Status Messages
Reviewing the Both Line LCD Error / Status Messages
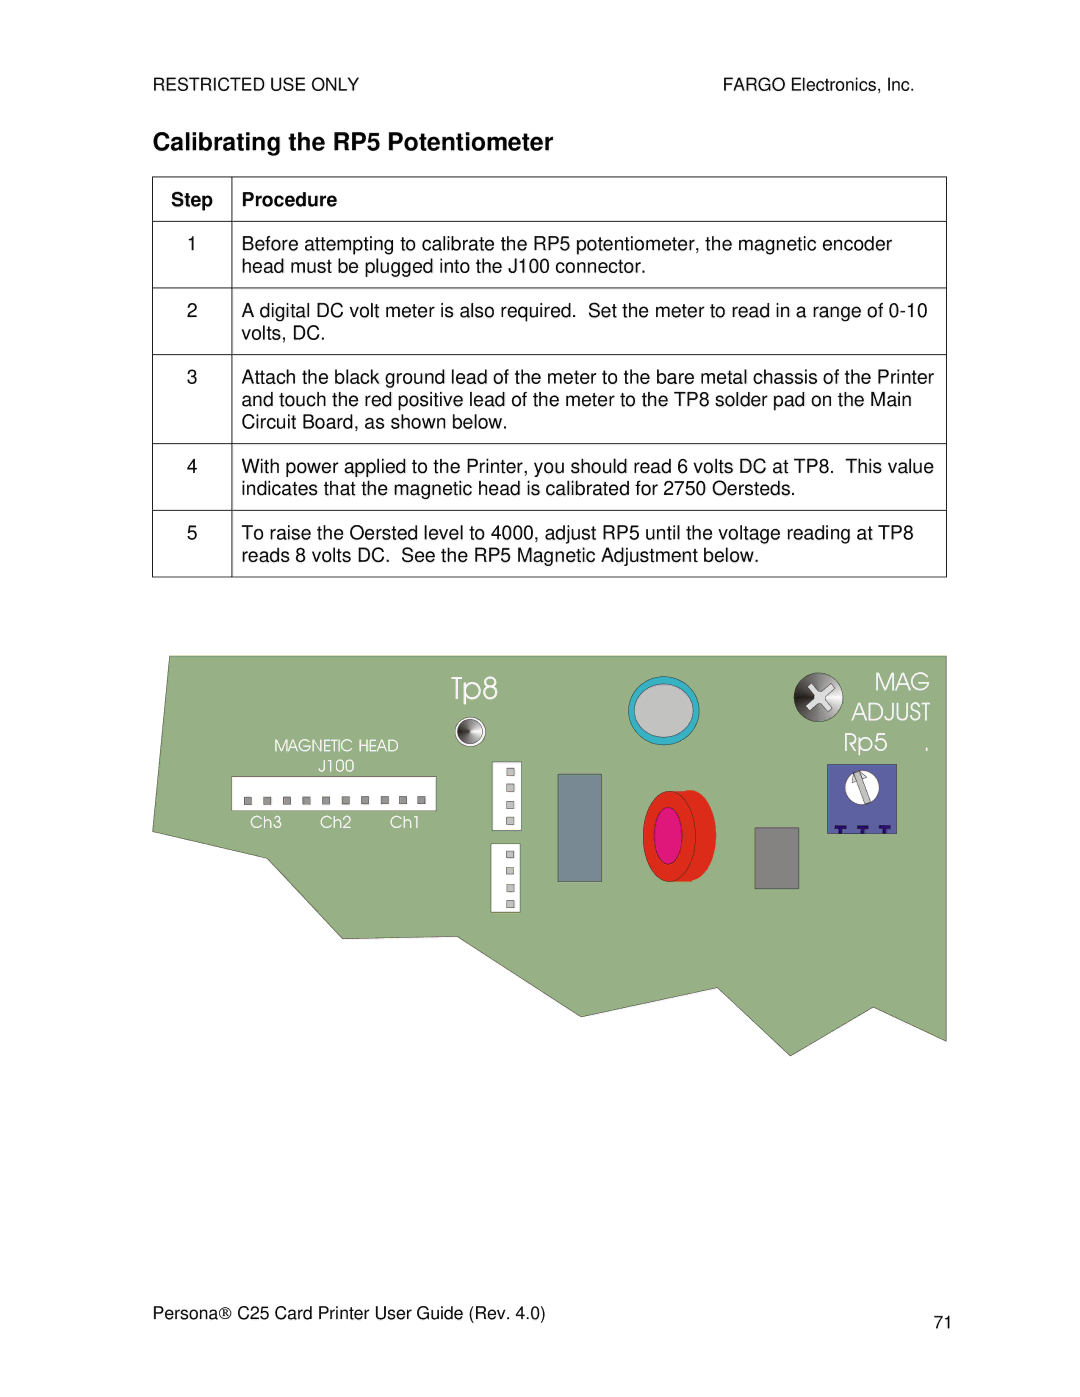
Step Procedure
Communications Errors
Resolving the Communication Errors
Resolving the Communication Errors
See the previous procedure
Resolving the Communication Errors
Resolving the Card Feeding Errors
Card Feeding Errors
Resolving the Card Feeding Errors
Graphic
Resolving the Flipper Jam error message
Resolving the Card Jam Print Error Message
Card Jam Errors
Step
Resolving the Card Jam Mag Error / Smart Error Message
Resolving the Card Jam Flip Error Message
Resolving the Skipping Ribbon Panel problem
Print Process Errors
Ribbon Errors
Resolving the Headlift error message
Resolving the Wrong Ribbon error being displayed incorrectly
Pause/Resume button
Resolving the Ribbon Low error message
Resolving the Ribbon Breaking problem
Resolving the Printer cannot read Encoded Data problem
Encoding Errors
Magnetic Offset Adjustment
Resolving the Mag Verify error message
Step
Restricted USE only
Resolving the Pixel Failure problem
Diagnosing Image Problem
Resolving the Card Surface Debris problem
Resolving the incorrect Image Darkness problem
Resolving the Ribbon Wrinkle problem
Resolving the excessive Resin Printing problem
Resolving the incomplete Resin Printing problem
Resolving the Image Placement problem
Resolving the Image Placement problem
Resolving the Image Placement problem
Resolving the poor Image Quality problem
Reviewing the Standard Self Test Print
Diagnostics and Calibration
Running the Standard Self Test Print
V1.0.1
Reviewing the Pin Assignments
Interfacing Information
Reviewing the Centronics Parallel Pin Assignments
Pin No Signal
Reviewing the Centronics Parallel Pin Assignments
Reviewing the Printer Timing Diagram
Interval Description Minimum Typical Value
Reviewing the Printer Timing
Printer Adjustments
RP1 potentiometer
Dye-Sub and Resin Intensity Adjustments
Adjusting the Dye-Sub and Resin Intensity Level
Reviewing the Self Test Output Samples RPI Potentiometer
Adjusting the RP3 Card Offset Location
Card Offset Adjustments
Adjusting the Card Offset for the Print Station
Adjusting the RP3 to center print the Card
Reviewing the RP5 Location Main Circuit Board Layout
Magnetic Intensity Adjustment magnetic encoding installed
Calibrating the RP5 Potentiometer
Tp8
Using the Magnetic Offset RP7 Potentiometer location
Determining the Magnetic Card Offset process description
Using the RP7 Offset Mag Potentiometer
Reviewing the Encoding Module Display a
Encoding Modul
Reviewing the Encoding Module Display B
See the Determining the Magnetic Card Offset procedure on
Calibrating the Color Ribbon Sensor
Steps Procedure
Sensor Calibration
Calibrating the Color Ribbon Sensor
Using the C25 Card Printer Advanced Document Settings
Selecting the Card Size
Determining Paper/Output
Determining the number of Copies
Selecting the Default Graphic Resolution
Using the Device Options
Selecting from the Ribbon Type options
Selecting from the Ribbon Type options
Selecting from the Color Matching options
Selecting from the Color Matching options
Using the Picture Controls
Controlling the Dye-Sub Intensity Ymcb
Controlling the Resin Heat
Using the default Dither Mode
Selecting the K Panel Graphics Mode option
Selecting the Split Ribbon Print option
Selecting the Split Ribbon Print option
Selecting the Print Back Side Only option
Selecting the Print Edge-to-Edge option
Selecting the Rotate 180 Degrees option
Selecting the Pause for Low Ribbon option
Selecting the Pause for Low Ribbon option
Selecting the Overlay option
Selecting the Overlay option
Selecting the SmartShield option
Selecting the SmartShield option
Using the Magnetic Encoding Options
Using the Coercivity option
Using the Magnetic Encoding Mode option
Selecting the Magnetic Track Options
Selecting the Track Bit Density option
Selecting the Track LRC Generation option
Selecting the Track Character Size option
Selecting the Track Character Parity option
Selecting the Track Character Ascii Offset option
Selecting the Shift Data Left option
Reviewing the Enable MLE Support checkbox
Selecting the Verify Magnetic Encoding option
Reviewing ISO Track Locations
Entering Track Information
Sending Track Information
Reviewing the Track Data Note
Reviewing Tracks 1, 2, and 3 in Table format
Reviewing the Ascii Code and Character Table
Selecting the Custom Non-Printable Area
Using the Non-Printable Area Setup window
Selecting the Smart Encode Mode option
Selecting the Disable Printing option
Selecting the Buffer Single Card option
Selecting the Calibration window
Using the Image Placement controls
Using Image Placement controls
Using the Sensor Calibration
Selecting the Self Test button
Cleaning
Cleaning the Printhead
Steps Procedures
Cleaning the Printer’s Exterior
Cleaning the Printer’s Interior
Card Feed Rollers
Cleaning the Card Feed Rollers
Cleaning the Card Feed Rollers
Maintaining the Cleaning Rollers
Cleaning the Drive Rollers
Maintaining the Cleaning Rollers
Persona→ C25 Card Printer User Guide Rev 137
Cleaning the Platen Rollers
Cleaning the Magnetic Encoder
Unpacking the Persona C25 Card Printer
Unpacking and Packing the Printer
Choosing a good location
About Moisture Condensation
Packing the Persona C25 Card Printer
Applying Power
Applying Power
Loading Cards into the Printer
Loading Cards into the Printer
Connecting the Printer to your Computer
Using your Card Printer
Connecting the Printer to your Computer
Installing the Windows Printer Driver
Installing Printer Driver Updates
Downloading
Installing
Installing the 32-Bit Print Spooler for Windows 95/98
Installing the 32-Bit Print Spooler for Windows 95/98
Windows NT
Setting up the Printer Driver
Windows 95/98
Contacting Fargo Technical Support
Fargo Technical Support
Term Definition
Glossary of Terms
Reviewing the Glossary of Terms
Persona→ C25 Card Printer User Guide Rev 157
Persona→ C25 Card Printer User Guide Rev 158
Persona→ C25 Card Printer User Guide Rev 159
Eeprom
Eprom
Persona→ C25 Card Printer User Guide Rev 162
Persona→ C25 Card Printer User Guide Rev 163
ISO
Persona→ C25 Card Printer User Guide Rev 165
Persona→ C25 Card Printer User Guide Rev 166
Persona→ C25 Card Printer User Guide Rev 167
PET
PVC
RGB
Persona→ C25 Card Printer User Guide Rev 171
TAC
Persona→ C25 Card Printer User Guide Rev 173
YMC
Black K, Black K the second K is for backside, black only
Index
Persona→ C25 Card Printer User Guide Rev 177
Persona→ C25 Card Printer User Guide Rev 178
Portrait, Landscape, or Rotate 180 Degrees
Persona→ C25 Card Printer User Guide Rev 180
Yellow, Magenta, and Cyan