Page
Page
HP LaserJet M9040/M9050 MFP
Page
Table of contents
Software for Windows
Use the product with Macintosh
Paper and print media
Connectivity
Print tasks
Copy
Scan and send to e-mail
10 Fax
Manage and maintain
Problem solve
Appendix a Supplies and accessories
Appendix C Specifications
Appendix B Service and support
Appendix D Regulatory information
263
Xii
Product Basics
Product introduction
Product features
Resolution
Functions
Speed and throughput
User interface
Language and fonts
Copying and sending
Print cartridge
Output
Environmental features
Security features
Product walkaround
2Product walkaround
Output devices
Sheet stacker
Sheet stapler/stacker
Multifunction finisher
Booklets
Bin mailbox
Control panel
Use the control panel
Control-panel layout
Data light
Ready light
Home screen
Control-panel help system
Buttons on the touchscreen
Control-panel help system on
Use the Administration menu
Navigate the Administration menu
Administration Information
Information menu
1Information menu
Menu item Sub-menu item Values Description
Default Job Options menu
Default Options for Originals
Administration Default Job Options
2Default Options for Originals menu
Administration Default Job Options Default Copy Options
Default Copy Options
3Default Copy Options menu
Default Fax Options
Administration Default Job Options Default Fax Options
4Fax Send menu
5Fax Receive menu
Default E-mail Options
Administration Default Job Options Default E-mail Options
Document File Type Choose the file format for the e-mail
Tiff Post Scanned files
Default Send to Folder Options
Tiff Version Tiff 6.0 default
Administration Default Job Options Default Print Options
Default Print Options
6Default Print Options menu
Time/Scheduling menu
Administration Time/Scheduling
7Time/Scheduling menu
Friday Saturday Sunday Sleep Time Monday
Tuesday Custom Wednesday Thursday Friday Saturday Sunday
Management menu
Administration Management
8Management menu
Initial Setup menu
Administration Initial Setup
Administration Initial Setup Networking and I/O
Networking and I/O
Manual Settings
Default IP
IPV6 Settings Enable
Dhcp Release
Manual Settings Use the Manual Settings menu to
Address
DHCPV6 Policy
Proxy Server
Talk Enable
Https Required Default For secure, encrypted
Reset Security
Diagnostics Embedded Test
Http Test
Snmp Test
Select All Tests
Data Path Test
Ping Test
Dest Type
Dest IP
Packet Size
Ping Results
Packets Sent
Packets Received
Percent Lost
Following protocols IPX/SPX, Novell NetWare
AppleTalk, DLC/LLC
Administration Initial Setup Fax Setup
Fax Setup
11Fax Setup menu
Fax Send Settings Fax Dial Volume
Low default High
Error Correction Enabled default
Mode Disabled
Detect Dial Tone Enabled
Dialing Prefix Off default
Billing Codes Off default
Fax Receive Settings Rings To Answer
Mail Setup
Send Setup menu
Administration Initial Setup E-mail Setup
Administration Initial Setup Send Setup
Device Behavior menu
Administration Device Behavior
14Device Behavior menu
Scan Ahead Enabled default
Auto Print Interrupt Enabled
Copy Interrupt Enabled
Letterhead Mode
Manual Feed Enabled
Edge-To-Edge Enabled
Override Disabled default
Courier Font Regular default
Orientation Portrait default
Symbol Set PC-8 default
Form Length
Font Source
Administration Print Quality
Print Quality menu
15Print Quality menu
Tray
Calibration/Cleaning Create Cleaning
Process Cleaning Process button
Administration Troubleshooting
Troubleshooting menu
16Troubleshooting menu
Order to test specific paper paths
Source All trays
Resets menu
Service menu
Administration Resets
Administration Service
Software for Windows
Supported operating systems for Windows
Supported printer drivers for Windows
HP Universal Print Driver UPD
UPD installation modes
Upd
Select the correct printer driver for Windows
HP PCL 6 driver description
Priority for print settings
Change printer-driver settings for Windows
Change the default settings for all
Print jobs Settings
Click the Device Settings tab
Install Windows software for direct connections
Install the Windows software
Install Windows software for networks
Remove software for Windows
HP Web Jetadmin
Supported utilities
Embedded Web server
HP Easy Printer Care
Supported operating systems
Supported browsers
HP Jetdirect printer installer for Unix
Software for other operating systems
Software
Linux
Use the product with Macintosh
Software installation types for Macintosh
Install Macintosh software for direct connections USB
Software for Macintosh
Supported operating systems for Macintosh
Mac OS X V10.3 and later
Install Macintosh software for networks
Rendezvous
Default Browser
Software for Macintosh computers
HP Printer Utility
IP Printing
Open the HP Printer Utility in Mac OS X V10.3
HP Printer Utility features
From the Printer menu, click Printer Utility
Priority for print settings for Macintosh
Change printer-driver settings for Macintosh
Supported utilities for Macintosh
Remove software from Macintosh operating systems
Embedded Web server
Use features in the Macintosh printer driver
Create and use printing presets in Macintosh
Resize documents or print on a custom paper size
Print a cover
Use watermarks
Print multiple pages on one sheet of paper in Macintosh
Print on both sides of the page duplex printing
Set the stapling options
Use automatic duplex printing
Print on both sides manually
Use the Services menu
Select Device Maintenance
Select Services on the Web
Store jobs
Enww
Connectivity
USB connection
1USB connection Connectivity
Auxiliary connection
Auxiliary connection port Jetlink
Configure TCP/IPv4 parameters
Network configuration
Change the IP address
Set the default gateway
Set the subnet mask
Disable network protocols optional
Configure TCP/IPv6 parameters
Disable IPX/SPX
Disable DLC/LLC
Disable AppleTalk
HP Jetdirect EIO print servers
Enww
Paper and print media
Understand paper and print media use
Size Dimensions Tray 1, mailbox Trays 2, 3 Stapler Stacker
Supported paper and print media sizes
1Supported paper and print media sizes
2Supported envelopes and postcards
Enww
Custom paper sizes
Special paper or print media guidelines
Media type
Load paper and print media
Load tray
Load trays 2, 3,
Load detectable standard-size paper in trays 2, 3,
Enww
9Load trays 2, 3, and 4 6
Load undetectable standard-size paper in trays 2, 3,
Load custom media in trays 2, 3,
Enww
21Load custom media in trays 2, 3, and 4 6
Configure a tray when loading media
Configure trays
Select the media by source, type, or size
Source
Type and Size
Select the output bin
Stacker or stapler/stacker output bins
Bin mailbox output bins
Multifunction finisher output bins
Printing
Select an output location
Copying
Enww
Print tasks
Media type and tray loading
1Tray 1 media information
2Tray 2 and 3 media information
3Tray 4 media information
Heavy 64 g/m2
Heavy glossy Facing up Glossy 64 g/m2
Use features in the Windows printer driver
Open the printer driver
Use printing shortcuts
Set paper and quality options
Set document effects
Set document finishing options
Set product output options
Borders , Page order , and Orientation
Down list so you can change the setting
Set job storage options
Obtain support and product-status information
Set advanced printing options
Printer Features section. b In the Print All Text as Black
Drop-down list, select Enabled
Change the number of copies that are printed
Option to collate the pages
Staple documents
Set the stapler at the control panel for printed jobs
Set the stapler at the control panel for all copy jobs
Set the stapler at the control panel for a single copy job
Load staples
Load staples in the stapler/stacker
Load staples in the multifunction finisher
Load staples in the multifunction finisher 4
Enww
Stop the current print job from the control panel
Cancel a print job
Stop the current print job from the software program
Print on envelopes
Load envelopes in tray
16Load envelopes in tray 1 3
Change the fuser levers
19Change the fuser levers 3 Close the left door
Print on envelopes from a program
Job storage features for print
Gain access to the job storage features for print
For Windows
For Macintosh
Use the proof and hold feature
Use the personal job feature
Create a proof and hold job
Print the remaining copies of a proof and hold job
Use the QuickCopy feature
Create a personal job
Print a personal job
Delete a personal job
Use the stored job feature
Create a QuickCopy job
Print additional copies of a QuickCopy job
Delete a QuickCopy job
Print a stored print job
Create a stored print job
Delete a stored print job
Enww
Copy
Use the Copy screen
Copy screen
Set the default copy options
Copy from the scanner glass
Basic copy instructions
Copy from the document feeder
Adjust the copy settings
Option name Description
Copy two-sided documents
Copying two-sided documents manually
Copy two-sided documents automatically
Make two-sided copies from one-sided documents
Make one-sided copies from two-sided documents
Touch 2-sided original, 2-sided output
Touch 2-sided original, 1-sided output
Copy mixed-size originals
Change the copy-collation setting
Copy a photo
Copy photos and books
Copy a book
Combine copy jobs by using Job Build
Touch Job Build On
Cancel a copy job
Job storage features for copy
Create a stored copy job
Print a stored copy job
Delete a stored copy job
Enww
Scan and send to e-mail
Configure the device to send e-mail
Configure e-mail server settings
Configure the Smtp gateway address
Supported protocols
Test the Smtp settings
Use the Send E-mail screen
Perform basic e-mail functions
Load documents
Send documents
Send a document
Use the auto-complete function
Create a recipient list
Use the address book
Use the local address book
Add e-mail addresses to the local address book
Delete e-mail addresses from the local address book
Change e-mail settings for the current job
Button Description
Original Sides
Optimize Text
Scan to a folder
Touch Send to Network Folder
Scan to a workflow destination
Enww
10 Fax
Configure and use the fax features
Connect the fax accessory to a phone line
Analog fax
Analog fax
Digital fax
Manage and maintain
Information pages
Menu map
Usage
File directory
Fax reports
Font lists
Open the embedded Web server by using a network connection
Embedded Web server
Sleep mode on
Settings tab
Embedded Web server sections
Tab or section
Tab or section Options
Digital Sending tab
Networking tab
Other links
Close the embedded Web server and reopen it
HP Easy Printer Care
Supported operating systems
Open the HP Easy Printer Care software
HP Easy Printer Care software sections
Section Options
Alert Settings link
Color Access Control
Overview and Support tabs
Supplies Ordering button
Use HP Web Jetadmin software
Print a cleaning
Print a configuration
HP Printer Utility for Macintosh
Open the HP Printer Utility
View supplies status
Order supplies online and use other support features
Upload a file to the printer
Update the firmware
Activate the two-sided printing duplexing mode
Lock or unlock printer storage devices
Save or print stored jobs
Configure trays
Change network settings
Configuration Settings list, select Tray Configuration
Configuration Settings list, select IP Settings
Set up e-mail alerts
Configuration Settings list, select E-mail Alerts
Security features
Secure the embedded Web server
Foreign Interface Harness FIH
Requirements
Disable the FIH portal
Enable the FIH portal
Secure Disk Erase
Security Lock
Authentication
Lock the control-panel menus
Enww
Set the real-time clock
Touch Time/Scheduling Touch Date/Time
Clean the MFP hardware
Clean the MFP
Clean the paper path
3Clean the paper path 2
Clean the ADF delivery system
Clean the outside of the MFP
Clean the touchscreen
Clean the glass
Locate the top and bottom ADF glass strips
16Clean the top ADF glass strip 4 Manage and maintain
Clean the ADF rollers
19Clean the ADF rollers 3
20Clean the ADF rollers 4 Locate the rollers
Calibrate the scanner
Configure alerts
Alerts and how to set them up
Software Information location
About the embedded Web server
Manage supplies
Through HP Web Jetadmin
Print cartridge life expectancy
Check the print cartridge life
On the MFP control panel
Printer maintenance kit
Install memory
Manage memory
Determine memory requirements
Slot 256 MB 128 MB Total 384 MB
27Install DDR memory DIMMs 5
Enww
Verify memory installation
Economy settings
Set the sleep delay
Sleep and wake
Set the sleep time
Economy settings
Enww
Problem solve
Solve problems
Troubleshooting checklist
Determining Solve MFP problems
Situation/Message Solution
Control-panel message types
Control-panel messages
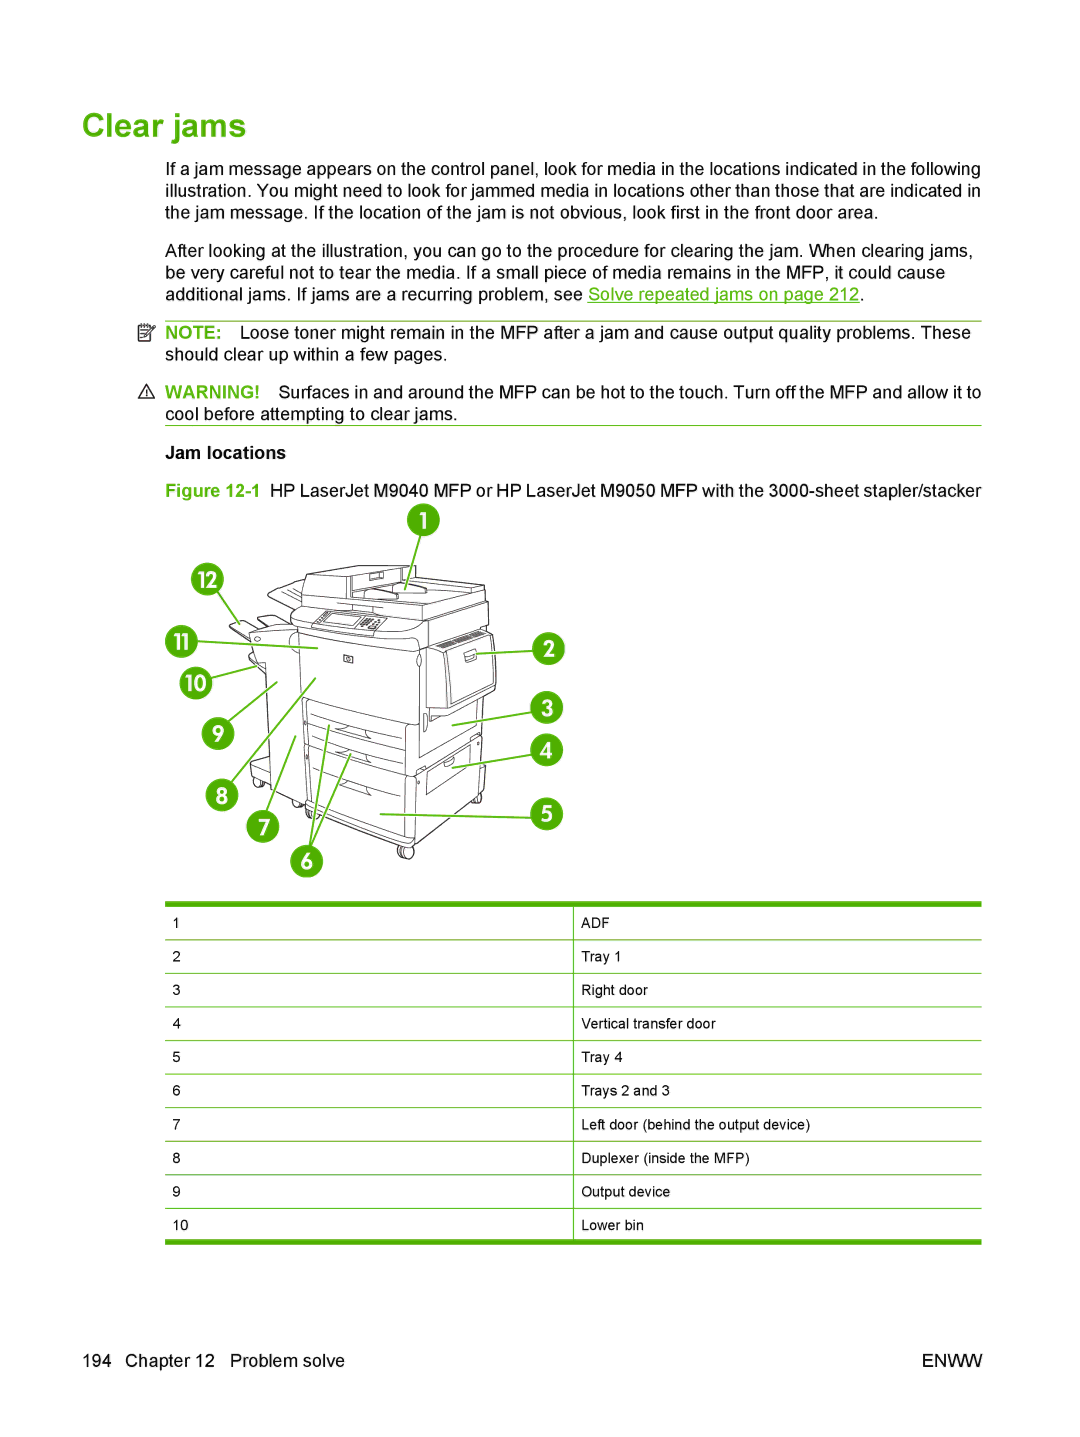
Clear jams
Jam locations
Clear jams from the duplexer
Front door and print-cartridge area Upper bin
Clear jams from the input-tray areas
Clear jams in tray
Clear jams inside the right door
Clear jams in trays 2
Clear jams from the output areas
Clear jams in the stacker or stapler/stacker
Move the output device away from the MFP
Open the top cover
Clear jams in between the multifunction finisher and the MFP
Clear booklet jams in the multifunction finisher
36Clear booklet jams in the multifunction finisher 3
Open the stapler-unit door
Clear a staple jam from the multifunction finisher
44Clear a staple jam from the multifunction finisher 4
Remove the staple cartridge
51Clear a staple jam from the multifunction finisher 11
Clear a staple jam from the stapler/stacker
60Clear a staple jam from the stapler/stacker 8
61Clear a staple jam from the stapler/stacker 9
Clear jams in the left door fuser area
Clear jams in the 8-bin mailbox
Situation Solution
Clean the ADF delivery system on
Solve repeated jams
Supported paper and print media sizes on
Media-handling problems
Printer feeds multiple sheets
Printer feeds incorrect page size
Printer pulls from incorrect tray
Media does not feed automatically Cause Solution
Media does not feed from tray 2, 3, or Cause Solution
Media does not feed automatically
Media does not feed from tray 2, 3, or
Transparencies will not feed Cause Solution
Envelopes jam or will not feed in the MFP Cause Solution
Transparencies will not feed
Envelopes jam or will not feed in the MFP
Output is curled or wrinkled
Output is curled or wrinkled Cause Solution
Printer will not duplex or duplexes incorrectly
Solve print-quality problems
Print-quality problems associated with media
Print-quality problems associated with the environment
Print-quality problems associated with jams
Light print partial
Light print entire
Specks
Dropouts
Lines
Gray background
Toner smear
Loose toner
Repeating defects
Repeating image
Misformed characters
Skew
Curl or wave
Wrinkles or creases
Tire tracks
Vertical white lines
White spots on black
Scattered lines
Blurred print
Random image repetition
88Random image repetition 1
Solve fax problems
Solve copy problems
Prevent copy problems
Image problems
Problem Cause Solution
Copy and then touch Optimize Text Picture. Select Text
Media-handling problems
Quality menu on page 42 or use long
Print Qualitysubmenu, touch Set
Quality menu on
See Calibrate the scanner
See Load paper and print media
Performance problems
Validate the Smtp gateway address
Solve e-mail problems
Validate the Ldap gateway address
Solve network printing problems
Solve network connectivity problems
Verify communication over the network
Solve network connectivity problems
Solve common Macintosh problems
1Problems with Mac OS
Software troubleshooting
Cause Solution
Print queue might be stopped
Hardware troubleshooting
Supplies and accessories
Order parts, accessories, and supplies
Order through service or support providers
Order directly from HP
Order directly through the HP Easy Printer Care software
Part numbers
Type of item Description or use Order number
Paper handling
Printing supplies
Accessories
One fuser assembly
Cable and interface
Enhanced EIO Cards HP Jetdirect Connectivity J4135A
Service and support
Hewlett-Packard limited warranty statement
Customer self repair warranty service
Print cartridge limited warranty statement
HP service agreements
Online Services
HP Customer Care
HP support and information for Macintosh computers
Enww
Specifications
Physical specifications
Table C-2Dimensions with all doors and trays fully opened
Model Height Depth Width Weight
Model Height Depth Width
Electrical specifications
Table C-3Power requirements
Table C-4Power consumption average, in watts1
Specification Volt models
Table C-5Sound power level1
Acoustic emissions
Operating environment
Table C-6Sound pressure level1
Regulatory information
FCC regulations
Environmental product stewardship program
Return and recycling instructions
HP LaserJet print supplies
United States and Puerto Rico
Paper
Non-US returns
Material restrictions
HP LaserJet M9040 and HP LaserJet M9050 device
Material Safety Data Sheet Msds For more information
Laser safety
Country/region specific statements
Declaration of Conformity
Declaration of Conformity
Canadian DOC regulations
Luokan 1 laserlaite
Varoitus
Symbols/Numerics
Index
MFP
Enww
Enww
Macintosh
Msds
Enww
Quality
FIH
Size, copy
Enww
Enww