2007
Series All-In-One Users Guide
Page
Contents
Loading paper and original documents
102
100
112
Scanning 142
Copying 133
152
178
169
187
213
212
214
215
235
234
236
237
277
261
279
Page
Finding info rma tion about the p rinter
Where to find
Finding information about the printer
Description
Click Yes Users Guide appears on the screen
Users Guide
Where to find rest of world
Where to find North America
Mail support
For e-mail support, visit our Web site
Click Customer Support Click Warranty Information
Where to find US
Scroll through the Web page to view the warranty
Operating system notice
Ope rating s ys tem no t ice
Windows users-See the Users Guide
Safety info rm ation
Checking the box contents
Setting up the printe r
Use
Understanding the parts of the printer
Slots
Page
Line port
DSL, or cable modem
Cable modem to the printer
Installing the optional Tray
Setting up the printer on a Windows operating system
Page
Choosing a fax connection
Getting the printer ready to fax
Equipment
Benefits
Send faxes using the computer
Connecting directly to a telephone wall jack
Printer
Telephone wall jack Printer Computer modem
Connecting directly to a telephone wall jack in Germany
Connecting to a telephone
Connecting to an answering machine
Page
Connecting to a computer with a modem
Country/region United Kingdom Italy Ireland Sweden Finland
Using an RJ11 adapter
Norway France Denmark Portugal
Page
Egypt Poland Bulgaria
Country/region Saudi Arabia Israel United Arab Emirates
Czech Republic Russia Belgium
Australia Spain South Africa Turkey
You may use an adapter with your printer
Setting up to fax while behind a PBX
Country/region
Using the control panel
Using a digital phone service
Understanding the control panel
Check wireless status
Following diagrams explain the sections of the control panel
Press To
Display Finger groove
Press To
Press
Installing another language control panel
Understanding and using default settings
Adjusting the display for easy viewing
Navigating the control panel menus
Print Fax Settings List Network Setup
Understanding the Setup menu
From here
You can
Installing the optional XPS driver Windows Vista users only
Installing the printer software
Using the installation software CD Windows users only
Using the installation software CD Macintosh users only
Click ΠControl Panel
Understanding the printer software
Click Have disk
Select Productivity Studio
Security Information
Turning printing voice notification on or off
Click OK
Wired network example
Common home network configurations
Wireless network examples
Con nectin g the p rin t e r to a n etwo rk
Connecting the printer to a network
Networking the printer
Setting up the printer
Network Time Menu Active Network
Understanding the Network Setup menu
General networking information
Wireless Setup menu
TCP/IP menu
Assigning an IP address
How to locate a printer IP address
Configure IP address
How to locate a computer IP address
Finding IP addresses
Installing the printer on additional network computers
Printing a network setup
Types of wireless networks
Wireless networking
Finding a printer/print server located on remote subnets
Infrastructure
Windows Vista
Installing the printer on a wireless network
Windows XP
Interpreting the colors of the Wi-Fi indicator light
Click Start ΠRun
Finding the signal strength
Wired networking
Why do I need an installation cable?
Installing the printer on a wired Ethernet network
Tips for using network adapters
Advanced wireless setup
Creating an ad hoc wireless network using Windows
For Windows Vista users
For Windows XP users
Select View Available Wireless Networks
Click Start
Switching between connections
Switching from a wireless connection to a USB connection
Switching from a USB connection to a wireless connection
Under Hardware and Sound, click Printer
Click Start ΠPrinters & Faxes
From the Ports tab, click Add Port
Connecting the printer directly to the computer
Prepare the computers to share the printer
Sharing a printer in a Windows environment
Click Start ΠPrinters and Faxes
Press to select Yes
Configuring a network printer manually
Loading various paper types in Tray
Load in g pape r a nd ori ginal do cu m ents
Loading paper in Tray
Load the paper Loading paper and original documents
Move the paper guides to the sides of Tray
Insert Tray
Load up to
Paper capacities for Tray
Make sure
Envelopes
Page
Page
Loading cards in Tray
Loading labels in Tray
Loading iron-on transfers in Tray
Loading transparencies in Tray
Loading custom-size paper in Tray
Loading banner paper in Tray
Using the small media feeder
Loading the optional Tray
Using the automatic paper type sensor
Move the paper guides to the sides of Tray
Page
Enabling tray linking
Understanding and using tray linking
Paper capacities for the optional Tray
To disable tray linking, set Tray Linking to Off
Disabling tray linking
Sheets of plain paper in letter, A4, or legal size
From here You can
Understanding the Paper Handling menu
Loading original documents on the scanner glass
Page
Sheets Letter paper A4 paper Legal-size paper
Automatic Document Feeder paper capacity
Load up to
Click Properties, Preferences, Options, or Setup
Using the Printing Preferences tabs
Prin ting
Printing basic documents
Printing photos or images from a Web
Printing a Web
Normal Quick Black and White Text Only
Click Print Now
Printing multiple copies of a document
Not collated
Printing collated copies
Printing multiple pages on one sheet
Printing the last page first reverse page order
Printing document files from a memory card or flash drive
Printing using watermarks
Click New Watermark
Canceling print jobs
Pausing print jobs
Printing specialty documents
Choosing compatible specialty paper types
Printing cards
Printing envelopes
Printing a document as a poster
Printing a booklet
Printing an image as a poster
Click File ΠAdd Photo from Scanner
Click Next Step
Assembling a booklet
Printing transparencies
Printing iron-on transfers
Printing a banner
100
101
Understanding the two-sided printing function
Printing on both sides of the paper duplexing
102
Select
103
Printing on both sides of the paper duplexing automatically
Printing on both sides of the paper duplexing manually
Click Properties, Preferences, Options or Setup
104
105
Understanding the Printer Default Settings menu
Click Start ŒSettings ŒPrinters or Printers and Faxes
Resetting printer software to factory default settings
For Windows XP or Windows 2000 users
106
Resetting all settings
Resetting factory default settings
Resetting only menu settings
Understanding the Print Files Options menu
Saving settings
Printing using Bluetooth technology
Inserting a Bluetooth adapter
108
109
Setting the Bluetooth mode
110
Printing using Bluetooth
111
Understanding the Bluetooth Default Settings menu
Retrieving and managing photos
Working with p ho tos
Inserting a memory card
112
113
Inserting a flash drive
114
Understanding the Photo Card Mode menu
Understanding the Photo Default Settings menu
Understanding the PictBridge Default Print Settings menu
115
Photo Size Layout Quality Paper Handling
Click Automatically save all photos to My Pictures
116
Click Select photos to save Click Deselect All
117
118
Transferring photos from a memory card to a flash drive
Click Temporary Files
Editing photos using the control panel
Changing the Productivity Studio transfer settings
Editing photos
Changing the Productivity Studio library preferences
Brightness Adjust the brightness of a photo Rotate
Understanding the Photo Edit Mode menu
120
Cropping a photo
Changing the Resolution / Size of a photo
Rotating a photo
121
Reducing the red-eye effect in a photo
Applying One-Click Auto Fixes to a photo
Blurring/Sharpening a photo
122
Enhancing a photo
Enhancing photo print quality using Printing Preferences
123
124
Changing the Hue / Saturation of a photo
Click Hue / Saturation
Applying a color effect to a photo
Changing the Exposure setting of a photo
125
Printing a photo or selected photos
Printing photos
Printing all photos from a memory device
126
127
128
Printing photos from a PictBridge-enabled digital camera
129
Printing photos from a digital camera using Dpof
Printer reads only one media device at a time
130
Viewing / Printing photos from the Productivity Studio
Press or to preview the photos Press to print
Click Select photos to print
Printing Photo Packages
Paper sizes supported Dimensions
Creating Photo Greeting Cards
131
Creating a slideshow
Dimensions
Creating and viewing a slideshow
Viewing a slideshow of photos on the control panel display
Cop ying
Understanding the Copy Mode menu
Making a copy
133
Layout Original Size Content Type Change Default Settings
Changing the default copy settings
134
Menu on
Copying on both sides of the paper duplexing
Making a color or black-and-white copy
135
Press Copy Mode menu appears
Copying a photo using the computer
Copying photos
136
137
Adjusting copy quality
Click Copy Now in the bottom right corner of the screen
Making a copy lighter or darker
Collating copies using the control panel
138
Press Copying
139
Repeating an image on one
Enlarging or reducing an image
Copying multiple pages on one sheet N-Up
140
141
Canceling a copy job
Scan ning
Understanding the Scan Mode menu
Scanning a document
142
143
Changing the default scan settings
Scanning text for editing
Scanning a document using the computer
Scanning images for editing
144
Scanning a photo to Work with Documents and Photos
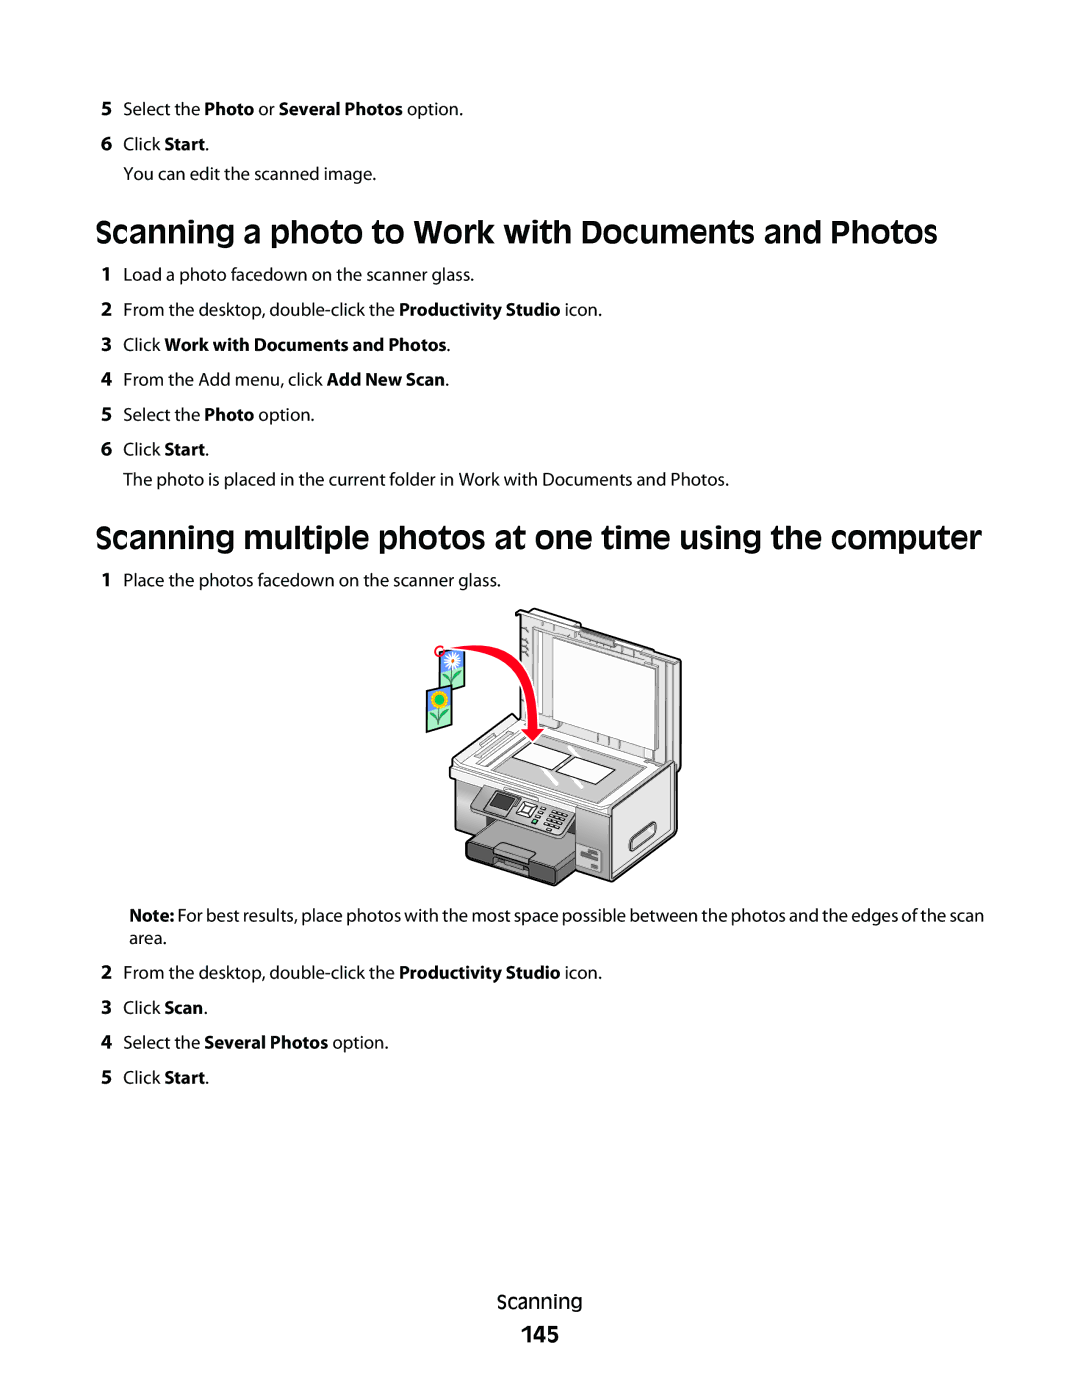
Scanning multiple photos at one time using the computer
145
146
Scanning in color or black and white
Select Photo, Several Photos, or Document
Customizing scan settings using the computer
Canceling a scan job
Click Custom Settings
Setting Options
148
Saving a scanned image on the computer
Click Scan Settings
Changing the Productivity Studio scan settings
Scanning clear images from magazines or newspapers
Adding a file to an e-mail message
Scanning documents or images for e-mailing
Adding a new scanned image to an e-mail message
Changing the Productivity Studio e-mail screen preferences
150
Click E-mail Screen
151
Sending a fax using the control panel
Faxing using th e con t rol pane l
Sending a fax using the control panel
Entering a fax number
153
Enter a fax number using
Method The text box
Name Search Phone Number Search Group Search
154
Sending a fax while listening to a call On Hook Dial
Method How to
On Hook Dial
155
Sending a broadcast fax at a scheduled time
Setting Auto Answer to On
Receiving a fax using the control panel
Receiving a fax manually
Receiving a fax automatically
Receiving a fax with an answering machine
Using Caller ID from the control panel
157
Printing a fax on both sides of the paper
Forwarding faxes
158
Understanding the Fax Mode menu
Customizing dial settings using the control panel
Understanding the Fax Setup menu
159
Understanding the History and Reports menu
Understanding the Phone Book menu
160
Understanding the Fax Printing menu
Understanding the Ringing and Answering menu
161
Caller ID Pattern
Understanding the Fax Blocking menu
Understanding the Dialing and Sending menu
162
Use this
163
Using the control panel phone book
Setting the distinctive ring
Setting up a dialing prefix
164
165
Setting up a fax footer
Managing faxes using the control panel
Creating a fax cover page using the control panel
Printing fax activity reports
Blocking unwanted changes to fax settings
Printing the Fax Settings List
Blocking junk faxes
167
168
Sending a fax using the computer
Faxing using th e com p uter
Sending a fax using the software
Sending and managing faxes using the Fax Solutions Software
170
Receiving a fax using the computer
Click To
Using Caller ID from the software
Setting a fax manual answer code
171
Using the computer phone book
Customizing dial settings using the computer
172
173
Adding a contact to a phone book
174
Setting up Speed Dial
Customizing settings using the Fax Setup Utility
Managing faxes using the computer
Click Fax History and Settings
Fax Solutions Software screen appears
176
Click each tab, and change the settings as needed
Tab
177
Changing user information on a fax cover
Click Change your personal information that appears on this
Enter the correct personal information Click OK
Installing print cartridges
Understanding the Maintenance menu
Main taining th e prin t er
178
179
Removing a used print cartridge
Using genuine Lexmark print cartridges
Refilling print cartridges
180
Aligning print cartridges
Improving print quality
181
Click Report a non-Lexmark print cartridge
Wiping the print cartridge nozzles and contacts
Cleaning the print cartridge nozzles
182
183
Preserving the print cartridges
Cleaning the exterior of the printer
Cleaning the scanner glass
Removing the printer from the Tray 2 base
184
Ordering print cartridges
Ordering supplies
Ordering paper and other supplies
185
Paper
186
Lexmark Photo Paper Lexmark PerfectFinish Photo Paper
Paper size
Power button is not lit
Setup troubleshooting
Troublesho oting
Incorrect language appears on the display
188
Software does not install
189
Does not print
190
Removing and reinstalling the software
Solving printer communication problems
Select Lexmark 9500 Series Select Uninstall
Understanding Warning levels
Enabling the USB port
Checking the port setting
Tray 2 does not operate correctly
192
Wireless network troubleshooting
Network troubleshooting
Printer cannot connect to the wireless network
Check your security keys
194
195
Wi-Fi indicator light is still orange
196
Check the access point and, if necessary, turn it on
If the light is not on, see Power button is not lit on
General network troubleshooting
197
Printer is no longer working
Make sure the Wi-Fi indicator light is green
198
Turn off and restart the computer
199
Windows Vista Click ΠControl Panel
Windows XP Click Start ΠPrinters & Faxes
Checking your network name
Checking printer ports
200
Click Properties ΠPorts
Ping the printer
Ping the access point
201
202
Run the Wireless Configuration Utility
Improving print quality
Print troubleshooting
203
Make Sure Paper Size is SET Correctly
204
Poor text and graphic quality
Check Print Cartridges
Review Steps to Improve Print Quality
205
Poor quality at the edges
206
Print speed is slow
Partial document or photo prints
Ink smudges during automatic two-sided printing
207
Checking the print cartridges
Photo smudges or scratches
Ink levels seem incorrect
208
Blank or incorrect page prints
Ink levels seem to go down too quickly
Characters on printout are missing or unexpected
209
Glossy photo paper or transparencies stick together
Are the Color and Print Speed Settings CORRECT?
210
Make Sure the Truetype Font is Available on the Computer
Print is too dark or smudged
Prints with different fonts
211
Transparencies or photos contain white lines
Printouts have alternating bands of light and dark print
212
Perform Maintenance on the Print Cartridges
Check the Program Settings
Vertical straight lines are not smooth
213
Checking the printer status
White lines appear in graphics or solid black areas
Checking printer readiness
Settings are not saved
215
Printer is busy printing another job
Resolving font problems
Ready or Busy Printing is listed as the status
216
Make Sure the Printer is Receiving Power
Is the Problem with the PROGRAM?
Printing a test
Test page does not print
Removing an external print server
External print server is not working
Cable is not connected, is loose, or is damaged
218
Printer is trying to print to File
Printer is plugged in but does not print
219
Check the Printer Status
220
TRY to Locate the Printer from the Remote Computer
Printer is not able to communicate with the computer
Problems when copying, scanning, or faxing
Wrong printer is attached
Bidirectional communication is not established
Updating the printer software
Experiencing poor quality or incorrect output
222
Cannot print from a Bluetooth-enabled device
Cannot print from digital camera using PictBridge
223
How to clear and avoid paper jams
Jams and misfeeds troubleshooting
224
Make Sure YOU Type in the Correct Pass KEY
Unsupported Paper Size / Unsupported Paper Type
Duplex unit does not operate correctly
Printing Manual Duplex
225
Paper jam in the Automatic Document Feeder ADF
Paper jam in the printer
226
Eject the Paper Automatically
227
Paper or specialty media misfeeds
Check Paper Loading
Printer does not feed paper, envelopes, or specialty media
Adjust the Paper Guides
228
Remove Each page AS IT is Printed
Paper continues to jam
Banner paper jams
229
230
Paper jam in the duplex unit
231
Paper jam in Tray 1 or optional Tray
232
Paper jam in the small media feeder
Nothing happens when memory card is inserted
Memory card troubleshooting
Memory card cannot be inserted
233
234
Cannot print documents from a memory card or flash drive
Copier does not respond
Copy troubleshooting
Scanner unit does not close
Poor copy quality
Partial document or photo copies
Copied item does not match the original item
236
Scanner does not respond
Scan troubleshooting
Scan was not successful
237
Poor scanned image quality
Scanning takes too long or freezes the computer
238
Partial document or photo scans
Fax troubleshooting
Cannot scan to a computer over a network
Cannot send or receive a fax
240
241
Can send but not receive faxes
Check the Dial Prefix Setting
Check Mode Selection
Can receive but not send faxes
242
243
Printer receives a blank fax
Check Speed Dial Number
Be Sure That Printer is Detecting a Dial Tone
Received fax has poor print quality
Review Checklist for Sender
244
Decrease the Transmission Speed
Remote Fax Error
Fax Error
Caller ID information is not displayed
245
Phone Line Busy
Change Redial Settings
246
Schedule to Resend FAX AT a Later Time
USE Phone Line Checklist
Phone Line Error
Failed to Connect
247
Unsupported Paper Size
Unsupported Fax Mode
248
No Answer
Conversion error
249
Alignment Error
Error messages on the printer display
Conversion Failed
250
Black Ink Low / Color Ink Low / Photo Ink Low
Cartridge Error 1102, 1203, 1204, or 120F
251
USE NEW Paper
Left Cartridge Error / Right Cartridge Error
Error
Clear Carrier Jam
Cover Open
Left Cartridge Missing / Right Cartridge Missing
Left Cartridge Incorrect / Right Cartridge Incorrect
Memory Failure
253
Paper or Photo Size error
Paper Size/Type error
PictBridge Communication Error
Could not detect a proof sheet
Paper Load Error
There is a problem reading the memory card
Proof Sheet Error
Please remove the camera card
Clearing error messages
Error messages on the computer screen
Paper Mismatch
256
Left/Right Cartridge Missing
General Printing Problem
Communication not available
Ink Low
Fixing a printing failure
Out of Memory
Unsupported file types found on memory card
Paper Jam
Paper Out
Print File Error
Invalid Device
No Twain detected
Select Twain driver
Fax Solutions Software print driver not installed
260
August
261
Lexmark International, Inc. All rights reserved
262
Trademarks
263
Industry Canada compliance statement
264
European Community EC directives conformity
265
266
Ambient temperature
Svenska
Meter average sound pressure, dBA
267
268
269
South Africa telecommunications notice
270
Mode Description
18.0 Copying
271
Off mode
272
Extent of limited warranty
Additional rights
273
274
275
276
277
Netwo rking glo ssary
Networking glossary
278
WPA Wi-Fi Protected Access
279
Index
280
Shown with asterisk 45 using Defaults
Menu
Panel
281
Duplex error
Mail
For
282
Fax settings
283
Settings 69 Invalid Device
Paper jam in small media feeder
Line port 22 loading Banner paper 79 cards
284
Printing using Bluetooth 110 printing using the proof Sheet
Fixes
Computer 136 copying photos 136 cropping 119 despeckling
285
Memory card using Refilling Black areas Computer Removing
Scratches, preventing Changing
286
Printing photos changing settings 115 customizing settings
Documents or images for e-mailing
287
Newspapers 125
Display
288
Checking network name Windows
289
Wrong printer attached XPS driver installing Index
Wi-Fi indicator light is still orange
290