Page
Trademarks
Copyright Notice
Software License Agreement
Page
General
Legal Restrictions on Copying
Financial Instruments
Legal Documents
For EU member states only
Page
Contents
User authentication and account track
About Duplex Printing
Loading a Document
Contents
Specifying destinations
Antistatic Protection
Solving Problems with Media Misfeeds
Logging in to this machine
Appendix Technical specifications
Contents
Introduction
Getting Acquainted with Your Machine
Space Requirements
The option appears shaded in the above illustrations
Front View
Part Names
Getting Acquainted with Your Machine
Front View with Options
Rear View
Adjusting the angle of the control panel
Printer Drivers XPS Drivers
Drivers CD/DVD
Printer Drivers PostScript Drivers
Printer Drivers PCL Drivers
PC Fax Drivers
Printer Drivers PPD Files
Scanner Drivers
Applications Use/Benefit
Applications CD/DVD
Applications
Enterprise Suite Plug-In
Documentation Use/Benefit
Documentation CD/DVD
Documentation
RAM
System Requirements
Getting Acquainted with Your Machine
Control panel and touch panel screens
Name Function
About the Control Panel
Interrupt key
Track in order to log on to this machine
Indication Description
Touch panel screens
Home screen
Touch panel screens
USB/HDD
Initial Copy mode screen
Initial Scan to Folder mode screen
Initial Fax mode screen
Initial Scan to E-mail mode screen
Appears. To view job details, press Details
When the job log is displayed, Details
Job screen
Reference
Status screen
The percentages remaining for
Amounts and should be used only as
USB/HDD screen
Icon Description
Keys and icons that appear in the screens
Report printing
External server authentication
User authentication and account track
With user authentication Device authentication
User authentication and account track
With account track
Logging in using the authentication device
Utility Settings
Accessibility
Accessibility
Severe Cau- tion Sound Enable Volume
To 3.0 seconds Default0.8
All factory default values are shown in bold
Select if sounds are to be produced when an opera
Then press the four check points + again
Meter Count
Meter Count
Address Registration
SMB
User Settings
User Settings
Jpeg
PCL
Model, and mm for other models
Machine Settings
User Settings is not displayed when the job log is full
Inch / mm
Optional lower feeder units have not
Been installed
Yes / No
Copy Settings
Factory Default / Current Set
Scan Settings
Print Settings
Legal, Govt Legal, Executive, A4
Model, and A4 for other models
Monarch, Env Chou#3, Env Chou#4
B5 ISO, Env #10 do not appear
Special Paper appear
Plain Paper, Recycled, 1 Side Only
Physical Tray
Fax Settings
Select Default Start App
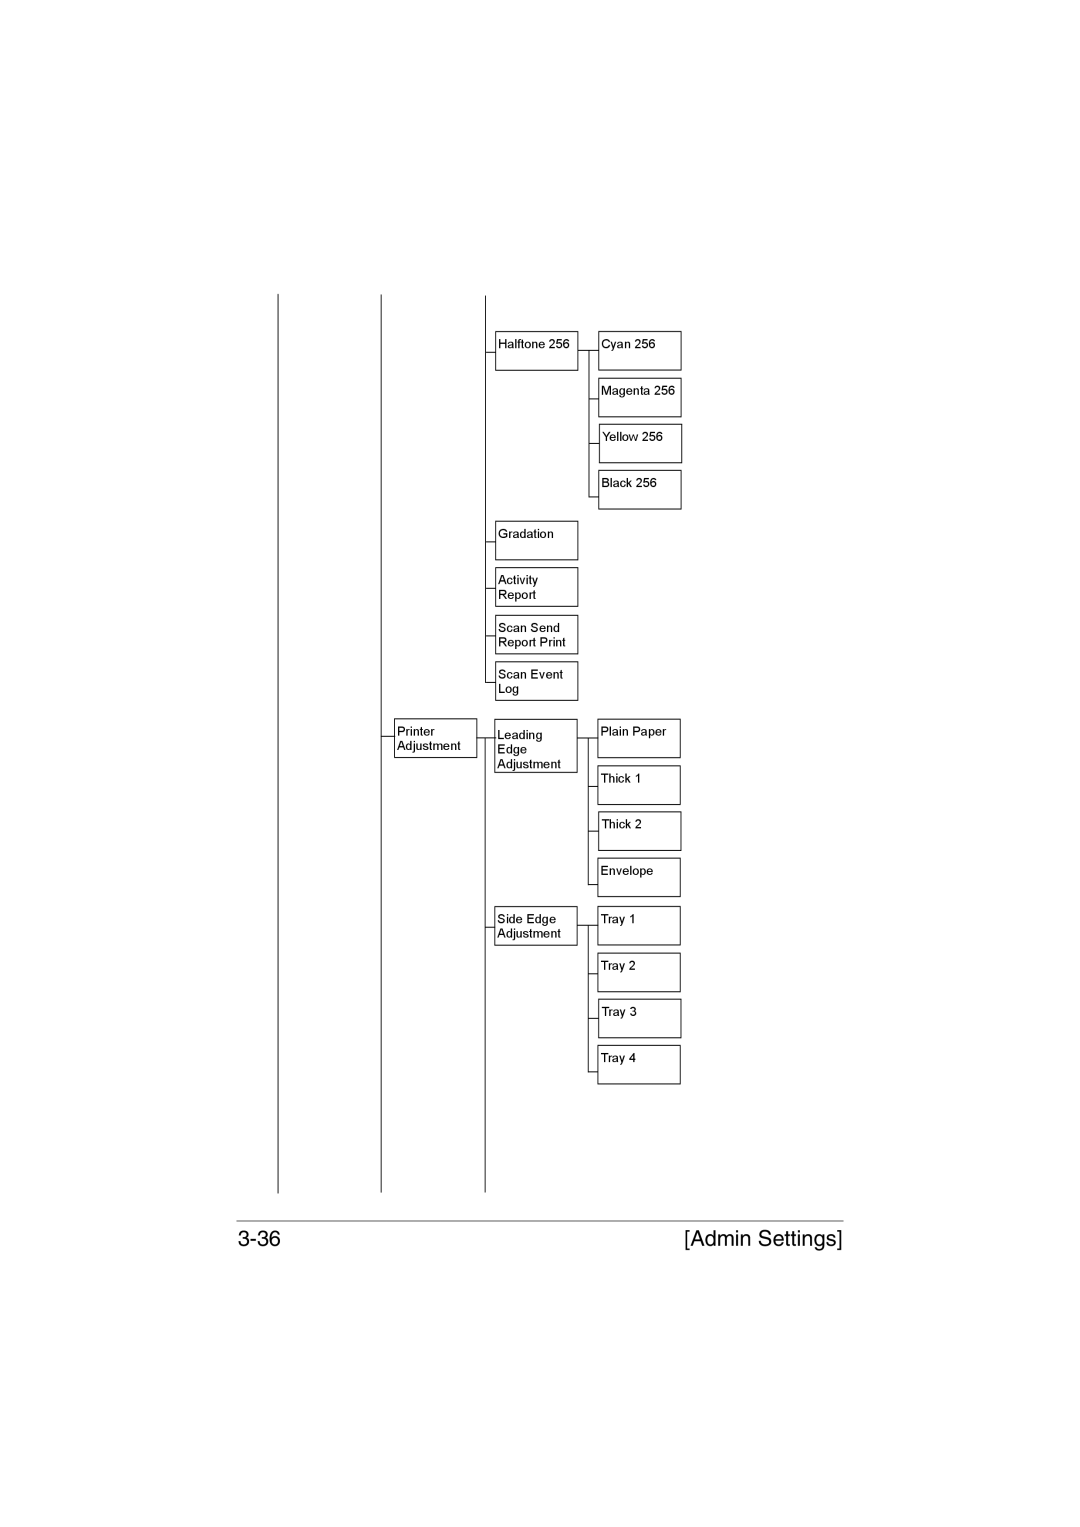
Admin Settings
Admin Settings
FTP
Number Addresses List Output
WebDAV Start Number Number of Addresses List Output
TCP/IP
SLP Smtp Snmp
Mime
Admin Settings
Admin Settings
Aidc
PCL XPS
PB/DP
Admin Settings
PBX
Maintenance Menu List Print Fax Target
Admin Settings
Admin Settings
ADJ
Consumables Replace
Press the Utility/Counter key Press Admin Settings
Year, month, then day YY.MM.DD
Month, day, then year MM.DD.YY for
120V model, month, then year
DD.MM.YY for 220V model Europe
Admin Settings
Messages sent from this machine
Administrator Registration
Address where machine status
Address Registration
Authentication Setting
Parameters do not appear
Ethernet
If OFF is selected, the TCP/IP
SLP
Add signature / Select when
External Memory Print
Job Timeout
Tray Before APS on / Default
Startup Page Setting Settings On / OFF
Size is set to Custom Size
Canada, and A4 for other
Countries
On the hard disk are deleted. If Disable is
Are emphasized
Vivid / Photographic
RGB Intent Settings Vivid / Photographic
RGB source profile
Auto
Ing RGB text data to Cmyk data
Ing RGB graphics data to Cmyk data
Bk=CMYK Gray=CMYK / Bk=K
Aidc processing consumes toner
CR = Crlf LF = Lfcr
CR = CR LF = LF / CR = Crlf
ARABIC8 / Hpwara
XPS
Maintenance Menu
Single-sided printing
Admin Settings
Envelope Settings Adjust the 2nd image transfer output Atvc
Grayscale printing
Instructions from the service
Quality Mode / Speed Mode
Settings. If it becomes necessary to
Change the settings, do so according to
Erase Disabled / 12 Hours
Folder Settings
12345678
Security Settings
Digit password must be specified
If the administrator password is
To USB function cannot be used
Admin Settings
Deleted by being overwritten
Overwritten, do not use the power switch
This machine
To turn the machine off and on
Limitations of the password rules
Passwords regulated by the password rules
Changing the administrator password
Administrator mode parameters Required settings
Conditions of the password rules
Required settings
Enhanced security settings
Administrator mode parameters Changed settings
Changed settings
HDD Format
Restore Defaults
Paper Empty
Restriction Code Settings
Media Handling
Print Media
Specifications
Print Media
Print Media
Plain Paper Recycled Paper
Types
Media Type
Thick Stock
Capacity Tray 1/2
Do not use envelopes that have
Envelope
Do not use label sheets that
Label
Thickness
Letterhead
Postcard
Do not use postcards that are
Glossy Media
Do not use single side only paper that is
Single Side Only
Use single side only paper that is
Do not use special paper that is
Special Paper
Use special paper that is
Area
Printable Area
Printable
Margins
Envelopes
Loading Media
Loading Media
How do I load media?
Tray 1 Manual Feed Tray
Loading Media
Other Media
Loading Envelopes
Load the envelopes flap side up in the tray
Loading Media
Up to 20 sheets can be loaded into the tray at one time
Tray
Loading Media
Slide the media guides against the edges of the paper
Pull out Tray
Up to 20 sheets can be loaded into the tray at one time
Slide the media guides against the edges of the paper
Tray 3/4 Optional Lower Feeder Unit
Load the paper face up in the tray
Loading Media
About Duplex Printing
How do I autoduplex?
Right-bound booklet
Output Tray
Output Tray
Media Storage
Media Storage
Documents that can be loaded into the ADF
Original Media
Original Media
Documents that can be placed on the original glass
Original Media
Loading a Document
Loading a Document
Placing a document on the original glass
Loading a document into the ADF
Adjust the document guides to the document size
Loading a Document
Using the Printer Driver
Selecting Driver Options/Defaults for Windows
Uninstalling the Printer Driver for Windows
Windows Vista/Server
Displaying Printer Driver Settings for Windows
Windows
Common Buttons
Using the Postscript, PCL and XPS Printer Driver
Advanced Tab PostScript Printer Driver Only
Basic Tab
My Tab
Stamp/Composition Tab
Cover Mode Tab
Layout Tab
Quality Tab
Download Manager Application should be installed earlier
Other Tab
Using the Postscript, PCL and XPS Printer Driver
Proof/Print, External memory and ID & Print functions
Proof/Print
Proof/Print
Printing a job saved on the hard disk
Deleting a job saved on the hard disk
External Memory
External Memory
Printing from a connected USB memory device
Printing simultaneously with log-in
ID & Print
Selecting the type of files to be displayed
ID & Print
Deleting a job
ID & Print
Performing Copy mode operations
Basic copy operation
Using the keypad, type in the desired number of copies
Original Size
Original Size
Documents of mixed page sizes
Paper
Paper
Zoom
Zoom
Duplex/Combine
Duplex/Combine
Density
Density
Original Type
Color Mode
Original Type
Proof Copy operation
When printing a proof copy, specify multiple copies
Finishing
Proof Copy
Separate Scan
Separate Scan
Scanning the document in separate batches
To change the scanning settings, press Change Settings
To copy only the front side, press Print
ID Copy
ID Copy
Paper Margin
Paper Margin
Image Quality
Image Quality
Image Quality
Additional copy operations
Interrupting a copy job
Copy programs
Copy programs
Storing a copy program
Deleting a copy program
Copying using stored settings copy programs
Scanning From a Computer Application
Basic Scanning Operation
Windows Twain Driver Settings
Mode settings
When Basic Mode is selected
When Advanced Mode is selected
Windows Twain Driver Settings
Windows WIA Driver Settings
Macintosh Twain Driver Settings
When Advanced Mode is selected
Macintosh Twain Driver Settings
Using a Web Service
Using a Web Service
Settings required to use a Web Service
Installing this machine on the computer
Specifying the scan command from a computer
Specifying the scan command from a computer Web Service
Using a Web Service
Scanning with 10 the machine
Useful functions
Initial settings
10-2 Initial settings
Basic Scan to E-mail operation
Performing Scan to E-mail mode operations
Performing Scan to E-mail mode operations 10-3
Simplex/Duplex
Specifying document settings
10-4 Performing Scan to E-mail mode operations
Original Size
Performing Scan to E-mail mode operations 10-5
Original Settings-Separate Scan
Original Settings- Orig. Binding Position
10-6 Performing Scan to E-mail mode operations
Original Type
Performing Scan to E-mail mode operations 10-7
Color Mode
Background/Density
Specifying scan settings
10-8 Performing Scan to E-mail mode operations
Resolution
File Settings-Scan Setting
Performing Scan to E-mail mode operations 10-9
File Settings-File Type
10-10 Performing Scan to E-mail mode operations
Performing Scan to E-mail mode operations 10-11
10-12 Performing Scan to E-mail mode operations
Specifying communication settings
Performing Scan to E-mail mode operations 10-13
Selecting from the Favorites list
Specifying destinations
Selecting from registered destinations
10-14 Specifying destinations
Selecting by searching for a destination type or name
Directly typing in the address
Selecting from the log
Specifying destinations 10-15
10-16 Specifying destinations
Selecting a program destination
Basic Scan to Folder operation
Performing Scan to Folder mode operations
Performing Scan to Folder mode operations 10-17
10-18 Performing Scan to Folder mode operations
Performing Scan to Folder mode operations 10-19
Original Settings- Original Direction
10-20 Performing Scan to Folder mode operations
Performing Scan to Folder mode operations 10-21
10-22 Performing Scan to Folder mode operations
Performing Scan to Folder mode operations 10-23
10-24 Performing Scan to Folder mode operations
File Name Type in the document name for the scan data
Performing Scan to Folder mode operations 10-25
Specifying the document name
URL Notification Address
10-26 Specifying destinations
URL Notification
Specifying destinations 10-27
With Pcsmb
10-28 Specifying destinations
With FTP
With USB Memory
Specifying destinations 10-29
With WebDAV
With HDD
With Web Service Settings
10-30 Specifying destinations
Only one program destination can be selected
Specifying destinations 10-31
10-32 Specifying destinations
Registering destinations 10-33
Registering destinations
Destination registration
Registering an address book destination E-mail transmission
Registering an address book destination
10-34 Registering destinations
Registering destinations 10-35
Registering Address Book SMB transmission
10-36 Registering destinations
Registering a program destination
Replacing 11 Consumables
11-2 Replacing Consumables
Replacing Consumables
About Toner Cartridges
Replacing Consumables 11-3
11-4 Replacing Consumables
Replacing a Toner Cartridge
Replacing Consumables 11-5
11-6 Replacing Consumables
Fully insert the toner car- tridge
Replacing Consumables 11-7
11-8 Replacing Consumables
Replacing Consumables 11-9
Replacing a Imaging Unit
C K
11-10 Replacing Consumables
Replacing Consumables 11-11
11-12 Replacing Consumables
Replacing Consumables 11-13
11-14 Replacing Consumables
Replacing Consumables 11-15
11-16 Replacing Consumables
Replacing Consumables 11-17
Replacing the Waste Toner Bottle
11-18 Replacing Consumables
Replacing Consumables 11-19
11-20 Replacing Consumables
Replacing the Transfer Roller
Replacing Consumables 11-21
11-22 Replacing Consumables
Replacing the Transfer Belt Unit
Replacing Consumables 11-23
11-24 Replacing Consumables
Do not remove the blue lever
Replacing Consumables 11-25
11-26 Replacing Consumables
Replacing Consumables 11-27
11-28 Replacing Consumables
Replacing Consumables 11-29
11-30 Replacing Consumables
Replacing the Backup Battery
Replacing Consumables 11-31
11-32 Replacing Consumables
Replacing Consumables 11-33
Replacing the Fuser Unit
11-34 Replacing Consumables
Replacing Consumables 11-35
11-36 Replacing Consumables
Replacing Consumables 11-37
11-38 Antistatic Protection
Antistatic Protection
Maintenance
12-2 Maintaining the machine
Maintaining the machine
Maintaining the machine 12-3
Exterior
Cleaning the machine
12-4 Cleaning the machine
Media Rollers
Cleaning the machine 12-5
Cleaning the Media Feed Rollers Manual Feed Tray
12-6 Cleaning the machine
Cleaning the Media Feed Rollers for Tray 2/3/4
Cleaning the machine 12-7
Cleaning the Media Transfer Rollers for Tray 3/4
12-8 Cleaning the machine
Cleaning the Media Feed Rollers for the ADF
Cleaning the machine 12-9
12-10 Cleaning the machine
Cleaning the Laser Lens
Cleaning the machine 12-11
12-12 Cleaning the machine
Cleaning the machine 12-13
12-14 Cleaning the machine
Troubleshooting
13-2 Introduction
Printing a configuration
Introduction
Unlocking the Scanner 13-3
Unlocking the Scanner
Avoid
Preventing Media Misfeeds
13-4 Preventing Media Misfeeds
Make sure that
Understanding the Media Path 13-5
Understanding the Media Path
Media misfeed locations Reference
Clearing Media Misfeeds
Media misfeed indications
13-6 Clearing Media Misfeeds
Clearing a Media Misfeed in Tray
Clearing Media Misfeeds 13-7
13-8 Clearing Media Misfeeds
Clearing Media Misfeeds 13-9
Slide the media guides against the edges of the paper
13-10 Clearing Media Misfeeds
Clearing a Media Misfeed in Tray 3/4
Clearing Media Misfeeds 13-11
13-12 Clearing Media Misfeeds
Clearing a Media Misfeed from the ADF
Clearing Media Misfeeds 13-13
13-14 Clearing Media Misfeeds
Clearing a Media Misfeed from the Duplex
Clearing Media Misfeeds 13-15
Clearing a Media Misfeed from the Fuser Unit
13-16 Clearing Media Misfeeds
Clearing Media Misfeeds 13-17
13-18 Clearing Media Misfeeds
Clearing Media Misfeeds 13-19
13-20 Clearing Media Misfeeds
Clearing Media Misfeeds 13-21
13-22 Clearing Media Misfeeds
Symptom Cause Solution
Solving Problems with Media Misfeeds
Solving Problems with Media Misfeeds 13-23
ADF
13-24 Solving Problems with Media Misfeeds
Solving Problems with Media Misfeeds 13-25
13-26 Solving Other Problems
Solving Other Problems
Solving Other Problems 13-27
13-28 Solving Other Problems
Solving Other Problems 13-29
13-30 Solving Other Problems
Solving Problems with Printing Quality 13-31
Solving Problems with Printing Quality
13-32 Solving Problems with Printing Quality
Solving Problems with Printing Quality 13-33
13-34 Solving Problems with Printing Quality
Solving Problems with Printing Quality 13-35
13-36 Solving Problems with Printing Quality
Status messages
Status, error and service messages
Status, error and service messages 13-37
Message Cause Solution
13-38 Status, error and service messages
Error messages
Status, error and service messages 13-39
Operator messages
13-40 Status, error and service messages
Status, error and service messages 13-41
13-42 Status, error and service messages
Status, error and service messages 13-43
13-44 Status, error and service messages
Message Cause Solution Service Call
Service messages
Status, error and service messages 13-45
Message Cause Solution Fax RX failed
13-46 Status, error and service messages
Installing 14 Accessories
14-2 Introduction
For details of accessories, visit our web site
Lower Feeder Unit PF-P08 14-3
Kit Contents
Lower Feeder Unit PF-P08
Be sure to place the lower feeder unit on a level surface
Installing a Lower Feeder Unit PF-P08
14-4 Lower Feeder Unit PF-P08
Lower Feeder Unit PF-P08 14-5
14-6 Working Table WT-P01
Working Table WT-P01
Working Table WT-P01 14-7
Installing a Working Table WT-P01
14-8 Working Table WT-P01
Working Table WT-P01 14-9
14-10 Working Table WT-P01
Authentication 15 unit IC card type
Do not leave the IC card within 40 mm of the card reader
Using authentication device IC card type
Configuring this machine
15-2 Using authentication device IC card type
Registering a user 15-3
Registering a user
15-4 Registering a user
Registering a user using Data Administrator
Checking the version of the installed Data Administrator
Registering a user 15-5
Setup
Install IC Card Driver USB-Driver
15-6 Registering a user
Registering a user 15-7
15-8 Registering a user
Install Data Administrator IC Card Plugin
Registering a user 15-9
15-10 Registering a user
User registration
Device Information window appears
Registering a user 15-11
15-12 Registering a user
Registering a user 15-13
15-14 Registering a user
Registering a user 15-15
15-16 Logging in to this machine
Associating the user with card using authentication device
Logging in to this machine
Logging in to this machine 15-17
When Card Authentication is enabled
When Card Authentication + Password is enabled
15-18 Logging in to this machine
Appendix
Technical specifications
Glossy 1 100 to 128 g/m2
Hour
Within an hour
Manual feed tray
Average Life Expectancy
Consumable Life Expectancy Chart
Replacement Cartridge High-Capacity
User-Replaceable
Media feed roller 300,000 pages
Service-Replaceable
Text input
Text input
Entering text
Our Concern for Environmental Protection
What is an Energy Star product?
Our Concern for Environmental Protection
Index
Index
Lower feeder unit
Print Setting
Utility Setting