OPERATOR’S Manual
PC Printer Interface Kit Printer Interface Type
Telephone Handset Handset Type
Energy Saving Information
Page
Important Safety Instructions
Table of Contents
Advanced Features
117
Replacement Procedure 127
On/Off Switches 156 User Parameter Settings 157
123
126
163
164
165
167
Telephone Line Problems Affect Fax Communication
What Does a Fax Machine Do?
Some of the Things That this Machine can do
Introduction
Manual Overview
Keynames
Conventions
Displays
Symbols
Rady
Power Supply
Power and Grounding
Grounding
Thunderstorms
Cold Weather POWER-UP
Do not use the machine near a humidifier
Copy Paper
Operating Precautions
Toner Cartridges
General
Ozone
Main Body
Guide to
Operation Panel
Display
Precautions Concerning Unacceptable Document Types
Sending a FAX Message
Condition
Transmission Procedure at a Glance
Overview
Scanning Quickly Memory Transmission
RADY100%1000AM
Sending to Just One Location
2125551234TRANSMITtttttttY/STARTttt
Start
Trnsmit
Sending to More Than One Location Broadcasting
DITRNSMITALNEXTNUMBEROPTIONk
Yes
You want to take out the document
You want to send more than 30 pages
You made a mistake while dialing
Check Display ndicator is blinking
Sending a Page with Very Fine Detail
Contrast
Resolution
Halftone
Selecting the Halftone Type
Home Position Setting Adjustments
Function 6 2 2 2 2 6 3 and Yes
SWITCH0000000000
Optional Features for Transmission
Personal Code
PERSONALCODE7362
Sending at a Specific Time
Sending by a Specific Time TRD Feature Expander Required
Setoption
Printing the Page Number Immediate Transmission only
If you use Page Count If you do not use Page Count
KON
Sending Your Identification at the Top of Your Message
Changing Transmission Mode
Procedure
Sending Quickly
Converting Immediate Transmission to Memory Transmission
PRNTLISTj
REDIALn01XYZCO.NEWYORKY
Selecting the Reception Mode
Auto Receive Mode
Manual Receive Mode
Receiving FAX Messages
Receiving Fax Messages When There Is a Problem
SETTING?
Switching Substitute Reception On or Off
Using On Hook Dial
Telephone Calls
Making a Telephone Call
On Hook Dial key
Using the Handset
Using Redial
Answering the Telephone
Phoning and Faxing on the Same Call
If the telephone rings just once
If the telephone rings continuously
Speaker and Buzzer Volume Adjustments
Function 6 2 2 2 2 9 2 and Yes
Transmission
Transfer Request
Storing your Machine’s Own Telephone Number
Function 6 2 2 2 2 6
Format of the number must be as follows
Yes and Function
Storing the ID Code
Programming the ID code
Function 6 2 2 2 2 6 1 and Yes
Editing the ID Code
Yes and No
DESTINATION#ll
Function 1 3 and Yes
Programming Keystrokes
Storing a Keystroke Program
Labeling a Program
Function 3 4 and Yes
Example Quick Dial key 01 and Yes
Using a Program
Trnsmit
Sending Confidential Messages
This feature is called Confidential Transmission
Erasing a Program
Normal Confidential Transmission
Confidential ID Override
Trnsmit OPTIONk
Storing an Auto Document
Storing an Often Used Document Auto Document
Function 3 5 and Yes
Using an Auto Document
N08
Printing the Contents of an Auto Document
Function 5 3 and Yes
Restricting Access to the Machine
Programming the Personal Codes
Storing a Personal Code
Function 6 2 2 2 2 7 2 and Yes
Code
Switching Restricted Access On
PERS.CODE
Tonal Signals
Operating the Machine with Restricted Access Switched On
Function 3 1 and Yes Press the Quick Dial key
Program the Tone Key
Operating the Tone Key
Storing Part of a Number
On Hook Dial or Handset Mode
Other
Closed Network Transmission
Press Function 6 2 2 2 2 6 3 and Yes
Preventing Transfer to a Wrong Connections
ECM Error Correction Mode and Page Retransmission
Batch Transmission Feature Expander Required
Example
Well Log Transmission
Turning the Batch Transmission On/Off
Receiving Confidential Messages Feature Expander Required
Reception
6754SETCONFIDtttt Lidkpad
Editing the Confidential ID
Function 5 4 and Yes
Printing a Confidential Fax Message
Confidential File Report
Locking Incoming Messages Memory Lock
To use Memory Lock, you must first
Storing a Memory Lock ID
Editing the Memory Lock ID
Switching Memory Lock On/Off
Function 6 2 2 2 2 6 2 and Yes
Finsh Yes and Function
Selecting Which Messages to Lock in Memory
Printing a Memory-Locked Message
Function 5 5 and Yes
Station.000000KPAD/Y/0000jk
Rejection of Messages from Unidentified Senders
Authorized Reception
SELECTLINEY/NEXTk
SWITCH08Terminals
Forwarding Feature Expander Required
Function 6 2 2 2 2 8 2 and Yes
Programming the Forwarding Feature
Example 2 1 2 5 5 5 1 2 3
Press Function
Editing or Deleting the Forwarding Feature
Tion
Switching Forwarding On/Off
RI/CSI
PRNTSETTING?LISTj Y/j
Selecting which Messages to Forward
SWITCH1101000000
Enabling and Disabling the Forwarding Mark
Wild Cards
SWITCH100000000000
Reverse Order Printing Feature Expander Required
Multi-copy Document Reception Feature Expander Required
Function 6 2 2 2 2 8 3 and Yes
Function
Switch
SWITCH0200000000
Printing a Center Mark
Reducing the Page Length
Closed Network Reception
PRNTLISTj
Function 6 2 2 2 2 8 1 and Yes
Editing the RTI/CSI for the Special Terminals
Either Store this RTI as a wild card Yes Otherwise No
ABCjk
Erasing the Special Terminal
Other
Calling to Request a Message Polling
Trans Pushstart
Function 1 5 and Yes
Function 1 4 and Yes
100
Yes Start
101
102
Picking Up Messages Stored Elsewhere Polling Reception
Function 1 1 and Yes
103
Stored D Override Option
104
File Management
Function 2 1 and Yes
Function 2 2 and Yes
Func ion 5 2 Example Using Function
105
Printing a File
Func ion 5 1
How to Start the Saving Energy Mode
How to Exit the Saving Energy Mode
106
Saving Energy
Which Saving Energy Mode is Best for You?
107
Night Timer
108
Switching the Night Timer On or Off
109
Temporarily Switching the Heating Roller On
110
111
Counters
Advanced Features
113
Copying
Dual Access
114
RDS Remote Diagnostic System
115
116
AI Short Protocol
Automatically Printed Reports
117
Descriptions of the Available Reports
118
Switching Reports On/Off
119
120
Printing a Sample of Data on the Reports
Example 1. Error Report
121
Report Formats
Example 2. TCR
122
123
USER-INITIATED Reports
Descriptions of Available Reports
Press Function 4 1 and Yes Start
124
Press Function 4 3 and Yes
Start Press Function 4 4 and Yes
Press Function 6 2 2 2 2 7 2 and Yes
Forwarding List Feature Expander Required
125
Press Function 6 2 2 2 2 8 2 and Yes
User Parameter List
126
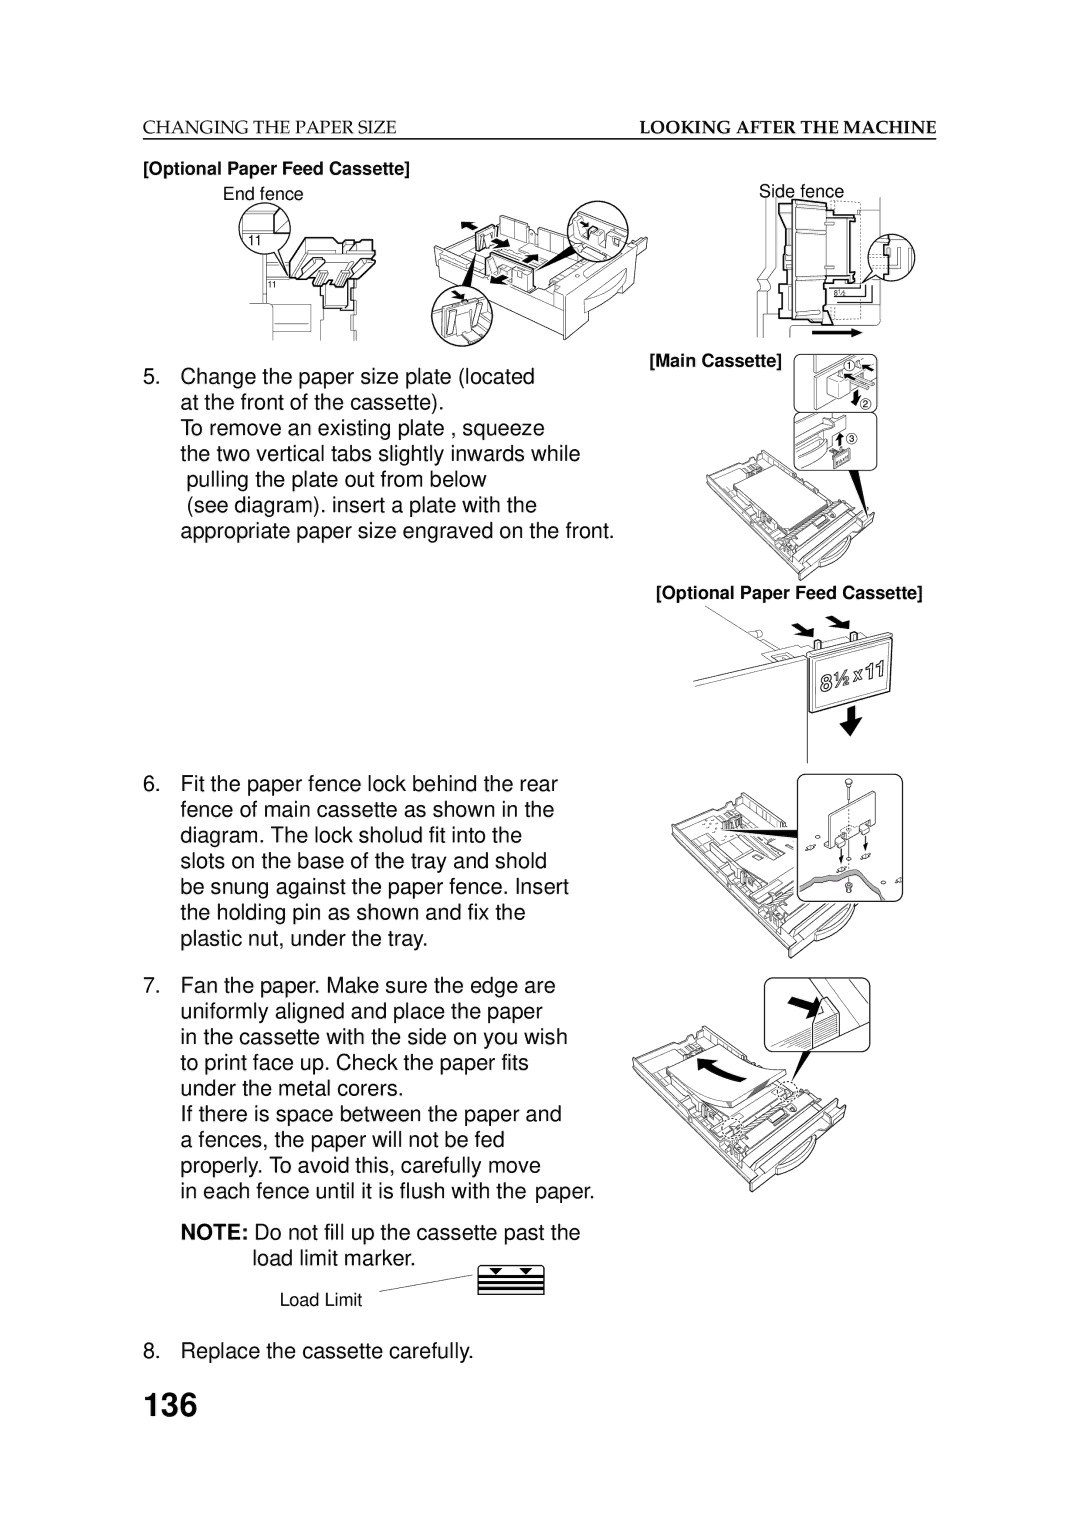
Replacing Paper
Replacement Procedure
Replacing Toner Cassette and Cleaning PAD
127
128
Cleaning Reference Table
User Maintenance Procedures
129
130
Cleaning Procedure
Scanner
131
132
133
134
Cleaning the Corona Wire
Cassette
135
Replacing the ADF Roller Assembly and the Separation Pad
136
137
138
Replacing the Photoconductor
139
Looking After the Machine
Document Jams
140
Clearing a Document Jam
Adjusting the Document Feeder
141
Copy Jams
142
Cassette Entrance
Copy Feed Area
143
Inside the machine
144
145
Copy Exit Area
146
Communication Problems
Operating Difficulties
147
Multifeeds
148
Reception
149
Telephoning
Displayed Error Messages
150
Error Codes
151
152
Calling the Service Station
Sending a Service Report
153
Dedicated Transmission Parameters
Storing Telephone Numbers
154
Storing Names and Labels
Punctuation Marks and Symbols
155
Editing with the Clear Key and Cursor
If YOU Make a Mistake
ON/OFF Switches and User Parameters
156
User Parameter Settings
157
Switch 00 Home position settings
Switch
Switch 02 Printing of various items on received messages
158
Switch 03 Automatic printing of reports
Switch 04 Automatic printing of reports, various
Switch 05 Various
Switch 06 Home position
Switch 08 Various
Switch 07 Do not change these settings
160
Switch 09 Various
Switch 10 Various
Switch 11 Various
Switch 12 Various
163
Location
Attaching the Document Table and Document Tray
164
Attaching the Copy Tray
165
166
Connecting the Machine
167
168
Loading the Paper in the Cassette
169
170
Installing the Optional Feature Expander
Attaching the Optional Handset
171
Some Items Must be Programmed First
Overview
Selecting the Display Language Selection
Setting the Date and Time
Press Function 6 2 2 2 2 9 1 and Yes
Setting Your Machine’s Identification
173
XYZCOMPANYSETttttttttttttttttttttRTI tttttttttABC
RTI Remote Terminal Identification
175
CSI Called Subscriber Identification
Mode, press Function 6 2 2 2
Pulse Dial or Tone Dial?
Press Function 6 2 2 2 2 6 2 and Yes
177
Quick DIAL, Speed DIAL, and Group Dial
Three Convenient Ways to Dial
Quick Dial and Speed Dial
178
Groups
Programming Quick Dial
179
Press Function 3 1 and Yes
Editing a Quick Dial
180
Function 3 1and Yes
181
Erasing a Quick Dial
Function 3 1 and Yes
Yes No and Yes
182
Programming Speed Dials
Programming a New Speed Dial
Function 3 2 and Yes
183
Editing a Speed Dial
Entering Group Programming Mode and Selecting a Group
184
Programming Groups
Erasing a Speed Dial
GUPn
185
Editing and Erasing the Group
186
Function 3 3 and Yes
Programming the Group Key
187
Press Quick Dial
188
Storage Capacity for Telephone Numbers
Dealing with Junk FAX Mail
189
Other Items to Program AT Your Leisure
190
ADF Automatic Document Feeder
191
Home Position
Function List
Index
RDS
Page
Official Notice to Users
Certification Label
Supplies
P27,53,57,62,Table of Contents and index
P42
From P117 to P120 and P159
P68
Ricoh FAX2700L
Paper Cassette Type
Page
Important Safety Instructions
Keynames Displays Symbols
On/Off Switches User Parameter Settings
Installing the Machine
Using Manual Feed with the Removable Cassette Option
121
152
Replacement Procedure 184
178
181
186
217
Introduction
Introduction
Introduction
HOW to USE this Manual
RTI/CSIttttttttttttABCtttttttt
100%1000AM
Storing Telephone Numbers
Cursor and Clear Key for Editing
YOU Make a Mistake
NEXTk
User Parameter Settings
Setting before making a transmission, then
Setting
Switch 07 Do not change these settings
These settings
Switch 13 Do not change these settings
General Precautions
General Precautions
General Precaution
General
Guide to Components
This page is intentionally blank
Copy
Stamp Key
Installing the Machine
Attaching Document Table and Document Tray
Installing the Machine
Installing the Machine
Main Power Switch Source
Machine
Installing the Machine
Installing Removable Cassette and Loading Paper Option
Installing the Machine
Installing Machine
Instaiing the Optional Feature Expander
Using Manual Feed
Using Manual Feed with the Removable Cassette Option
Language Selection
Overview
Fpress Yes and Function
Date and Time
ONkOFF
Terminal Identification
Press Function 6 2 2 2 2 6 1 and Yes
TTI Transmit Terminal Identification
TTItttttttttttttttABCttttt
Telephone Line Type
Mode, press Function, 6, 2, 2, 2, 2, 6
Three Convenient Ways to Dial
Groups
Programming a New Quick Dial
Programming Quick Dial
PressFFunction 3 1 and Yes
CHANGE?jk
ABCY/N
Programming Speed Dials
0114475551234
XYZCOPRINTt01CHANGE?t .LONDONLISTj/SEARCHKPAD/Y/jkkk
GROUP1
Programming Groups
Group
GROUPtttttt1ttttttttDIAL/Ntttttt
Press 32 of the Quick Dial key
Storage Capacity for Telephone Numbers
Dealing with Junk FAX Mail
Precautions Concerning Unacceptable Document Types
Minimum Maxmum 47.2 12.0
Routine Operation
Transmission Procedure at a Glance
Memory Transmission
Routine Operation
A4›A4TRANSMIT
Ten Key Pad Quick Dial Speed Dial
Transmission using the Group key
Roup
You want to send more than 30 pages
FCheck Display Indicator are blinking
Contrast, Resolution, and Halftone Modes
Halftone
SWITCH1010000000
SWITCH000000
Routine Operation
Optional Features for Transmission
Press kand make sure that the display is
Toption
Send Later
Transmission Deadline TRD Feature Expander Required
F1 2 5
Count Immediate Transmission only
FIf you use Page Count FIf you do not use Page Count
KON
Immediate Transmission
Transmission Mode Home Position Adjustment
2 2 2 6 3 and Yes
Using the Stamp
Page
Using the Redial Key
Selecting the Reception Mode
Substitute Reception
SWITCH0000000000
Making a Telephone Call
THANDSETtttttttMODEtttttttttttt
Press the OnHook Dial and Redial key
Answering the Telephone
Phoning and Faxing on the Same Call
Routine Operation
This page is intentionally blank
Transfer Request
Transfer Request
Fber
Storing the ID Code
4363OWNNUMBERPOLLINGSET
Yes Yes and No
Fer broadcasting station Fthen press Yes
Keystroke Programs
Make sure that the machine is in standby
Ttt/Y/Nttt
PressFthe programmed Quick Dial Key
OGRAMCLEAR?08 Y/N
Confidential Transmission
Function 1 2 and Yes
Confidential ID Override Option
ID2567
Auto Document
N08
Transmitop
CLEAR?Y/N
Erasing an Auto Document
Restricting Access to the Machine
Llll
Tttt
Switching on Restricted Access
Tttt
Digit 4Underlined Digit 5Double Underlined
Tonal Signals
112
113
Chain Dialing
115
Closed Network Transmission
Protection Against Wrong Connections
ECM Error Correction Mode and Page Retransmission
Batch Transmission Feature Expander Required
Well Log Transmission
Changing the Batch Transmission On/Off
Confidential Reception Feature Expander Required
Kpad
Tttt
124
Memory Lock Feature Expander Required
LlllLOCKID Kpad
6754
Specifying Which Senders Messages to Lock in Memory
Selecting Which Mesages to Lock in Memory
Printing from Memory Lock Feature Expander Required
Llll
Station.SWITCH000000KPAD/Y/0000jk
Rejection of Messages from Unidentified Senders
Authorized Reception
Advanced Features
SWITCH080000KPAD/Y/0000jk
Forwarding Feature Expander Required
134
RTI/CSI
Editing the Forwarding Feature
SETRTI/CSI?
0000000000
138
Selectline
140
Wild Cards
Reverse Order Printing Feature Expander Required
Multi-sort Document Reception Feature Expander Required
Switching Multiple Sort Document On or Off
Programming the List of Senders to Make Multiple Copies
Selecting Specified Senders for Making Multiple Copies
SWITCH0800000000
Center Mark
Length Reduction
Closed Network Reception
ABCY/N
SET#COPIESY/jk
ABCjk
Polling
Unction 1 5 and Yes
Polling Transmission
FStart
SETPOLLIGID?OPTION
StartF
Advanced Features
Polling Reception
Page
CLEAR?
File Management
FILENO.ttt KPAD/jk
Func ion 5 2
Saving Energy
SETTING?PRNTLISTj Y/j
Night Timer
Programming Procedure
Function 6 2 2 2 2 7 1 and Yes
OFFTIMER#1FROMTUE0900PM∗/#/Y
Temporarily Switching the Heating roller
Counters
Function 6 2 2 2 2 9 4 and Yes
Entering PC Printer Mode Printer Interface Required
Function 3 6 and Yes
KLG
Copying
Dual Access
RDS Remote Diagnostic System
Switching RDS On/Off
AI Short Protocol
Descriptions of the Available Reports
172
Memory Storage Report
Polling Reserve Report
Polling Result Report
174
Switching Reports On/Off
Function 6 2 2 2 2 6 3 a nd Yes
PRNTLISTSETTING?j
Printing a Sample of Data on the Reports
176
Report Formats
Results Column
Code Message Explanation
Descriptions of Available Reports
Reports
180
Paper
Replacingf Toner Cassette and Cleaning PAD
Replacement Procedure
183
Replacing the Stamp
Changing the Paper Size Optional Cassette
Changing the Paper Size Optional Cassette
187
User Maintenance Table of Cleaning
User Maintenance Procedure of Cleaning
190
191
Cleaning the Corona Wire
192
193
Replacing the ADF Roller Assembly and the Separation Pad
194
195
196
Replacing the Photoconductor
197
Looking After the Machine
199
Clearing a Document Jam
Adjusting the Document Feeder
200
201
Cassette Entrance
202
203
Developing area or inside the machine
204
205
206
Communication Problems
207
Standby Mode
208
209
210
211
212
213
214
215
216
217
Glossary
218
219
Index
170
Page
Page
Official Notice to Users
Function List
Certification Label
Stamp
Quick Reference Card
Function
TRD
Programming Quick Dial Speed Dial
Key Stroke Program
Copying
Clear File From Memory
Automatically
Printed Report
Ricoh FAX3700L
Paper Feed Unit TYPE140F
Energy Saving Information
Page
Important Safety Instructions
Making a Telephone Call Answering the Telephone
104
139
132
158
On/Off Switches 168 User Parameter Settings 169
Using Manual Feed with the Removable Cassette Option 186
166
174
Introduction
Some of the Things That this Machine can do
Introduction
HOW to USE this Manual
RTI/CSI
Rady
General Precautions
Cold Weather POWER-UP
Copy Paper
General
Guide to Components
Operation Panel
Speed Dial/Tel
Routine Operation
Condition
Transmission Procedure at a Glance
Scanning Quickly Memory Transmission
Dialfaxnumber
A4→ A4TRANSMIT
Trnsmit
G1DISTRIBUTOR
You want to take out the document
Sending a Page with Very Fine Detail
Contrast
SWITCH0000000000KPAD/Y/jk
SWITCH0000000000
Dialing with the Telephone Directory
Press Speed Dial/Tel Directory
Optional Features for Transmission
ERSONALCODE7362
Time
PAGES?
KON
Dialfaxnumber
Page
Redialing
Automatic Redialing
Using the AI Redial Key
Twice
Receiving FAX Messages
Receiving Fax Messages When There Is a Problem
PRNTLISTj
Onhookmode
Redial
Answering the Telephone
Operation Routine
Advanced Features
Ownno
Storing the ID Code
4363
Kpad
Programming Keystrokes
QUICK/j
Trnsmit
08OGRAMCLEAR? Y/N
Normal Confidential Transmission
Trnsmit OPTIONk
PROGn08.AUTODOCUMENT?Y/N
N08
N08
Restricting Access to the Machine
Using Personal Codes see pages 28, 53, 61,
Code
Tttt
Rady 100%1000AM
PROGRAM?
Quick Dial and Speed Dial see Label Insertion see
Printing Your Personal Identification at the Other End
Closed Network Transmission
Preventing Transfer to a Wrong Connection
ECM Error Correction Mode and Page Retransmission
Batch Transmission Feature Expander Required
Turning Batch Transmission On/Off
Reception
674
Ttt
Locking Incoming Messages Feature Expander required
Tttt
OFF
Llll
Station.000000KPAD/Y/0000jk
Authorized Reception
SELECTLINEY/NEXTk
SWITCH08Terminals
Forwarding Feature Expander Required
RTI/CSI ABCY/N
SETRTI/CSI?
RI/CSI
PRNTLISTj
PRNTLISTSETTING?j
Example
Features
SWITCH0800
Wild Cards
SWITCH100000000000
Multi-copy Document Reception Feature Expander Required
Reception Advanced Features
Multi Copy on/off Digit Result Function
SWITCH020000000010
SETTING?PRNTLIST0000000000KPAD/Y/j Y/jjk
Checkered Mark
0100
Reception Time
Two in One Into
KPAD/Y/jk
RTI/CSI ABC
RT/CSI ABC
ONkOFF
104
Trans Pushstart
TRNSMITDIAFAXNUMBEROPTIONk
Tttt
TTIPRINT?
Dialnextfaxnumber
Continuous Polling Reception
CLEAR?
LISTj/SEARCHk
113
5916+0#SWITCH0500000000
115
NGHTTIMERY/N
0600PM∗
Pritx
Entering PC Printer Mode Printer Interface Required
Function 36 and Yes
Function 3 7 and Yes
Yes, then Function
120
ON/OFF
KLTLG
123
124
125
SWITCH040000
127
There is no facsimile machine at the other end
129
ALLLISTS?
131
Main Cassette
133
134
Changing the Paper Size
Main Cassette and Optional Paper Feed Cassette
End fence Side fence
137
Optional Removable Cassette
138
139
140
141
142
Main Cassette
Optional Lower Cassette
144
145
146
RPLACEPCm
148
PC? Y/N
150
151
152
153
154
155
156
157
158
159
160
161
162
163
164
5551234DIALING
166
167
NEXTk
Optional Paper Feed Cassette required
170
171
172
173
Specifications
Appendix
Appendix
Appendix Installation
178
179
180
181
182
Appendix
184
185
Using Manual Feed with the Removable Cassette Option
Appendix Initial Settings
Initial Settingsappendix
ONkOFF
XYZCOMPANYSETttttttttttttttttttttRTI tttttttttABC
Xyzheadoffice
KTTPD
193
194
PROGRAM?Y/jk
PROGRAMLABEL?
NLABELSET01 kONOFFY/jk
198
Telephone Directory
N01
XYZCOPRINTt01CHANGE?t .LONDONLISTj/SEARCHKPAD/Y/jkkjk
N08
N25
DISTRIBUTORttttttttt
PRINTt
One fax Message at Same Time
206
Glossary
208
Function List
Index
RDS
Page
Page
Official Notice to Users
Certification Label
Supplies
Errata
P70 Wrong
Addition Correct
P143, P152, P153 and P180
Errata
Errata and Additional Information
P169 Errata
174, 205 Errata
Programming Groups/Printing
Go to . Otherwise, press Start Machine stores your message
Label just press No Press Function to finish
Memory Transmission Digit
Ricoh FAX3800L
Feature Expander TYPE100 2M Plus Novell Nest
Table of Contents
116
137
147
On/Off Switches 184 User Parameter Settings 185
Using Manual Feed with the Removable CassetteOption 202
190
191
223
222
Operator Safety
Important Safety Instructions
Tsurugasone YASHIO-SHI SAITAMA-KEN Japan Manufactured
Official Notice to Users
Telephone Line Problems Affect FAX Communication
What does a FAX Machine DO?
Some of the Things That this Machine can do
Introduction Some of the Things That this Machine can do
HOW to USE this Manual
Changed to OFF
Much memory space is remaining
General
Cold Weather POWER-UP
General Precautions Copy Paper
General
Document Table
Operation Panel
User Function Keys
Guide to Components
Minimum Maximum 47.2 10.07 12.0
Condition
Immediate Transmission
Cross-referencesSending at a Specific Time see
Parallel Memory Transmission
Do not use pages of different sizes
Ten Key Pad Quick Dial Speed Dial Handset
Dial in one of the following ways
Routine Operation Sending a FAX Message
Possible Problems
Check Display Indicator are blinking
Cancelling the Memory Transmission
$%&*+,+-%
Sending a Page with Very Fine Detail
Contrast
Sending a FAX Message Routine Operation
Factory setting
Sending a FAX Message
Cross-references
Optional Features for Transmission
Routine
Sending at a Specific Time
Sending by a Specific Time TRD
If you use Page Count If you do not use Page Count
Press or until the displayed setting Is correct
Sending Quickly
Immediate Transmission as Your First Choice
Using the Stamp
Redialing
AI Redial key employs the AI Short Protocol feature
Operation Routine
Receiving Fax Messages When There Is a Problem
Default settings
If you wish to cancel the call
Continue as for a normal telephone con- versation
Answering the Telephone
Operation Routine
Advanced Features
Advanced Features
Storing the ID Code
Press until the opposite display ap Pears
Function 1 3 and Yes
Cross-reference Sending at a Specific Time see
Ready
Program LABEL?
Transmission Program
Free Polling Reception Program
Press Yes To delete the programYes
Sending Confidential Messages
CONFID,L Trans D/STA Dial Next FAX Number
Storing an Often Used Document Auto Docoment
PROG. Auto DOCUMENT? ABC
Transmit
Used AS Auto DOC
Restricting Access to the Machine
Personal Code
Editing or Erasing a Personal Code
Switch 05 0000
Ready 100% 1000AM Personal CODEtttt
Using the Tone Key
Press Quick 29 and Yes
Dialling with the Dial Option Key
Press Quick 29 or Yes
Quick Dial and Speed Dial see page 209. Label Insertion see
Printing Your Personal Identification at the Other End
Closed Network Transmission
Protection Against Wrong Connections
ECM Error Correction Mode and Page Retransmission
Batch Transmission
Well Log Transmission
Receiving Confidential Messages
Reception
Function 5 5 and Yes
##$########
Press until the screen is as shown opposite
No and input a new number
##$########
Programming Special Terminals for Lock in Memory
List of Special Memory Lock on/off Switch 09 Digit7
##$########
Authorized Reception
Switching Authorized Reception On/Off
Reception on/off Digit Result Function Empty
Forwarding
To print a list, press
Type in an RTI or CSI How to enter characters, see
If you do not do this, all incoming messages will be
Forwarded to that station
Wish to use Forwarding, you must switch Memory Lock off
If you want to forward all incoming
Page
RTI and CSI see Wild Cards see
Advanced Features
Choose the setting you need see opposite
102
Reverse Order Printing
Multi-sort Document Reception
Switching Multi-sort Document On or Off
Programming the Special Terminals to Make Multi-sort-copies
Set as shown opposite Finish Yes and Function
Digit 1Double underlined Center mark will not be printed
Digit 4 Double underlined
109
Received Message Half-letter size Printout Letter Size
Letter 14.4 Legal 15.7 For option cassette
Cross-referencesID Codes see
At this time, you can print a Pro
114
Both features are available
Message Transmitter Message Receiver
Free Polling
Function 1 4 and Yes Start
Secured Polling
Stored ID Override
119
Advanced Features
Operating Procedure
Stored ID Override Option
Function 2 3 and Yes
User Function Keys
User Function Codes
Function 3
Yes Function
Using a Function Program
Printing a File
Deleting a Function Program
Yes, No and Yes
126
#########
128
##∗
###∗
131
Function 3 8 end Yes
Possible, Impossible
134
Cross-referencesQuick Dial and Speed Dial see
Cross-references
Journal
138
Journal
Procedure
Example 2. Journal
Journal APR 28 1995 1140AM
Footnote on the Journal
User-Initiated Reports
Program List
Press Function 4 4 and Yes Start
Programmed Special Numbers List Special Terminals
Programmed Special Numbers List Forwarding
Quick Key Label List
Optional Lower Cassette
Machine
148
149
150
151
152
153
154
155
156
157
158
159
160
Looking After the Machine
162
Or toner may spill out
164
165
166
Open the operation panel
168
Problems
170
Pull out the jammed paper carefully
172
Solving Problems
Communication Problems
Problems
176
177
Themachine
Solving Problems
180
Function 6 2 2 2 2 7 3 and Yes Start
182
Reference Technical
184
Optional Cassette required
186
Digit 5 Digit 4 Setting
Switch 07 Various
Lock all messages except those from
Scanning Speed
Data Compression
Maximum Printing Width Speed
Appendix Installation and Initial Settings
Attaching the Document Table and Document Tray
Nstalling
194
Line
Phone Company’s Jack
Loading the Paper in the Cassette
Appendix Loading the Paper in the Cassette
Installing Removable Cassette and Loading Paper Option
199
200
Appendix Attaching the Optional Handset
Using Manual Feed
Appendix Some Items Must be Programmed First
Some Items Must be Programmed First
Use the and arrows on the scroll key
Press until the screen is as shown Opposite Press Yes
207
Pulse Dial or Tone Dial
Press Function, 6 2 2 2 2 6 1
Appendix Quick DIAL, Speed DIAL, and Group Dial
Broadcasting
Example Quick Dial
Keys to scroll through the Quick Dial Keys on the screen
Edit another Go to step Finish Function
Programming Speed Dial
Printing Quick Dial List or Quick Key Label
Telephone Directory
Cross-reference
Inputting and editing labels see
For how to edit See
Programming Group Dial
218
Not programmed into a Quick Dial Key You don’t have to do it
220
221
222
223
224
ITU-T
225
Scanner Mode
Make sure that the machine is in standby mode
Programming Quick Dial Speed Dial
Report
Pcfe Required, **Printer Interface Required
Index
Reception Time 109
Page
Page
September