Operator
USA
Domestic/Household Environment
Product Recycling and Disposal
European Union
Professional/Business Environment
DocuTech 128/155/180 HighLight Color Operator Guide
Table of Contents
Problem Solving
Technical information
Service and supplies
DocuTech 128/155/180 HighLight Color Operator Guide
Introduction
Conventions
System safety
Laser safety
Ozone safety
Operation safety
European Union declaration of conformity
Safety notices
Electricity at Work Regulation UK
Regulation
Check your understanding
Equipment in my premises
Would like to carry out my own safety tests on the Xerox
Additional queries
Require records of all tests
Safety notices
Electronic reprographics process
DocuSP controller DocuTech Printer
Functional overview
Optional Components
Data stream resolution
Data formats supported
Paper weights
Stock specifications
Special stocks
General paper characteristics
Graphical user interface overview
Input queue
System software and job flow
Job
Decomposer
Printer overview
Output queue
Printer
High volume printer
Feeder/paper tray High volume printer
Ready to Open
Indicator
Trays 3, 4, 5, and 6 high-capacity trays 2600 sheets each
Please Wait
Sample tray
Purge tray
Inverter feeder/stacker
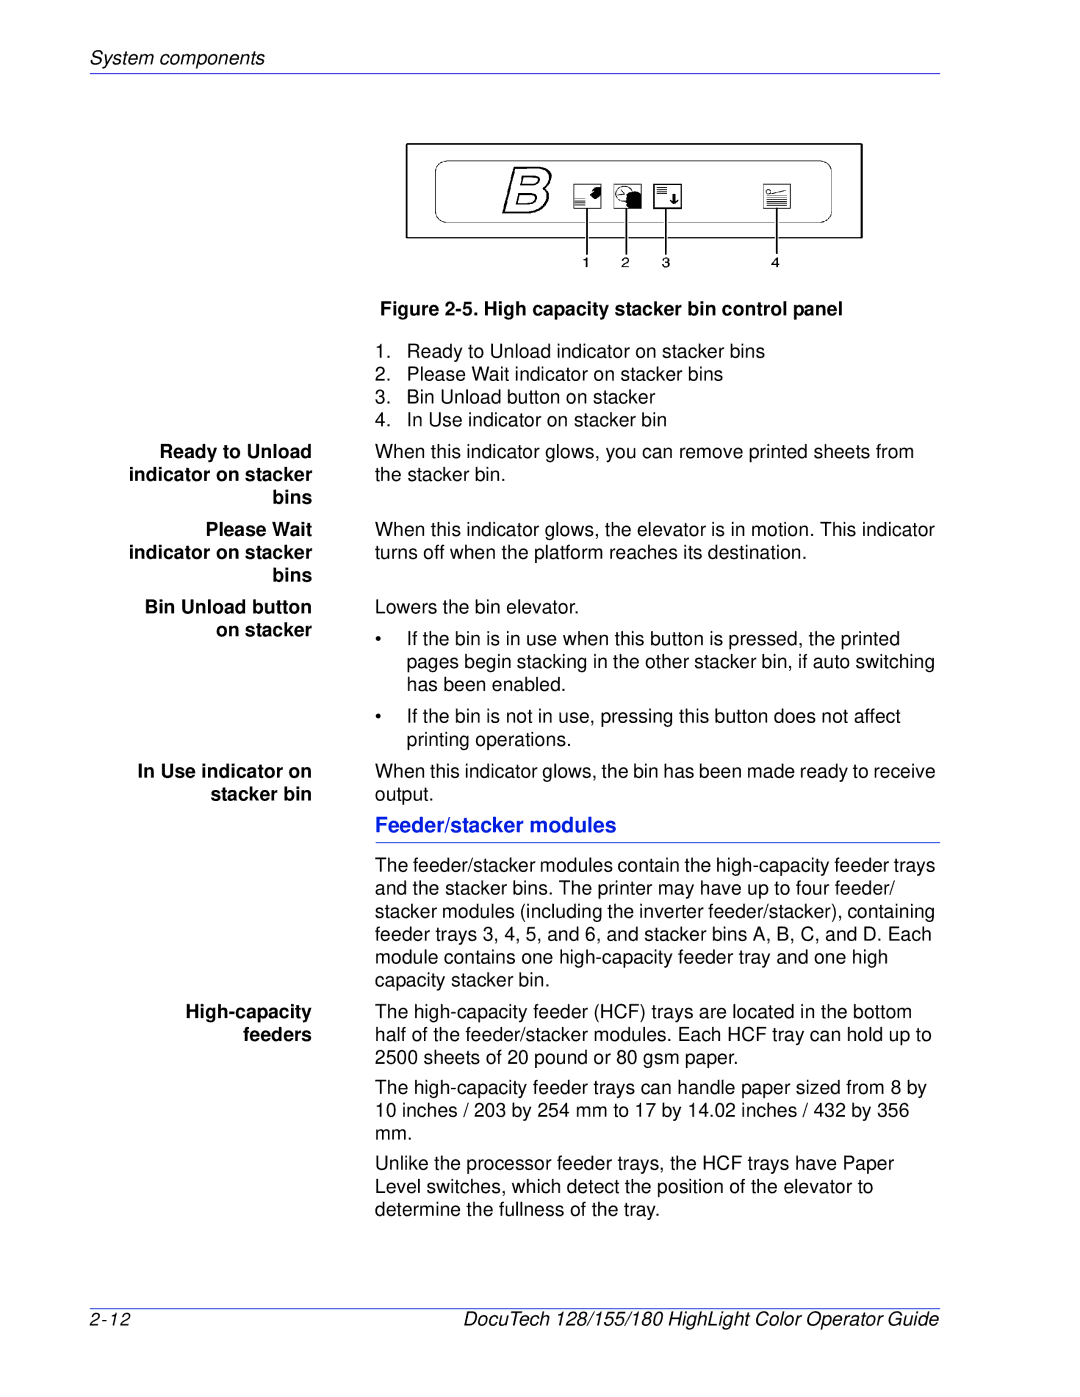
On stackers
Feeder/stacker modules
More High volume printer configurations
Production publisher
Convenience tray
Interposer
Interposer production publisher only
Finisher
Bindexer
Stitcher
Top tray
Stacker
Binder
Bypass transport
Bypass transport on the production publisher
Bypass transport on the High volume printer
By 10 inch enablement kit
Paper paths
High volume printer paper path
11. Route of paper through the high volume printer
System components
Production publisher paper path
Bypass transport paper path
High volume printer bypass transport paper path
DocuSP controller
System
System Hardware
Controller overview
Tape drives overview
Accessing DocuSP remotely Remote Workflow
Moving the controller
Do not
Peripheral cabinet 9-track and 18/36-track tape drives
14 -track cartridge tape drive
Paper sizing and print speed
15. Peripheral cabinet
System components
System components
Cleaning and maintenance overview
Necessary Precautions
Finisher precaution
Routine maintenance
Paper
Storing paper
Recommended temperature and humidity for Paper storage
Conditioning paper
Paper curl
Paper conditioning
Adding paper to tray 1 or
Preparing the paper tray
Using the custom transfer assist blade
Positioning the stack
Paper Size Set Paper Size
Adjusting for paper curl
Measuring the paper curl
Move green Decurler lever
Adjusting the decurler lever
Locating the decurler lever
Maintaining the printer
Replacing the black dry ink bottle
Replace the black dry ink bottle
Removing the empty bottle
Replacing the highlight color container
10 Removing the paper seal
11 Highlight color container
Removing the CCU using the CCU cart
Changing the highlight color Customer Changeable Units
12 Leveling the cart
13 Unlatching the CCU
Inserting a CCU
15 Closing the top cover
17 Turning the backup roller handle Counterclockwise
Removing the CCU using the service stand
Storing the cart and CCU
19 Unlatching the CCU
Adding fuser shield
20 Removing the CCU from the printer
21 Opening the fuser drawer
22 Preparing to add fuser blend
23 Adding the fuser blend
Waste containers
Replacing the 128/155/180 HLC developer waste container
Replacing the 128/155/180 toner waste bottle
26 Opening the HLC module door
27 Flat cap on waste bottle
Wire Module Removal and Replacement
29 Wire module retainer springs
Routinemaintenance
Cleaning the system and its components
Cleaning the 18/36-track cartridge tape drive
Cleaning the 26-track cartridge tape drive
Cleaning the DVD drive
Cleaning the diskette drive
Cleaning the sensors and the reflecting surfaces
Cleaning the Q850 and Q861 sensor
30 Area 4 and green handle
Cleaning the Q1011/1009 sensor and mirror
Cleaning the Q1106 and Q1166 sensors
Cleaning the Q1107 sensor
33 Q1106 and Q1166 sensors
Cleaning the Q1164 sensor
34 Q1107 sensor
Cleaning the display
Cleaning the exterior surfaces of the system
Clearing or cleaning the finisher sensors
Clearing the Q1201 sensor
Clearing the Q1202 and Q1203 sensors
37 Locating the Q1201 sensor
38 Locating the Q1202 and Q1203 sensors
Cleaning the Q1222 and Q1210 sensors
40 Locating the Q1222 and Q1210 sensors
Clearing the Q1205, Q1206, and Q1207 sensors
41 Locating the Q1222 and Q1210 sensors
Clearing the Q1213 sensor
42 Locating the Q1205, Q1206, and Q1207 sensors
Clearing the Q1221, Q1218, and Q1227 sensors
43 Q1213 sensor
Cleaning the binder
44 Locating the Q1221, Q1218, and Q1227 sensors
45 Opening the binder drawer
Cleaning the binder tape guides
Cleaning the binder platen
Cleaning the flappers
48 Cleaning the binder platen
Cleaning the calipers
49 Cleaning the flappers
Closing the binder
Replacing the stitcher spool a
51 Releasing the stitcher head
52 Removing the stitcher wire plug
53 Removing the wire from the tubing
55 The measuring bracket
57 Replacing the pin
58 Removing the paper wrapper
Storing the binder tape reels
60 Storing binder tape in a cool, dry place
Replacing the binder tape reel
62 Opening the binder drawer
63 Removing the tape
65 Locking the reel
67 Threading the tape to the pressure roll
Adjusting the binder tape registration
69 Cutting the tape
70 Locating the binder tape knob
71 Adjusting the tape position up
Routine maintenance
How problems are displayed
Printer faults and fault windows
Resolving a processor problem
When a fault occurs
Resolving a processor problem
ProblemSolving
Sheets from the fuser
ProblemSolving
Solving print quality problems
Clearing paper jams
Checking job integrity following a paper jam
Area
Area
Area
Area
Using the pinch lever to access area
10 Area 11 all feeder/stackers
11 Area 12 all feeder/stackers
Clearing paper jams in the Feeder/Stackers
12 Area
14 Area
15 Area
16 Area
Clearing a paper jam in the bypass transport
17 Area
18 Area
Clearing a misfeed feeder tray fault
19 Area
ProblemSolving
Incorrect paper size message
Interposer problems
Finisher problems
Resolving a finisher problem
Resolving a finisher problem
Binder tape fault
Stitcher spool a fault
23 Stitcher head release handle
24 Removing the stitcher wire plug
25 Cutting the wire
27 Removing the wire fragments
Customer Support Center
Checking paper curl
29 Location of printing system serial number
Problem Solving
Paper tray capacities
DocuTech printer specifications
Printer rates
All trays
Technical information
Top tray
Additional paper capacities
Inverter
Stacker
Improving the feeding reliability
Printer satisfaction guides
Stock storage
Stitches per spool
Stock satisfaction guides
Satisfaction guide for paper trays 1
Satisfaction guide for paper trays 3, 4, 5,
Using various stocks
Satisfaction guide for 2-sided printing
Satisfaction guide for various stocks
Stock Type Instructions for use
Technicalinformation
Using non-standard stock
Stock width impact on system performance
Paper stock rotation
Background
Stock length impact on system performance
Limitations
Common US paper sizes
Other paper sizes that can be rotated
Finisher satisfaction guides
10. Stacker capacity
11. Stitcher satisfaction guide
11. Stitcher satisfaction guide
12. Binder satisfaction guide
13. Top tray satisfaction guide
13. Top tray satisfaction guide
Xerox support services
Customer support
Supplies service
Operator training
Service and supplies
Routine maintenance
Meter reading and reporting
Consumable supplies table
Consumable supplies
Transparencies
Labels
Gummed
Black
Stitcher Wire
Cleaning
Wire Modules
Royal Blue
Supplies checklist
Description Quantity Date of order Ordered