Facsimile Guide
ImageRUNNER 2010F Facsimile Guide
Manuals for the Machine
How This Manual Is Organized
Appendix
Contents
Additional Sending Features
Basic Sending
Memory Features
Receiving Documents
Using Polling
Relay Broadcasting
Confidential Mailboxes
Special Fax Features
Dual Line Functions Optional
Printing Reports and Lists
Troubleshooting
Summary of Important Settings
Appendix
How to Use This Manual
Symbols Used in This Manual
Keys Used in This Manual
Illustrations Used in This Manual
Xii
Users in the U.S.A
Legal Notices
FCC Federal Communications Commission
Location
Power Requirements
Xiv
Case of Equipment Malfunction
Users in Canada
Xvi
Xvii
Utilisation au Canada
Emplacement
Installation téléphonique
Condition dalimentation
Remarques
Xix
Trademarks
Copyright
Disclaimers
Before You Use the Fax Functions
Main Features
Overview of the imageRUNNER 2010F
Monitoring Transactions and Checking Settings
Additional Functions with Optional Equipment Installed
Control Panel Parts and Functions
Alarm lamp
Direct TX indicator
Main Power indicator
Special Features key
Stack Bypass Settings key
Delayed Transmission key
Speaker volume switch
Advanced Communication key
Things You Must Do Before Using This Machine
Connecting the Telephone Line
Additional Functions 1 Press Additional Functions
Setting the Telephone Line Type
Press F3 or F4 to highlight 03 FAX Settings
Press OK
Press F3 or F4 to highlight 01 TEL Line Settings press OK
Press Reset to return to the Fax Basic Features screen
Press F3 or F4 to highlight 02 TEL Line Type Press OK
Setting the Current Date and Time
Press F3 or F4 to highlight 05 Timer Settings
Setting press OK
Enter two digits for the year
Time enter the current date and time using the numeric
Keys
Examples
Registering the Required Sender Information
If the TX Terminal ID is set to ‘INSIDE IMAGE’
Fax Number
Registering This Machine’s Fax Number
Date and Time
Unit’s Name or Sender’s Name
Settings press OK
Press F3 or F4 to highlight 01 User TEL no
Use the numeric keys to enter your fax number press OK
Registering the Unit’s Name
Press F3 or F4 to highlight 02 Unit Name
Enter the unit’s name using the numeric keys press OK
Registering the Sender Information TX Terminal ID
Press F3 or F4 to highlight the transmission type
Press F3 or F4 to highlight 01 on press OK
If you selected 01 TTI Position
If you selected 02 TEL Number Mark
Registering Sender Names
Press F3 or F4 to highlight 01 User Settings press OK
Press F3 or F4 to highlight 02 Personal Settings press OK
Press F3 or F4 to highlight 01 Sender FAX Number press OK
Press F3 or F4 to highlight 02 Mail Account Press OK
If you selected 01 User TEL Number
If you selected 02 Other FAX Numbers
Press Reset to return to the Fax Basic Features screen
Registering the Sender’s Fax Number
Press F3 or F4 to highlight 05 Sender FAX Number press OK
Speed Dialing
Overview of Speed Dialing Methods
Press Additional Functions
Setting Up Speed Dialing
One-Touch Speed Dialing
Press F3 or F4 to highlight 04 ADD
Press F3 or F4 to highlight 01 TEL# Registration press OK
Press F3 or F4 to highlight 01 TEL Number Entry press OK
Enter the name of the destination up to 16 characters
Including spaces press OK
Press F3 or F4 to highlight 02 Name press
Display for entering the destination name appears
Press F3 or F4 to set the desired optional setting
Description
If you want to set an access code
TX Time Setting
If you want to select the transmission type
Speed Dialing
If you want to select an international calling setting
If you want to turn the Error Correction mode on or OFF
If you want to select a transmission speed
Speed Dialing
Registration press OK
When you are finished registering numbers for one-touch
Coded Speed Dialing
If you want to select a sender name
Press F3 or F4 to highlight 02 Coded SPD Dial Press OK
Entry press OK
Display for entering the fax number appears
Press F3 or F4 to highlight 01 OFF or 02 on
Press F3 or F4 to set the desired optional setting press OK
GHI JKL MNO PRS TUV WXY Oper Symbols ABC
18Setting Up Speed Dialing
If you want to select an international calling setting
20Setting Up Speed Dialing
When you are finished registering numbers for coded speed
Group Dialing
Press F3 or F4 to highlight 03 Group Dial
Create a group dial
To create a group under a one-touch speed dialing key
Press F3 or F4 to highlight 01 Destination TEL/ ID press OK
To create a group under a coded speed dialing code
F4OK
Repeat until you finish entering all the numbers you
Want to include in the group press OK
Group press OK
OK. The display returns to the Group Dial menu to continue
Press F3 or F4 to highlight 03 Optional Setting press OK
Or F4 to highlight 02 on press OK
Registering the group
Dialing
Access Code Dialing
Press F3 or F4 to highlight 05 Access Code press OK
Press F3 or F4 to highlight 01 Access Code KEY press OK
Press F3 or F4 to highlight 02 no of Characters press OK
Using Speed Dialing
Press FAX
Place your documents on the machine
Press Start to scan your documents immediately
Number of the key you want, open the first or second one
Touch speed dialing panel to see more keys
Desired one-touch speed dialing key. If you do not see
Press Coded Dial
Correct code
Press the one-touch speed dialing key, or Coded Dial
Numbers you want to dial is registered
Directory Dialing
Press Directory
Press the access code key you have set using the numeric
If you have set # as the access code key, press
Press Start
38Using Speed Dialing
Basic Sending
Flow of Fax Sending Operations
If the message Insert a Control Card appears
If the message Enter Department ID and Password appears
Place your original
Select the desired fax sending modes
Specify the destination
If you have set Department ID Management, press ID
Placing Originals
Platen Glass
Feeder
Orientation
Vertical Placement Horizontal Placement Feeder
Vertical Placement Horizontal Placement
Platen Glass
Platen Glass
Lift up the feeder
Place your original face down
Gently lower the feeder
Feeder ADF-J1
Adjust the slide guides to fit the size of your originals
Original Output Tray
Adjusting the Resolution, Density, and Image Quality
Resolution
Place you documents on the machine
Density
Image Quality
Press F1 RESOLUTION, F2 DENSITY, or
Press
Selector
Sending a Document with a Sender Name
Open all three one-touch speed dialing panels press TTI
Press F3 or F4 to highlight the desired sender’s
Specify the destination press Start
Document Stamp Feature
Setting the Stamp Feature
Press F3 or F4 to highlight 03 TX Settings press OK
Press F3 or F4 to highlight 06 Stamp Action press OK
Open all three one-touch speed dialing panels press Stamp
Turning ON/OFF the Stamp Feature
Place your documents in the feeder
Stamp
20Document Stamp Feature
Sending Methods
Book Sending
Place your document face down on the platen glass
Press F4 Book Sending to select the document size press OK
After scanning all the pages you want to send, press OK
Memory Sending
24Sending Methods
Direct Sending
Press Direct TX
26Sending Methods
Using Regular Dialing
Dial the other party’s fax number using the numeric keys
Number you enter appears on the display
Machine starts scanning and sending the document
Redialing When the Line Is Busy
Automatic Redialing
Press F3 or F4 to highlight 03 Auto Redial
Press F3 or F4 to highlight 03 TX Settings
Adjust the auto redial settings to suit your needs
OK. Proceed to step
If you want to resend a document after an error occurs
If you want to set the redial interval
Press Monitor F1 TX/RX Result
Following screen is displayed
If you are sending a document using Direct Sending
Manual Redialing
Press Pause/Redial
During transmission, press Stop
Canceling Send Jobs
Canceling Transmission
Press F3 YES
Press Monitor
Canceling Automatic Redialing or Memory Sending
Want to cancel F4 Delete Docmt
Press F1 TX/RX Result
Press F3 or F4 to highlight 01 DOC. Memory List press OK
You can cancel the sending job by pressing
Checking Transaction Results
To check the detailed information
Press F1 RX/TX Status
40Checking Transaction Results
Additional Sending Features
Transmission Settings
Setting Up the ECM for Sending
Press F3 or F4 to highlight 01 on or 02 OFF
Features
Press F3 or F4 to highlight 01 ECM TX press OK
Additional
Pause Time
Press F3 or F4 to highlight 02 Pause Time press OK
Automatic Document Deletion after a Failed Transmission
Time Out Mode
Press F3 or F4 to highlight 05 Time OUT press OK
Press F3 or F4 to highlight 01 on or 02 OFF press OK
TX Rotation
10Transmission Settings
Sequential Broadcasting to More Than One Location
To enter fax numbers using one-touch speed dialing
To enter fax numbers using coded speed dialing
To enter fax numbers using regular dialing
Printing the Multi TX Report
Report function
Sending Documents at a Preset Time
Enter the time using the numeric keys press OK
Specify the destinations
Scanning starts
Enter the time in 24-hour notation e.g., 1p.m. as
Setting a Delayed Transmission During a Sending Operation
During a sending operation, press Delayed Transmission
Enter all the numbers, including zeros
Checking and Canceling a Delayed Transmission Setting
Sending a Document with a Subaddress/Password
Press F3 or F4 to highlight 04 Subaddress Press OK
Additional
Press F3 or F4 to highlight 05 Password Press OK
Display for entering the subaddress appears
Enter the ITU-T password using the numeric keys press
Press Start
Setting Up and Using PIN Codes
Setting a PIN Code
If your PBX always requires PIN code entry, press F3 or
Press F3 or F4 to highlight 08 PIN Code press OK
Press F3 or F4 to highlight 02 on press OK
F4 to highlight 02 on
Dialing with a PIN Code after a Number
Press Stop to return to the Fax Basic Features screen
Enter the telephone number using the numeric keys
Originals, on p
Enter the PIN code up to 20 digits using the numeric keys
Dialing with a PIN Code before the Number
PIN code is not displayed as it is entered
Enter the telephone number using the numeric keys press
Setting PIN Code Access for Speed Dialing
Code enter the telephone number using the numeric keys
Using Speed Dialing with PIN Code Access
Press a speed dialing key
Forced PIN Code Access
Dial the telephone number using the numeric keys or
Speed dialing keys
Transmission starts
Receiving Documents
Receiving Documents
Available Paper Sizes
Available Paper Sizes for Received Documents
Receiving Documents into Memory
Received document is printed
Receiving Documents
Receive Settings
Setting the ECM for Receiving
Press F3 or F4 to highlight 04 RX Settings press OK
Press F3 or F4 to highlight 01 ECM RX press OK
Press F3 or F4 to highlight 04 RX Settings
RX Page Footer
On 1 Mode
Press F3 or F4 to highlight 01 OFF or 02 on
RX Settings menu appears
Press F3 or F4 to highlight 03 2 on 1 press
Documents
Printing Received Documents
Number of Copies
Press F3 or F4 to highlight 05 Printer
To 99 press OK
Printing Methods
Press F3 or F4 to highlight 01 # of RX Copies
Press F2 or F3 + to enter the number of copies from
12Printing Received Documents
Press F3 or F4 to highlight 05 Printer Settings press OK
Press F3 or F4 to highlight 02 Select Drawer Press OK
Press F3 or F4 to highlight a drawer press OK
Printing in Reduced Form
Press F3 or F4 to highlight 03 RX Reduction press OK
If you selected 02 OFF
If you selected 01 on
If you selected 01 Auto Selection
If you selected 02 Fixed Reduction
When the Machine Runs Out of Toner
LOW press OK
Press Reset to return to Fax Basic Features screen
Transfer Box Settings Table
Description Setting
Transferring Documents
Creating a Transfer Box
Press F3 or F4 to highlight 05 Transfer press OK
Press F3 or F4 to highlight 06 File Settings press OK
Press F3 or F4 to highlight 01 Setup File
Press F3 or F4 to highlight 01 File Name press OK
To 24 characters press OK
Enter a name for the transfer box using the numeric keys up
Specify the destinations using speed dialing
Press F3 or F4 to highlight 02 Select
Display for entering the password appears
Press F3 or F4 to highlight 03 Password
Enter a password up to seven digits using the numeric keys
Unit press OK
Press F3 or F4 to highlight 01 Start Time press OK
Press F3 or F4 to highlight 05 Time Setup press OK
Press F3 or F4 to highlight 01 OFF or 02 on press OK
If you selected 01 OFF
If you selected 01 Everyday
If you selected 02 Select Days
26Transferring Documents
Print RX DOC. menu appears
Press F3 or F4 to highlight 05 Transfer
Changing Transfer Box Settings
Press F3 or F4 to highlight 06 File Settings
Press F3 or F4 to highlight 02 Change Data
Deleting a Transfer Box
Password of the transfer box using the numeric keys
Change the settings
If the message Enter AN ID Number is displayed, enter
Press F3 or F4 to highlight 03 Delete File
Appears. Proceed to the next step
Is deleted. Proceed to step
Using a Transfer Box
Create a transfer box for document transfer
32Transferring Documents
Memory Features
Memory Lock for Received Documents
Press F3 or F4 to highlight 07 System
Press F3 or F4 to highlight 01 Memory Lock RX Press OK
Press F3 or F4 to highlight 02 Report press
Enter the memory lock password up to seven digits using
Numeric keys press OK
Output no press OK
Time Setup menu appears
6Memory Lock for Received Documents
Until the Time Setup menu appears
14 To finish setting the Memory Lock start time, press Back
Press F3 or F4 to highlight 02 END Time press OK
Turning Memory Lock ON/OFF Using the Memory Reception Key
Follow the procedure in to set the Memory Lock end
Time Press Reset to return to the Fax Basic Features screen
Memory Features
Open all three one-touch speed dialing panels press Report
Checking Documents Stored in Memory
Printing a List of Documents in Memory
Press F3 or F4 to highlight 04 DOC. Memory List press OK
List press OK
Memory Reference
Press F3 or F4 to highlight 01 DOC. Memory
Memory Reference menu appears on the display
Resending a Document after an Error
Printing a Document Received in Memory
Memory Reference menu appears
Press F3 or F4 to highlight 02 Memory
Press F2 or F3 to highlight the document you want
To resend press OK
Press F3 or F4 to highlight 04 Resend
To send to another destination press OK
Deleting a Received Document from Memory
Press F3 or F4 to highlight 05 Delete
To delete press OK
Using a Memory Box
Storing Documents in a Memory Box
Press F3 or F4 to highlight 01 Polling press
Press F3 or F4 to highlight the sending feature for
Advanced Communication
Memory box to be used press OK
Printing/Deleting Documents from a Memory Box
Press F3 or F4 to highlight the sender’s name
To print the document
To delete the document
If you are asked to enter the memory box password, use
Numeric keys to enter the password press OK
22Using a Memory Box
Relay Broadcasting
What Is Relay Broadcasting?
Setting Up Your Machine as a Relay Unit
Relay Broadcasting Memory Box Settings Table
Subaddress
Creating a Relay Group
Press F3 or F4 to highlight 01 Setup File press OK
Press F3 or F4 to highlight 02 Relay TX Group Press OK
Press F3 or F4 to highlight 01 Group Dial Name press OK
Highlight 02 Password press OK
Enter a name for the relay group up to 24 characters using
If you want to set a password, press F3 or F4 to
Display for entering a password appears
If you selected 01 Subaddress
If you selected 02 Senders FAX no
If you selected 03 Mail Address To
Press F3 or F4 to highlight 05 Select Orig Unit press OK
Display returns to the Setup File menu
Press F3 or F4 to highlight 07 Select
Specify the destinations registered under one-touch speed
Dialing keys or coded speed dialing codes press OK
Or 02 Transmit press OK
Press F3 or F4 to highlight 01 do not Transmit
When you are finished setting the TX start times, press
If you want to set a preset time for your documents to be
Press F3 or F4 to highlight a preset time number
Relayed, press F3 or F4 to highlight 09 TX Start
Press F3 or F4 to highlight the 10 Relay Bcast
Changing Relay Group Settings
Group number whose settings you want to change press
Password for the relay group using the numeric keys
Change the desired relay TX group settings
Procedure described in Creating a Relay Group, on p
Deleting a Relay Group
Relay TX group password using the numeric keys press
You want to delete press OK
Selected relay group is deleted
Using Relay Broadcasting
Create a memory box for relay broadcasting on your machine
Sending a Document to a Relay Unit for Relay Broadcasting
Sending a Document to a Relay Unit with Speed Dialing
Sending with the Advanced Communication Key
Press F3 or F4 to highlight 03 Relay press OK
Press Advanced Communication
Enter the ITU-T subaddress required to start the relay
Keys press OK
Otherwise, proceed to step
Enter the ITU-T password using the numeric keys press OK
Confidential Mailboxes
What Is a Confidential Mailbox?
Setting Up a Confidential Mailbox
Confidential Mailbox Setting Table
Creating a Confidential Mailbox
Press F3 or F4 to highlight 01 Confidntl Mailbox press OK
Display for entering the desired mailbox number appears
Or F4 to highlight 02 Password press OK
Using the numeric keys press OK
If you want to set up a password for your mailbox, press F3
Press F3 or F4 to highlight 01 File Name
To set a subaddress, press F3 or F4 to highlight
Enter an ITU-T subaddress up to 20 digits using the numeric
Subaddress press OK
Display for entering an ITU-T subaddress appears
Documents in your mailbox, press F3 or F4 to
Highlight 04 RX Password press
Or F4 to
Highlight 05 # of RX Copies press OK
Mailbox press OK
Press Additional Functions press F3 or F4 to
Password for the confidential mailbox using the numeric
Change the desired mailbox settings
Mailbox whose settings you want to change press OK
Procedure described in Creating a Confidential Mailbox, on p
Deleting a Confidential Mailbox
You can also use the numeric keys to enter the number
Confidential mailbox password using the numeric keys
Mailbox you want to delete press OK
Selected mailbox is deleted
Using a Confidential Mailbox
Create a confidential mailbox on your machine
Receiving a Confidential Document
Press F3 or F4 to highlight 02 Confidential RX Press OK
Sending a Confidential Document
Sending a Confidential Document with Speed Dialing
Sending a Confidential Document
Specify the destination using the numeric keys press OK
Press F3 or F4 to highlight 01 Confidential TX Press OK
Press F3 or F4 to highlight 05 Password
Confidential documents on the other party’s fax machine
Enter the ITU-T password using the numeric keys press
Using Polling
What Is Polling?
Before You Use Polling Receiving
Polling Receiving
Open all three one-touch speed dialing panels press
Press F3 or F4 to highlight 01 Polling press OK
Press F3 or F4 to highlight 02 Polling RX press OK
Specify the destination press OK
After entering the fax number of the party you want to poll
If an ITU-T password is required, proceed to step
Press F3 or F4 to highlight 04 Subaddress
CommunicationPress Advanced Communication
Enter the ITU-T password up to 20 digits using the numeric
Display for entering the ITU-T password appears
Polling Receiving with a Subaddress/Password
10Polling Receiving
Enter the ITU-T password up to 20 digits using the numeric
Polling to Receive at a Preset Time
Preset Time Polling Box Settings Table
Creating a Preset Time Polling Box
Press F3 or F4 to highlight 03 FAX Settings press OK
Press F3 or F4 to highlight 03 Preset Polling Press OK
Enter a name for the polling box up to 24 characters using
F3 or F4 to highlight 02 Password press
F3 or F4 to highlight 04 Start Time press
Highlight 03 Select Locations press OK
Dialing keys press OK
To specify select locations to poll, press F3 or F4 to
If you select 01 Everyday
If you select 02 Select Days
Changing Preset Time Polling Box Settings
Using the numeric keys. press OK
Password using the numeric keys press OK
Press F3 or F4 to highlight 03 Preset Polling
Press F2 or F3 + to enter the number of the preset
Polling box whose settings you want to change press OK
Deleting a Preset Time Polling Box
Change the desired preset polling box settings
Selected preset polling box is automatically deleted
Press F3 or F4 to highlight 03 Delete File press OK
Polling Box Settings Table
Polling Sending
Creating a Polling Box for Sending Documents
Press F3 or F4 to highlight 04 Polling BOX
Display for entering the polling box number appears
Enter a password up to seven digits using the numeric keys
Display for entering a password for the polling box appears
Display for entering a TX password appears
If you want to set a TX password for polling sending, press
Enter a TX password up to 20 digits using the numeric keys
F4 to highlight 03 Subaddress press OK
If you want the document erased from memory after
Machine has been polled and sent the document, press F3
Press F3 or F4 to highlight 04 Polling BOX press OK
Press F3 or F4 to highlight 02 Change Data press OK
Change the desired polling box settings
Data menu appears
Press F2 or F3 + to enter the number of the poling box
Automatically deleted
Press Reset to return to the Fax Basic Features screen
Using a Polling Box for Sending Documents
Store the document to be polled into the polling box
Special Fax Features
10-1
Using Tone Dialing on a Pulse Line
Information service
Use the numeric keys to enter the numbers requested by
Program One-Touch Keys
List of Available Functions
10-3
Setting Up a Program One-Touch Key
Memory Reference
Press F3 or F4 to highlight 07 Prog -TOUCH KEY press OK
Press F3 or F4 to highlight 02 USE press OK
10-5
Press F3 or F4 to highlight the desired function press OK
Setting the TX/RX Start Speed
10-7
TX Start Speed or RX Start Speed menu appears
Adjusting the Scanning Density
10-9
Press F3 or F4 to highlight 06 Density Control press OK
If you select 01 Light
If you select 02 Standard
If you select 03 Dark
10-11
Setting the RX Password
RX Password menu appears
Press F3 or F4 to highlight 02 RX Password
Enter the RX password up to 20 digits using the numeric
10-13
Confirming the Other Party’s Fax Number
Press F3 or F4 to highlight 03 Phone NO. Check press OK
10-15
Changing the Fax Default Settings
Press F3 or F4 to highlight 04 FAX Default press OK
10-17
Scan Density menu appears
10-19
TX Mode menu appears
10-21
10-22Changing the Fax Default Settings
Dual Line Functions Optional
11-1
Connecting the Telephone Lines to the Machine
Setting Up Line 2 for Fax Transmissions
Registering Your Telephone Number
11-3
Press F3 or F4 to highlight 02 Line 2 press
Selecting the Dialing Mode
11-5
Press F3 or F4 to highlight 02 Line 2 press OK
Changing the Start Speed
11-7
Or 04 RX Start Speed press OK
Speed press OK
11-9
Line Selection When Sending a Fax
Press F3 or F4 to highlight 01 User Settings
Selection press OK
Press F3 or F4 to highlight 01 Auto or 02 MAN. press OK
If you select 01 Auto
If you select 02 MAN
11-12Line Selection When Sending a Fax
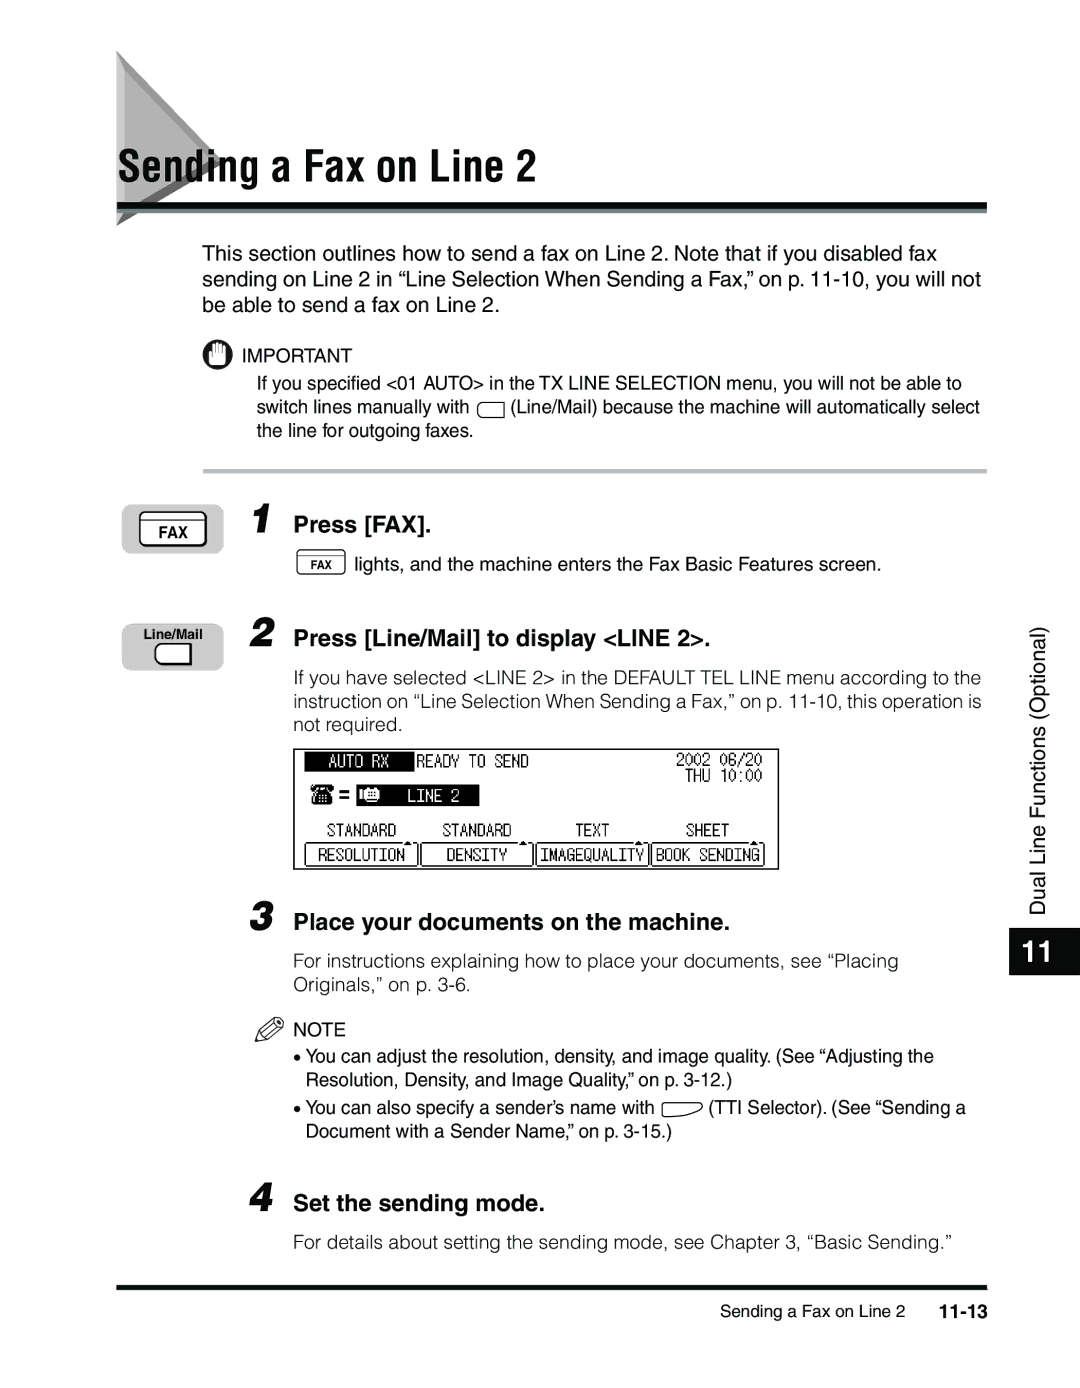
Press Line/Mail to display Line
Set the sending mode
Sending a Fax on Line
11-13
Cancel an Outgoing Fax
Wish to cancel press F4 Cancel
Press F2 or F3 to highlight he transmission you
Cancel an Incoming Fax
Receiving a Fax on Line
11-15
11-16Receiving a Fax on Line
Printing Reports and Lists
12-1
Setting Reports to Print Automatically
TX Reports
Press F3 or F4 to highlight 01 TX Report press OK
Press F3 or F4 to highlight 02 Report Settings press OK
If you have highlighted 02 Print Error only or
Output YES in , press F3 or F4 to highlight
RX Reports
Press F3 or F4 to highlight 02 Report
Confidential RX Reports
Press F3 or F4 to highlight 02 RX Report
12-5
Press F3 or F4 to highlight 03 CONFID. RX Report press OK
Activity Reports
12-7
Press F3 or F4 to highlight the item you want to set
To select 01 Auto Print
To select 02 Daily Report Time
To select 03 TX/RX Separate
Press OK
12-9
Printing the Activity Report
Printing the Confidential Reception List
Press F3 or F4 to highlight 05 CONF. Mailbox List press OK
12-11
Printing the List of Fax Settings
Group Dial List
To print the user data list
Press F3 or F4 to highlight 08 Print Lists press OK
Press F3 or F4 to highlight the list you want to print
12-13
To print the group dialing list
To print the department information list
To print the access code list
To cancel printing of lists
12-15
Press F3 YES
Troubleshooting13
13-1
When Problems Occur
Sending Documents
13-3
Resend the document
Receiving Documents
13-5
13-6When Problems Occur
Other Problems
13-7
Error Codes
13-9
#0025 Cause
13-11
#0102 Cause
Questions and Answers
13-13
13-14Questions and Answers
Summary of Important Settings
14-1
Fax Settings Table
Settings Applicable
14-3
ADD. Registration
Appendix15
15-1
Report Samples
One-Touch Speed Dialing List
15-3
Coded Speed Dialing List
Access Code List
Group Dialing List
15-5
User’s Data List
Activity Report
15-7
Error Transmission TX Report
Transmission TX/ Reception RX Report
Confidential Reception RX Report
Multi-Transaction TX/RX Report
15-9
Relay Broadcast Report
Confidential Mailbox List
Document Memory List
Memory Clear Report
15-11
Specifications
Glossary
Density control
Delayed transmission
Confidential mailbox
Dialing methods
Document
Dual access
Fax Basic Features screen
Document density
Long distance dialing
Use Memory lamp
Jack
Manual redialing
Pause
Memory box
Memory lock
Pause time
Polling transmission
PIN code
Polling box
Pulse
Scanning area
RX password
Rotary pulse
Sending speed
Super Fine
Tone/pulse setting
Transfer password
Super G3 FAX Expansion Kit-B1
TTI Selector
Ultra Fine
Symbols
Index
TEXT/PHOTO
FINE, 3-12 STANDARD, 3-12 Super FINE, 3-12 Ultra Fine
Appendix
Appendix
Canon Deutschland GmbH
Canon Italia S.p.A