Program a pattern
Your pump will keep your pattern settings even when the Patterns option is turned off. The patterns feature must be on to program a basal pattern.
NOTE - Be aware. When you make changes to a pattern, the pump will use that pattern as the current basal. Make sure the basal you want is selected in the SELECT PATTERNS screen.
Do these steps to program your patterns:
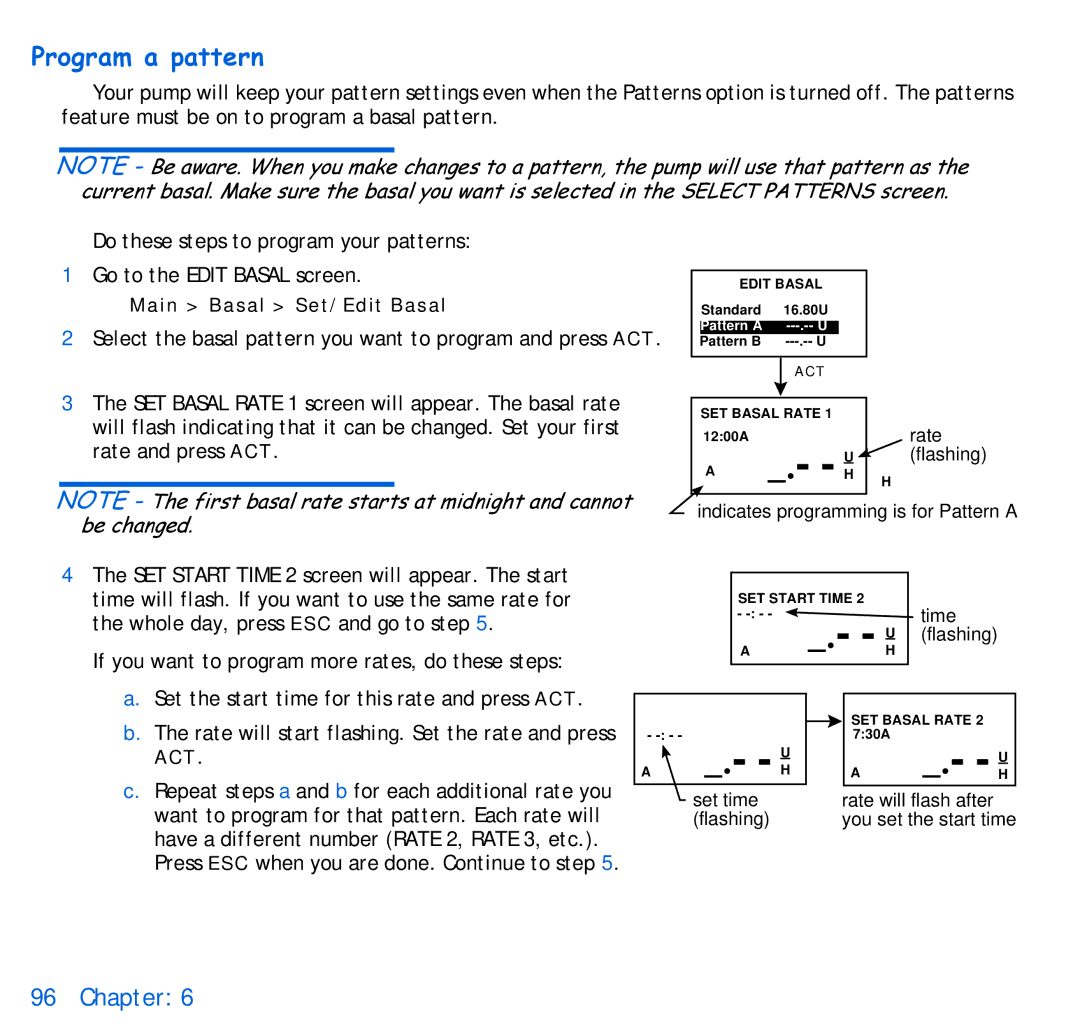
| 1 Go to the EDIT BASAL screen. |
|
|
|
|
|
| ||
|
| EDIT BASAL |
|
| |||||
| Main > Basal > Set/Edit Basal |
|
|
| |||||
|
| Standard |
| 16.80U |
|
| |||
| 2 Select the basal pattern you want to program and press ACT. |
| Pattern A |
|
|
| |||
|
| Pattern B |
|
|
| ||||
|
|
|
|
|
|
|
|
|
|
|
|
|
|
|
|
| ACT |
|
|
| 3 The SET BASAL RATE 1 screen will appear. The basal rate |
|
|
|
|
|
|
| |
|
|
| SET BASAL RATE 1 |
|
| ||||
| will flash indicating that it can be changed. Set your first |
|
|
| rate | ||||
|
|
| 12:00A | _.- - |
| ||||
| rate and press ACT. |
|
|
| |||||
|
|
| A | U | (flashing) | ||||
|
|
|
|
| H | H | |||
|
|
|
|
|
|
|
|
| |
|
| at midnight and cannot |
|
|
|
|
|
|
|
NOTE - The first basal rate starts |
|
|
|
|
|
| |||
|
| indicates programming is for Pattern A | |||||||
| be changed. | ||||||||
|
|
|
|
|
|
| |||
4The SET START TIME 2 screen will appear. The start
time will flash. If you want to use the same rate for | SET START TIME 2 | time | |
the whole day, press ESC and go to step 5. | - | _.- - HU | |
| (flashing) | ||
If you want to program more rates, do these steps: | A | ||
|
|
| |
a.Set the start time for this rate and press ACT.
b. The rate will start flashing. Set the rate and press | - |
|
|
|
|
| SET BASAL RATE 2 | |
|
|
|
|
| ||||
_.- - | H |
|
| 7:30A | _.- - H | |||
ACT. | A |
|
| A | ||||
|
| U |
|
|
| U | ||
c. Repeat steps a and b for each additional rate you |
|
|
|
|
|
|
|
|
| set time |
|
|
| rate will flash after | |||
want to program for that pattern. Each rate will |
|
|
|
| ||||
| (flashing) |
|
|
| you set the start time | |||
have a different number (RATE 2, RATE 3, etc.). Press ESC when you are done. Continue to step 5.