|
|
|
|
|
|
|
|
|
|
|
|
| |||
Add |
| Delete | Review | ||||||||||||
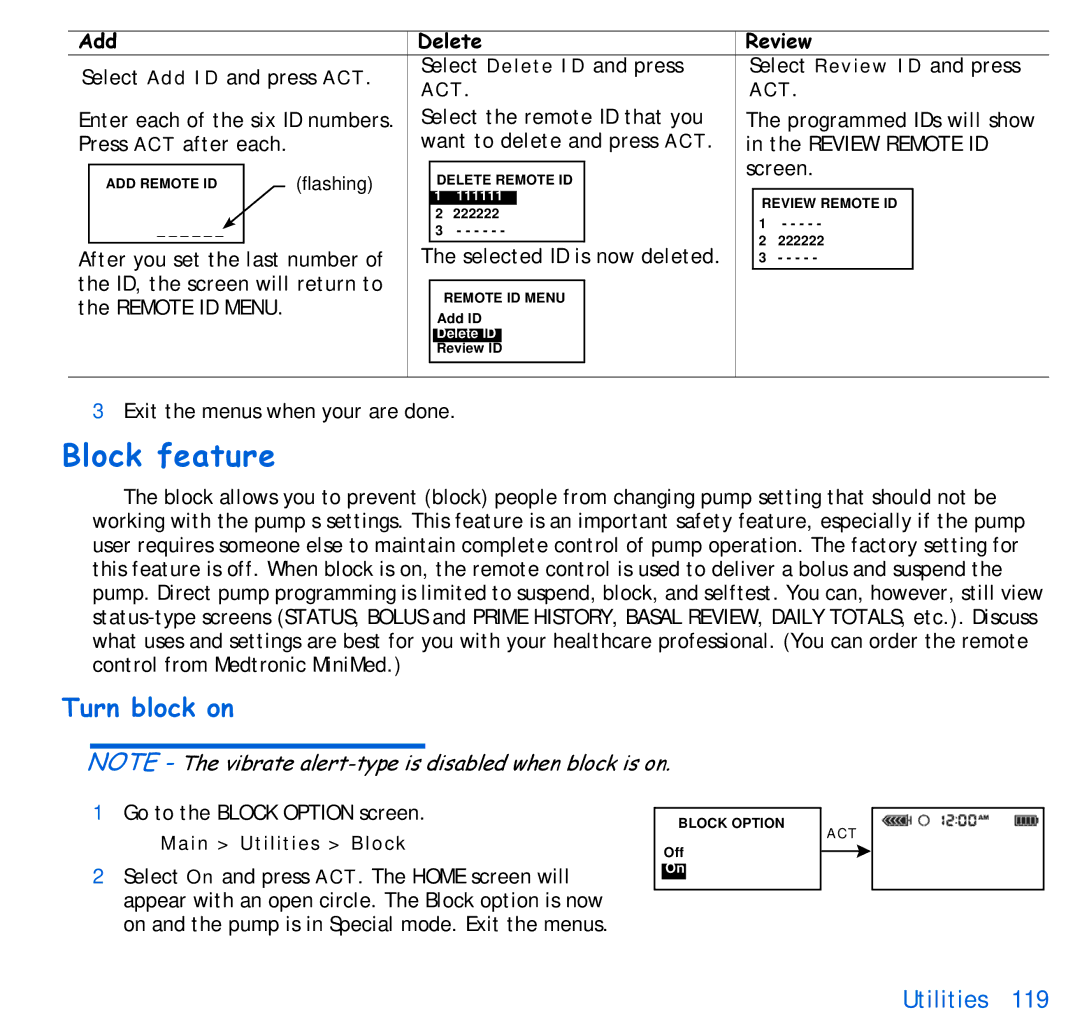
Select Add ID and press ACT. | Select Delete ID and press | Select Review ID and press | |||||||||||||
ACT. | ACT. | ||||||||||||||
|
|
|
| ||||||||||||
Enter each of the six ID numbers. | Select the remote ID that you | The programmed IDs will show | |||||||||||||
Press ACT after each. |
| want to delete and press ACT. | in the REVIEW REMOTE ID | ||||||||||||
|
|
| (flashing) |
|
|
|
|
|
|
| screen. | ||||
| ADD REMOTE ID |
|
|
| DELETE REMOTE ID |
| |||||||||
|
|
|
|
|
|
|
|
| |||||||
|
|
|
|
| 1 | 111111 |
|
|
| REVIEW REMOTE ID |
| ||||
|
|
|
|
| 2 | 222222 |
|
|
|
|
| ||||
| _ _ _ _ _ _ |
|
|
|
|
|
|
| 1 | - - - - - |
| ||||
|
|
|
| 3 - - - - - - |
|
|
|
| |||||||
|
|
|
|
|
|
| 2 | 222222 |
| ||||||
After you set the last number of | The selected ID is now deleted. |
|
| ||||||||||||
| 3 | - - - - - |
| ||||||||||||
the ID, the screen will return to |
|
|
|
|
|
|
|
|
|
|
| ||||
|
|
| REMOTE ID MENU |
|
|
|
|
| |||||||
the REMOTE ID MENU. |
|
|
|
|
|
|
|
|
| ||||||
|
|
| Add ID |
|
|
|
|
| |||||||
|
|
|
|
|
|
|
|
|
|
| |||||
|
|
|
|
|
| Delete ID |
|
|
|
|
|
| |||
|
|
|
|
|
| Review ID |
|
|
|
|
|
| |||
|
|
|
|
|
|
|
|
|
|
|
|
|
|
| |
3Exit the menus when your are done.
Block feature
The block allows you to prevent (block) people from changing pump setting that should not be working with the pump s settings. This feature is an important safety feature, especially if the pump user requires someone else to maintain complete control of pump operation. The factory setting for this feature is off. When block is on, the remote control is used to deliver a bolus and suspend the pump. Direct pump programming is limited to suspend, block, and selftest. You can, however, still view
Turn block on
NOTE - The vibrate
1Go to the BLOCK OPTION screen.
Main > Utilities > Block
2Select On and press ACT. The HOME screen will appear with an open circle. The Block option is now on and the pump is in Special mode. Exit the menus.
BLOCK OPTION
Off
On
ACT
