Setup Manual
NT631 and NT631C Programmable Terminals
Page
Omron Product References
Page
Table of Contents
Index 291 Revision History 295
About this Manual
Connecting and Setting Up the Programmable Terminal
Connecting to Controllers Not Made by Omron
Programmable Terminal Functions and Operation
Read and Understand this Manual
Application Considerations
Disclaimers
Xiv
Precautions
Safety Precautions
General Precautions
Intended Audience
Conventions used and their meanings are presented below
Safety Precautions
Xviii
Section
Role and Operation of the NT631/NT631C
Panel Switch Functions
Operation of an NT631/NT631C at an FA Production Site
Mitted to the host
Displays Screens
Operations of the NT631/NT631C
Receives Data from a Host
Sends Data to a Host
Features
NT631/NT631C has the following features
Functions of the NT631/NT631C
Section
Section
Comparison between NT631 and NT631C
NT631C
Comparison between NT620S/NT620C/NT625C and NT631
NT620S/NT620C/NT625C NT631/NT631C
NT-ZJCAT1-EV4
Data areas listed below can be accessed
Following are the principal functions of the NT631/NT631C
Principal Functions of NT631/NT631C
Numeral/character string setting function
Input by touch switches
System program install function
Screen display history function/alarm history function
Fixed Displays
Displays
Lamps
Touch Switches
Normal Standard Lamps
Image/Library Lamps
Numeral Display String Display Numeral Input String Input
Graphs
Thumbwheel Switches
Bar graphs
Analogue meter
Alarm List/History
System Configuration
Alarm List
Alarm History
Host
Peripheral Devices That Can Be Connected
Communications with the Host
Connecting to the Host
Direct Connection Function
Serial Port a
Host Link NT Link
Features of the Direct Connection Function
Section
Connecting to Other Companies’ PLCs
Communications Using Memory Links
Memory Link
Compatible PLC
Memory Link Online Transfer Function
Comparison between Direct Connection and Memory Link
Device or Software Manual Title Manual Number
Before Operating
Sysmac CPM1/CPM1A/CAM2A/CPM2C/SRM1-V2
Preparing for Connection
Communications Methods That Can Be Used with the Host
Method for Connection to the Host
NT631/NT631C and the host are indicated in the table below
Combinations of Communications Method and Connection Method
Connection possible ⋅ Connection not possible
RS-422A RS-232C Connection via a convertor unit
1N connection
RS-485 Direct 11 connection
Names and Functions of Parts
Power LED
Front View
Reference The NT631/NT631C comes in two body colors
Rear View
Hardware Settings and Connections
Installation
Installation Environment
Installation in the Operation Panel
Power Supply Connection
Applicable power supply specifications are as follows
Power Supply
Grounding
Parts Used for Connection
Connecting to the Support Tool
Recommended Connector Cable
Communications Conditions
Connecting a Bar Code Reader
Connecting a Printer
Connection Method
Reference
Possible Settings Default Setting
Setting a Bar Code Reader
Possible Settings
EVEN, ODD, None
About RS/CS Control
Data Format
STX
ETX
PT Model Function of Memory Unit
Using a Memory Unit
DIP Switch Functions
Installation Method
Switch Function
Method of Use
Method of Execution
SW2
SW2-4 on System/Screen transmitted simultaneously
Reference Reading and Writing Data by Manual Transmission
Current PT Screen Data, Screen
Current PT Screen Data, System
Errors When Using a Memory Unit
Current Memory Unit Screen Data
Source Destination
Error Probable Cause Remedial Action
Connecting to the Host from the RS-232C Port
Connecting to the RS-232C Port at the Host
Host Types and Settings
When Using the Host Link Method Compatible Host Units
CPM1
C20HE-CPU42-ZE
+CPM1-CIF01
CPM2A
Switch Setting
Connecting to a C-series Host Link Unit Settings at The Host
CTS
Setting the Rear Switches
Supply
Setting at Host
CPU Bus Unit Settings
CV500-CPU01-EV1/CV1000-CPU01-EV1/CV2000-CPU01-EV1
PLC Setup
PLC model Connection method
CQM1H
CPM2A, SRM1
Word # Writing Value Settings
PLC Setup Area Settings
When using a CPM1
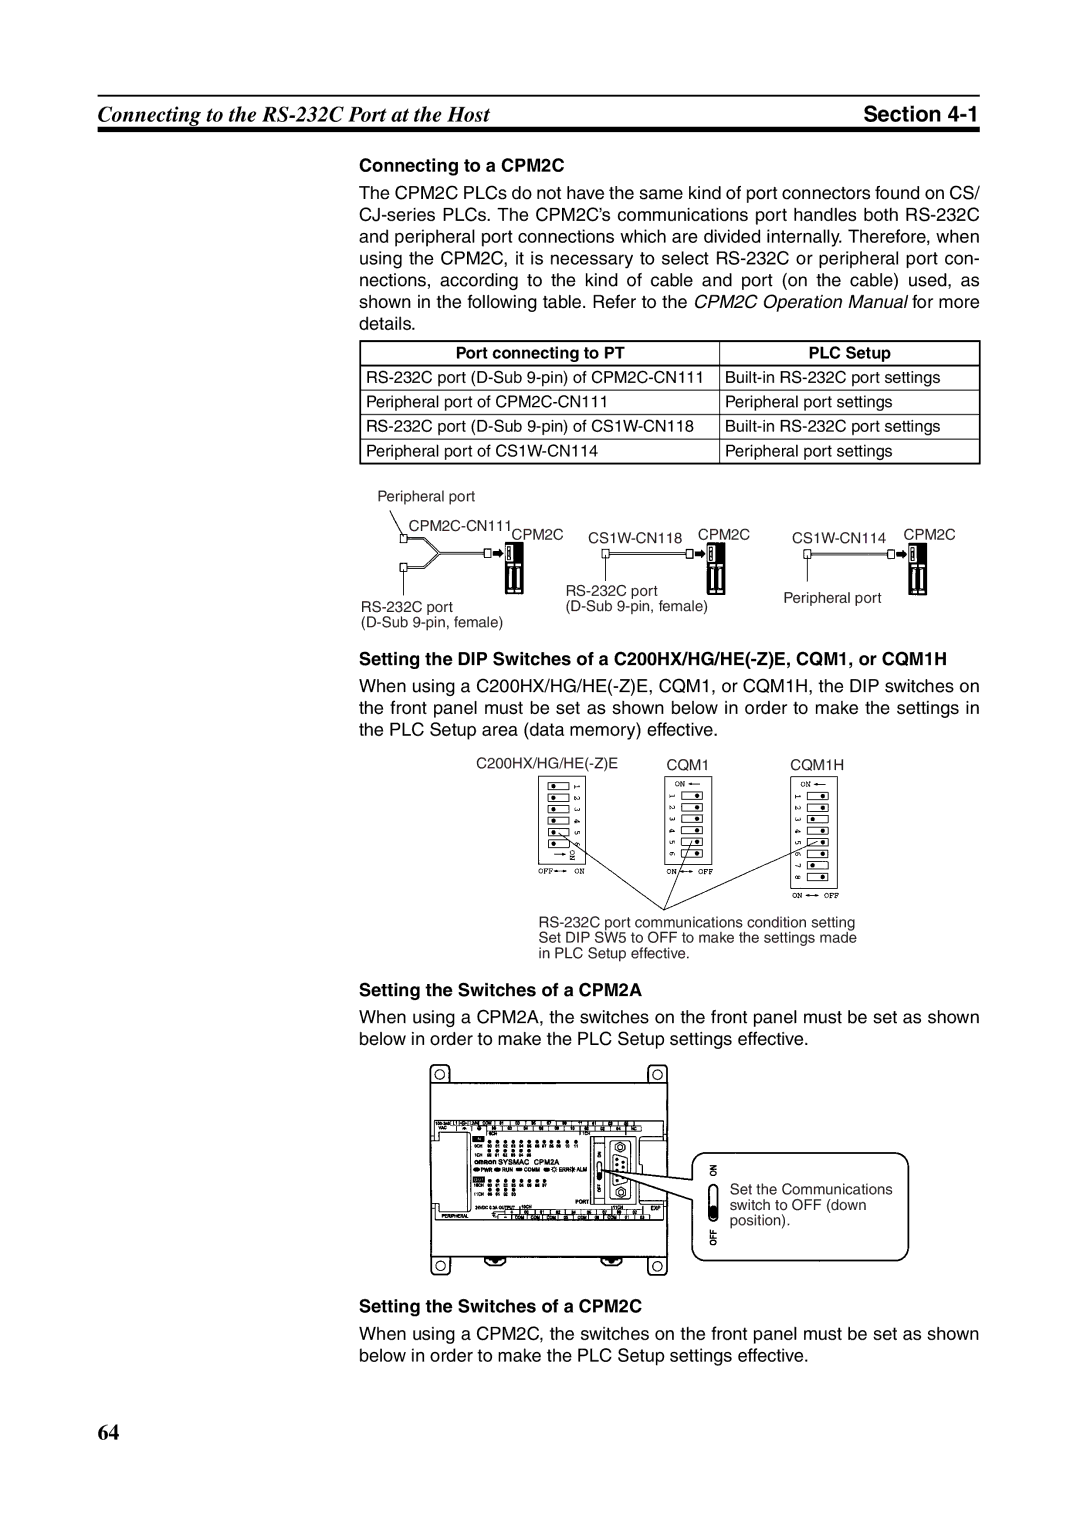
Connecting to a CPM2C
Port connecting to PT PLC Setup
Setting the Switches of a CPM2A
Setting the Switches of a CPM2C
Setting the Switches on a RS-232C Adapter
CS/CJ-series CPU Unit CS1G/H-CPU@@-EV1, CS1G/H/D-CPU@@H
Using the CPU Unit’s Peripheral Port
Allocation DM Area Settings for CPU Unit
Connecting to CS-series Serial Communications Board
Setting the Front-panel Switches
Allocation DM area words Writing Value Settings Port
Allocation DM area CH Writing Value Settings Port
When Using the NT Link 11 Method Compatible Host Units
CQM1H-CPU61
CQM1H-CPU51
Setting methods for each Unit are as follows
Host Model Word # Writing Value Setting
HG/HE-ZE, CPM2A, CPM2C CQM1, CQM1H, SRM1
CPM2C-CN111 CPM2C
Setting the Switches on an RS-232C Adapter
Using the NT Link 1N Method
Connecting to CVM1/CV Series -EV@
Set the DIP switches on the front panel as follows
CS Series CS1G-CPU42/43/44/45-EV1 CS1G-CPU42/43/44/45-EV1 *1
Connection to Word # Writing Setting
Setting the DIP Switches of a C200HX/HG/HE-ZE
Using the CPU Units Built-in RS-232C Port
CPU Unit Allocation DM Area Settings
Connecting to CS/CJ-series Serial Communications Unit
Allocated DM Area words Setting Setting Contents Port
Using the High-speed NT Link 1N Method
Settings required for each Unit are described below
Connecting CS/CJ-series CPU Units
Word # Setting Setting Contents
Connecting to a CS-series Serial Communications Board
Connecting to a CS/CJ-series Serial Communications Unit
When Using the Memory Link Method
Connecting Directly between RS-232C Ports
Settings at the host
Word m = DM30000 + 100 ⋅ unit number
Model Cable Length Connector Specification
Omron Cables with Connectors
Check the required components and prepare them in advance
Name Model Remarks Delivered with
Wiring for a Host Link Unit 25-pin Connection
Wiring for Other Connections
Serial Port A, B
NT631/NT631C PLC Host link unit
Wiring for a Memory Link Connection
Pin type Host side
Section
Connecting to the Host from the RS-422A/485 Port
Connecting to the Host’s RS-232C Port
Type of Host and Settings
Settings at the RS-232C RS-422A Adapter NT AL001
Method Reference
Example the terminal resistor is active RS-422A, NT Link 1N
Connecting an NT631/NT631C and NT-AL001 RS-422A
Connecting an NT631/NT631C and NT-AL001 RS-485
Connecting an NT-AL001 and Host
Wiring for Connections Other Than Memory Link
Wiring When Connecting a Host Link Unit 25-pin
CVM1-CPU01-EV2CVM1-CPU11-EV2 CVM1-CPU21-EV2
C200HX-CPU65-ZEC200HX-CPU85-ZE
C200HX/HG/HE-ZE
Connecting an NT631/ NT631C and NT-AL001RS
Connecting an NT631/ NT631C and NT-AL001 RS-422A
Connection between NT631/NT631C Units RS- 422A
Connection between NT631/NT631C Units RS
Connectors and Cables Recommended for RS-232C
Recommended Connectors, Cables, and Crimp Terminals
C200HX/HG/HE-ZE
Cables with Connectors Made by Omron
IFVV-SB
Name Model Maker Remarks
TKVVBS4P-03
RDA
Connecting to the Host’s RS-422A/485 Port
RS-485 cable Max. total length 500 m
Standard or high-speed
C200HE-ZE
Below
C200HG-ZE
C200HX-ZE
CVM1-CPU11-EV2 CVM1-CPU21-EV2 SRM1
Instruction level, parity, and transfer code SW4
Port selection selector switch Set this to RS-422A
Port selection selector switch Set this to RS-422A Supply
100
Connecting to a CPU Unit CVM1/CV-series -EV@ CPU Units
DIP SW4
C200HX/HG/HE-ZE, CPM1, CPM2A, CPM2C, CQM1H, or SRM1
When using a CQM1H
When using a CPM1, CPM2A, CPM2C, SRM1
Setting Switches on a C200HX/HG/HE-ZE Communications Board
Setting Switches on a CQM1H Serial Communications Board
Setting the Switches on an RS-422A Adapter
Serial Communications Board Switch Settings
DM Area Allocation Settings
Allocated DM Setting Setting Contents
Using the NT Link 11 Method
Allocated DM Area Setting Setting Contents Words Port
= DM 30000 + 100 ⋅ unit number
Host Model Word # Setting Setting Contents
Connecting to a C-series C200HX/HG/HE-ZE
108
Connection to Word # Setting Setting Contents
Series C200HX/HG/HE-ZE
CPU Units with CPU Unit that becomes Model Name
110
111
112
Port DM32010 8200 1N NT Link Mode
Allocated DM Area Setting Setting Contents
114
Direct Connection between RS-422A Ports at Both Units
Connecting an NT631/NT631C and Host RS-422A
Wiring When Connecting CPM1, CPM2A, CPM2C, or SRM1
Connect to the PLC through a CPM1-CIF11 RS-422A Adapter
CS1W-SCU31-V1
CVM1-CPU01-EV@CVM1-CPU11-EV@ CVM1-CPU21-EV@
Wiring When Connecting a CVM1/CV-series CPU Unit
Direct Connection between RS-485 Ports at Both Units
Connecting an NT631/NT631C and Host
4 1N Connection among RS-422A Ports
Connecting an NT631/NT631C and a Host
Connecting between NT631/NT631C Units
C200HX-CPU65-ZE/85-ZE CQM1H-CPU51/61
5 1N Connection among RS-485 Ports
Connecting an NT631/ NT631C and a Host
Connectors and Cables Recommended for RS-422A/485
Recommended Connectors, Cables and Crimp Terminals
Examples of Applicable Terminals
For M3.5
For M3
Preparing the Shield of RS-422A/485 Connectors
Connecting the Ground Wire
Handling the Shield on RS-422A/485 Cables
Terminals
Example of Recommended Wiring
System Menu Operation
128
Starting the NT631/NT631C
System Menu Operation Flow
Operation at Startup
Initial Processing
Relationships among Modes
Operation Modes and the System Menu
Menu Item Function
RUN Mode
Functions of the System Installer Mode
Menu Tree
PLC, CPM1, CPM2A, CPM2C, CQM1, CQM1H, C200HX/HG
System Menu Memory INIT. Menu
Operations with the System Menu
Pressing a Touch Switch That Displays The System Menu
Reference Calling the System Installer Mode
Touching The Corners of The Touch Panel
Selecting Menu Items
Press Maintenance Mode
Memory Initialization
Clearing Screen Data
Select Maintenance Mode
Initializing Display History Record Data
Initializing Alarm History Record Data
139
System Menu shown below
Initializing the Recipe Tables
Menu shown below
Initializing the Memory Tables
142
Initializing the Memory Switches
Setting the Display Language in the System Installer Mode
Operations in the System Installer Mode
Memory Switch Status
OFF
Clearing/Installing the System Program
Clearing the System Program Downloading the System Program
Select Run System
Changing the System Settings
Disabling/enabling System Menu Display
Disabling/enabling Writing to The Screen Data Memory
148
Transmitting the Screen Data
150
Precautions to Be Observed When Transmitting Screen Data
Select Transmit Mode Select Tool Transmit
About Communications Conditions
Communications Condition Settings for The Host Link Method
Port Communications Method/Communications Type Settings
Communications Condition Settings for The NT Link 11 Method
No further communications conditions need to be set
Possible Combinations Communications Method Settings
Select Maintenance Mode Select Memory Switch
Setting the Host Link Method
156
Setting the NT Link 11 Method
Setting the NT Link 1N Method Standard/High-speed
159
Setting the Memory Link Method
161
Setting the Communications Type for Serial Port B
Starting Operation
Transmission of The Contents of Memory Tables
Display of The System Initialization Screen
Display of The Startup Screen
Various System Settings
Memory Switch Setting Screens
Memory Switch Settings
For the bar code reader, refer to
Setting the Start-up Wait Time
Setting the Buzzer Sound
Setting the Key Press Sound
167
Setting the Printer Controller
Setting the Print Method NT631C Only
Setting Screen Saver Movement
171
172
Setting the Screen Saver Start-up Time
174
Setting the History Display Method
Tem Menu shown below
Setting the Resume Function
178
Setting the Automatic Reset Function
180
Setting the Time-out Interval
Setting the Retry Count
Comm. Auto-return on
Comm. Auto-return OFF
Shown below
Setting the Bar Code Reader Input Function
Communications Condition Settings for Bar Code Readers
Default factory setting
Setting Communications Conditions and Setting Method
186
11-1 I/O Settings
System Maintenance
Contrast Adjustment for NT631C-ST141@-EV1 only
Setting from the System Menu
Decrease 10 steps
189
190
Displaying/Setting the Calendar and Clock
192
Display Contents
Checking the PT Setting Status
Display Contents of The First Screen
Display Contents of The Second Screen
Display Method
Displaying and Printing the Display History Record
195
Example Print-out
Displaying and Printing the Alarm History Record
Sort by occurrence, from oldest record
YY/MM/DD Hhmm
197
Checking Screen Data
Sort by occurrence method, from oldest record
YY/MM/DD
Specifying The Display Method
Operations On The Screen Data Check Screen
ON, OFF
Displaying the Screen Data Check Screen
Select Maintenance Mode Select Screen Data Disp
Device Check
Backlight Screen data memory Touch switches Battery voltage
Buzzer Sound memory switch
Checking the Buzzer
Check if the buzzer sounds correctly
203
Checking the Backlight for NT631C only
Checking the LCD Screen Display
Screen Data Memory
Touch switch is displayed in reverse video
Check if the screen data memory is functioning normally
Check
206
207
Reference Checking the Battery Voltage
Checking Communications with the Support Tool
Checking Interfaces
Checking Communications at Serial Ports
Check Screen
For Host Link
For NT Link 11, 1N Standard, or 1N High-speed
For Memory Link
For a Bar Code Reader
Check Method
Select Maintenance Mode Select I/O Check Select I/F Check
Checking Communications with a Printer
Programming Console Function
Communica Applicable PLCs Connected Port Tions Method
Usable Systems
HG/HE-ZE, or SRM1
CQM1, CQM1H, C200HX
CPM1 or CPM2A
CS/CJ-series PLC
Key Operations Mode Selection Keys, Mode Lock Key
Mode lock key, which prevents unintended mode changes
Touch panel to display the System Menu
During Lock OFF
During Lock on
Programming Console Keyboard
219
Device Monitor Function
Compatible Systems
CQM1H or C200HX/HG/ HE-ZE CQM1 or C200HS
Communications PLC model Method
Adapter or CPM1-CIF11RS-422A Adapter
CPM1, CPM2A, or SRM1
232C Adapter, or a CPM1-CIF11RS-422A Adapter
Method is exactly the same as for the 1N NT Link
Version Display
224
Troubleshooting and Maintenance
NT631/NT631C Cause Remedy Symptoms
Troubleshooting
Remedy indicated in the table
Do not disassemble the PT for repair or modification
Omron
Programming Console Function
228
Errors Occurring at Start of Operation and Their Remedies
Responding to Displayed Error Messages
Nance Mode
Message Cause Remedy
Menu
Erly referring to Replacing the Backlight
NT631/NT631C and their remedies
Errors Occurring during Operation and Their Remedies
Errors in the System Installer Mode and Their Remedies
NT631/NT631C, and the remedies for these errors
Dies
Communications Errors and Their Remedies
Parity error at serial port a
Receive Errors
Send Errors
Error Details Displayed Probable Cause Remedy
Probable Causes and Remedies
Guide to Backlight Replacement
Maintenance of the NT631/NT631C
Spare PT Backlight for NT631C- ST141@-EV2/ST151@-EV2 only
Replaceable Backlight Model
Replacing the Backlight
Procedure
Fitting The Touch Panel Cable
238
NT631C-CFL02 for NT631C-ST141@-EV2
240
Battery Type
Replacing the Battery
Guide to Replacement
Battery Replacement Method
Cleaning Method
Inspection and Cleaning
Remove them during cleaning
Used in its optimum condition
Inspection Method
Items Required for The Inspection
Points Inspected
244
Appendix a
Specifications General Specifications
Appendix a
Performance Specifications
Display Specifications
RUN
Panel Specifications
External Interface Specifications
Specification
Special Features
Specifications
Programming Environment
EIA RS-232C
Communications Specifications For a Host Link, RS-232C
For an NT Link, 11, RS-232C
For a Host Link, RS-422A
For an NT Link, 11, RS-422A
For an NT Link, 1N, RS-232C
For a High-speed NT Link, 1N, RS-232C
For an NT Link, 1N, RS-422A/485
For a High-speed NT Link, 1N, RS-422A/485
For a Memory Link, RS-232C
For a Memory Link, RS-422A
For a Bar Code Reader
RS/CS
254
Body
Dimensions
Mounting Dimensions
Cable Connection Dimensions with NT-MF261
258
Using an RS-232C/RS-422A Adapter Dimensions
Methods for Mounting and Removal
Mounting to a DIN Rail
Mounting to an Operation Panel
Removal from a DIN Rail
DIP Switch Settings
Specifications
262
CSB and CSA signals are for specialized applications
RS-232C Connector
Pin Arrangement
RS-422A/485 Terminal Block
Block Diagram
Transporting and Storing the NT631/NT631C
Appendix D
Appendix D
Cable with Shielding Wire Not Connected to FG
Cable with Shielding Wire Connected to FG
Making the Cable
Cable Preparation
Soldering
Assemble the connector hood as shown below
Hood Assembly
270
Assembly of Connecting Cables
Making the Cable for Connecting a PLC
Pin Connector
Name Model Remarks
Appendix F
Wiring Method
Connector and Related Parts
Making the Cable for Connection to a Bar Code Reader
Appendix G
Making the Cable for Connection to a Printer
Appendix H
Appendix H
Model History System program
Relationship between system program Hardware
NT-ZJCMX1-EV2
NT-ZJCMX1-EV3
Combining a -EV1 Version and -EV2 Version
Combining a -EV1 Version and Version without a -EV@Suffix
Combining a -EV2 Version and Version without a -EV@Suffix
Appendix
Host Link Units
Model List PTs
CompoBus/S Master Control Unit
Communications Unit
Model Specification PLC Type
CPU Units for Connection via a Host Link
C200HX-CPU65-ZE C200HX-CPU85-ZE
CPU Units for Connection via a 11 NT Link
CQM1-CPU41-EV1
CQM1H-CPU51 CQM1H-CPU61
CPU Units for Connection via a High-speed NT Link 1N
CPU Units for Connection via a 1N NT Link
RS-232C/RS-422A Adapter
Cables with Connectors for PT ↔ PLC/NT-AL001
RS-232C Adaptor, RS-422A Adaptor
Related Parts and Equipment for PT
Connecting Cable for the CPM2C Communications Connector
Applicable Connectors
Connection Cable
Printer Cable
Option List
Appendix K
This is a lithium battery used for memory backup
Replacement Battery .. G2A9-BAT08
Chemical-resistant Cover ... NT625-KBA01
Protects against Does not protect against
Memory Unit ... NT-MF261
290
Numerics
Index
293
294
Cat. No. V063-E1-03 Revision code
Revision History
Revision History
Terms and Conditions of Sale
Omron Electronics LLC