User Guide
Page
Table of Contents
111
108
113
118
136
135
138
140
172
169
173
175
237
234
240
241
291
288
292
293
330
329
331
332
383
377
393
399
435
433
436
438
Page
Trademarks
Guide to the Machine
Product names of Windows Server 2008 R2 are as follows
Disclaimer
Manuals for This Machine
120
Model-Specific Information
Units
List of Option
Symbols
How to Read This Manual
This manual uses the following symbols
About IP Address
Installing Manuals on Your Computer
Using Manuals
Opening from the desktop icon
Opening Manuals
Opening from the Start menu
Opening from the CD-ROM
Removing Manuals from Your Computer
Using the Machine as a Printer
Feature Highlights
Connecting via USB
Connecting via a network
Printing confidential documents
Making enlarged or reduced copies
Using the Machine as a Copier
Printing directly from a Digital Camera PictBridge
Copying multiple pages onto a single sheet of paper
Making 2-sided copies
Copying both sides of an ID card onto one side of paper
Preparation for sorting the output paper
Using the Machine as a Scanner
Sorting the output paper
Scanning from a computer
Sending scanned files to an FTP server
Sending scanned files via e-mail
Sending scanned files to a computers shared folder
Sending scanned files to a USB flash disk
Using the Machine as a Fax Machine
Using as a fax machine
Sending faxes from a computer LAN-Fax
Using the machine with an external telephone
CES191
Exterior Front View
Guide to Components
Exterior Rear View
CES099
Interior
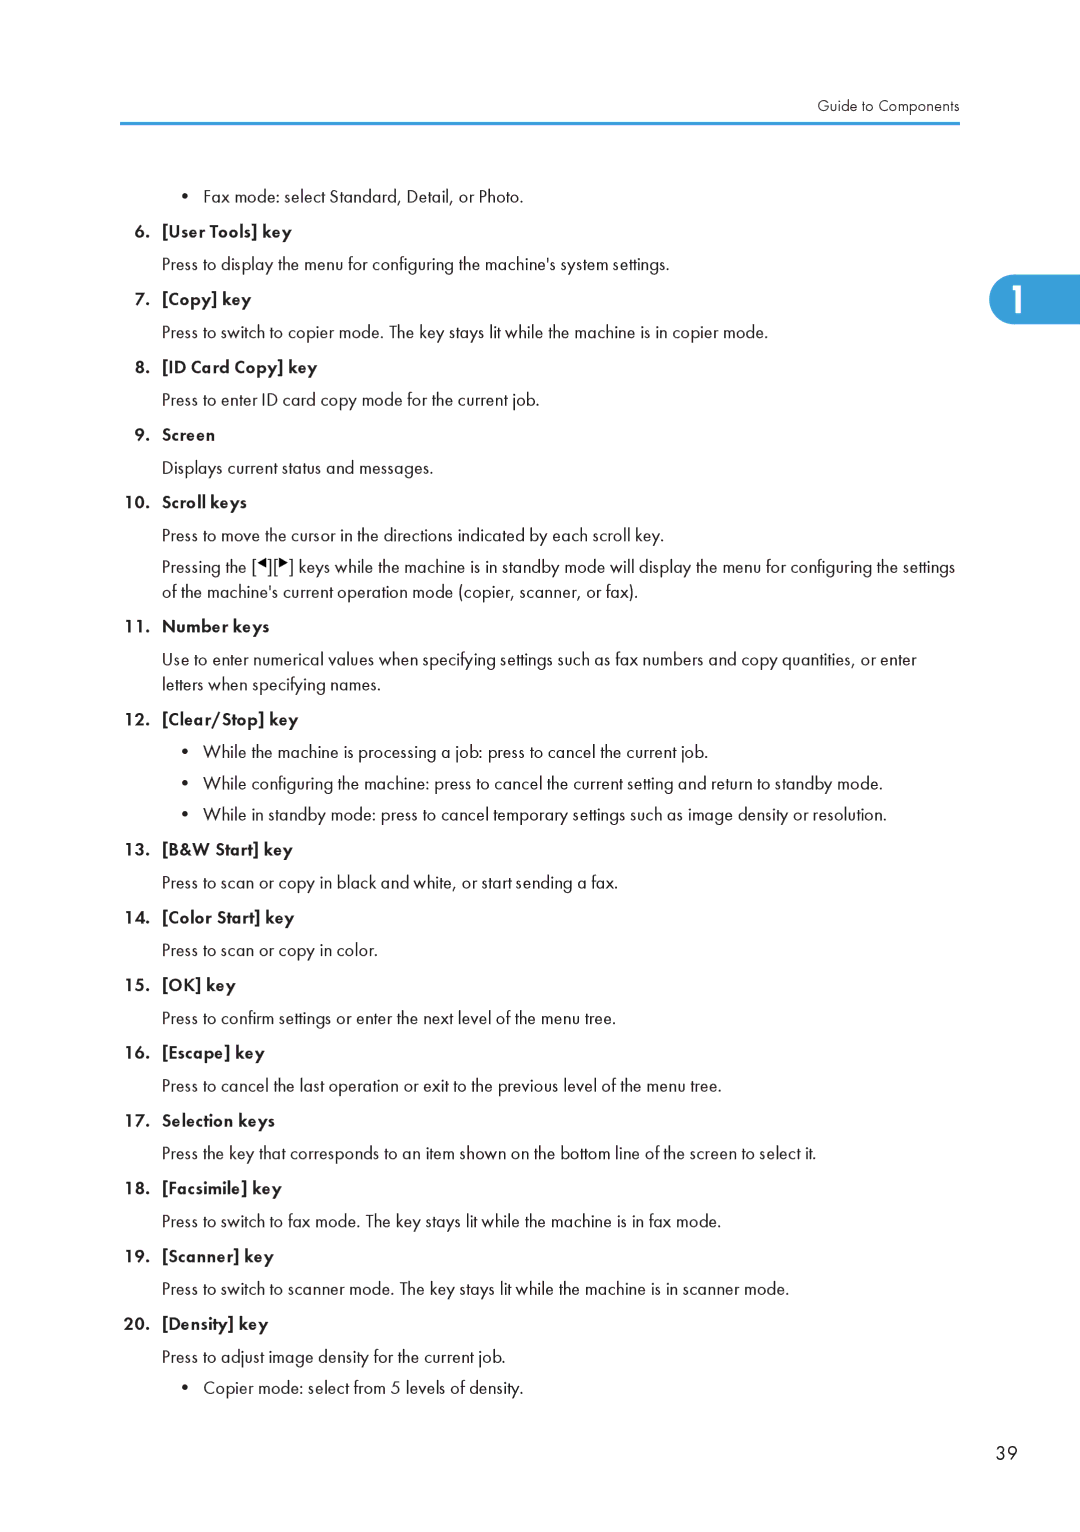
Control Panel
Fax Received indicator
Guide to Components
CES152
Out Faxes Stored in Memory
Guide to the Machine
Where to Put the Machine
Installing the Machine
Getting Started
Installing the Machine
Large quantities, you might detect an odd smell
Unpacking
Installing the Machine
CER088
CES032
Lift the paper feed roller slightly to remove it
Open the ADF cover
Return the paper feed roller to its original position
Pull the protective sheet to remove it
Close the ADF cover
Lower the lever until it clicks into place
Pull up the fusing unit levers
Remove the protection tapes
CES031
Apply the indicated sticker as in the illustration below
Turning the Power on
Installing the Machine
Plug in the power cord
Initial Setup
Changing Operation Modes
Function Priority
Energy Saver mode
Saving Energy
Multi-access
Fax memory reception storing
Simultaneously
Fax immediate printing Internet Fax reception no printing
Printing out the received Internet Fax
Internet Fax
Receiving a LAN-Fax job from
Getting Started
Remove the cable cover
Connecting the Machine
Connecting with a Computer Using a USB Cable
Attach the cable cover
Connecting with a Digital Camera Using a USB Cable
Connecting with a Network Cable
Connect the Ethernet cable to the Ethernet port
Reading the LED lamps
Connecting to a Telephone Line
Connect a telephone line cord to Line
If using an external telephone, connect the telephone to TEL
Attach the cable cover in place
Press the User Tools key
Configuring the Machine
Assigning the machines IPv4 address manually
Configuring the IPv6 Address Settings
Setting the machine to receive an IPv6 address automatically
Assigning the machines IPv6 address manually
Selecting the telephone line type
Configuring Telephone Network Settings
Selecting the telephone network connection type
Setting the outside line access number
Press the User Tools key
Click OK
Sharing the Printer on a Network
Installing the Paper Feed Unit Tray
Installing Option
Check that the package contains paper feed unit
Lift using the inset grips on both sides of the machine
CER005
Supported Paper for Each Tray
Paper and Other Media
B6 JIS
16 to 43 lb 80 g/m2, 20 lb Middle thick paper Thick paper 1
Getting Started
16 to 43 lb Middle thick paper Thick paper 1
× 267 mm
Specifications of Paper Types
None
Half that of middle thick paper
Paper and Other Media
Plain Paper, Thick Paper 1, or Thick Paper
None Approximately half that of middle thick paper
Print cartridges photo conductor unit
Fan envelopes, and then align their edges before loading
Unsupported Types of Paper
Printable Area
Paper Storage Precautions
CER117
Pull out tray 1 carefully with both hands
Loading Paper
Loading Paper in Tray
Push the metal plate down until it clicks into place to lock
Place the tray on a flat surface
Load the new paper stack print side up
102
103
Loading paper longer than A4
Carefully push tray 1 straight into the machine
104
Remove the rear cover using a coin
105
CER104
CER103
CER106
109
Press down on the bottom plate until it clicks
110
Lift and slide the tray, then push it all the way
Loading Paper in the Bypass Tray
Insert the top edge of the paper into the machine
Adjust the paper guides to the paper size
Loading Envelopes
Lowering the fusing unit levers
114
Lower the fusing unit levers
Loading envelopes in tray
115
Set the envelopes in Tray 1 with the printing side facing up
117
Loading envelopes in the bypass tray
Insert the edge of the envelope into the machine
Specifying Paper Type and Paper Size
Adjust the paper guides to the envelope size
Specifying the paper type
This section describes how to specify the paper type
Specifying a custom paper size
This section describes how to specify a custom paper size
Specifying the standard paper size
Press the User Tools key
Recommended size of originals
Placing Originals
About Originals
Unscannable image area
Lift the ADF
Placing Originals
Placing originals on the exposure glass
Adjust the guides according to the size of the original
By using the ADF, you can scan multiple pages at once
Placing originals in the Auto Document Feeder
Lower the ADF
CES200
Entering Characters
Getting Started
Restricting Machine Functions According to User
Enabling the User Restriction Settings
List of currently registered user entries appears 130
Click Available Functions per User
Modifying user entries
This section describes how to modify user entries
Click Apply Close the Web browser
List of currently registered user entries appears
Deleting user entries
Press the OK key
When Machine Functions are Restricted
Getting Started
Following procedure is based on Windows XP as an example
Configuring Option and Paper Settings
Windows
This chapter describes the printer functions
Click OK to close the printer properties dialog box
Mac OS X
Mac OS X 10.5/10.6
137
Windows
Accessing the Printer Properties
Accessing the Printer Properties from an Application
139
Mac OS
If a Paper Mismatch Occurs
Basic Operation in Printer Mode
Following procedure explains how to perform basic printing
Continuing printing using mismatched paper
Canceling a Print Job
Resetting the print job
Canceling a print job before printing has started
Cancel the print job using the control panel
Canceling a print job while printing
Mac OS X 10.5/10.6
Press the Clear/Stop key Press Yes
Storing a Locked Print file
Printing Confidential Documents
Press Print
For details about Locked Print, see p.274 System Settings
Printing a Locked Print file
To do so
Deleting a Locked Print file
Locked Print file is deleted
Checking which Locked Print File Jobs Have Been Canceled
Press Delete
Press Delete. The log is deleted
Page
Direct Printing from a Digital Camera PictBridge
What Is PictBridge?
PictBridge Printing
This function is compatible with USB
Index printing
What Can Be Done on this Machine
Use the following procedure to quit the PictBridge mode
When PictBridge Printing Does Not Work
Exiting PictBridge
Paper size
Settings are enabled
Problem Cause Solution PictBridge is not available
Machine has fully booted
Printing is disabled Paper size setting for this
Print Quality Functions
Using Various Print Functions
Can configure are described below
Changing orientation or rotating the image
Print Output Functions
Using Various Print Functions
156
This chapter describes the copier functions
Screen in Copier Mode
Screen in standby mode
Using the Copier Function
Press the Copy key
Basic Operation in Copier Mode
Canceling a Copy
161
Press the Clear/Stop key
Making Enlarged or Reduced Copies
Press the Reduce/Enlarge key
Combining Multiple Pages
In-1 mode
Copying Two or Four Pages onto One Sheet
Portrait
Portrait T to B Top to Bottom
Portrait L to R Left to Right
Landscape L to R Left to Right
Landscape T to B Top to Bottom
Press Reduce, press the keys to select Comb on 1 or Comb on
Copying Both Sides of an ID Card onto One Side of Paper
167
Press the ID Card Copy key
Card copy mode
Top to Top
Making 2-sided Copies
Top to Bottom
Top to Bottom 169
Keys
Use this procedure to set the machine to make 2-sided copies
Making 2-sided Copies
Press the Density key
Specifying Scan Settings
Adjusting Image Density
Press the Image Quality key
Selecting the Document Type According to Original
Using the Copier Function
Screen in Scanner Mode
Using the Scanner Function
Using the Scanner Function
Registering Scan Destinations
Characters
Entry
Required Scale Pages in a document, but Jpeg does not
Required Support multiple pages in a document 178
Resolution Optional
Setting Description
Scan Size Optional
Then specify the width and length
Are stored. Can contain up to 64 characters
Directory Optional
Service Name Required
Setting Description Quick Dial Number Optional
Can contain up to 32 characters Login Password Optional
Then specify the width and length Resolution Optional
Modifying Scan Destinations
Related settings using Web Image Monitor
Deleting Scan Destinations
This section describes how to delete registered destinations
Basic Operation for Scan to E-mail/FTP/Folder
Scanning Using the Control Panel
Specified destination
Press the Scanner key
185
Press the Address Book key
Specifying the scan destination
Basic Operation for Scan to USB
188
Insert your USB flash disk into the USB flash disk port
189
When in halftone black-and-white scanning mode
When in color or gray scale black-and-white scanning mode
Remove the USB flash disk from the machine
Specifying the Scan Settings
Confirm that Ready appears on the display
Press the Reduce/Enlarge key or Scn Size
Adjusting image density
Specifying resolution
Basic Operation for Twain Scanning
Scanning from a Computer
Scanning from a computer Windows
This section describes the basic Twain scanning operation
195
Scanning from a computer Mac OS
Settings you can configure in the Twain dialog box
197
ADF-Better
198
This chapter describes the fax functions
Screen in Fax Mode
Using the Fax Function
Setting the Date and Time
Using the Fax Function
Registering Fax Destinations
Registering Fax Destinations Using the Control Panel
Modifying fax destinations
Mode from pulse to tone temporarily
Deleting fax destinations
Current name is deleted
Registering Fax Destinations Using Web Image Monitor
Current number is deleted
Before the fax number Forwarding
Speed Dial Number Dial or Speed Dial destination
Characters Fax Number Optional
208
This section describes how to delete registered destination
Press the Facsimile key
Selecting Transmission Mode
Sending a Fax
Press the keys
Internet Fax Transmission Overview
This section describes the basic operation for sending a fax
Basic Operation for Sending a Fax
Scanned
Press the B&W Start key
213
Canceling a fax
Specifying the Fax Destination
Touch button
Specifying the destination using the One Touch buttons
Specifying the destination using Speed Dial
Press the Address Book key
Add a destination by using one of the following methods
Specifying the destination using the broadcast function
Specifying the destination using the redial function
Useful Sending Functions
Sending a fax using On Hook Dial
Press the Pause/Redial key
This section explains some useful fax functions
Press the On Hook Dial key
Sending a fax after a conversation
On Hook appears on the screen
Press TX, and then press the B&W Start key
Specifying the Scan Settings
221
Specifying the resolution
222
Configuring the LAN-Fax Address Book
Using the Fax Function from a Computer LAN- Fax
This section describes how to open the LAN-Fax Address Book
Opening the LAN-Fax Address Book
Click the Address Book tab
Registering destinations
All Displays all destinations
224
Modifying destinations
226
Registering groups
Allows you to register it under the same name
Deleting individual destinations or groups
This section describes how to modify registered groups
Modifying groups
Confirmation message appears
Exporting/Importing LAN-Fax Address Book data
Click Yes
228
Following operations
For each field, select an appropriate item from the list
Repeat this step to add more destinations 230
Basic Operation for Sending Faxes from a Computer
Repeat this step to add more destinations
231
Edit the cover sheet as necessary, and then click OK
Click Send
Editing a Fax Cover Sheet
233
Settings you can configure for the fax cover sheets
LAN-Fax driver properties dialog box appears
Configuring Transmission Settings
235
Settings you can configure in the LAN-Fax drivers properties
Using the Fax Function
This section describes fax reception functions
Receiving a Fax
238
Receiving a fax in FAX/TEL Manual mode
Keys to select Fax Features, and then press the OK key
Press the B&W Start key Replace the handset
Receiving a fax in Fax Only mode
Receiving a fax in FAX/TEL Automatic mode
You can manually receive a fax during silence detection
Receiving a fax in FAX/TAD mode
Receiving an Internet Fax
Forwarding or Storing Faxes in Memory
Configuring the forwarding conditions
Configuring the storing conditions
Press RX File
Printing Out Faxes Stored in Memory
Registering the Special Senders
Receiving or Rejecting Faxes from Special Senders
246
Limiting the incoming faxes
Fax number can contain 0 to 9, , and space
Basic Operation Using the Menu Screen
Configuring the Machine Using the Control Panel
Configuring the Machine Using the Control Panel
This section lists the parameters included in each menu
Menu Chart
Configuring the Machine Using the Control Panel
Pstn / PBX
Configuring the Machine Using the Control Panel
This section describes how to configure the copy settings
Copy Settings
Changing Copy Settings
Copy Setting Parameters
Comb on 255
256
Copy Settings
258
Changing Scanner Settings
Scanner Settings
Scanner Setting Parameters
Scanner Settings
Changing Fax Transmission Settings
Fax Transmission Settings
Fax Transmission Setting Parameters
Configuring the Machine Using the Control Panel
Changing Fax Feature Settings
Fax Feature Settings
Fax Feature Setting Parameters
This section describes fax feature setting parameters
FAX/TAD
Destination
Delete Selected File 268
Fax Feature Settings
Jbig
Fax Feature Settings
Registering Fax Destinations in Fax Quick Dial/Speed Dial
Fax Address Book Settings
Fax Address Book Parameters
Entries
Fax Address Book Settings
Changing System Settings
System Settings
System Setting Parameters
This section describes the machines operational settings
System Settings
Default Middle Thick Paper
Facsimile 277
Job, the printed image will be cropped
Copier
USB
Default 60 seconds 15 sec 300 sec Network
Settings made on the control panel Default Off Toner Saving
Configuring the Machine Using the Control Panel
System Settings
Configuring the Machine Using the Control Panel
Changing Network Settings
Network Settings
Network Setting Parameters
This section describes the network settings
Dhcp
Default
Configuring the Machine Using the Control Panel
Follow the procedure below to print the configuration
Printing the Configuration
Printing Lists/Reports
Types of Report
Reading the Configuration
Printing Lists/Reports
IP Address Dhcp Stateless Address Link-local Address 290
Mail IPv6 Configuration Shows the IPv6 settings
Reading the Fax Journal
Reading the TX/RX Standby File List
Reading the Scanner Journal
Configuring the Machine Using the Control Panel
Changing Administrator Settings
Administrator Settings
Administrator Setting Parameters
This section describes administrator settings
Specifies the user information for sending a fax
Default Copier Facsimile Scanner System Auto Reset Timer
Default Pstn
Fax transmissions
Be sure not to clear the settings by mistake
Reset All Settings
Administrator Settings
Changing Printer Feature Settings
Printer Feature Settings
Printer Feature Setting Parameters
This section describes the printer feature settings
Printer Feature Settings
Default Off
Printer Feature Settings
Solid Colour Presentation Photographic Off 304
Using Web Image Monitor
Configuring the Machine Using Web Image Monitor
Configuring the Machine Using Web Image Monitor
Displaying Top
Changing the Interface Language
Contact
Checking the System Information
Checking the Status Information
Intermediate Transfer
Checking the Counter Information
Full or Full
Checking the System Information
Covered A4 pages
Functions, and lists/reports
Accumulated value of cyan toner A4 page coverage in percent
Fully-covered A4 pages
Fully-covered A4 pages Yellow Using the printer function
Covered A4 pages Magenta Using the printer function
Checking the Machine Information
Configuring the Sound Volume
Configuring the System Settings
75-90g/m2, Thick Paper 1 91-105g/m2, Recycled Paper, Color
Configuring the Paper Settings
Paper, Cardstock, Envelope, Thick Paper 2 106-160g/m2
Paper, Letterhead, Preprinted Paper, Prepunched Paper
Settings of the machine and printer driver do not match 317
Machine’s settings
Specifying the Size of Paper for Printing Copies
Configuring the Fax Settings
Tray 2, Bypass Tray, A4, or 8 1/2 ×
Tray to continue printing
Select Paper Tray Description
Administrator Fax Received File Processing Description
Continue printing
Sure to select a tray that contains paper of the valid size
Be sent even if this setting is enabled
Address in the Administrator
Print Automatically
Automatically or stored for later manual printing
Receive Conditions
Specifying the Priority Tray
Senders
Special Sender
Switches to the other tray to continue printing
Configuring the Toner Saving Setting
Priority Tray Description Printer
Or tray
Toner Saving Description
Configuring the I/O Timeout Settings
Out copies
Machines or not under USB connection
Locked Print Timeout
Configuring the Black-and-White Print Priority Settings
Warm-up time for maintenance will also be lowered
Seconds
Registering Destinations
Registering Fax Special Senders
Restricting Machine Functions According to User
Items below cannot be configured
Configuring the Network Settings
Checking the Network Status
Firmware
Gateway Enter the IPv4 address of the network gateway
Configuring the IPv6 Settings
Network settings
For details about IPv6, see p.283 Network Settings
Configuring the Network Application Settings
Select to enable the Scan to FTP feature
Folder Select to enable the Scan to Folder feature 330
Configuring the DNS Settings
Configuring the Auto E-mail Notification Settings
Configuring the Snmp Settings
Trap Description Target Trap
Select whether to enable the machine to use Snmp services
NMS
Host 2 below become unavailable
Characters Password
Configuring the Smtp Settings
Description Primary Smtp Server
Characters 335
Configuring the POP3 Settings
Configuring the Internet Fax Settings
Server only
POP Server E-mail
Connections to the POP3 server to acquire new e-mails 2 to
Minutes
Configuring the IPsec Global Settings
Configuring the IPsec Settings
Security
Configuring the IPsec Policy
Can contain up to 39 characters Prefix Length
IP Policy Settings Description
Any subsequent policies will be renumbered accordingly
Authentication and data encryption
IKE Settings
Authentication
Drop IP packets are discarded
Seconds IKE Diffie-Hellman
Description Authentication
Configuring the Machine Using Web Image Monitor
Prints a list of scan destinations Scanner Journal
List Sent, or forwarded
Prints a list of Quick Dial entries
Configuring the Machine Using Web Image Monitor
Enter the same password again, to confirm
Configuring the Administrator Settings
Configuring the Administrator Password and E-mail Address
Backing Up the Machines Settings
Resetting the Machine’s Settings
Select to restore network settings to their defaults
Reset Menu Settings
349
Menu Settings instead
Backs up fax destinations and Special Sender list to a file
File
Restoring the Machines Settings from a Backup File
Restore Setting Description File to Restore
Configuring the Energy Saver Mode Settings
Configuring the Date and Time Settings
Saver mode 1 than in Energy Saver mode
Energy Saver Mode Description
Than from Energy Saver mode
Machine has been idle for about 30 seconds
Overview
Troubleshooting
Common Problems
Common Problems
Paper Feed Problems
Such as a desk
Problem Solution
See p.86 Paper and Other Media Paper gets wrinkles
More frequently Printed paper is curled
Removing Printing Jams
359
If paper jams inside the fusing unit
Pull the paper downward to remove it. Do not pull it upward
If paper jams inside a tray
362
Pull out the jammed paper carefully
363
If paper jams inside the transfer unit
Removing Scanning Jams
Check that the error is cleared
365
366
Gently pull the jammed original to remove it
367
368
Close the ADF
Checking the Condition of the Machine
Print Quality Problems
Machines location
Being used See p.423 Consumables
Printer Problems
About Locked Print, see p.274 System Settings
Locked Print file is canceled
Deleting a Locked Print file
Process
Changing the Printer Driver Settings
Print Positions Do Not Match Display Positions
Printed Colors Do Not Match Displayed Colors
Copier Problems
Cleaning
Problem Solution Image density is too high
Toner on the printed surface is not dry
Photocopied paper is dirty
Scanner Problems
Fax in Immediate Transmission mode 1XXX11
Fax Problems
Network. See p.295 Administrator Settings 377
See p.364 Removing Scanning Jams
If the problem persists, contact your sales or service
Error Code Solution An error occurred while sending a fax
Or to send at a lower resolution
An error occurred while receiving a fax
Error Code Solution 3XXX11
To check the e-mail settings
Error Code Solution 4XXX21
Sender to check the e-mail settings
E-mail had an invalid Content-Type, or an
Send at a lower resolution
Error Code Solution 4XXX43
Compression method of the received Tiff file was
Tiff file
Cannot print received faxes See p.99 Loading Paper
Adjusting image density
Load paper of the right size in the paper tray
Received Correct orientation. See p.122 Placing Originals
Print cartridge. See p.393
Error and Status Messages on the Screen
Jammed paper. See p.358 Large Removing Printing Jams
See p.274 System Settings
Copy Settings
Prepare a new waste toner bottle
Waste Toner Bottle Full Specify the tray containing the A4
Could not be performed Set Original to ADF
Press JobReset to cancel the job
Paper type set for Check Paper Type
Disconnect the telephone line from Connection Failed
Resolution. See p.259 Scanner
Settings to reduce the scanning
Timeout period set in I/O
If I/O Timeout is set to 15 seconds
Canceled To Standard or High Quality 387
Message Causes Solutions
Complex to print
Machine with the printer Machine, and then print
Cancel to cancel
Cancel
Transmission mode Misfeed Dup. Unit
Memory Overflow
Paper Loading Paper Press No to cancel the job
Message Causes Solutions Out of Paper
Transfer belt is no longer Contact your sales or service
Machine Restarted Machine failed to proceed Remove Paper
An error occurred
Message Causes Solutions Server Connection
Network administrator
Because the destination could
Preprinted or prepunched System Settings
TX Comm. Error Fax could not be
Machine will redial the number and try
Transmitted correctly
Write Protect Press
Message Causes Solutions USB Memory
Key
Replacing Print Cartridges
394
Store print cartridges in a cool dark place
395
396
Remove the cover from the print cartridge
398
Replacing the Waste Toner Bottle
400
Slide both levers on the front cover forward
CES073
Leave the bottle cap open 402
Close the bottle cap
403
Place the transfer unit down on the front cover
This chapter describes how to maintain the machine
Cleaning
Lift out the rearmost print cartridge
Cleaning the Toner Density Sensor
Slide the lever only once
Slide the toner density sensor lever once to the left
Carefully insert the print cartridge removed in vertically
407
Cleaning the Friction Pad and Paper Feed Roller
409
Wipe the friction pad with a damp cloth
Cleaning the Registration Roller and Paper Tray
CES059
412
Wipe the inside of the paper tray with a cloth
CES089
Following procedure describes how to clean the ADF
Cleaning the Exposure Glass
Cleaning the Auto Document Feeder
Moving the Machine
Moving over a Short Distance
If you have removed tray 2, reinstall it
Moving over a Long Distance
Be sure to check the following points
Be sure to check the following points
Disposal
Preparing the Machine for a Long Period of Inactivity
Turn off the power switch Pull out the plug from the socket
If the Machine is Not Going to Be Used for a Long Time
Close the front cover with both hands carefully
Lower the fusing unit lever
421
Pull up the fusing unit lever
Where to Inquire
Print Cartridges
Consumables
Waste Toner Bottle
Print via FTP
Available Functions
Appendix
ESP Protocol
Transmission Using IPsec
Encryption and Authentication by IPsec
Security Association
Specifying Encryption Key Exchange Settings
Encryption Key Exchange Settings Configuration Flow
Click OK twice
Specifying IPsec Settings on the Computer
If the settings are not displayed, click Add
431
Click OK three times Click Next Click Finish
Click OK Click Close
Enabling and Disabling IPsec Using the Control Panel
New IP security policy IPsec settings is specified
This section lists the machines specifications
Specifications of the Machine
General Function Specifications
420 × 493 × 476 *1 mm 16.6 × 19.5 × 18.8 *1 inches
Copier Function Specifications
Printer Function Specifications
Maximum resolution scanning and printing
Type 2 model PCL6, PCL5c, PostScript 3, PictBridge Fonts
Printing 600 × 600 dpi
Scanner Function Specifications
ADF
Internet Fax transmission and reception
Fax Function Specifications
Fax transmission and reception
Encoding 439
SMTP, TCP/IP
Original size A4 Resolution dpi 200 × 100, 200 × 440
Paper capacity Sheets Paper size
Specifications of Options
Paper Feed Unit TK1010
Electromagnetic Interference
Expat
Copyright Information about Installed Applications
444
Index
446
447
448
449
300, 333 WIA scanning
450
451
452
2011
Operating Instructions User Guide