RoHS compliant
Compatibilidad RoHS
Liquid Crystal Display
Owner’s Instruction Book
AD68-01064G
Dispositivo acoplado por carga
Contents Índice
Movie Mode
Reproducción de archivos de vídeo en la pantalla LCD
Ajuste de EIS Estabilizador electrónico de la imagen
Ajuste de BLC Compensación de luz de fondo
Índice
Almacenamiento de MP3 en la Vídeocámara con memoria
Contents Índice
117
Using the Menu
Solución de problemas 130
126
130
Precautions when using the Memory Camcorder
Avisos y precauciones de seguridad
Notas referentes a la condensación de humedad
Notas referentes a la Vídeocámara con memoria
Make sure that the battery pack is attached firmly in place
Notas referentes a la batería
Avisos y precauciones de seguridad
Features
Características
Basic Accessories
Accesorios básicos
Accesorios opcionales
Notas
Location of Controls Ubicación de los controles
Rear & Left View Vistas posterior y lateral izquierda
Side & Bottom View Vistas lateral e inferior
Movie Play Mode
Location of Controls LCD Display
Pantalla LCD
Modo Grabar vídeo
Location of Controls LCD Display Pantalla LCD
Photo Capture Mode
Photo View Mode
MP3 Mode
MP3 Mode Modo MP3
Voice Record Mode
Voice Play Mode
File Browser Mode
System Settings Mode
To eject the battery pack
How to Use the Battery Pack Uso de la batería
To insert the battery pack
Mantenimiento de la batería
How to Use the Battery Pack
Maintaining the Battery Pack
How to Use the Battery Pack Uso de la batería
Battery Level Display
Indicador de carga de la batería
Recording
Connecting the USB Cable
Connecting the AC Power Adapter
Carga de la batería
Inserte la batería en la unidad
Getting Started
Introducción
LED Colour
Color de LED
Funciones de cada modo
Using the Mode button
Utilización del botón Mode
Using the Joystick Utilización del Joystick
Using the Menu button
Getting Started Introducción
Utilización del botón Menu
Using the Display button Utilización del botón Display
Using the Delete button Utilización del botón Delete
If you press the Display button in another mode
Open the LCD monitor
Do not turn the power off while
Losing data Save important files separately
Puede almacenar datos generales en
Archivos o formato
Getting Started Introducción
Recording Time and Capacity Tiempo y capacidad de grabación
Movie Record Time
Tiempo de grabación de vídeo
Do not format the memory card on your PC
El uso de una tarjeta de memoria de 1,25 MB/seg. o superior
Using a Memory card SD/MMC not supplied
Inserción de una tarjeta de memoria
Movie Mode
La Vídeocámara con memoria
Grabación
Movie Mode Recording Mode Movie Vídeo Grabación
Recording
Zooming In and Out
Acercamiento y alejamiento de las imágenes
Zoom Out
Zoom
Movie Mode Playing Mode Movie Vídeo Reproducción
Playing Movie Files on the LCD monitor
Move the W/T switch to Wwide
Memory Camcorder Movie Record screen appears
Multi-view screen appears
Repeatedly
Frame when paused
Play the movie file in Movie Play mode
Volume
You can adjust the volume up to 10 steps
Movie Mode Modo Movie Vídeo
Setting the Movie Size Ajuste del tamaño del vídeo
Setting the Movie Quality Ajuste de la calidad del vídeo
Available options are Super Fine / Fine / Normal
Aparece el icono de la función seleccionada
Press the Menu button to exit the menu
Setting the White Balance Ajuste del balance de blanco
Under different lighting conditions
To set Custom, frame your Memory
JoystickOK to set
Mode
To adjust the aperture setting to suit different
Conditions
Setting the Effect
Ajuste de efectos
You can apply various digital effects to your recording
Puede aplicar a la grabación diversos efectos digitales
On Enables EIS function Off Disables EIS function
Shake and other movements while recording
Al grabar con zoom
Al grabar objetos pequeños
Setting the Focus
Ajuste del enfoque
Manual Focus MF
Enfoque manual MF
On Set the BLC function Off Cancel the BLC function
On fija la función BLC Off cancela la función BLC
Puede utilizar esta función cuando utilice la
Backgrounds
Setting the Digital Zoom Ajuste del zoom digital
Move the Joystick left / right to select Digital Zoom
Setting the Record Mode Ajuste del modo de grabación
Grab
Set to 720i only
Is set to 720p or 352p
Setting the Line In/Out
Memory Camcorder is set to the selected setting
Ajuste de entrada!salida de línea
Recording 1200AM 2006/01/01 Sepia Movie Line In/Out
Movie Mode Modo Movie Vídeo Ajuste
Selected using the JoystickOK
Deleting Movie Files Eliminación de archivos de vídeo
You can delete saved movie files
Setting the Play Mode
Ajuste del modo de reproducción
Pulse el botón Play o JoystickOK
Cambia al modo de reproducción de vídeo
Locking Movie Files in Multi-View
Locking Movie Files Bloqueo de archivos de vídeo
Press the JoystickOK to lock
Copying Movie Files in Multi-View
Copying Movie Files Copia de archivos de vídeo
Copying a Movie File in Full Screen-View
Botón de Encendido
Set the Photo mode by pressing the Mode button
Pulse el botón Power para Ajuste el modo Photo
Photo Mode Capturing
Capturing Images Captura de imágenes
Photo Capture screen appears
Foto
Photo Mode Capturing Modo Photo Foto Captura
Set the Photo mode by pressing the Mode button
Slide the W/T switch
To zoom out
Photo Mode Viewing Modo Photo Foto Visualización
Ajuste el modo Photo Foto pulsando el botón Mode
Viewing Photo Files on the LCD monitor
Para buscar la foto que desea ver
Photo Mode Viewing Modo Photo Foto Visualización
Multi-view screen appears
To find the photo file you want to view
Photo file you want Full screen is displayed
Modo Photo Foto
Photo Capture screen appears
Then press
JoystickOK
Mode.mode
Aperture setting to suit different conditions
Program AE
Se pasará al modo de captura de foto
Effect
Para seleccionar Effect Efecto
Setting the Flash Ajuste del Flash
Setting the Continuous Shot Ajuste del disparo continuo
Continuous Shot
One photo at a time
Takes 3 photos in a row
EIS provides more stable photo when
Toma imágenes
Capturing through the window of a Movimiento Moving vehicle
Vehículo en movimiento
AF enfoca automáticamente
Setting the Focus Ajuste del enfoque
Para seleccionar Focus Enfoque
Press the Power button to turn on
Photo Capture screen appears Press the Menu button
Move the Joystick left /right to select BLC
Para seleccionar BLC
Imagen granulosa
Admite zoom digital 10x que produce un zoom total
De 100x. Al sobrepasar el límite del zoom óptico se
Aplicará automáticamente el zoom digital cuando
Modo Photo Foto Ajuste
Deleting Photo Files Eliminación de archivos de fotos
Setting the Slide show Ajuste de la presentación
Switches to Photo View mode
That supports Dpof
Memory Camcorder
Camcorder
Locking Photo Files in Multi-View
Locking Photo Files Bloqueo de archivos de fotos
Locking a Photo File in Full Screen-View
Copying Photo Files Copia de archivos de fotos
Copying a Photo File in Full Screen-View
Copying Photo Files in Multi-View
Then press the Joystick OK
Set the MP3 mode by pressing the Mode button
Encender la Vídeocámara
Copying MP3 Files to the Memory Camcorder
MP3 Mode Storing Modo MP3 Almacenamiento
MP3 files in the Memory Camcorder
MP3 Mode Playing Modo MP3 Reproducción
Playing MP3 Files Reproducción de archivos MP3
MP3 Mode Setting the MP3
Modo MP3 Ajuste de las
Play Options Opciones de reproducción de MP3
Deleting MP3 Files
MP3 Mode Setting the MP3 Modo MP3 Ajuste de las
Setting the Repeat Play Ajuste de reproducción repetida
Press the Menu button in pause mode
Files, or play the MP3 files at random
Setting the Equalizer Ajuste del ecualizador
MP3 playlist appears
Equalizer
Off / Pop / Classic / Jazz Off / Pop / Classic Clásica
Locking MP3 Files Bloqueo de archivos MP3
Set the MP3 mode by pressing the Mode button
Copying MP3 Files Copia de archivos MP3
Copying MP3 Files in MP3 playlist
Copying an MP3 File in Full screen
Voice Recorder Mode
Pulse el botón Power para Ajuste el modo Voice
Set the Voice Recorder mode by pressing the Mode button
Recording Voice Files Grabación de archivos de voz
Press the Record / Stop button to start recording
To stop recording, press the Record / Stop button again
Voice Recorder Mode Playing
Playing Voice Files Reproducción de archivos de voz
Voice Recorder Mode
Mode button Voz pulsando el botón Mode
Deleting Voice Files
Eliminación de archivos de voz
Setting the Play Mode Ajuste del modo de reproducción
Locking Voice Files Bloqueo de archivos de voz
Switches to the Voice Playlist screen
Copying Voice Files
Copia de archivos de voz
OK Copies the selected voice file
Using File Browser
Pulse el botón Power para
Using File Browser Utilización del explorador de archivos
Set the File Browser mode by pressing the Mode button
Selected file will be played back
Se reproducirá el archivo seleccionado Notas
All All files or folders will be deleted
Select the desired file or folder by using the Joystick
OK The selected file or folder are deleted
Bloqueo de archivos
Using File Browser Utilización del explorador de archivos
Locking Files
Copying Files or Folders
Copia de archivos o carpetas
Press the JoystickOK to finish viewing file information
Viewing File Information
Visualización de la información del archivo
Ajuste de la Vídeocámara
Ajuste el modo System
Setting the Memory
Camcorder Setting Memory Memoria Ajuste de la memoria
Selecting the Storage Type
Selección del tipo de almacenamiento
Camcorder Setting USB Mode Memoria Ajuste del modo USB
Setting USB Mode
Move the Joystick left / right to select USB Mode
Ajuste del modo USB
Setting the File No. Function
Aparece la pantalla System Settings Ajustes sistema
File No Series Reset
Ajuste de la función Archivo nº
Formatting the Memory Formato de la memoria
Move the Joystick left / right to select Format
Viewing Memory Space Visualización de espacio en memoria
Memoria Ajuste de la pantalla LCD
You can adjust the colour of the LCD monitor depending on
Mode button System Settings screen appears
You can adjust the LCD colour from 0% to 100%
Situation
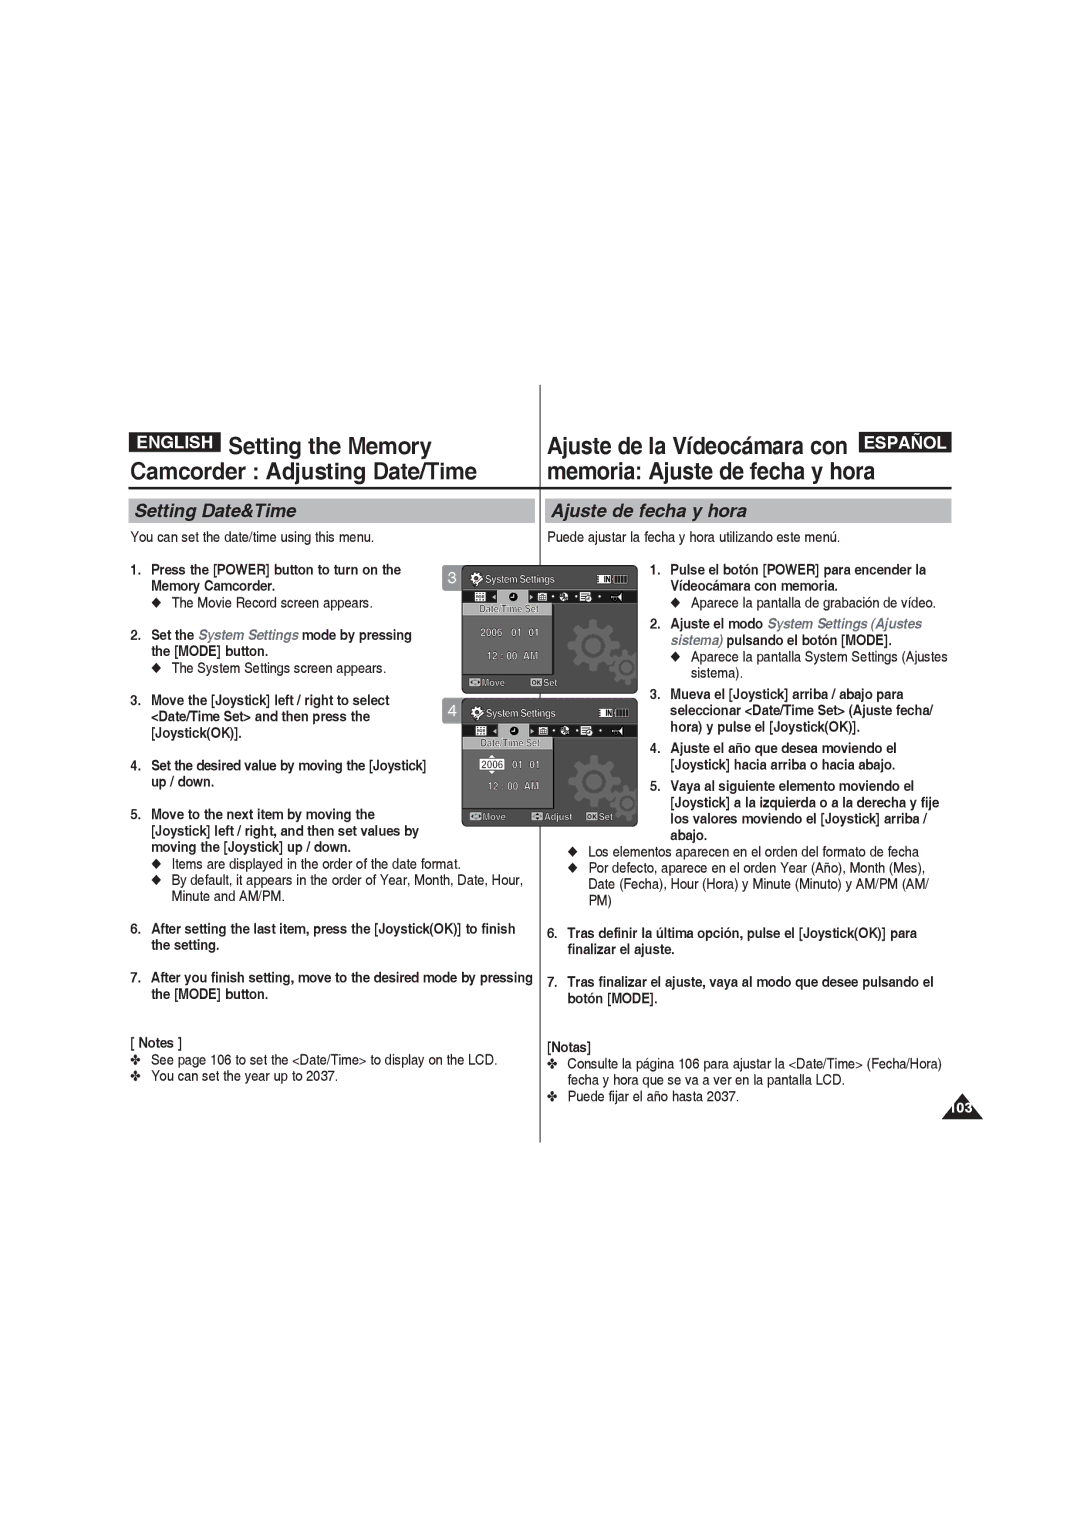
Setting Date&Time Ajuste de fecha y hora
Memoria Ajuste de fecha y hora
Setting Date Format Ajuste del formato de fecha
You can select the date format to display
Puede seleccionar el formato de fecha que va a aparecer
Format
English Setting the Memory
Setting Time Format Ajuste del formato de hora
Desee pulsando el botón Mode
Move the Joystick left / right to select Date/Time
Date Fecha aparece la fecha
Time Hora aparece la hora
Move the Joystick left / right to select Beep Sound
Setting the Beep Sound
Ajuste de Sonido Beep
Setting Start-up Mode
Movie Mode The Memory Camcorder starts up in the Movie mode
Ajuste del modo Inicio
Move the Joystick left / right to select Start-up
Resetting the Memory Camcorder
Reset Reinic. y pulse el JoystickOK
Predeterminados fábrica
Movie Record screen appears Vídeocámara con memoria
Selecting Language
Selección del idioma
Move the Joystick left / right to select Language
You can select the desired language of the Memory Camcorder
Setting the Auto Shut off Ajuste de apagado automático
Off cancela la función de Auto Shut off Apag. autom
Off Cancels the Auto Shut off function
Move the Joystick left / right to select Auto Shut off
Setting the Demonstration Function
Off cancela la función de demostración
Ajuste de la función de demostración
Move the Joystick left / right to select Demonstration
Puede ver la información de la versión del firmware
You can see the firmware version information
Move the Joystick left / right to select Version Info
Firmware version of the Memory Camcorder is displayed
Transferencia de archivos a un PC
Camcorder Using USB Mode
Transferring files to a computer
System Settings screen appears
Printing with PictBridge Impresión con PictBridge
PictBridge and then press the JoystickOK
Range of possibilities 01 ~
English Setting the Memory
Cámara WEB
126
127
128
129
USB connection to a computer
System Environment
Conexión USB a un PC
Entorno del sistema
Installing Software Instalar el software
Installing DV Media Pro
Miscellaneous Information
Instalación de DV Media Pro
Ulead Video Studio
Disconnecting from a PC
It starts to play back
For example, the movie file may play abnormally
Copie el archivo en el PC
Connecting to a TV monitor
Conexión a un monitor de TV
Connect the provided
Camcorder
Connect the other end
Colours of the terminals Haciendo coincidir los
Encender el dispositivo
Recording unscrambled content from other digital devices
Con los colores de los
Printing Photos
Printing with Dpof
Impresión con Dpof
Printing Dpof files in the memory card
Maintenance Cleaning Mantenimiento Limpieza y
After using the Memory Camcorder
Maintaining the Memory Camcorder
Pasos tras utilizar la Vídeocámara con memoria
Cleaning the Body
Using the Built-in Rechargeable Battery
Limpieza de la carcasa
Utilización de la batería recargable incorporada
Regarding the Battery
Información sobre la batería
Using the Memory Camcorder Abroad
Power Sources
Colour System
Fuentes de alimentación
Troubleshooting Solución de problemas
Self Diagnosis Display Pantalla de autodiagnósticos
Troubleshooting Solución de problemas
Using the Menu Uso del menú
Grabar Tamaño
System Settings
Voice Recorder
Grabador voz
Ajustes sistema
Specifications Especificaciones técnicas
Dimensions Mm x 29.7 mm x 59.1 mm Weight 85.1g
Model Name
AC Adapter
0C 32F ~ 40 104F
Index
21~24
54, 73, 81, 88
126~129
Acercamiento y alejamiento de las imágenes
Index Índice alfabético
53, 72, 80, 87
Customer Care Center Web Site
Contact Samsung World Wide
Contacte con Samsung World Wide