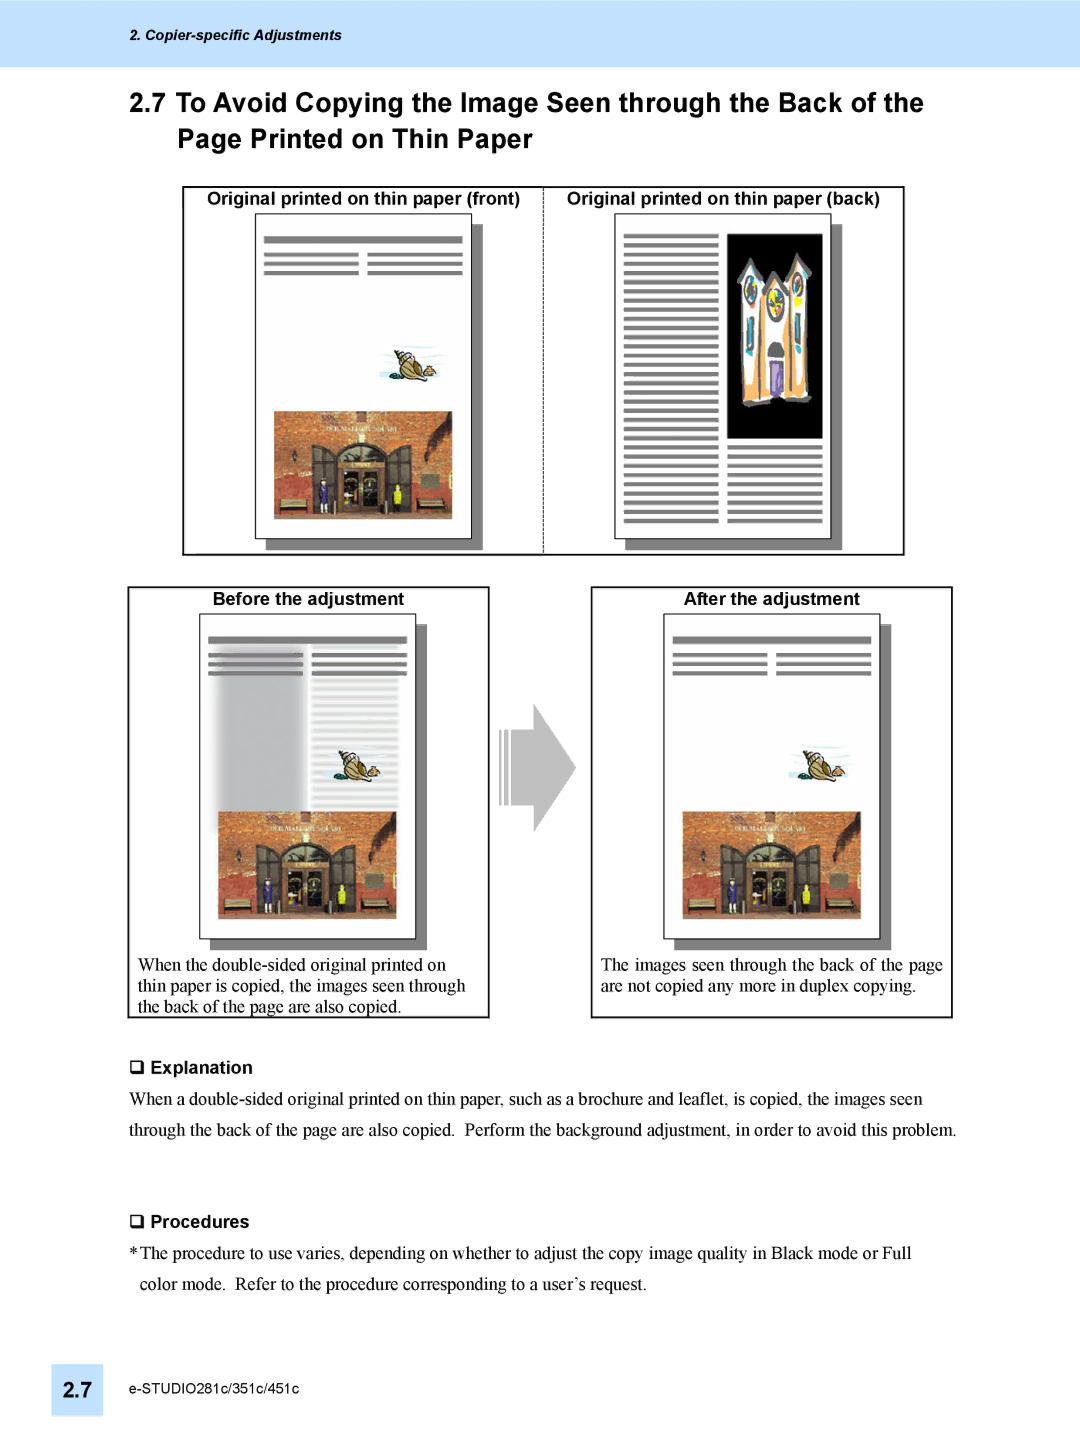
File No. SME05001100 R05072188300-TTEC Ver002005-11
2005 TOSHIBA TEC CORPORATION
All rights reserved
Revision Record
Issue of the first version
File No. SME05001100
Date
Precautions in Servicing
Purpose of the Imaging Manual
Icons
Table of Contents
2. Copier-specific Adjustments
3. Printer-specific Adjustments
4. e-Filing-specific Adjustments
5. Scanning-specific Adjustments
1.1 To Obtain a Darker Image
Before the adjustment
After the adjustment
Procedures
To adjust the copy image quality
To adjust the print image quality
Printer driver
Printing type
Default
Acceptable paper weight
Paper type
05 code
Cautions after the completion of the adjustment
Remarks
1.2 To Achieve the Image Quality Most Suitable for Paper Used
The image sometimes looks slightly blurred or grained on the copy or printout, depending on the type of paper used. In addition, it may become lighter at the trailing edge of the paper. Adjust the transfer roller bias output, in order to achieve the image quality most suitable for the paper used
1.2.1 To Adjust the Blurred or Grained Image
Default
Acceptable paper weight
Paper type
Cautions after the completion of the adjustment
Remarks
Page
Default
Acceptable paper weight
Paper type
05 code
Default
05 code
Subcode
Value recommended
Cautions after the completion of the adjustment
Remarks
e-STUDIO281c/351c/451c
1.3 To Minimize Variations in the Image Quality after Power-on
To optimally program image quality control
Procedures
Cautions after the completion of the adjustment
Value for
Image quality control immediately after the copier is turned on
To optimally program image quality control
The image quality is constantly maintained
1.4 e-STUDIO281c/351c/451c
Procedures
Image quality control when the relative humidity varies
Explanation
Value for
When a copy or print job is initiated, if the waiting period until image quality control is performed has already elapsed, image quality control is performed, first. Then a copy or print job will be performed
Cautions after the completion of the adjustment
Remarks
1.5 To Correct Out-of-Register Colors
image
A4/LT, 1st page
A4/LT, 2nd page
Page
Correction at the leading edge
Correction at the trailing edge
Page
Page
Correction at the leading/trailing edge
Pattern at the leading edge
Pattern at the trailing edge
Before After Lower spacing 0.169 mm Upper spacing 0.169 mm
Cautions after the completion of the adjustment
Remarks
2. Copier-specific Adjustments
2.1 To Sharply Copy Light Text or Thin Lines
To darken handwritten text or thin lines in the graphic image
2.1.1 To Adjust the Copy Image Quality in Black Mode
Acceptable value range
Original mode
Value
2.1.2 To Adjust the Copy Image Quality in Full Color Mode
Default
Original mode
05 code
Cautions after the completion of the adjustment
2. Copier-specific Adjustments
Remarks
2.1.3 To Adjust the Copy Image Quality in Auto Color Mode
Default
Original mode
05 code
Cautions after the completion of the adjustment
2. Copier-specific Adjustments
Remarks
2.2 To Closely Match with the Color Balance of the Original
Procedures
Color to be
Cautions after the completion of the adjustment
Remarks
2.3 To Improve the Reproducibility of Gray
2.3 e-STUDIO281c/351c/451c
Color to be
2.4 To Copy in Vivid Colors
2.4 e-STUDIO281c/351c/451c
Color to be
2.5 To Make the Pale Area of the Original Look Darker and Sharper
To improve the highlight reproducibility
Adjustment
Default
Original mode
05 code
Color to be
The adjustment may possibly cause the background color to become excessively dark. Therefore, carefully perform the adjustment, while checking the copy image
2.6 To Eliminate the Background Color
2.6 e-STUDIO281c/351c/451c
2.6.1 To Adjust the Copy Image Quality in Black Mode
Value
Default
Cautions after the completion of the adjustment
Original mode
05 code
2.6.2 To Adjust the Copy Image Quality in Full Color Mode
Adjustment
Default
Original mode
Cautions after the completion of the adjustment
2. Copier-specific Adjustments
Remarks
2.7 e-STUDIO281c/351c/451c
2.7.1 To Adjust the Copy Image Quality in Black Mode
Default
Original
05 code
Value
Original mode
2.7.2 To Adjust the Copy Image Quality in Full Color Mode
Adjustment
Default
Original mode
Cautions after the completion of the adjustment
2. Copier-specific Adjustments
Remarks
2.8 To Eliminate Moiré
2.8 e-STUDIO281c/351c/451c
To change default original mode on the Control Panel
To change default original mode in setting mode
Default original mode at power-on
Default
Color mode
Original mode
05 code
Cautions after the completion of the adjustment
Remarks
2.9 To Copy Sharply To enhance sharpness
2.9 e-STUDIO281c/351c/451c
Default
Cautions after the completion of the adjustment
Color mode
Original mode
2.10 To Make Photo Edges Look Softer
2.10 e-STUDIO281c/351c/451c
To copy in Full color mode
Color mode
Default
Cautions after the completion of the adjustment
Color mode
05 code
2.11 To Make Solid Filled Bold Text Logo Highly Colored
2.11.1 To Adjust the Copy Image Quality of a Black Logo
Text
05-1795
0/1/2
Set a value larger than
2.11.2 To Adjust the Copy Image Quality of a Colored Logo
Color to be
2.12 To Sharply Contrast the Hues of Highlighters on the Copy
Before the adjustment
After the adjustment
Procedures
WARM
2.12 e-STUDIO281c/351c/451c
Color to be
2.13 To Obtain a Good Color Balance on Thick Paper
2.13 e-STUDIO281c/351c/451c
Cautions after the completion of the adjustment
Remarks
2.14 To Obtain Smooth Gray-scale Photo Images
Procedure
Cautions after the completion of the adjustment
Remarks
2.15 To Change the Threshold in Auto Color Mode
Procedures
Threshold to be adjusted
Default
Cautions after the completion of the adjustment
2.16 To Clearly Copy Text To adjust the density of text
2.16 e-STUDIO281c/351c/451c
2.16.1 To Adjust the Copy Image Quality in Black Mode
2.16.2 To Adjust the Copy Image Quality in Full Color Mode
2.17 To Adjust the Twin Color Copy Image Quality
To adjust the image quality in red and black mode
2.17.1 To Adjust the Reproducibility of Black in Red and Black Mode
2.17.2 To Adjust the Tint of Red in Red and Black Mode
Cautions after the completion of the adjustment
2.18 To Adjust the Image Quality Scanned from the RADF
Procedure
3. Printer-specific Adjustments
3.1 To Maintain a Steady Color Balance
3. Printer-specific Adjustments
PCL5c PCL6 PS3 Mac
3.2 To Obtain the Desired Color Balance
3.2 e-STUDIO281c/351c/451c
For Windows
For Macintosh
Menu
photos and gradational images. This provides the color balance closely matching
2 Enter adjustment mode 05. Select code 395. Press the START button
This adjustment will have an effect only on full-color printing
Color to be
Photograph
Presentation
Halftone = Auto
3.3 To Closely Match with the Color Balance on the Monitor
Procedure
For Windows
3.3 e-STUDIO281c/351c/451c
Cautions after the completion of the adjustment
For Macintosh
Menu
Remarks
3.4 To Maintain a Uniform Gray Hue
To Maintain consistency in Gray among Text, Photos and Graphics
Procedure
For Windows
For Macintosh
Menu
For Windows
PCL5c
For Macintosh
Menu
The adjustment performed in accordance with procedure 1 will allow gray areas to always be reproduced using all toner colors C, M, Y and K. As a result, undesired colors may look blended, depending on the image to print out. Therefore, carefully perform the adjustment, while checking the printout
3.5 To Easily Adjust the Overall Brightness
Procedure
Cautions after the completion of the adjustment
Remarks
PCL5c
3.6 To Easily Adjust the Overall Saturation
3.6 e-STUDIO281c/351c/451c
Cautions after the completion of the adjustment
Remarks
3.7 To Clearly Print Light-colored Thin Lines or Text
3.7 e-STUDIO281c/351c/451c
For Windows
PCL5c PS3
For Macintosh
Menu
To adjust the image quality in full-color printing
Area for the density to be adjusted
Halftone
05 code
Value
Mono is selected from among the Color options on the PCL5c or PS3 printer driver. To print using PCL6, Mono is selected from among the Color Resolution Type options on the Macintosh printer driver
3.8 To Clearly Print Thin Lines/Double Lines
3. Printer-specific Adjustments
For Windows
PCL5c PCL6 PS3
e-STUDIO281c/351c/451c
Cautions after the completion of the adjustment
For Macintosh
Menu
3.9 To Decrease the Image Density and Save Toner
To Print in Toner Save Mode
3. Printer-specific Adjustments
PCL5c PCL6 PS3
3.9 e-STUDIO281c/351c/451c
Cautions after the completion of the adjustment
For Macintosh
Menu
Remarks
3.10 To Adjust the Image Density in Toner Save Mode
Page
3.11 To Print Illegible Gray or Colored Text in Black
3.11 e-STUDIO281c/351c/451c
Cautions after the completion of the adjustment
Remarks
3.12 To Ignore Blank Pages for Printing
3. Printer-specific Adjustments
For Windows
PCL5c PCL6 PS3
e-STUDIO281c/351c/451c
3. Printer-specific Adjustments
For Macintosh
Open the print dialog box. Mark the Do not Print Blank Pages checkbox
Menu
The adjustment may possibly cause the functions in the Layout tab Booklet printing, N-up printing, Use Front Cover, Use Back Cover and Interleave Pages not to work, as programmed. Therefore, pay special attention to a combination of the functions to be used
3.13 To Sharply Print Black Text
3.13 e-STUDIO281c/351c/451c
For Windows
For Macintosh
Menu
3. Printer-specific Adjustments
PCL5c PCL6 PS3
4 Enter adjustment mode 05. Select code 395. Press the START button
Area for the density to be adjusted
Halftone
05 code
Value
100% black indicates the following values RGB data RGB = 0%
1 Open a PDF file on Acrobat 7.0 Professional
4. e-Filing-specific Adjustments
4.1 To Clearly Store the B/W Image in Auto Color Mode
4. e-Filing-specific Adjustments
4.2 To Store the Original, while Reducing the File Size
Ex. A4, 200 dpi, LOW = Approx. 1000 KB
Ex. A4, 200 dpi, HIGH = Approx. 400 KB
Page
4.3 To Store the Color Photo Image, while Minimizing Moiré
4.3 e-STUDIO281c/351c/451c
To change default original mode on the Control Panel
To change default original mode in setting mode
Default original mode at power-on
Cautions after the completion of the adjustment
To change the density in Copy to Box
4.4 e-STUDIO281c/351c/451c
To change default original mode on the Control Panel
To change default original mode in setting mode
Default original mode at power-on
Cautions after the completion of the adjustment
To adjust the color balance in Print to Box
4.5 To Match with the Color Balance on the Original
Procedure
Cautions after the completion of the adjustment
Explanation
4.6 To Scan and Print, while Minimizing Moiré
4.6 e-STUDIO281c/351c/451c
Default
Cautions after the completion of the adjustment
Color mode
Original mode
4.7 To Finely Print the Image Stored in the e-Filing box
To Print Images Stored through Copy to Box or Print to Box
Procedure
Cautions after the completion of the adjustment
Explanation
Remarks
Copy to Box Print data
Scan to Box RGB data
Downloaded RGB data
Procedure
Cautions after the completion of the adjustment
Explanation
Remarks
4.9 To Finely Print Color Images Stored through the Scanning Function
To Print Images Stored through Scan to Box
Procedure
Cautions after the completion of the adjustment
4. e-Filing-specific4.Adjustments
Explanation
5. Scanning-specific Adjustments
5.1 To Clearly Scan Text To reduce noise around text
Cautions after the completion of the adjustment
Resolution
5. Scanning-specific Adjustments
File size ratio
5.2 To Scan the Original, while Eliminating the Background Color
To eliminate the background density
Default
Cautions after the completion of the adjustment
Color mode
Original mode
5.3 To Clearly Scan and Print the Original in Black and White
To improve gradation and reduce graininess
Ratio of the file size in Black mode to Gray scale mode
5.4 To Scan the Original, while Reducing the File Size
Approx. 100 KB Approx. 30 KB Approx. 150 KB Approx. 90 KB
In the JPEG COMPRESS option, MID is selected by default
Cautions after the completion of the adjustment
Resolution
Procedures used
File size ratio
Remarks
5.5 To Sharply Scan the Original To increase the sharpness intensity
5.5 e-STUDIO281c/351c/451c
Procedure
Default
Cautions after the completion of the adjustment
Color mode
5.6 To Scan the Original, while Enhancing Black
Procedure
Default
Cautions after the completion of the adjustment
Color mode
5.7 To Scan the Original with the Desired Gradation
Procedure