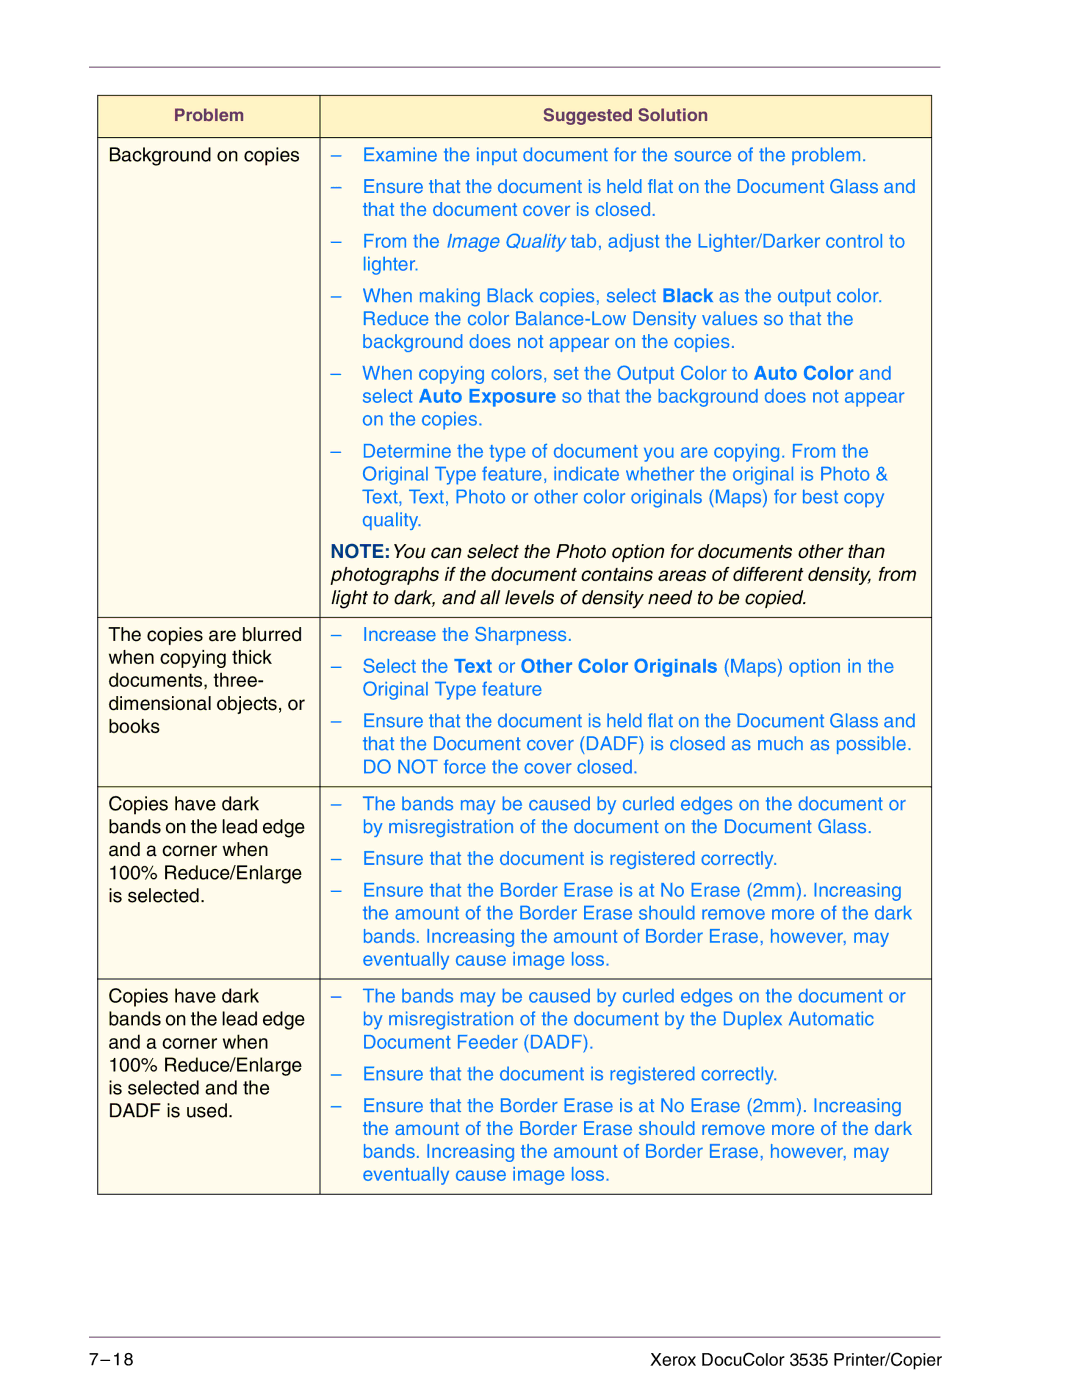
Problem | Suggested Solution | |
|
| |
Background on copies | – Examine the input document for the source of the problem. | |
| – Ensure that the document is held flat on the Document Glass and | |
| that the document cover is closed. | |
| – From the Image Quality tab, adjust the Lighter/Darker control to | |
| lighter. | |
| – When making Black copies, select Black as the output color. | |
| Reduce the color | |
| background does not appear on the copies. | |
| – When copying colors, set the Output Color to Auto Color and | |
| select Auto Exposure so that the background does not appear | |
| on the copies. | |
| – Determine the type of document you are copying. From the | |
| Original Type feature, indicate whether the original is Photo & | |
| Text, Text, Photo or other color originals (Maps) for best copy | |
| quality. | |
| NOTE:You can select the Photo option for documents other than | |
| photographs if the document contains areas of different density, from | |
| light to dark, and all levels of density need to be copied. | |
|
| |
The copies are blurred | – Increase the Sharpness. | |
when copying thick | – Select the Text or Other Color Originals (Maps) option in the | |
documents, three- | ||
Original Type feature | ||
dimensional objects, or | ||
– Ensure that the document is held flat on the Document Glass and | ||
books | ||
| that the Document cover (DADF) is closed as much as possible. | |
| DO NOT force the cover closed. | |
|
| |
Copies have dark | – The bands may be caused by curled edges on the document or | |
bands on the lead edge | by misregistration of the document on the Document Glass. | |
and a corner when | – Ensure that the document is registered correctly. | |
100% Reduce/Enlarge | ||
– Ensure that the Border Erase is at No Erase (2mm). Increasing | ||
is selected. | ||
| the amount of the Border Erase should remove more of the dark | |
| bands. Increasing the amount of Border Erase, however, may | |
| eventually cause image loss. | |
|
| |
Copies have dark | – The bands may be caused by curled edges on the document or | |
bands on the lead edge | by misregistration of the document by the Duplex Automatic | |
and a corner when | Document Feeder (DADF). | |
100% Reduce/Enlarge | – Ensure that the document is registered correctly. | |
is selected and the | ||
– Ensure that the Border Erase is at No Erase (2mm). Increasing | ||
DADF is used. | ||
| the amount of the Border Erase should remove more of the dark | |
| bands. Increasing the amount of Border Erase, however, may | |
| eventually cause image loss. | |
|
|
7– 1 8 | Xerox DocuColor 3535 Printer/Copier |
