PARTNER
Table of contents
Menu interface
Avaya, Inc Iii Partner ACS 1600 DSL module User Guide
Avaya, Inc Iv Partner ACS 1600 DSL module User Guide
Avaya, Inc Partner ACS 1600 DSL module User Guide
Administration
WAN configuration
Router configuration
NAT configuration
IP Filtering
Connector pinouts
USI Cables
Glossary
Introduction
Organization of this guide
Avaya, Inc Partner ACS 1600 DSL module User Guide
Hardware and software requirements
Connectors
Partner ACS 1600 DSL module basics
Console cable
Front View
Connecting
Logging on
19200
Using a terminal emulation program
Access Level User ID
None
Using a Telnet program
Configuring a port IP address
Select Configure Port IP Address
Running the Telnet program
Restarting
Default values
Menu interface
Enter a new subnet mask for this interface 255.255.255.0
Verifying an IP address
Auto Log off
Exiting
Computer running Windows 95/98/Me/2000
Select Display Current Configuration
Partner ACS 1600 DSL module
Menu interface
Main Menu
Simple Network Management Protocol Snmp enabled or disabled
Display Current Configuration
Spanning Tree bridge priority 1-65,535 default = 32,768
Reports Menu
Snmp Trap Host IP Address IP address of the Snmp trap host
Frame Relay Management
Display Network Statistics
Display Interface Statistics
Clear Frame Relay Dlci Statistics Clear Serial Statistics
Display Media Statistics
Clear a Statistic
Display Bridge forwarding database
Display Route Table
Display ARP Table
Display Bridge status
Display PPP Authorization Entries
Spanning Tree Protocol STP enabled or disabled
Display System Uptime
Configure IP Router
Routing
Add/Remove a Static Route
Configure Port IP Address
Unconfigure Port IP Address
Configure RIP Poisoned Reverse by Port
Enable/Disable RIP
Configure RIP Version by Port
Configure Dhcp Relay
Configure DNS Client
Configure Dhcp Client
Globally enable/disable input or output filters
Configure Telnet Server Port
Configure IP Filtering
Display Dhcp Relay Statistics
Toggle input or output type filters to view/edit
Displays all filters of the type that you set with
Display the filter in the copy buffer
Source.ip.addr.high Filter Source IP High Address
Delete all filters of the chosen type
Edit the filter in the copy buffer
Deletes the filter in the copy buffer
Show IP filtering statistics
Display Route Table
Configure Bridge
Bridging
Configure Bridge Aging Timer
Enable/Disable Bridging Globally
Enable/Disable Bridging by Port
Enable/Disable Spanning Tree Globally
Configure Spanning Tree Max Age
Configure Spanning Tree Port Priority
Configure Spanning Tree Hello Time
Configure Spanning Tree Forward Delay
Delete Bridge Forwarding Database Entry
Configure
WAN
Quick Configuration
Configure Datalink Protocol
RS-530
Configure Physical Interface
Set WAN interface type
Externally provided MBps KBps
Set Sdsl to AccessLan CPE Mode Set Sdsl Speed Manually
Sdsl Mode
Set Sdsl Sync Delay Lucent
Configure Dlcis Frame Relay
Configure Receive CIR
Set Fragmentation Size
Modify Existing Dlci
Show Current DLCIs
Configure Pvcs ATM
Delete Dlci
Add New PVC
None PAP Client PAP Server Chap Client Chap Server
Proprietary Voice
RFC 2364 PPPoATM with LLC Encapsulation
RFC 2364 PPPoATM using VC Muxing
Modify Existing PVC
Proprietary Voice
Enable Automatic Fragment Sizing Set Manual Fragment Size
Configure FR Options Frame Relay
Enable/Disable FRF.12
Delete PVC
Configure Congestion Parameters
Configure Copper Mountain Fragmentation
Enable/Disable CuMtn Fragmentation
Configure Transmit Congestion Parameters
Configure EmptyCells
Configure ATM Options ATM
Configure Receive Congestion Parameters
Configure System Name
Enable/Disable Snmp
Configure System Contact
Configure System Location
Configure Login
Trace Route
System Utilities
Ping Utility
Hard Reset or Reload Acos from Flash
Configure Console Baud Rate
Configure Console Timeout
Set System Defaults
File Transfer Menu
Add Interworking Connection
Update Entire System
Interworking Connections
File Transfer Utilities
Always
Set FR-SSCS, ATM =
True
Always Map FR Fecn to ATM Efci 1. Always
Always Map FR Fecn to ATM Efci False
Delete Interworking Connection
Print Interworking Connections
Always Map FR Fecn to ATM Efci Map FR DE to ATM Clpi
Enable/Disable Dhcp
Configure Dhcp Server
Default Interworking Connections
Enable/Disable Dhcp Debug Messages
Configure Dhcp Address Range Pool
Configure Dhcp Client Entry
Display Dhcp Configuration
Display Dhcp Server Statistics
Display Dhcp Entry Details
Nacks sent Requests for other servers Protocol errors
Display Dhcp Server Assigned Addresses
Delete a Dhcp Client Entry
Configure NAT TCP Timeout
Enable/Disable NAT Debug Messages
Enable/Disable NAT Translation by Port
Configure NAT UDP Timeout
Configure NAT Local Server Entry
Display NAT Statistics
Display NAT Local Server Table
Display NAT Connection Table
Display NAT Connection Details
Delete IP Address from NAT Tables
Derived Timing
Enable/Disable Derived Timing
Enable/Disable Derived Timing Debug Messages
Delete NAT Local Server Entry
Sdsl Diagnostics
Diagnostics Menu
Pots Diagnostics
Hotline Test Ring Test On/Off Hook Test
Commands
Command Line Interface
Command line syntax
Set Voice Gateway
VoicePath Configure
Set Jitter Delay
Set Compander Mode u-Law, a-Law
Display Jitter Delay
Set Slic Control Mode
Auto Control Mode Manual Control Mode
Enable Debug Disable Debug
Set Debug Mode
Configure Echo Cancellation Default Settings
Configure Echo Cancellation default setting per port
Display MGCP/NCS statistics
Configure MGCP/NCS parameters
Manage MGCP/NCS Embedded Client
Debug MGCP/NCS
Statistics
Configure
CopperCom Call Control
Debug Control
Payload CPE Signal GWY Signal Display Debug State/Flags
Flags
Stats Display
Call Control Settings
Configure Ring Test
Ring Test
Display Parameters
Display IAD State
Trace
Set Trace data
Pick sound heard if insufficient WAN B/W to complete call
Configure Tollbridge Voice Client
Print Current Configuration
Set Client IP address
Debugging options
Administration
Security
Changing the User ID
Changing the Password
Access level Menu access level
Select Change User ID
Enter new Password up to 17 characters
Configuring
Select Change User Password or Change NetMan Password
Select Enable/Disable Snmp
Configuring the System Contact
Snmp Configuration Menu displays
Enabling/disabling Snmp
Select Configure System Name
Configuring the System Name
Select Configure System Contact
Configuring the System Location
Configuring the System Community
Select Configure Snmp Community
Configuring the Snmp Trap Host IP Address
Upgrading the system
Configuring the Tftp Server
Using Tftp
File Transfer Method Receive via Tftp Receive via Xmodem
Select Update Entire System
Select File Transfer Menu File Transfer Menu displays
Select Receive via Tftp
Select File System Menu File System Menu displays
Using Telnet
Verifying the download
Upgrading
Acos
Select File Transfer Menu File Transfer Menu displays
Select Update Acos acos.bin
Support
WAN configuration
Changing Datalink Protocol
Configuring Physical Interface
Select Configure Physical Interface
Configuring the Sdsl Interface
WAN Configuration Menu displays
Available WAN Interfaces
Configuring the USI interface
Avaya, Inc Partner ACS 1600 DSL module User Guide
Select Set WAN interface type
Quick Configuration
Configuring ATM PVCs
Select Quick Configuration
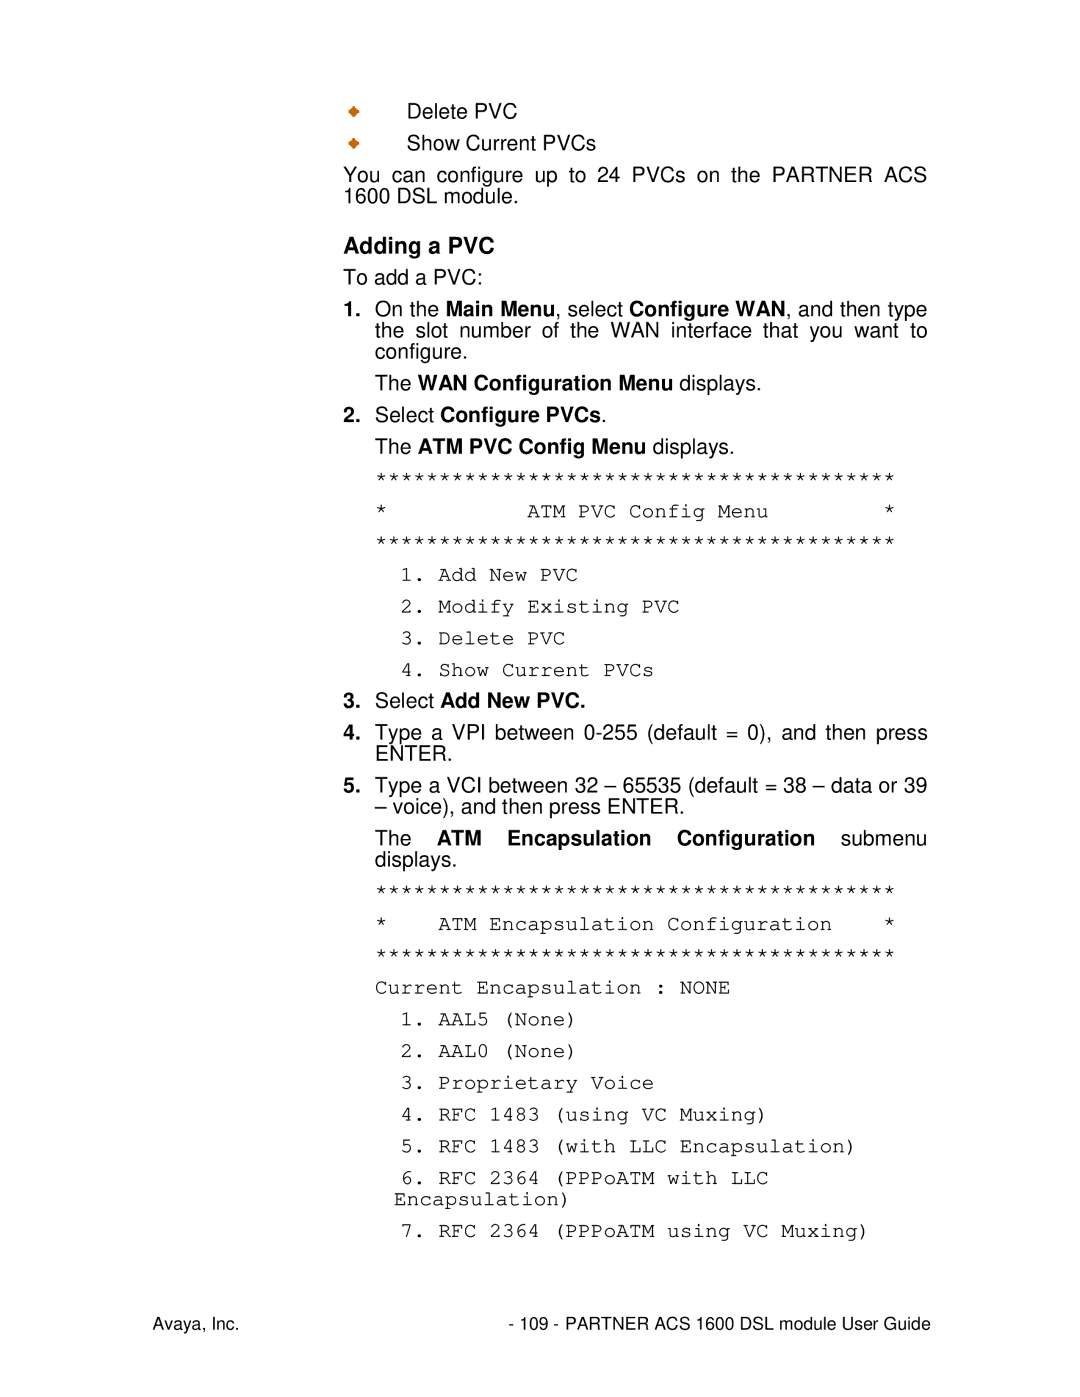
Select Add New PVC
ATM Encapsulation Configuration submenu displays
Adding a PVC
Select Modify Existing PVC
ATM Service Category Configuration CBR UBR
Modifying a PVC
ATM Encapsulation Configuration submenu displays
Select Delete PVC
Configuring ATM options
Deleting a PVC
Configuring Payload Scrambling
Configuring the F4 OAM Cell
F4 OAM Type Configuration Menu None F4 End to end OAM
Sending OAM Loopback
Select Send OAM Loopback
Configuring Empty Cells
Select Configure EmptyCells
Empty Cells are currently Idle
Enter 1 for Idle cells or 2 for Unassigned cells
Configuring Frame Relay DLCIs
Adding a Dlci
Select Add New Dlci
FR Encapsulation Configuration submenu displays
Modifying a Dlci
Select Modify Existing Dlci
Deleting a Dlci
WAN Configuration Menu displays Select Configure FR Options
Configuring Frame Relay options
Configuring fragmentation
Select Delete Dlci
Do one of the following
Both
Configuring the maintenance protocol
User
Configuring the congestion parameters
Select Set Jitter Delay
Configuring the voice path
Setting the jitter delay
Enter number of ms to delay
Setting the Slic Control Mode
Configuring Echo Cancellation
Display current Echo Cancellation default settings
Avaya, Inc Partner ACS 1600 DSL module User Guide
Router configuration
Configuring an IP address
Router Configuration Menu displays
Router Configuration Menu redisplays
Enabling RIP poisoned reverse
Enabling RIP poisoned reverse globally
Enabling RIP poisoned reverse by port
Setting the RIP version
Avaya, Inc Partner ACS 1600 DSL module User Guide
Adding a static route
Select Add a Static Route
Adding a default route
Router Modification Menu redisplays
Disabling bridging
Select Add/Change the Default Route
Bridge Configuration Menu displays
Disabling bridging globally
Disabling bridging by port
Bridge Configuration Menu
Configure Spanning Tree Bridge Priority
Disabling STP
Disabling STP globally
Disabling STP by port
Bridge Configuration Menu redisplays
Bridge configuration
Enabling Bridging
Enabling bridging globally
Enabling bridging by port
Setting the bridge aging timer
Enter Bridge Aging time in seconds 1..3600
Disabling RIP poisoned reverse
Disabling RIP poisoned reverse globally
Router Configuration Menu resplays
Disabling RIP poisoned reverse by port
Enabling STP
Enabling STP globally
Enabling STP by port
Bridge Configuration Menu redisplays
NAT configuration
Enabling NAT translation
NAT Configuration Menu displays
NAT Configuration Menu redisplays
Configuring the NAT local server entry
Enter NAT Local Server Entry to Configure 1..10
Configuring the NAT timeouts
Enter NAT Local Server Protocol 1=TCP 2=UDP
Enter NAT TCP Connection Timeout in seconds 60..3600
Configuring a NAT TCP timeout
Select Configure NAT TCP Timeout
Enter NAT UDP Connection Timeout in seconds 60..3600
Configuring a NAT UDP timeout
Select Configure NAT UDP Timeout
Configuring the NAT port range
Enter High End of NAT Port Range 5010..65534
Select Configure NAT Port Range
Enter Low End of NAT Port Range 5000..65534
Enabling
Dhcp server configuration
Dhcp Server Configuration Menu displays
Delete a Dhcp Assignment Entry
Configuring the Dhcp server parameters
Select Enable/Disable Dhcp
Type the new gateway IP address, and then press
NetBIOS Type Configuration Menu displays
Dhcp Server Configuration Menu redisplays
Configuring Dhcp address range pool
Avaya, Inc Partner ACS 1600 DSL module User Guide
Operational test
Power-up test
Verification
Maintenance
Displaying the current configuration
Display Current Configuration Display Network Statistics
Menu hierarchy
Configure IP Router
Configure Dhcp Client Configure Dhcp Relay
Configure Telnet Server Port Configure IP Filtering
Totally Transparent Raw Hdlc Cisco compatible Hdlc
USI
Configure DLCIs Datalink Protocol = Frame Relay
Configure PVCs Datalink Protocol = ATM
Avaya, Inc Partner ACS 1600 DSL module User Guide
Avaya, Inc Partner ACS 1600 DSL module User Guide
Configure FR Options Datalink Protocol = Frame Relay
Configure ATM Options Datalink Protocol = ATM
Change User ID Change User Password Change NetMan Password
Ping Utility Trace Route Configure Console Baud Rate
Interworking Connections
Always Map Fr Fecn To ATM Efci Map Fr De To ATM Clpi
Hotline Test Ring Test
Command Line Interface VoicePath Configure
Set Jitter Delay Display Jitter Delay Set Slic Control Mode
Display Statistics C. Clear Statistics
Stats Display Ring Test
Display IAD State Trace
Bridging Routing
Partner ACS 1600 DSL module specifications
Network Interfaces
Protocols
Management and Configuration
Environmental
100BaseT Connector
Connector pinouts
10BaseT Connector
Pin Signal
Connector
Which Hardware Protocol?
USI Cables
DTE or DCE?
Signal RS-530 RS-449
Signal RS-530
IP Filtering
Glossary
Icmp
Inverse ARP
MAC address
OSI Reference
Router
Poisoned
Reverse
Subnet Mask
SVC
Index
Partner ACS
Avaya, Inc Partner ACS 1600 DSL module User Guide
Avaya, Inc Partner ACS 1600 DSL module User Guide
Partner ACS
Avaya, Inc Partner ACS 1600 DSL module User Guide
Eeprom
Avaya, Inc Partner ACS 1600 DSL module User Guide
Avaya, Inc Partner ACS 1600 DSL module User Guide
Avaya, Inc Partner ACS 1600 DSL module User Guide
Avaya, Inc Partner ACS 1600 DSL module User Guide
STP
Telnet
Avaya, Inc Partner ACS 1600 DSL module User Guide