User guide
Page
User Guide
Trademark Credits
Contents
Printing tasks
Problem solving
Service and support
Appendix B Control panel menus
Index
Navigational features in this guide
How to use this online user guide
Magnifying the Page View
Features of Acrobat Reader
Browsing with thumbnails
Paging through a document
Finding words
Printing the document
Choose All n pages n represents the total number of pages
Setting up the printer
Where to look for more information
HP JetDirect Print Server Administrator’s Guide
Getting Started Guide
Accessory guides
Using the printer
Online Help
HP Fast InfraRed Receiver User Guide
Overview
Printer basics
Printer features and benefits
Expandable design
HP LaserJet
Printer configurations
HP LaserJet 4100N
HP LaserJet 4100TN
Printer parts front view, HP LaserJet 4100/4100N printer
Printer parts and locations
Printer parts back view
Accessories and supplies
Ordering information
Ordering through service or support providers
Items and part numbers
Ordering directly through the embedded web server
Ordering directly through the printer software
Paper handling Part number Description or use
Cables and interfaces Part number Description or use
Hardware Part number Description or use
Documentation
Maintenance Part number Description or use
HP LaserJet Paper
Printing supplies Part number Description or use
HP Premium Choice LaserJet
Control panel layout
Light Indication when lit
Control panel
Control panel lights
Key Function
Control panel keys
Using the printer online help system
To print a control panel menu map
To change a control panel setting
Control panel menus
Software provided
Printer software
Page
PPDs
Printer drivers
Operating system PCL 5e
Software for Windows-based computers
Access the Windows printer driver
HP Resource Manager
Choose the right printer driver for your needs
Printer driver help
HP JetSend communications technology
Networked devices
How the JetSend communications technology works
HP LaserJet Utility
Software for Macintosh computers
PostScript Printer Description files PPDs
Software for networks
HP Web JetAdmin
Printer basics
Printing tasks
Printing to the top output bin
Selecting the output bin
Printing to the rear output bin
Loading tray
On the next
Loading trays 2, 3,
Page
Printing both sides of paper optional duplexer
Guidelines for printing both sides of paper
Tray
Placement for paper requiring a specific orientation
Long-edge portrait Landscape Short-edge Portrait
Layout options for printing both sides of paper
Paper single-sided
Printing special paper
Printing small or narrow paper
Paper orientation for trays 2, 3,
Paper orientation for tray
Printing envelopes
Loading envelopes in tray
Feeder
Feeding envelopes automatically optional envelope
Inserting and removing the envelope feeder
Loading envelopes in the envelope feeder
Page
Do not
Printing labels
Printing transparencies
Printing cards, custom-size, and heavy paper
Setting custom paper sizes
Guidelines for printing custom-size paper
Tray Minimum size Maximum size
Front edge
Printer collation
Using features in the printer driver
Advanced printing tasks
Scaling page image ZoomSmart
Saving printer setup information Quick Sets
Printing booklets
Printing with a watermark
Printing multiple pages on one sheet of paper n-up
Different first
Understanding tray order
Customizing what tray is used for printing
Customizing tray 1 operation
SettingExplanation
To print by type and size of paper
Printing by type and size of paper locking trays
Benefits of printing by type and size of paper
Manually feeding paper from tray
Printing additional copies of a quick copy job
Job retention features
Quick copying a job
Deleting a quick copy job
Printing the remaining copies of a held job
Proofing and holding a job
Deleting a held job
Releasing a private job
Printing a private job
Specifying a private job
Deleting a private job
Printing a stored job
Storing a print job
Deleting a stored job
Setting up to print with Macintosh computers
Setting up to print with Windows
Printing with the optional HP Fast InfraRed Receiver
Select Printer IR Infrared and click OK
Printing a job
Interrupting and resuming printing
Printer maintenance
Managing the toner cartridge
Toner cartridge authentication
HP toner cartridges
Non-HP toner cartridges
Using the embedded web server
Using the printer control panel
Toner cartridge storage
Toner cartridge life expectancy
Cartridge interaction shaking
Using printer software
Using HP Web JetAdmin
Toner low and toner out conditions
When toner is low
When toner is out
General guidelines
Cleaning the printer
Cleaning procedure
Reinstall the toner cartridge, close
Running the cleaning page manually
Cleaning the fuser
Press Item until Auto Cleaning FREQUENCY=2000 appears
Running the cleaning page automatically
Performing preventative maintenance
For See the following
Configuring alerts
Problem solving
Clearing paper jams
Back Front
Paper jam locations
Clearing jams from the top cover and toner cartridge areas
Page
Optional envelope feeder
Clearing jams from
Open and close the top cover to
Trays 2, 3,
Clearing jams from the input tray areas
Page
Clearing jams from the optional duplexer
Page
Clearing jams from the output areas
Clearing jams from the fuser area
On the next
Page
If paper jams occur frequently, try the following
Solving repeated paper jams
If a message persists
Using the printer online help system
Understanding printer messages
Printer messages Message Explanation or recommended action
Operation Failed
Disk File
System is Full
Disk is
External Device
Envelope Feeder
Flash Device
Flash File
Memory Settings
Install Toner
Input Device
Condition
Simplified
Cleaning
Detected
Continue Offline
Toner OUT
RAM Disk File
Toner LOW
Tray 1 Load
Tray 1 Type =
Tray Size =
Unable to
Mopy JOB
Press GO to
Memory
Continue
TOO
Cycle Power to
Printer Error
Cycle Power to Continue
Parallel I/O
Remove
Fuser Error
Sealing Tape
From Toner
Cycle Power
Storage Error
Service Error
Check Settings
Permanent
Printer messages Message
8x.yyyy EIO z Error
Mopy disk error messages
Mopy disk error messages
Image defect table
Correcting output quality problems
See White spots on
Specks
Light print partial
Light print entire
Lines
Dropouts
Toner smear
Gray background
Repeating defects
Loose toner
Skew
Repeating image
Misformed characters
Vertical white lines
Curl or wave
Wrinkles or creases
White spots on black
Tire tracks
Troubleshooting flowchart
Determining printer problems
Does the control panel display READY?
Go to step
YES
Can you print a configuration page see
Can you print from a software application?
Does the job print as expected? on the following
Does the job print as expected?
RESOLUTION=
Does the printer select the proper trays
For other problems
Can you print from a software
Troubleshooting flowchart for Macintosh users
Index, or the printer
Check the Contents,
Click Select PPD
Selecting an alternate PPD
Renaming the printer
Initialized
Troubleshooting the optional printer hard disk accessory
PS troubleshooting ItemExplanation
Troubleshooting PS
Or compatible driver
Troubleshooting optional HP Fast InfraRed Receiver problems
Troubleshooting optional HP Fast InfraRed Receiver problems
Communicating with an optional HP JetDirect print server
Menu map
Checking the printer configuration
Configuration
Configuration
Supplies status
Supplies status
To print a PCL or PS font list
PCL or PS font list
World Wide Web
HP Customer Care Service and Support
Online services
Service and support
Argentina
HP service parts information CD
HP direct ordering for accessories or supplies
HP service agreements
HP direct ordering for genuine HP parts
HP SupportPacks
HP fraud hotline
Customer support options worldwide
Page
In-country/region support numbers
Guidelines for repacking the printer
Warranty information
What Needs to be DONE? Attach a separate sheet if necessary
Service information form
HP Product Duration of Warranty
Hewlett-Packard limited warranty statement
Service and support
Limited warranty for toner cartridge life
License Grant
HP software license terms
HP software license terms
Worldwide country/region sales and service offices
Germany
Finland
France
Hungary
Greece
Macedonia, The Former
Yugoslav Republic
Romania
Portugal
Russian Federation
Slovakia
Ukraine
Switzerland
United Kingdom
Turkey
Belize
Argentina
Bolivia
Brazil
El Salvador
Ecuador
Guatemala
Honduras
China
Australia
Bangladesh
India
Korea, Republic
Indonesia
New Zealand
Pakistan
Sri Lanka
Singapore Japan
Thailand
Vietnam
Ishikawa
Ibaraki Saitama
Shizuoka
Kanagawa
Angola
Algeria
Bahrain
Egypt
Mozambique
Morocco
Namibia
Saudi Arabia
Zimbabwe
United Arab Emirates
Zambia
Specifications
Paper specifications
Supported sizes and weights of paper
Page
Capacity
Supported types of paper
Guidelines for using paper
Symptom Problem with paper Solution
Such as those used in some types of thermography
Weight
Paper weight equivalence table
Bristol Index Tag Metric Thickness Weight
Label construction
Labels
Transparencies
Envelope construction
Envelopes
Envelopes with double-side-seams
Envelopes with adhesive strips or flaps
Envelope margins
Card stock and heavy paper
Envelope storage
Type of address Top margin Left margin
Card stock guidelines
Card stock construction
Physical dimensions
Printer specifications
Electrical specifications
Environmental specifications
Printer weight without toner cartridge
Acoustic emissions per ISO
General specifications
Printer state Sound power level a Bystander position
Paper trays
Product compatibility matrix
Memory
Control panel menu map
Control panel menus
Quick Copy Jobs Menu Value Explanation
Quick Copy Jobs Menu
Jobname
COPIES=1
Private/Stored Jobs Menu Value Explanation
Private/Stored Jobs Menu
Information Menu Explanation
Information Menu
Print Paper Path Test
Information Menu ItemExplanation
Print Supplies Status
Paper Handling Menu Values Explanation
Paper Handling Menu
Plain
Tray 1 TYPE=
Tray 2 TYPE=
Tray 3 TYPE=
Mode MENU=NO YES
Configure Fuser
Small Paper Normal
SPEED=NORMAL Slow
Printing Menu Values Explanation
Printing Menu
Inches
DIMENSION=
Millimeters
ORIENTATION= Portrait
PCL Font NUMBER=
PCL Symbol SET=
PCL Font PITCH=
PCL Font Point
Regular Dark
Courier FONT= Regular
Wide A4=NO
Override
Print Quality Menu Values Explanation
Print Quality Menu
ECONOMODE=OFF
Create Cleaning
Toner DENSITY=3
Auto
Configuration Menu Values Explanation
Configuration Menu
Maintenance OFF
JAM RECOVERY= Auto
Clearable JOB
Auto CONTINUE=
TIMEOUT=OFF Hour
Print PS ERRORS= OFF
RAM DISK=AUTO OFF
Quick Copy
Menu Values Explanation
Menu
Accessory Resets Menu Value Explanation
Resets Menu
POWERSAVE=
Resets Menu Value Explanation
EIO Menu Values Explanation
EIO Menu
CFG TCP/IP=NO
CFG IPX/SPX=NO
CFG LINK=NO
Appendix B Control panel menus
Printer memory
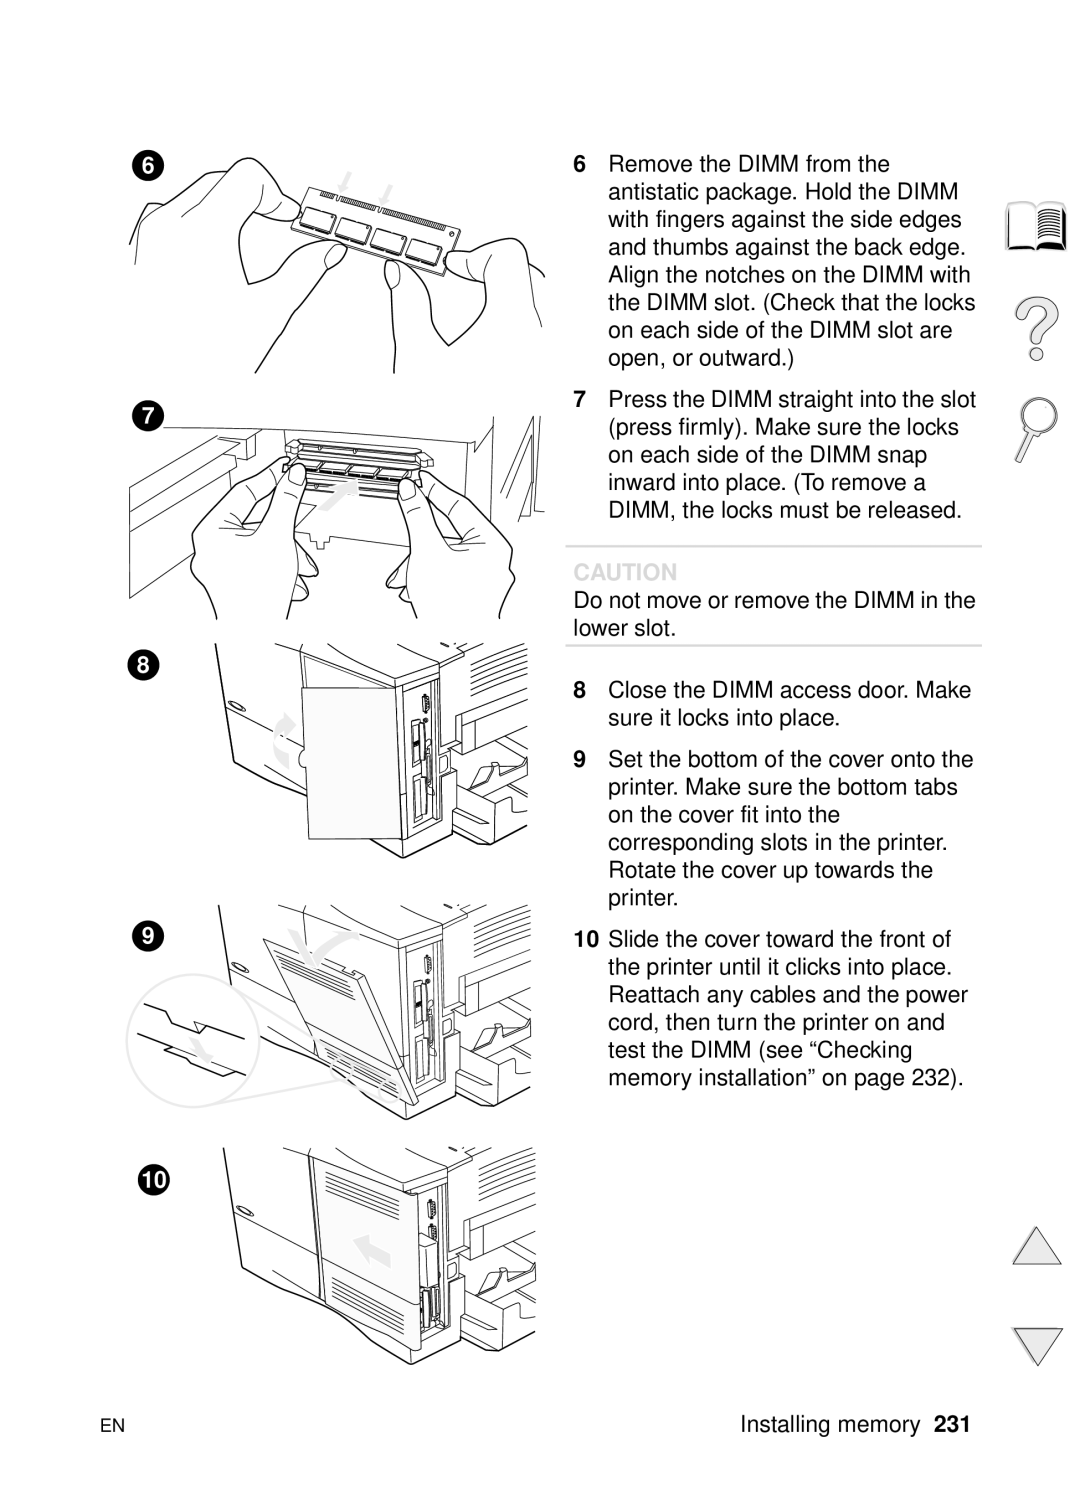
Installing memory
Page
Saving resources permanent resources
Checking memory installation
Installing EIO cards/mass storage
Appendix C Printer memory and expansion
Printer commands
Lowercase l Uppercase O Number one
Understanding PCL 5e printer command syntax
DOS software application Entry What appears
Combining escape sequences
Entering escape characters
Font list
Selecting PCL 5e fonts
Common PCL 5e printer commands
Common PCL 5e printer commands
?&l#E
?s#B
Appendix D Printer commands
FCC regulations
Regulatory information
Protecting the environment
Environmental product stewardship program
Recycling returns
Plastics marking for recycling
HP Planet Partners toner cartridge recycling program
Extended warranty
Material safety data sheets
Non-U.S. recycling returns
Recycled paper
Declaration of Conformity
Laser safety statement
Safety statements
Canadian DOC regulations
EMI statement Korea Vcci statement Japan
Luokan 1 laserlaite Klass 1 Laser Apparat
Laser statement for Finland
Varoitus
Varning
Varning
Embeddedserver web
Embedded web server pages
Accessing the embedded web server
Device pages
Home pages
Network pages
Index
IPX/SPX
Index
Guide
Escape sequences combining 237 selecting 156 Etalk setting
Fast Infrared Receiver User Guide
Envelopes 55
JetDirect Print Server Administrator’s Guide
LaserJet paper. See HP LaserJet paper
143
Index
Printing 156 PostScript Level 2 emulation
Print speed 202
RAM
RIP Once
Manually feeding Printer personality language 221 Ordering
212 Tray HP UltraPrecise Capacity 189 Loose problem
Setting size from control panel
Index
Index
Page
Copyright 2002 Hewlett-Packard Company