DEFINING THE PRINTER TO THE HOST: TCP/IP ATTACHMENT
Table
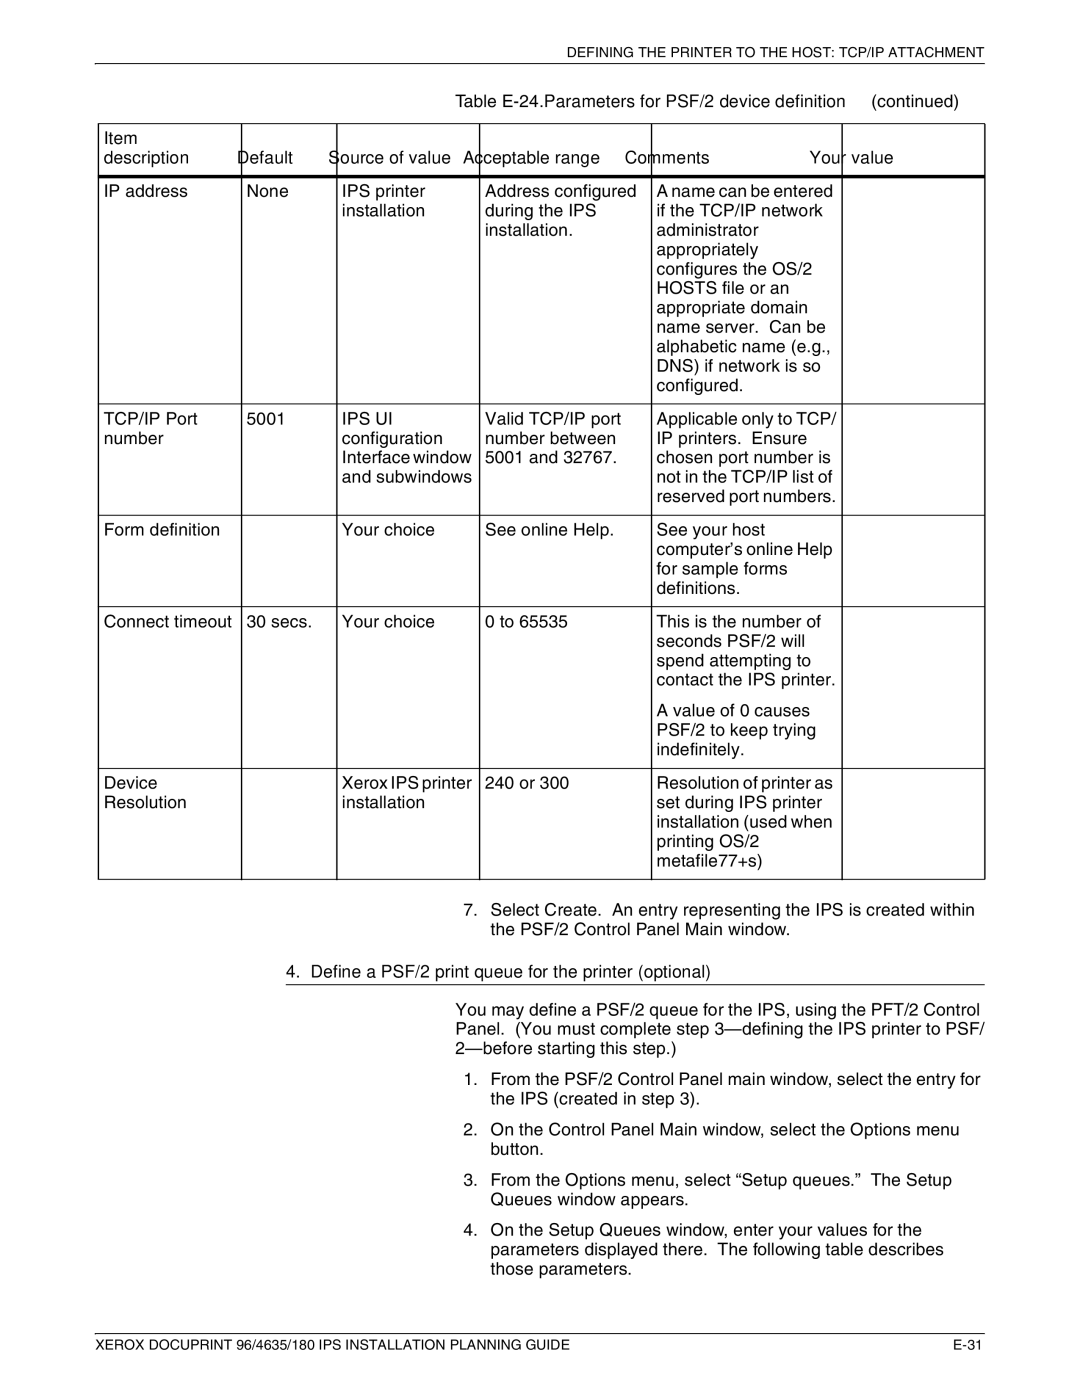
Item |
|
|
|
|
|
description | Default | Source of value | Acceptable range | Comments | Your value |
|
|
|
|
|
|
IP address | None | IPS printer | Address configured | A name can be entered |
|
|
| installation | during the IPS | if the TCP/IP network |
|
|
|
| installation. | administrator |
|
|
|
|
| appropriately |
|
|
|
|
| configures the OS/2 |
|
|
|
|
| HOSTS file or an |
|
|
|
|
| appropriate domain |
|
|
|
|
| name server. Can be |
|
|
|
|
| alphabetic name (e.g., |
|
|
|
|
| DNS) if network is so |
|
|
|
|
| configured. |
|
|
|
|
|
|
|
TCP/IP Port | 5001 | IPS UI | Valid TCP/IP port | Applicable only to TCP/ |
|
number |
| configuration | number between | IP printers. Ensure |
|
|
| Interface window | 5001 and 32767. | chosen port number is |
|
|
| and subwindows |
| not in the TCP/IP list of |
|
|
|
|
| reserved port numbers. |
|
|
|
|
|
|
|
Form definition |
| Your choice | See online Help. | See your host |
|
|
|
|
| computer’s online Help |
|
|
|
|
| for sample forms |
|
|
|
|
| definitions. |
|
|
|
|
|
|
|
Connect timeout | 30 secs. | Your choice | 0 to 65535 | This is the number of |
|
|
|
|
| seconds PSF/2 will |
|
|
|
|
| spend attempting to |
|
|
|
|
| contact the IPS printer. |
|
|
|
|
| A value of 0 causes |
|
|
|
|
| PSF/2 to keep trying |
|
|
|
|
| indefinitely. |
|
|
|
|
|
|
|
Device |
| Xerox IPS printer | 240 or 300 | Resolution of printer as |
|
Resolution |
| installation |
| set during IPS printer |
|
|
|
|
| installation (used when |
|
|
|
|
| printing OS/2 |
|
|
|
|
| metafile77+s) |
|
|
|
|
|
|
|
7.Select Create. An entry representing the IPS is created within the PSF/2 Control Panel Main window.
4.Define a PSF/2 print queue for the printer (optional)
You may define a PSF/2 queue for the IPS, using the PFT/2 Control Panel. (You must complete step
1.From the PSF/2 Control Panel main window, select the entry for the IPS (created in step 3).
2.On the Control Panel Main window, select the Options menu button.
3.From the Options menu, select “Setup queues.” The Setup Queues window appears.
4.On the Setup Queues window, enter your values for the parameters displayed there. The following table describes those parameters.
XEROX DOCUPRINT 96/4635/180 IPS INSTALLATION PLANNING GUIDE |