Troubleshooting and routine maintenance
Improving the print quality
If you have a print quality problem, print a test page first (Menu, 4, 2, 3). If the printout looks good, the problem is probably not the machine. Check the interface cable or try the machine on another computer.
![]() Note
Note
You can resolve a print quality problem by replacing a toner cartridge with a new one when the | C | ||||
LCD shows the Toner Life End message. | |||||
| |||||
|
|
|
|
| |
Examples of poor print | Recommendation |
| |||
quality |
|
| |||
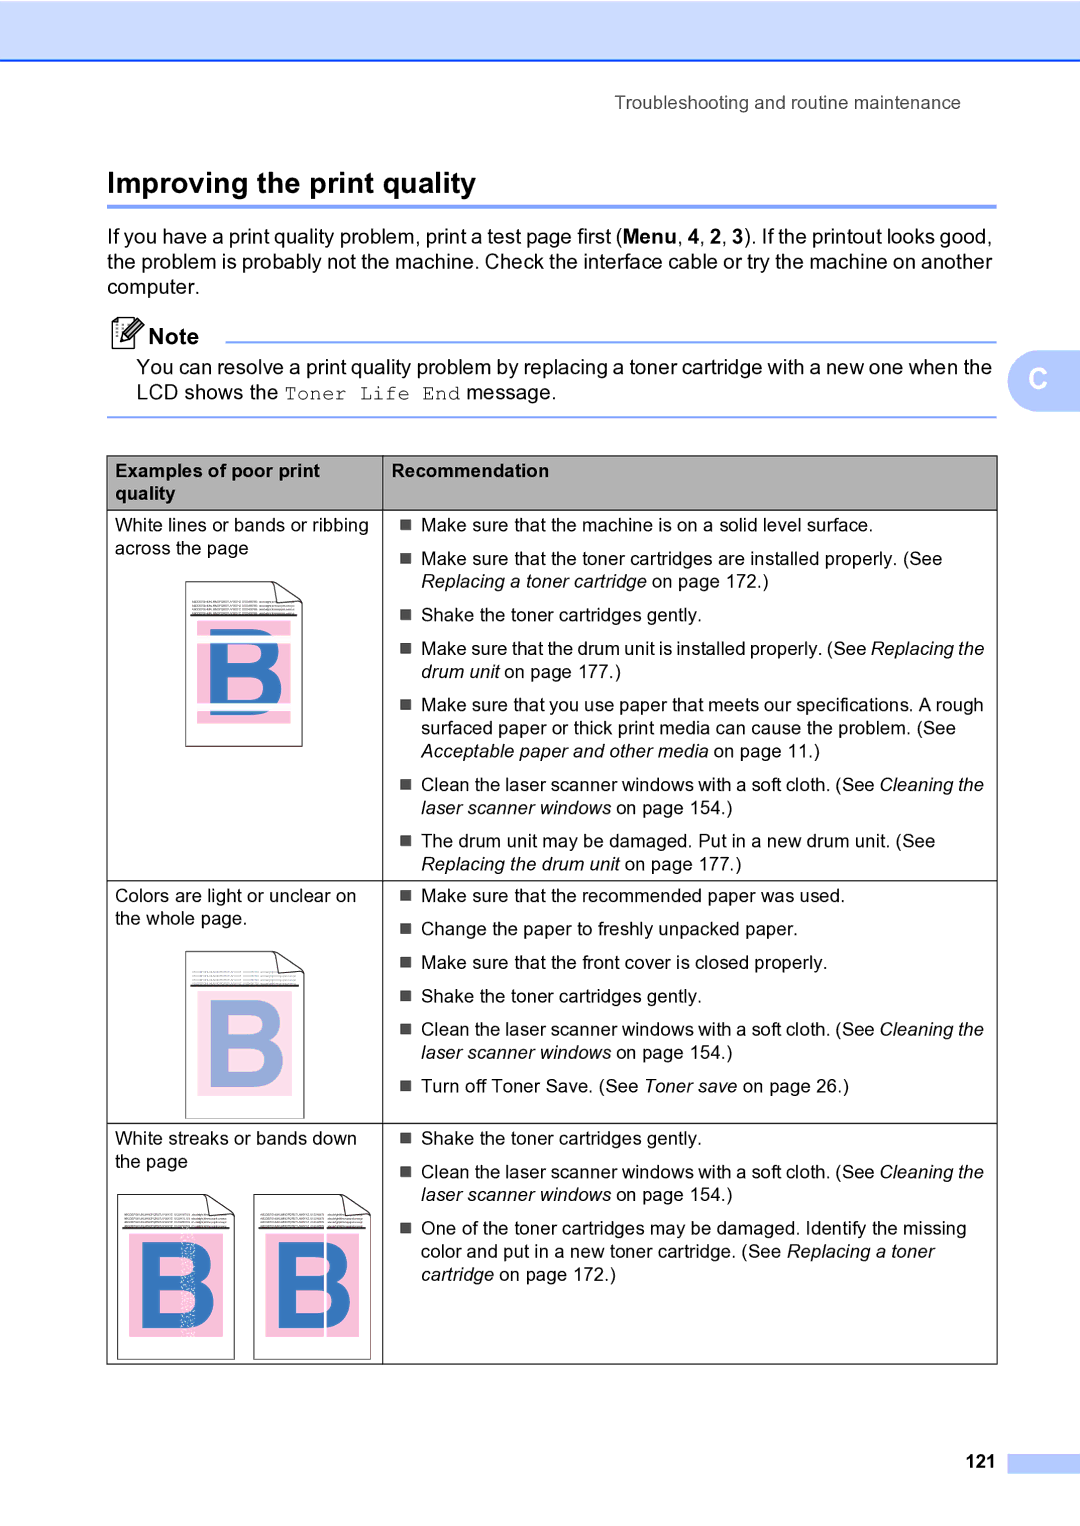
White lines or bands or ribbing | Make sure that the machine is on a solid level surface. |
| |||
across the page | Make sure that the toner cartridges are installed properly. (See |
| |||
|
|
|
| ||
|
|
| Replacing a toner cartridge on page 172.) |
| |
| ABCDEFGHIJKLMNOPQRSTUVWXYZ. 0123456789. abcdefghijklmnopqrstuvwxyz. | Shake the toner cartridges gently. |
| ||
| ABCDEFGHIJKLMNOPQRSTUVWXYZ. 0123456789. abcdefghijklmnopqrstuvwxyz. |
| |||
| ABCDEFGHIJKLMNOPQRSTUVWXYZ. 0123456789. abcdefghijklmnopqrstuvwxyz. |
|
| ||
| ABCDEFGHIJKLMNOPQRSTUVWXYZ. 0123456789. abcdefghijklmnopqrstuvwxyz. |
|
| ||
|
|
| Make sure that the drum unit is installed properly. (See Replacing the |
| |
|
|
| drum unit on page 177.) |
| |
Make sure that you use paper that meets our specifications. A rough surfaced paper or thick print media can cause the problem. (See Acceptable paper and other media on page 11.)
Clean the laser scanner windows with a soft cloth. (See Cleaning the laser scanner windows on page 154.)
The drum unit may be damaged. Put in a new drum unit. (See Replacing the drum unit on page 177.)
Colors are light or unclear on | Make sure that the recommended paper was used. |
the whole page. | Change the paper to freshly unpacked paper. |
| |
| Make sure that the front cover is closed properly. |
ABCDEFGHIJKLMNOPQRSTUVWXYZ. 0123456789. abcdefghijklmnopqrstuvwxyz.
ABCDEFGHIJKLMNOPQRSTUVWXYZ. 0123456789. abcdefghijklmnopqrstuvwxyz.
ABCDEFGHIJKLMNOPQRSTUVWXYZ. 0123456789. abcdefghijklmnopqrstuvwxyz.
ABCDEFGHIJKLMNOPQRSTUVWXYZ. 0123456789. abcdefghijklmnopqrstuvwxyz.
Shake the toner cartridges gently.
Clean the laser scanner windows with a soft cloth. (See Cleaning the laser scanner windows on page 154.)
Turn off Toner Save. (See Toner save on page 26.)
White streaks or bands down | Shake the toner cartridges gently. | |||||||
the page |
|
|
|
| Clean the laser scanner windows with a soft cloth. (See Cleaning the | |||
|
|
|
|
|
|
|
| |
|
|
|
|
|
|
|
| laser scanner windows on page 154.) |
| ABCDEFGHIJKLMNOPQRSTUVWXYZ. 0123456789. abcdefghijklmnopqrstuvwxyz. |
| ABCDEFGHIJKLMNOPQRSTUVWXYZ. 0123456789. abcdefghijklmnopqrstuvwxyz. | One of the toner cartridges may be damaged. Identify the missing | ||||
| ABCDEFGHIJKLMNOPQRSTUVWXYZ. 0123456789. abcdefghijklmnopqrstuvwxyz. |
| ABCDEFGHIJKLMNOPQRSTUVWXYZ. 0123456789. abcdefghijklmnopqrstuvwxyz. | |||||
| ABCDEFGHIJKLMNOPQRSTUVWXYZ. 0123456789. abcdefghijklmnopqrstuvwxyz. |
| ABCDEFGHIJKLMNOPQRSTUVWXYZ. 0123456789. abcdefghijklmnopqrstuvwxyz. | |||||
| ABCDEFGHIJKLMNOPQRSTUVWXYZ. 0123456789. abcdefghijklmnopqrstuvwxyz. |
| ABCDEFGHIJKLMNOPQRSTUVWXYZ. 0123456789. abcdefghijklmnopqrstuvwxyz. |
| ||||
|
|
|
|
|
|
|
| color and put in a new toner cartridge. (See Replacing a toner |
|
|
|
|
|
|
|
| |
|
|
|
|
|
|
|
| cartridge on page 172.) |
|
|
|
|
|
|
|
|
|