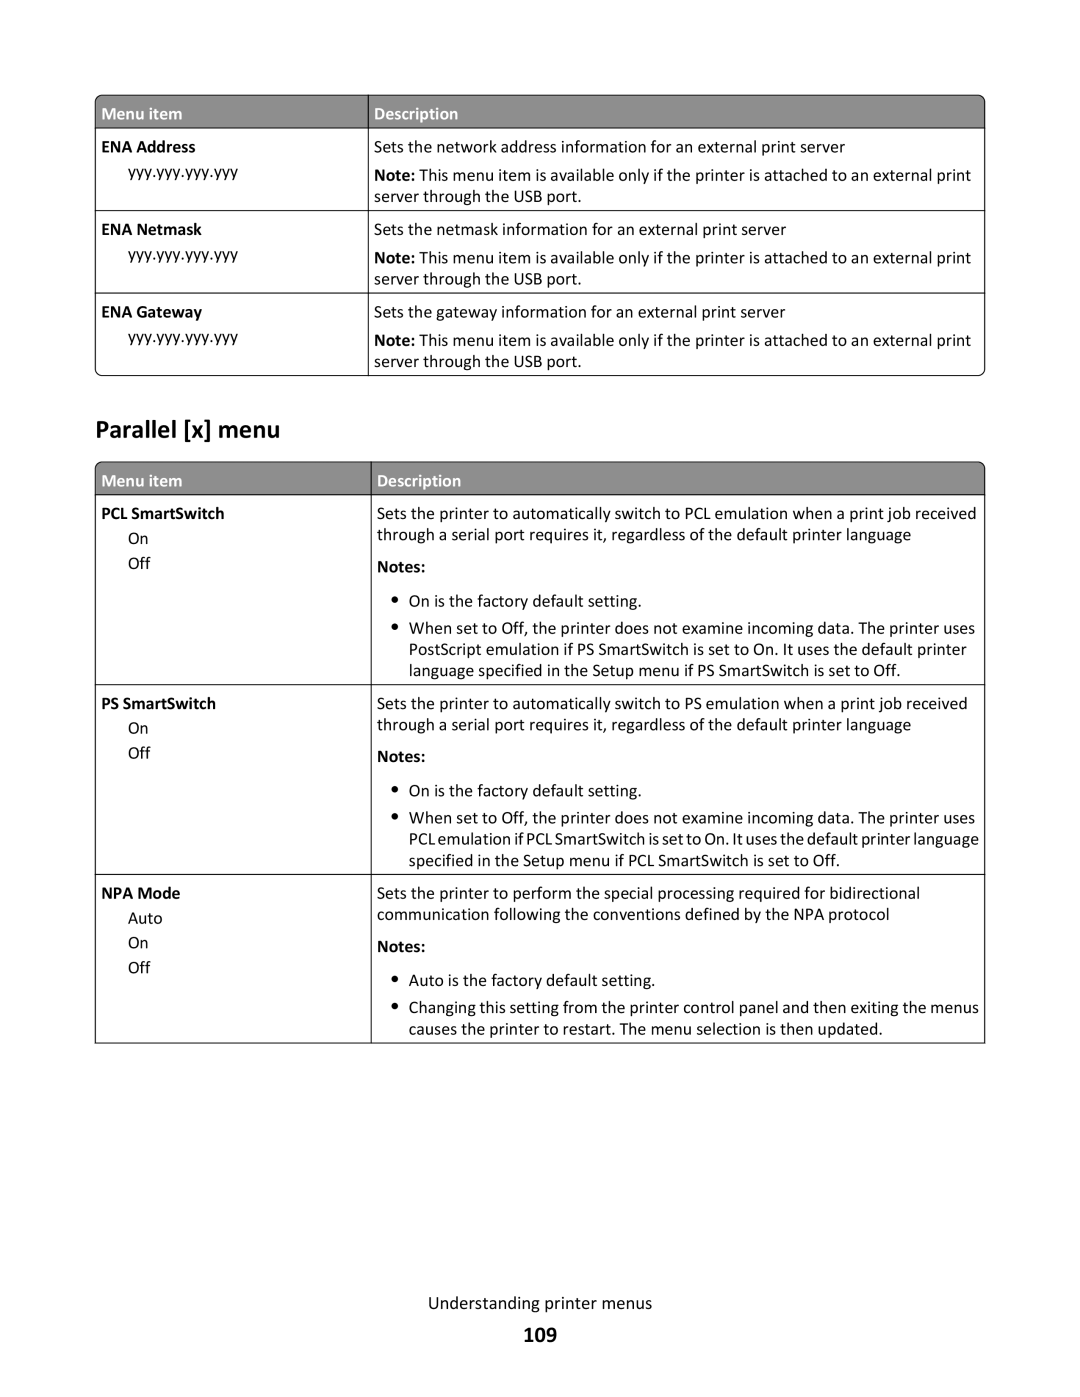
January
Users Guide
C790 Series
Machine types 5062 Models 210, 230
Safety information
Contents
Additional printer setup
Exporting and importing a configuration using the Embedded Web Server
Loading paper and specialty media
Securing the printer hard disk and other installed memory
Paper and specialty media guide
Printing
Troubleshooting
Administrative support
Finding advanced networking and administrator information
Maintaining the printer
Solving option problems
Solving home screen applications problems
Solving paper feed problems
Solving print quality problems
Safety information
SAVE THESE INSTRUCTIONS
Thank you for choosing this printer
Learning about theprinter
Finding information about the printer
Selecting a location for the printer
152.4 mm 6.0 in 101.6 mm 4.0 in 609.6 mm 24.0 in. 381 mm 15.0 in
Printer configurations
304.8 mm 12.0 in
Description
Understanding the printer control panel
USB port
Understanding the home screen
Understanding thehomescreen
Sample touch screen
Using the touch-screen buttons
Other touch-screen buttons
Features
Customizingthe homescreen
Accessing the Embedded Web Server
Showing or hiding icons on the home screen
Activating the home screen applications
Forms and Favorites
Eco-Settings
Exporting a configuration
Exporting and importing a configuration using the Embedded Web Server
2 Click Device Solutions Solutions eSF, or click Embedded Solutions
4 Click Configure Export
4 Click Configure Import
Importing a configuration
2 Click Device Solutions Solutions eSF, or click Embedded Solutions
Installing internal options
Additionalprintersetup
Available internal options
Additional printer setup
Using the security lock feature
Accessing the system board
3 Internal print server connector
1 Memory card connector 2 Firmware and flash memory card connectors
Hard disk connector
4 Reattach the system board cover
c Close the cover Additional printer setup
b Align and then turn each screw clockwise to tighten
Installing a memory card
6 Reattach the system board cover Additional printer setup
4 Align the notches on the memory card to the ridges on the connector
Notch
Ridge
Plastic pins Metal pins
Installing a flash memory or firmware card
Installing an Internal Solutions Port
5 Remove the metal cover from the ISP opening
Additional printer setup
11 Tighten the long thumbscrew
Additional printer setup
Warning-Potential Damage Do not overtighten the thumbscrew
Installing a printer hard disk
a Using a flathead screwdriver, loosen the screws
3 Locate the appropriate connector on the system board
Additional printer setup
To install a printer hard disk directly on the system board
4 Reattach the system board cover Additional printer setup
Removing a printer hard disk
Installing optional trays
Order of installation
Standard 550-sheet tray Tray Optional 550-sheet trays
Supported finishing features
Finisher bin
Standard bin
Standard bin Finisher bin
Attaching cables
Finishing features
Printing a menu settings page
Verifying printer setup
Reports Menu Settings Page
Printing a network setup page
Setting up the printer software
Installing the printer software
Using the Internet
Information you will need to set up the printer on a wireless network
Setting up wireless printing
2 Double-click Printer Setup Utility or Print Center
Updating available options in the printer driver
Installing the printer on a wireless network Windows
2 Insert the Software and Documentation CD
Prepare to configure the printer
Installing the printer on a wireless network Macintosh
Enter the printer information
Configure the printer for wireless access
In Mac OS X version 10.5 or later
In Mac OS X version 10.4 or earlier
4 Click Default Browser tab More Printers
Configure your computer to use the printer wirelessly
In Mac OS X version
2 Double-click Printer Setup Utility or Print Center
For Windows users
Installing the printer on a wired network
For Macintosh users
1 Insert the Software and Documentation CD
In Mac OS X version 10.4 or earlier
In Mac OS X version 10.5 or later
In Mac OS X version
2 Double-click Printer Setup Utility or Print Center
For Windows users
7 Click Properties Ports tab
For Macintosh users
b Double-click Printer Setup Utility or Print Center
Setting up serial printing
d Click the Default Browser tab More Printers
b Double-click Printer Setup Utility or Print Center
a Insert the Software and Documentation CD
b Click Advanced Options Custom Install
f Click Continue
d Click Properties
Minimizingyour printersenvironmental impact
Using recycled paper
Saving paper and toner
Conserving supplies
Saving energy
Using Eco-Mode
Reducing printer noise
Avoid paper jams
Using Hibernate Mode
Adjusting Sleep Mode
Using the Embedded Web Server
Using the printer control panel
2 Click Settings General Settings Sleep Button Settings
Adjusting the brightness of the display
2 Click Settings General Settings
Recycling
Recycling Lexmark packaging
Recycling Lexmark products
Returning Lexmark cartridges for reuse or recycling
Configuring Universal paper settings
Setting the paper size and type
Loading paper andspecialtymedia
LTR LGL A4 A4 LTR LGL
Loading the standard or optional 550-sheet tray
Loading paper and specialty media
5 Load the paper stack with the recommended print side faceup
Place pre-punched paper with the holes toward the front of the tray
Place the print side facedown for duplex printing
Place letterheads faceup with the header on the left side of the tray
6 Insert the tray
Loading the 2000-sheet high-capacity feeder
Place pre-punched paper with the holes toward the front of the tray
4 Load paper into the tray with the print side faceup
Place letterheads faceup with the header on the left side of the tray
5 Insert the tray Loading paper and specialty media
Loading the multipurpose feeder
Note Avoid scratching or touching the print side
Paper Envelopes Transparencies
Linking trays
Linking and unlinking trays
2 Click Settings Paper Menu Custom Name type a name Submit
Paper Menu Bin Setup
Unlinking trays
Linking exit bins
Assigning a custom paper type name
Configuring a custom name
Paper Menu Paper Size/Type
Weight
Paper characteristics
Moisture content
Paperandspecialtymediaguide
Selecting preprinted forms and letterhead
Storing paper
Using recycled paper and other office papers
Supported paper sizes
Supported paper sizes, types, and weights
7 3/4 Envelope Monarch 9 Envelope Com Envelope DL Envelope
Universal
C5 Envelope B5 Envelope Other Envelope2
X X X X X X X X X X X
Paper
Supported paper types and weights
Card stock Transparencies1 Labels3
Envelopes4
b Click Properties, Preferences, Options, or Setup
Adjusting toner darkness
Settings Print Settings Quality Menu Print Mode Black Only
Printing
Printing from a flash drive
2 Click Settings Print Settings Quality Menu Toner Darkness
Printing from a flash drive
Flash drive
Supported flash drives and file types
File type
Tips on using transparencies
Tips on using letterhead
Tips on using envelopes
Printing specialty documents
To optimize performance and minimize jams, do not use envelopes that
Use only new envelopes from undamaged packages
Have excessive curl or twist Are stuck together or damaged in any way
Have windows, holes, perforations, cutouts, or embossing
Printing confidential and other held jobs
Tips on using card stock
Storing print jobs in the printer
Printing information pages
2 Click Properties, Preferences, Options, or Setup
Printing confidential and other held jobs
Printing a font sample list
Canceling a print job from the printer control panel
Canceling a print job
Canceling a print job from the computer
2 Double-click Utilities Print Center or Printer Setup Utility
5 From the icon bar at the top of the window, click the Delete icon
4 From the printer window, select the print job you want to cancel
Printing
Menus list
Understanding printermenus
Settings
Supplies
Cyan Cartridge
Supplies menu
Magenta Cartridge
Yellow Cartridge
Paper menu
Default Source menu
Default Source
Fuser
Tray x Size
Paper Size/Type menu
Tray x Type
MP Feeder Size
Understanding printer menus
MP Feeder Type
Manual Paper Size
Understanding printer menus
Manual Paper Type
Manual Envelope Size
Substitute Size menu
Configure MP menu
Paper Texture menu
Configure MP
Heavy Glossy Texture
Glossy Texture
Labels Texture
Vinyl Labels Texture
Plain Weight
Paper Weight menu
Card Stock Weight
Transparency Weight
Bond Weight
Vinyl Labels Weight
Envelope Weight
Rough Envelope Weight
Card Stock Loading
Paper Loading menu
Recycled Loading
Glossy Loading
Heavy Loading
Custom Types menu
Rough/Cotton Loading
Custom x Loading
Custom Names menu
Universal Setup menu
Custom Bin Names menu
Custom Name
Configure Bins
Bin Setup menu
Output Bin
Overflow Bin
Reports menu
Reports menu
Menu Settings Page Device Statistics Network Setup Page
Network x Setup Page Profiles List Print Fonts
Active NIC menu
Network/Ports menu
Standard Network or Network x menus
PCL SmartSwitch
Standard Network Setup
Network Reports menu
Network x Setup
Network Buffer
TCP/IP menu
Network Card menu
Network Reports
Netmask Gateway Enable DHCP
IPv6 menu
Enable RARP
Enable BOOTP
Enable IPv6
Wireless menu
Auto Configuration
Set Hostname View Address View Router Address Enable DHCPv6
Standard USB menu
AppleTalk menu
View Signal Quality View Security Mode
PCL SmartSwitch
NPA Mode
PS SmartSwitch
USB Buffer
Job Buffering
PCL SmartSwitch
Parallel x menu
PS SmartSwitch
NPA Mode
Parallel Buffer
Parallel Mode
Job Buffering
Advanced Status
PCL SmartSwitch
Serial x menu
PS SmartSwitch
Mac Binary PS
Understanding printer menus
NPA Mode
Menu item
Serial Buffer
Robust XON
SMTP Setup menu
Baud
Data Bits
SMTP Server Authentication
SMTP Timeout
Device Userid Device Password Kerberos 5 Realm NTLM Domain
Reply Address Use SSL
Security menu
Miscellaneous Security Settings menu
Confidential Print menu
Login Restriction
Wiping Mode
Disk Wiping menu
Verify Job Expiration
Reserve Job Expiration
Automatic Method
Security Audit Log menu
Manual Method
Scheduled Method
Configure Log
Set Date and Time menu
Enable NTP
Current Date and Time Manually Set Date and Time
General Settings menu
Settings menu
Display Language
Eco-Mode
Run Initial setup
Quiet Mode
Understanding printer menus
Keyboard
Displayed Information
Paper Sizes
Home screen customization
Displayed Information
Date Format
Time Format
Output Lighting
Error Lighting
Audio Feedback
Show Bookmarks
Timeouts
Alarms
Timeouts
Timeouts
Timeouts
Timeouts
Print Recovery
Print Recovery
Factory Defaults
Flash Drive menu
Press Sleep Button
Press and Hold Sleep Button
Paper Source
Hole Punch Mode
Color
Collate
Paper Saver Border
Paper Saver
Paper Saver Ordering
Separator Sheets
Black Only Mode
Setup menu
Printer Language
Job Waiting
Resource Save
Job Accounting menu
Print All Order
Job Accounting Log
Disk Near Full Level
Log Action at End of Frequency
Disk Near Full Action
Disk Full Action
Sides Duplex
Finishing menu
Duplex Binding
Copies
Paper Saver
Hole Punch Mode
Paper Saver Ordering
Paper Saver Orientation
Print Mode
Quality menu
Print Resolution
Color Correction
RGB Contrast
RGB Brightness
RGB Saturation
Color Balance
Understanding printer menus
Spot Color Replacement Color Adjust
Menu item
Manual Color
XPS menu
Utilities menu
Print Error Pages
Remove Held Jobs
PostScript menu
PDF menu
Print PS Error
Lock PS Startup Mode
Symbol Set
PCL Emul menu
PCL Emulation Settings
T3 Default = T4 Default = T5 Default = Env Default = MPaper Default =
View Factory Defaults MPF Default = T1 Default = T2 Default =
MEnv Default =
Restore Defaults Yes No
Font Name
HTML menu
Font Size
Scale
Image menu
Help menu
Margin Size
Backgrounds
Menu item
Understanding printer menus
Description
Disposing of a hard drive
Statement of Volatility
Securing theprinterharddisk and otherinstalled memory
3 Touch Wipe All Settings
Using the printer control panel
4 Touch Back, and then Exit Config Menu
Erasing volatile memory
Erasing printer hard disk memory
Using the Embedded Web Server
Using the printer control panel
6 Touch Back, and then Exit Config Menu
Configuring printer hard disk encryption
3 Touch Disk Encryption Enable
Using the Embedded Web Server
5 Touch Back, and then Exit Config Menu
Cleaning the printhead lenses
Cleaning the exterior of the printer
Maintainingthe printer
Storing supplies
Ordering supplies
Checking the status of supplies
Checking the status of supplies from the printer control panel
Checking the status of supplies from a network computer
Ordering a waste toner bottle
Ordering a fuser or a transfer module
Ordering staple cartridges
Recommended print cartridge and part number
Replacing supplies
Ordering a cleaning kit
Replacing a print cartridge
Maintaining the printer
4 Unpack a new print cartridge
Maintaining the printer
6 Remove the red packing strip from the new cartridge
Replacing the waste toner bottle
Before moving the printer
Moving the printer
Shipping the printer
Moving the printer to another location
Finding advanced networking and administrator information
Adminis trativesupport
Using the Embedded Web Server
Checking the virtual display
2 Click Settings
Setting up e-mail alerts
Viewing reports
2 Click Device Status
Settings General Settings Factory Defaults Restore Now
Restoring factory default settings
Avoiding jams
Clearingjams
Understanding jam numbers and locations
Paper tray recommendations
Jam numbers
Area
200-239 24x 250 400-403 431-458 455
What to do
201 paper jam
200 paper jam
Paper jam in the fuser
202-203 paper jams
Paper jam under the fuser
230 paper jam
24x paper jam
231-239 paper jams
Paper jam in Tray
Paper jam in the optional trays
250 paper jam
400-403 and 460-461 paper jams
455 staple jam
431-454, and 456-458 paper jams
Clearing jams
5 Press down on the staple guard until it clicks into place
4 Close the staple guard
7 Close the stapler door
8 From the printer control panel, touch Continue, jam cleared
Adjusting color
Troubleshooting
Checking an unresponsive printer
Understanding printer messages
Change paper source to custom string load orientation
Change paper source to custom string
Change paper source to paper size paper type
Change paper source to paper size paper type load orientation
Error reading USB drive. Remove USB
Disk problem
Close finisher side door
Close finisher top cover
Install envelope feeder
Install bin
Install Tray
Insert staple cartridge
Load src with custom string
Load src with custom type name
Load src with size
Load src with type size
Load Manual Feeder with custom string
Load Manual Feeder with custom type name
Load Manual Feeder with paper type paper size
Load staples
Reattach bin x - y
Reattach bin
Remove paper from standard output bin
Some held jobs were not restored
Restore held jobs?
Remove paper from bin
Remove paper from all bins
36 Printer service required
35 Insufficient memory to support Resource Save feature
31.xx Missing or defective color cartridge
32.xx color cartridge part number unsupported by device
37 Insufficient memory to collate job
37 Insufficient memory, some held jobs will not be restored
37 Insufficient memory for Flash Memory Defragment operation
37 Insufficient memory, some Held Jobs were deleted
54 Standard network software error
54 Serial option x error
54 Network x software error
51 Defective flash detected
56 Serial port x disabled
56 Parallel port x disabled
56 Standard USB port disabled
56 Standard parallel port disabled
58 Input config error
57 Configuration change, some held jobs were not restored
58 Too many disks installed
58 Too many flash options installed
59 Incompatible output bin
58 Too many trays attached
61 Remove defective disk
62 Disk full
80.xx Fuser missing
80.xx Replace fuser
82.xx Waste toner bottle nearly full
82.xx Replace waste toner bottle
1565 Emulation error, load emulation option
Solving printing problems
88.xx color cartridge low
88.xx Color cartridge very low
MAKE SURE THERE IS NO PROBLEM WITH YOUR PRINTER
Error message about reading USB drive appears
CHECK IF A SUPPLY IS MISSING OR NEEDS REPLACEMENT
MAKE SURE THE CORRECT PRINTER SOFTWARE IS INSTALLED
TURN OFF THE PAGE PROTECT SETTING
MAKE SURE YOU ARE USING A RECOMMENDED USB, SERIAL, OR ETHERNET CABLE
Settings General Settings Print Recovery Page Protect Off
CHANGE THE ENVIRONMENTAL SETTINGS
USE THE SAME PAPER SIZE AND PAPER TYPE SETTINGS
CHECK THE PAPER TYPE AND PAPER SIZE SETTINGS
Job prints from the wrong tray or on the wrong paper
Incorrect characters print
Solving option problems
Solving home screen applications problems
An application error has occurred
Option does not operate correctly or quits after it is installed
2,000-sheet drawer problems
Paper tray problems
MAKE SURE THE OPTION IS INSTALLED
MAKE SURE THE PAPER TRAY IS INSTALLED CORRECTLY
CHECK THE INTERNAL SOLUTIONS PORT ISP CONNECTIONS
Internal Solutions Port does not operate correctly
MAKE SURE THE NETWORK SOFTWARE IS CONFIGURED CORRECTLY
Cannot detect flash memory card
Internal print server does not operate correctly
Solving paper feed problems
Memory card
USB/parallel interface card does not operate correctly
TURN ON JAM RECOVERY
Solving print quality problems
Settings General Settings Print Recovery
Paper jam message remains after jam is cleared
Characters have jagged or uneven edges
CHECK THE PAPER SIZE SETTING
Clipped images
Fine horizontal lines appear on color pages
ABCDE ABCDE ABCDE
CHECK THE PAPER TYPE AND WEIGHT SETTINGS
Shadow images appear on prints
Gray background on prints
Incorrect margins
ABCDE
MAKE SURE THERE IS NO DEFECTIVE PRINT CARTRIDGE
MAKE SURE THE TRANSFER BELT IS NOT DEFECTIVE
Print irregularities
Paper curl
LOAD PAPER FROM A FRESH PACKAGE
AVOID TEXTURED PAPER WITH ROUGH FINISHES
Print is too dark
AVOID TEXTURED PAPER WITH ROUGH FINISHES CHECK THE PAPER TYPE SETTING
Print is too light
MAKE SURE THE FUSER IS NOT DEFECTIVE
AVOID TEXTURED PAPER WITH ROUGH FINISHES CHECK THE PAPER TYPE SETTING
Repeating defects appear on prints
LOAD PAPER FROM A FRESH PACKAGE
MAKE SURE THE PRINT CARTRIDGE IS NOT LOW ON TONER
Solid color or black pages appear on prints
Skewed print
REPLACE THE PRINT CARTRIDGE
REPLACE THE FUSER
Streaked horizontal lines appear on prints
Black or white streaks appear on transparencies or paper
ENSURE THAT THE FILL PATTERN IS CORRECT
CHECK THE PAPER TYPE
Toner rubs off
Toner fog or background shading appears on a page
SELECT ANOTHER TRAY OR FEEDER
MAKE SURE THERE IS NO WORN, DEFECTIVE, OR EMPTY PRINT CARTRIDGE
CHECK THE PAPER TYPE SETTING
CHECK THE PAPER TEXTURE SETTING
ABCDE ABCDE ABCDE
Transparency print quality is poor
FAQ about color printing
Solving color quality problems
What is RGB color?
What is CMYK color?
Manual Color menu
What is manual color correction?
2 Click Configuration Color Samples Detailed Options
What are detailed Color Samples and how do I access them?
How can I match a particular color such as a corporate logo?
Embedded Web Server does not open
TEMPORARILY DISABLE WEB PROXY SERVERS
Contacting customer support
CHECK THE NETWORK CONNECTION
Product information
Notices
Edition notice
2010 Lexmark International, Inc All rights reserved
Trademarks
UNITED STATES GOVERNMENT RIGHTS
Licensing notices
Modular component notice
Directory
File
Waste from Electrical and Electronic Equipment WEEE directive
Noise emission levels
Static sensitivity notice
ENERGY STAR
Power consumption
Temperature information
Product power consumption
Laser notice
Off mode
Sleep Mode
Industry Canada compliance statement
Avis de conformité aux normes de l’industrie du Canada
Radio interference notice
Regulatory notices for wireless products
Exposure to radio frequency radiation
Industry Canada Canada
Notice to users in the European Union
AT EL LI RO
Limited warranty
Statement of Limited Warranty
Limited warranty service
Lexmark International, Inc., Lexington, KY
Limitation of liability
Extent of limited warranty
Additional rights
LEXMARK SOFTWARE LIMITED WARRANTY AND LICENSE AGREEMENT
LEXMARK SOFTWARE LICENSE AGREEMENT
Page
Notices
MICROSOFT CORPORATION NOTICES
ADOBE SYSTEMS INCORPORATED NOTICE
Numerics
Index
Page
Page
Page
port settings configuring PostScript menu 138 print cartridge
Page