Accordent PresenterPRO v User’s Manual
Important Notice
Table of Contents
1. INTRODUCING ACCORDENT PRESENTERPRO
6. PREPARING TO LAUNCH A PRESENTATION
5. INTRODUCTION TO AND USING THE PRESENTATION MANAGER
9. ARCHIVING A PRESENTATION
7. USING THE ACCORDENT POWERPOINT ADD-IN
8. LAUNCHING A PRESENTATION
1.1 Introducing Accordent PresenterPRO
1. Introducing Accordent PresenterPRO
2.1 System Requirements for Accordent PresenterPRO
2. System Requirements
Hardware
Presenter Software
3.2 Installing & Registering Accordent PresenterPRO
3. Installation & Registration
3.1 Installation & Registration Overview
Required fields are indicated with a red asterisk
The “Proxy Settings” fields provide the following options
The Proxy Settings fields will appear See Figure
3.3 Installing the PE-Controller
5. On the Start Installation screen, click Next
2. When the Welcome screen appears, click Next
3.4 Installing the Accordent PowerPoint Add-In
In the Add-Ins screen select Accordentv6.0 and click Close
4.2 Using the Presentation Wizard
4. Using The Presentation Wizard
4.1 Presentation Wizard Overview
Example Interface Logo/URL
4.3 Project Info Page
4.3.2 Selecting A Publishing Type
4.3.1 Creating A Project Directory
4.4 Interface Options Page
Chat
General
In addition to a video/audio window, a template interface may include
Slides
Interactive
Advanced Features
Registration
4.4.1 Selecting An Interface
4.4.2 Completing The “General” Screen
Speaker Name and Date & Time
Titles and Sub-Titles
Downloadable Document
Logos & URLs
4.5 Slide & PDF Import Screen
Chaptering & Closed Captioning
4.5.1 Importing Slides & PDFs
Page
Accordent PresenterPRO will default to 80% image compression quality
4.5.2 Converting Slides to JPG or GIF
4.5.3 Display Slide Titles
4.5.4 Display Slide Notes
4.5.5 Enable Slide Navigation
4.6.2 Moderated Q&A
4.6 Q&A Screen
4.6.1 Email Q&A
4.7 Chat Screen
4.7.1 Use Included Chat Solution
4.9 Registration Screen
4.7.2 Use Custom Chat Solution
4.8 Interactive Screen
Page
4.10 Advanced Screen
Example
4.11 Publishing Information
4.11.2 Completing the FTP/SFTP Fields
4.11.1 Completing The Publishing Information Fields
“User” Field
“Password” Field
“Sub Directory” Field
“Port” Field
Click Advanced Settings See Figure
4.11.5 Using Advanced FTP Settings
4.11.3 Completing The UNC Fields
4.11.4 Selecting A Web Server
“Off/On” Fields
“Firewall Type” Fields
“Firewall Password” Field
“Firewall Host” Field
“Firewall Port” Field
4.12.1 Entering Media Locations
4.12.3 In-Band & Out-of-Band Synchronization
4.12.2 Enabling An Individual Stream
Configuring The PE-Controller
4.12.4 Selecting In Band & Configuring the PE-Controller
Main Screen
The View Config screen is shown in Figure
After completing the PE-Controller Configuration fields, click OK
Windows Media Screen
The “Manage Profiles” screen will appear See Figure
RealProducer Screen
The input device configuration screen will appear See Figure
To configure an input, click Stream See Figure
Relay Screen
4.12.5 Initiating the PE-Controller Service
Page
These fields should be completed as follows
Fig. 4-111 MS
4.12.7 Configuring for Closed Captioning
Fig. 4-109 RN
In the “Closed Captioning” section, first click Enable See Figure
Page
4.12.8 Testing the Encoder
4.12.9 Using Out-Of-Band Interface Update Interval
4.12.10 Using Auxiliary Audio/Video Sources Out-of-Band Only
4.12.11 Inputting Clip Information
4.13 Distribute Content Page
4.14.1 Saving a Configuration File
4.14 Using Configuration Files
4.14.2 Accessing a Configuration File
5.1.1 Slide Preview & Publish
5. Introduction To And Using The Presentation Manager
5.1 Presentation Manager Overview
5.1.3 Interactive Preview & Publish
5.1.2 URL Preview & Publish
5.1.5 Moderated Q&A
5.1.4 Chapters Screen
5.1.7 Event Launch & Event Record
5.1.6 Registration
5.2 Managing & Publishing Slides
5.1.8 Starting A Practice Run
5.2.2 Slide Preview & Publish
5.2.1 Slide Preview
5.2.4 Last Minute Slide & PDF Import
5.2.3 Slide Auto-Publish
The Import Slides window will appear See Figure
5.3 Managing & Publishing URLs
5.3.1 Preparing URLs
5.3.2 Saving & Opening A URL List
5.3.3 Targeting URLs
5.3.4 Publishing URLs
5.4 Creating & Publishing Interactive Content
5.4.1 Selecting An Interactive Content Type
Survey
5.4.2 Displaying or Hiding Answer Results
Trivia
Image
5.4.3 Adding & Deleting Interactive Content
5.4.4 Saving & Opening An Interactive Content List
5.4.5 Publishing Interactive Content
Automatic
5.5 Creating & Editing Chapters
Custom chapters 5.5.1 Creating Chapters Automatically
By Slide By URL By Interactive
5.5.2 Creating Custom Chapters
5.6 Using Moderated Q&A
To access the “Moderated Q&A” screen, click Q&A See Figure
If the registration feature is being used in conjunction with Moderated Q&A, additional information about the person that submitted the question can be accessed by double-clicking on the submitted question See Figure
5.7 Using the Registration Page
6.1 Pre-Launch Preparation
6. Preparing To Launch A Presentation
6.2 In-Band & Out-Of-Band Preparation
6.2.1 Out-of-Band
6.2.2 Setting Encoding Time Offsets
6.2.4 In-Band Distribution
6.2.3 Auxiliary Media Time Offset
6.3 Testing Presentation Settings
7.1 Using The Accordent PowerPoint Add-In
7. Using The Accordent PowerPoint Add-In
The Accordent PowerPoint Add-In will appear See Figure
Page
8.1 Launching A Presentation
8. Launching A Presentation
8.3 Stopping A Presentation
8.2 Controlling Presentation Events
Page
9.1 Archive Wizard Overview
9.2 Accessing the Archive Wizard
9. Archiving A Presentation
9.3 Using the “Event Details” Page
Timing must always be input in the hhmmss format
9.3.1 Editing Publish Times
9.3.2 Adding Slides & URLs
Once a slide is selected or a URL entered, click Add See Figure
The “New Event Information” fields will appear See Figure
9.3.3 Deleting Non-Streaming Content
9.3.4 Using The Event Time Shift To Edit Events
9.4 Editing Chapters
9.4.1 Editing Chapter Times & Titles
9.4.2 Using Chapter Event Time Shift To Edit Chapters
The Media Locations page will appear See Figure
9.5 Inputting Media Locations
Once all edits have been completed, click Next See Figure
Page
9.5.1 Cropping A Presentation
Directory
9.6 Creating & Publishing Archived Media
9.6.1 Publication to CD or File Server
9.6.2 Creating & Publishing Media For On Demand Use
9.6.3 Streaming Media Upload Information
“User” Field
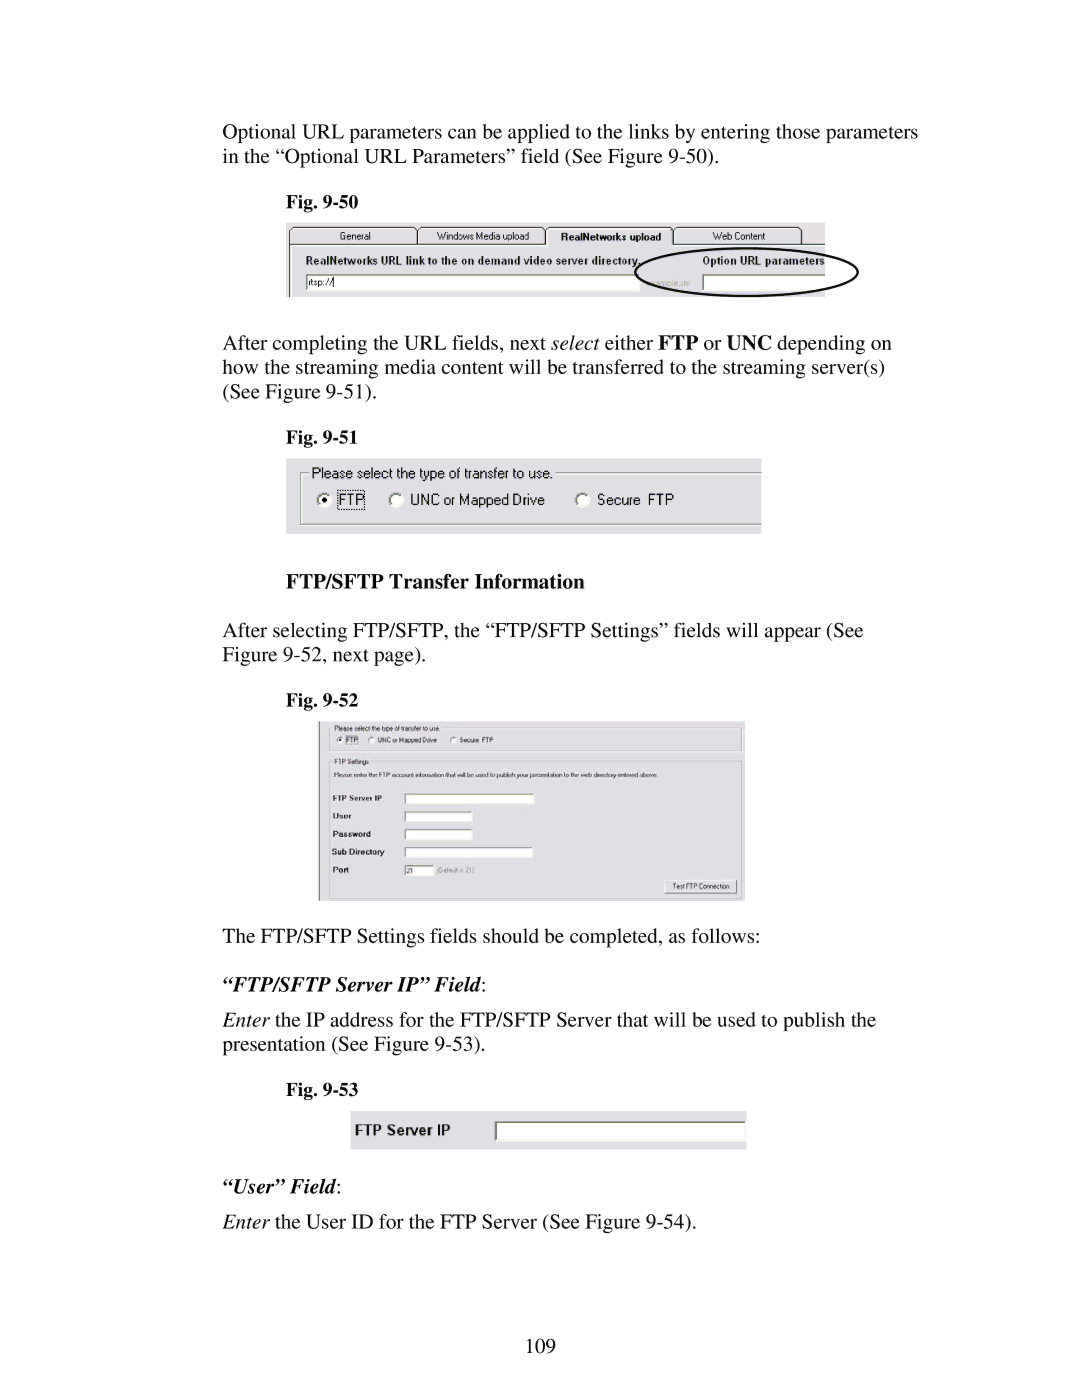
FTP/SFTP Transfer Information
“FTP/SFTP Server IP” Field
“Password” Field
Completing The UNC Fields
“Sub Directory” Field
“Port” Field
9.6.4 Completing the Web Content Page
Page
Done
9.7 Distributing A Presentation