MX-M260 MX-M310
For Your Records
Contents
110
103
111
115
119
117
123
127
Do not install your machine in areas that are
Important Points When Selecting AN Installation Site
Changes, e.g., near an
Air conditioner or
Laser Information
Safety precautions
Do not touch the photoconductive drum green portion
Scratches or smudges on the drum will cause dirty copies
Software setup guide for printer
Using the Manual
Environmental Information
Online manual for printer
Meaning of R in Original and Paper Size Indications
Conventions Used in this Manual
Explanation of words and illustration
Enhanced copying features
Main Features
High-speed laser copying
High-quality digital image
Exterior
Part Names and Functions
Interior
Operation Panel
Touch Panel
Using the touch panel Selecting a function
Example
Beep tone
Display switching keys
Mode switching keys
Job list
Print JOB key
Power on
Power on and OFF
Power OFF
Turn the power switch to the on position
Power Save Modes
Initial Settings
Preheat mode
Auto power shut-off mode
Loading Paper
Tray Paper tray type Paper type Size Weight Capacity
Paper
Letterhead Paper 11 x
Special papers
Follow these guidelines when using special papers
Envelopes
Letterhead paper
Loading the paper in the paper tray
Loading Paper
Important points when inserting paper in the bypass tray
Loading paper in the bypass tray
Set the paper guides to the copy paper width
Changing a TRAY’S Paper Type and Paper Size Settings
Touch the Tray Settings key
Select the tray in which you loaded paper
Setting the paper type in the bypass tray
Main Screen of Copy Mode
Normal Copying
How to place the original
Copying from the Document Glass
Press the Start key
Stream feeding mode
Copying from the Rspf
Copying a large number of originals
Document glass and Rspf
Points to Note When Making Copies
Originals that can be used in the Rspf
Acceptable originals
Copying originals of mixed length Mixed feeding
Select the MIX Size Original Feeding Mode checkbox
Automatic copy image rotation Rotation copying
Touch the Special Modes key
Set the type of paper that
You loaded in the bypass
Tray. p.21
Automatic TWO-SIDED Copying
Using the Document Glass
Touch the One-sided to two-sided copy key Touch the OK key
Original → Paper
Touch the desired copy mode
Using the Rspf
To cancel automatic two-sided copying, press the Clear key
Original for the front side is scanned
Touch the Exposure key Manually adjust the copy exposure
Exposure Adjustment
Selecting the original image type
Exposure value guidelines
Automatic Ratio Selection
REDUCTION/ENLARGEMENT/ZOOM
Place the originals. p.23, p.24
Then select the desired paper size
Manual Ratio Selection
Preset reduction keys 25%, 50%
Menu
200%, 400%
Touch the XY Zoom key
Place the originals. p.23, p.24 Touch the Copy Ratio key
Touch the Y key
Copy ratio in the vertical Y direction
Press the Interrupt key to interrupt the copy run
Interrupting a Copy RUN
Sort Copy
Copy Finishing Functions
Group Copy
Enabling the offset function
System Settings Administrator
When using the document glass
Touch the Output key
Touch the Sort or Group key Touch the OK key
Staple Sort
Using the Rspf
Orientation of the Original and Stapling Positions
Insert the originals face up Place each original face down
Place the originals. p.23, p.24 Touch the Output key
Touch the OK key When using the Rspf
Touch the Staple Sort key
Copying will start after all originals have been scanned
Special Modes
Touch the key of the desired special mode
General Procedure for Using the Special Functions
Example Selecting the margin shift
Function
Margin Shift Copy
Adjust the shift width as needed and touch the OK key
Touch the Margin Shift key in the special modes screen
Select the shift direction
Adjust the erase width as needed and touch the OK key
Select the desired erase mode
Erase Copy
Touch the Erase key in the special modes screen
Dual page Copy
When copying book originals
Touch the Dual page Copy key in the special modes screen
Place the originals on the document glass. p.23
Touch the OK key in the special
Pamphlet Copy
Modes screen
Specify whether 1-sided or 2-sided originals will be copied
JOB Build Mode
Touch the JOB Build key in the special modes menu screen
Touch the READ-END key
Multi Shot Copy
Touch the Manual key
Original Size
Select the original size
Touch the inside OK key
Cover Copy
Copying onto a cover
Not copying onto a cover
Select the covers that you wish to add
Touch the OK key in the cover setting screen
Load the cover paper to be used into the bypass tray
Specify whether or not the front cover is to be copied on
Reverse Copy
Touch the outer OK key
Card Shot
Place the back side of the original
Place the original on the document glass
Front side of the card Is scanned
Back side of the card is scanned and copying begins
Introduction
Network Scanner Function
About the Network Scanner Function
Accessing WEB Pages
Use the following procedure to access the Web pages
Open the Web browser on your computer
About the WEB
Basic Settings for Network Scanning
Configuring Smtp server settings
Smtp Server and DNS Server Settings
Configuring DNS server settings
When you have completed all of the entries, click Submit
Configuring Ldap Server Settings When Using AN Ldap Server
Programming Custom Index Names
Storing destinations for Scan to E-mail
Setting UP Destination Information
Click E-mail
FTP
Click Destination in the menu frame
Storing destinations for Scan to FTP
Storing destinations for Scan to Desktop
Storing Groups Scan to E-mail
Editing and deleting programmed transmission destinations
Click Sender in the menu frame Click Edit or Delete
Editing and deleting programmed senders information
Enter the current password in Admin Password
Enter passwords in User Password and Admin Password
Entered password is stored
Logging in when user authentication is enabled
Settings required for user authentication
Condition settings screen
Initial Screen of Scanner Mode
Address book screen
Sending AN Image
Load the original Adjust the resolution setting. p.80
Basic Transmission Method
Touch the Address Book key
Touch the one-touch key of the desired destination
Using the document glass
Enter a file name for the scanned image. p.82
After the final page is scanned, touch the READ-END key
Sending an image by entering an e-mail address manually
Transmission Methods for Scan to E-MAIL
Continue from of Basic Transmission Method p.73
E-mail address entry
Touch the ADD Selected key
Touch the Global Address Search key
Initial screen
Continue from of Basic Transmission Method p.72 to
Touch the JOB Build key
Manually Setting the Scanning Size
Scanning Settings
Touch the desired original size key
Selected size appears in the top half of the Original key
Selecting the Quality
Adjust the density
Touch the Quality key
Selecting the original type
Change the resolution
Selecting the Resolution
Touch the Resolution key
Touch the desired resolution key
Selecting the File Format
Compression mode
Touch the File Format key
Select the file type
Touch the Send Settings key
Changing the Send Settings
Touch the OK key in the send settings screen
Up to 64 characters can be entered
Press the JOB Status key
Canceling AN E-MAIL/FTP Transmission
Touch the Scan to key
Touch the STOP/DELETE key
Metadata Delivery Data Entry
Preparations for Metadata Transmission
Settings Required in the WEB Pages
Metadata Transmission for Scan to Desktop
Storing Metadata Sets
Touch the Data Entry key
Transmitting Metadata
Touch the key of the metadata that you wish to use
Touch the key of the value that you wish to enter
Auto
Metadata Fields
Name entered Description Where entered Metadata field
Sender Name
Subject
System settings screen will appear
Touch the Printer Settings List key
Checking the IP Address
Touch the List Print key
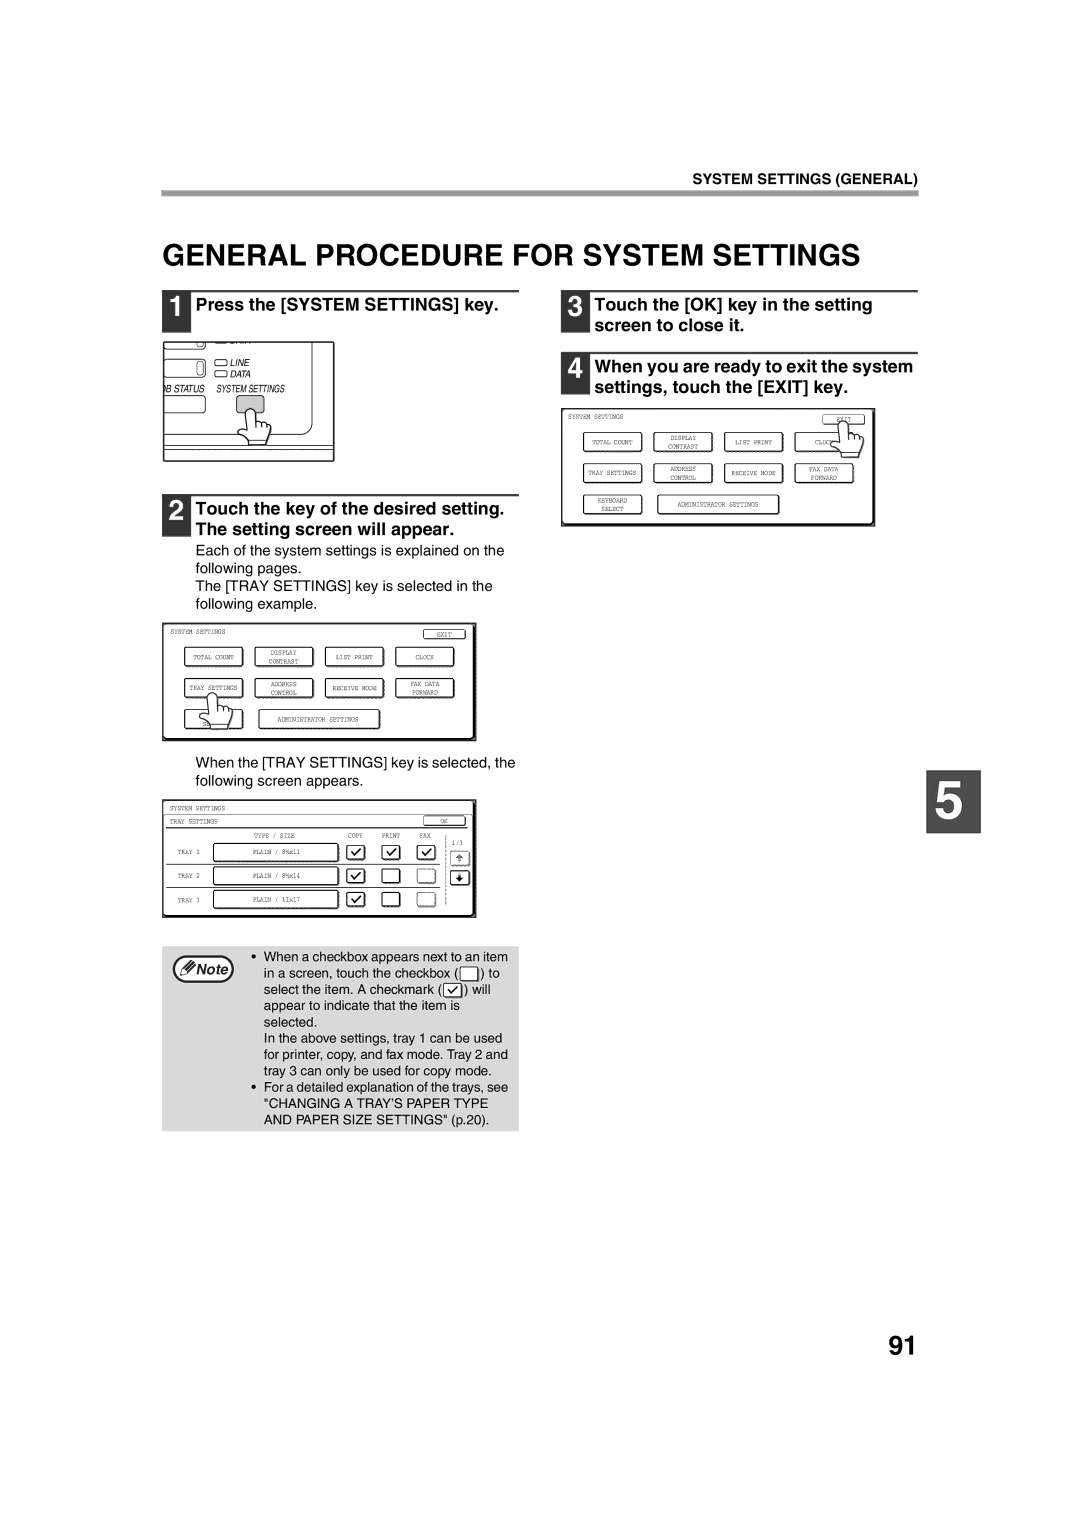
System Settings
System Settings
General Procedure for System Settings
Settings
JOB Program Memory
Storing a JOB Program
Touch the STORE/DELETE key
Deleting a Stored JOB Program
Executing a JOB Program
Press the #/P key
Touch the program number key of the desired program
Copying When Auditing Mode is Enabled
Auditing Mode
When the copy job is finished, press the Logout key
Enter your account number 5 digits with the numeric keys
Programming a Administrator Password
Purpose of the Administrator Settings
Press the Clear ALL key to exit the setting
Touch the Administrator Settings key
Touch the OK key. You will return to the screen of step
Example
Example Auditing mode
Keys Used in Administrator Settings
Program name Factory default Settings
Administrator Setting List
100
Programs for Print Mode
Administrator Setting Menu
101
Level
102
General Programs
Account Control
103
Cancel Jobs of Invalid Accounts
Account Limit Setting
104
Account Number Control
105
Energy Save
106
Operation Settings
107
Device Control
108
109
Product KEY
Programs for Copy Mode
Copy Settings
110
Programs for Print Mode
Print Settings
111
Timeout
Hexadecimal Dump Mode
USB Port Emulation Switching
Network Port Emulation Switching
113
Restore Factory Defaults *1
Reset the NIC *1
Store Current Configuration *1
Restore Configuration *1
Programs for Network Scanner Mode
Scanner Settings
115
Paper feeding problems
Problems related to machine operation
Image quality problems
116
Message Cause and solution
Display Messages
117
118
Troubleshooting
Problems related to machine operation
119
120
121
Paper feeding problems
122
Image quality problems
123
Problems When the Network Scanner Function is Used
124
Resolution
Error Code Table
Error codes
Display Messages
125
If Your E-MAIL is Returned
Important Points When Using Scan to E-MAIL
126
Original image samples
Misfeed Removal Guidance
Misfeed Removal
127
First, locate the misfeed
Misfeed in the Rspf
128
Remove the misfed original
Misfeed in the Machine
Misfeed in the Bypass Tray
129
Misfeed in the paper feed area
130
Misfeed in the fusing area
Close the front cover and side cover
Turn the roller rotating knob in the direction of the arrow
Misfeed in the Upper Paper Tray
Misfeed in the Center Tray
131
Replace the upper paper tray
Misfeed in the Lower Paper Tray
Misfeed in the Right Tray
132
Misfeed in AN Output Tray
Misfeed in the Upper Exit Area
133
Close the upper right side cover
Replacing the Toner Cartridge
134
Close the front cover
135
Staple Cartridge Replacement
Replacing the staple cartridge
Replace the staple case
136
Removing staple jams
Follow the steps below to remove a staple jam
Checking the Toner Quantity and Total Count
Cleaning the Machine
Document Glass and Rspf
137
Cleaning the scanning glass for Rspf
Bypass Tray Paper Feed Roller
138
139
Peripheral Devices
Finisher MX-FN13
Specifications
140
Part names
141
Sheet Paper Feed Unit
MX-DE10 MX-DE11
Paper Upper tray
Proper Storage
Storage of Supplies
142
Store the supplies in a location that is
143
Specifications
Reversing single pass feeder Rspf
144
145
Specifications for Network Scanner
Scanning margins
TCP/IP, SMTP, LDAP, FTP
146
Material Safety Data Sheet
Hazards Identification
147
Personal Protective Equipment
148
Disposal Considerations
149
Sharp Corporation Nagaike-cho, Abeno-ku, Osaka, Japan
150
151
Exposure Limit Values� � � � � � � � � � � � � �
152
153
Symbols
Index
154
155
156
157
158
Troubleshooting and maintenance
Configuring the administrator settings
159
Misfeeds, removing
Trademark acknowledgments
161
Factory default passwords
To the Administrator of the Machine
Factory default administrator password
Factory default passwords Web pages
Memo
Connectors
Page
2009G KS1 TINSE2026QSZZ
Sharp Electronics Corporation