SCANNING SETTINGS
(ORIGINAL SIZE, QUALITY, RESOLUTION, FILE FORMAT, AND SEND SETTING)
When sending an image, you can change the original scan size, quality, resolution, file format, and file name.
MANUALLY SETTING THE SCANNING SIZE
If you load an original that is not a standard size, or if you wish to change the scanning size, touch the [ORIGINAL] key and set the original size manually.
Perform the following steps after loading the document in the RSPF or on the document glass.
*Standard sizes:
Note | The following originals sizes will be correctly detected: |
|
•Countries/regions that use
•Countries/regions that use AB standard sizes: A3, A4, A4R, A5, A5R*, B4, B5, B5R.
*These sizes can only be automatically detected when the RSPF is used.
If a
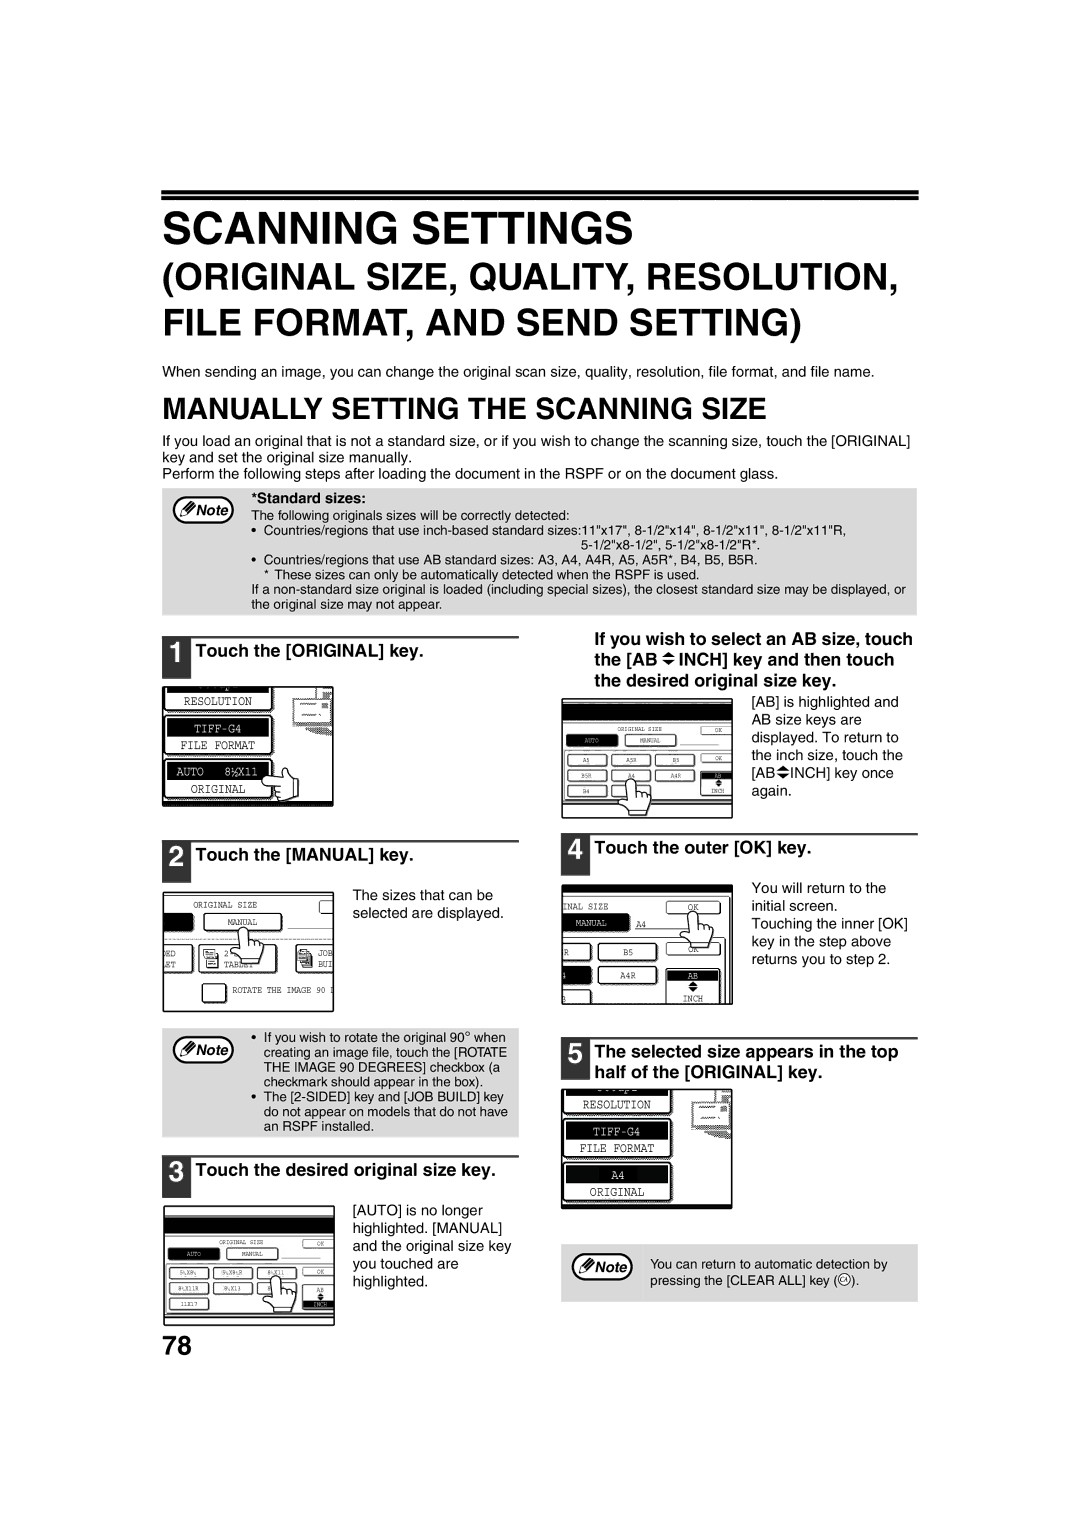
1 Touch the [ORIGINAL] key.
RESOLUTION
FILE FORMAT
AUTO 8½X11
ORIGINAL
If you wish to select an AB size, touch the [AB ![]() INCH] key and then touch the desired original size key.
INCH] key and then touch the desired original size key.
|
|
|
|
|
|
|
|
|
|
|
|
|
|
| [AB] is highlighted and |
|
|
|
|
|
|
|
|
|
|
|
|
|
|
| AB size keys are |
|
|
|
| ORIGINAL SIZE |
|
|
|
|
|
|
|
| |||
|
|
|
|
|
|
|
|
| OK | displayed. To return to | |||||
|
|
|
|
|
|
|
|
|
|
|
|
|
|
| |
|
|
|
|
|
|
|
|
|
|
|
|
|
|
| |
| AUTO |
|
| MANUAL |
|
|
|
|
|
|
| ||||
|
|
|
|
|
|
|
|
|
|
| the inch size, touch the | ||||
|
|
|
|
|
|
|
|
| OK |
| |||||
| A5 |
|
|
| A5R |
| B5 |
|
|
| |||||
|
|
| |||||||||||||
|
|
|
|
|
|
|
|
|
| [AB INCH] key once | |||||
| B5R |
|
|
|
| A4 |
| A4R |
|
| AB | ||||
|
|
|
|
|
|
|
|
|
|
|
|
|
|
| again. |
| B4 |
|
|
|
| A3 |
|
|
|
|
|
| INCH | ||
2 Touch the [MANUAL] key.
The sizes that can be
| ORIGINAL SIZE | selected are displayed. | |
O | MANUAL | ||
| |||
DED | JOB | ||
LET | TABLET | BUIL |
ROTATE THE IMAGE 90 D
• If you wish to rotate the original 90° when
Note creating an image file, touch the [ROTATE THE IMAGE 90 DEGREES] checkbox (a checkmark should appear in the box).
•The
3 Touch the desired original size key.
|
|
|
| [AUTO] is no longer | |
|
|
|
| highlighted. [MANUAL] | |
| ORIGINAL SIZE |
| OK | and the original size key | |
AUTO | MANUAL |
|
| ||
|
| you touched are | |||
51/2X81/2 | 51/2X81/2R | 81/2X11 | OK | ||
highlighted. | |||||
81/2X11R | 81/2X13 | 81/2X14 | AB | ||
11X17 |
|
| INCH |
|
4 Touch the outer [OK] key.
|
|
|
|
|
|
|
|
|
| You will return to the |
|
|
|
|
|
|
|
|
|
| initial screen. |
INAL SIZE |
|
|
|
|
|
| ||||
|
|
|
|
| OK | |||||
|
|
|
|
|
|
|
|
|
| Touching the inner [OK] |
MANUAL |
|
| A4 |
|
| |||||
|
|
|
|
|
|
|
|
|
| key in the step above |
|
|
|
|
|
|
|
| OK |
| |
5R |
|
| B5 |
|
|
|
| returns you to step 2. | ||
|
|
|
|
|
|
| ||||
|
|
|
|
|
|
|
|
|
| |
|
|
|
|
|
|
|
|
|
| |
|
|
|
|
|
|
|
|
|
| |
4 |
|
| A4R |
|
|
| AB |
|
| |
|
|
|
|
|
|
|
|
|
|
|
3 |
|
|
|
|
|
|
| INCH |
|
|
5 The selected size appears in the top half of the [ORIGINAL] key.
300dpi
RESOLUTION
FILE FORMAT
A4
ORIGINAL
![]() Note You can return to automatic detection by pressing the [CLEAR ALL] key (
Note You can return to automatic detection by pressing the [CLEAR ALL] key (![]() ).
).
78