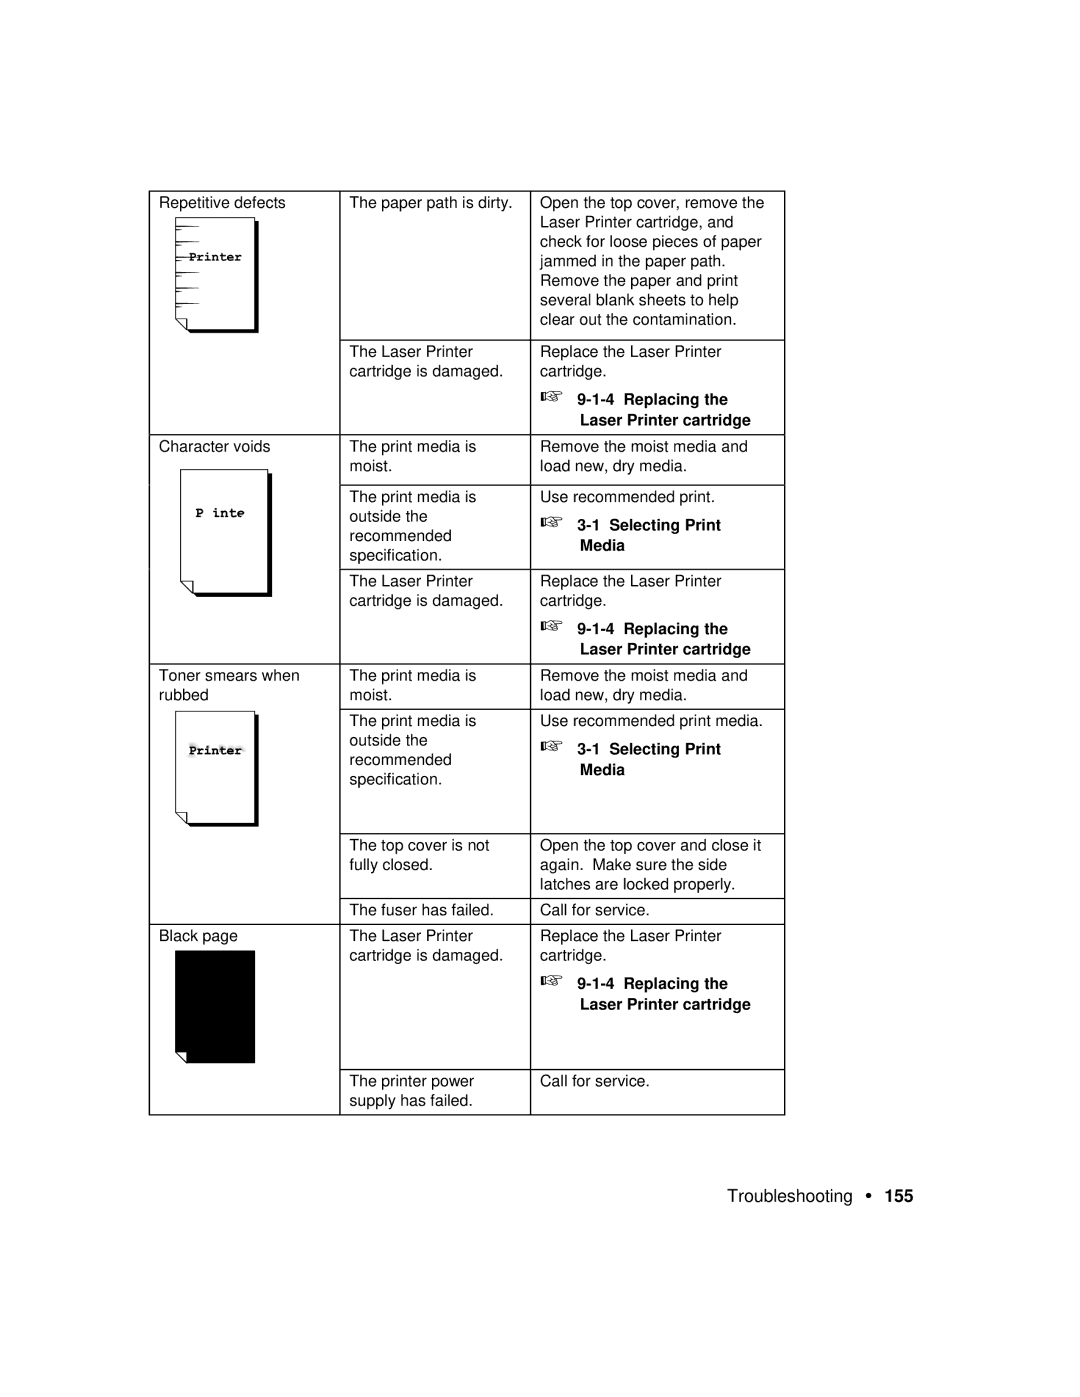
602E20580 11/97
DocuPrint P12 User Guide
Xerox Corporation 800 Phillips Road Webster, New York
Energy Star
Introduction
Chapter 1 Knowing Your Printer
Safety Notes
Chapter 2 Setting Up
What This Manual Contains
Chapter 10 Troubleshooting
Chapter 9 Maintenance
Appendix
The following conventions are used throughout this manual
Manual Conventions
the documentation might result in hazardous exposure to laser light
Safety Notes
Laser Safety
Ozone Safety
shock or fire
Electrical Safety
You might receive a severe electrical shock if you do not connect the
grounding conductors properly
Scientific and Medical ISM equipment, the external radiation from ISM
Radio Frequency Emissions
equipment may have to be limited or special mitigation measures taken
Operational Safety
CHAPTER 1 KNOWING YOUR PRINTER
Table of Contents
Table of Contents
CHAPTER 2 SETTING UP
3-2 Loading Print Media
8-1 Options
Knowing Your Printer
Check to make sure you have received all of the items listed
1-1 Unpacking
Remove the printer from the shipping carton and place it on a
flat and stable surface
1-2 Printer Parts
1 Power cord socket
2 Power switch
11 Power cord
Fuser
Cleaning brush
1-2-2 Internal view
① Warning label
DOS Control Panel
1-3 Software
DOS Status Monitor
1-4-1 Printer space requirements
1-4 Installation Requirements
1-4-3 Printer electrical requirements
1-4-2 Operating environments
1-4-5 Printer software requirements
1-4-4 Interface cable
Knowing Your Printer
A 486SX 25MHz or better personal computer
A 1.44 MB 3.5-inch floppy drive At least 640 K of RAM
DOS 5.0 or later
Setting Up
2-1 Assembling the Printer
Procedure
Reference
Check that the power switch is off
2-1-1 Installing the Laser Printer cartridge
Push the release button to fully open the top cover
eight times to distribute the toner evenly
Drum shutter
3 Unpack the new Laser Printer cartridge
Hold the cartridge as shown below and gently rock it seven to
With one hand, hold the cartridge down on a flat surface. With
16 Chapter
2-1-2 2-1-3
In the Main group, double click on File Manager. Then insert
2-2 Installing Printer Software
2-2-1 Installing software in Windows 3.1x Floppy Disk
the Windows 3.1x Setup Disk
In the File Manager window, select the drive in which you have
inserted your diskette. Then double click on SETUP.EXE to run
the setup program
This brings you to the setup program. A dialog box as shown
2,478K
4 A component selection dialog box as shown below appears
Windows
All Components
Manager window
2-2-2 Installing software in Windows 3.1x CD-ROM
Insert the CD-ROM and double click on setup.exe in the File
When the following dialog box appears, select Xerox
2,478K
4 A component selection dialog box as shown below appears
Windows
All components
A. Activate setup program in setup disk
2-2-3 Installing software in Windows 95 Floppy Disk
Click on Add Printer button and the Add Printer Wizard dialog
B. Add Printer
C. Plug & Play
2-2-4 Installing software in Windows 95 CD-ROM
the onscreen instructions until you reach the following dialog
Select Xerox DocuPrint P12 Printer Software. Then follow
installing. ex. d\win95\disk1\xcp12.Inf
2-2-5 Installing software in DOS environment
Enter
Type del a\XC12CP.HLP and press Enter
2-2-6 Uninstalling the software
Type del a\XC12SM.EXE and press Enter
Type del a\XC12CP.EXE and press Enter
2-3-1 Switching on the printer
2-3 Testing the Printer
2-3-2 Test printing
2-3-3 Switching off the printer
Print Media
3-1-1 Plain paper
3-1 Selecting Print Media
Special print media
3-1-2
3-1-3 Other print media
3-1-4 Print media to avoid
3-1-5 Storing print media
Paper sizes
3-2 Loading Print Media
3-2-3 Using Multi-sheet Bypass
Paper
3-1-1 Plain paper
3-2-1 Using the paper cassettes
38 Chapter
2 Press the bottom plate down until it locks into place
① Slide end guide A out to the desired paper length
To shorten the cassette, reverse the procedure
4a For the 250-sheet paper cassette, follow the instructions below
To lengthen the cassette
Page
edge of the paper stack
Insert a stack of papers along the left side of the cassette
Make sure the stack goes under the metal retaining clip and the
Slide the side guide to the left so that it slightly touches the
a 250-sheet paper cassette
7 Gently push the paper cassette into the printer until it stops
b 500-sheet paper cassette optional
2 Press the bottom plate down until it locks into place
3-2-2 Using the Envelope cassette optional
Reach into the pocket on the handle of the cassette and pull the
cassette straight out
44 Chapter
3 Pinch the side guide and slide it to the far right
While lifting the end guide slightly, slide it to the desired
envelope length. Then lower the guide until it locks into place
Slide the side guide to the left so that it slightly touches the
Insert a stack of envelopes along the left side of the cassette
with the print side facing down. Make sure the stack is under
edge of the envelope stake
46 Chapter
7 Gently push the envelope cassette into the printer until it stops
Paper Type
3-2-3 Using the Multi-sheet Bypass Feeder
Stacking Height Limit
tab to flip out the last section
Pull the top of the front cover to open it. The multi-sheet
bypass feeder drops down automatically
Pull the sliding section toward you until it stops. Pull the gray
Print Media
3 Slide the side guide to the far right
If the print medium is a stack of papers, transparencies or
labels, fan them before loading. Then load the print medium
50 Chapter
Adjust the side guide to the size of the loaded print medium
Make sure the print medium is under the plastic tab on the side
guide
Close the front cover, together with the multi-sheet bypass
3-2-4 Closing the multi-sheet bypass feeder
Remove all papers from the multi-sheet bypass feeder
Close the extended tray, then push it in
Control Panel
Label
4-1 Control Panel
Color
Explanation
Error
4-2 The LEDs
Response
Action
Definition/Cause
Printer Status
Definition/Cause
Printer Status
Action
Action
Memory overflow occurs when the
Printer Status
Definition/Cause
Control Panel
Printer Status
Definition/Cause
Action
Definition/Cause
Hardware Malfunction status
Table next page
Printer Status
Explanation
Hardware Malfunction
Error
Response
4-3 Control Panel Button
Xerox DocuPrint P12 Printer Driver
5-1 The Printer Driver
5-2 Setup tab
2-Sided Printing button Click to bring up the 2-Sided Printing dialog
5-2-1 Add/Edit Text Watermark dialogs
Text
Preview area
5-2-2 Add/Edit Graphics Watermark dialogs
Page
5-2-3 2-Sided Printing dialog
Options area
DocuPrint P12 Printer Driver
5-2-4 Layout Options dialog
Reduce for N-up printing 4 pages up
Enlarge for Poster 2 x 2 sheets
Normal
5-2-2 2-Sided Printing dialog
5-2-5 Booklet Printing dialog
76 Chapter
Source display Vertical tab
5-3 Paper Source tab
Source Source display display Vertical tabs
Paper source options
In instances whereby you have not installed these optional cassettes, but you have specified in the Accessories tab to add these options, they will appear. Any print job sent to the Secondary or Envelope cassette will be switched to Main cassette and Envelope MBF respectively
5-4 Destination tab
Image entire page as graphic
5-5 Image Control tab
Optimize for text and spreadsheets
Optimize for graphics and photos
Optimize for photocopy reproduction
The default value is Optimize for laser print output Fine
Optimize for laser print output Fine
Optimize for laser print output Standard
5-6 Accessories tab
B5, Legal 13, DL Env., C5 Env. and Japanese Official Postcard
5-7 Advanced tab
5-7-1 Printer Administration dialog
Wait time-out
5-8 Precautions & Limitations
Xerox DocuPrint P12 Status Monitor
6-1 The Status Monitor
6-2-1 Mini-window view
6-2 Views of Status Monitor
Icon
6-2-2 Icon view Windows 3.1x only
6-2-4 Max Window view
6-2-3 Taskbar view Windows 95 only
6-3 General tab
Print Manager button Windows 3.1x only
Printer Info button
96 Chapter
6-4 Change Printer tab
Pop up on alerts
6-5 Alerts tab
Always stay on top
Never pop up on alerts
6-6 Preferences tab
DOS Utilities
7-1-1 Main menu
7-1 DOS Control Panel
7-1-2 Control printing menu
7-1-3 Change printer settings
Vertical offset
Save settings, return to Main Menu
Auto-continue
Horizontal offset
7-1-4 Change LaserJet IIP emulation settings
Paper size
Symbol set
The default is PC-8 Save settings, return to Main Menu
Paper Source
Return to Main Menu Select this command to display the Main Menu
7-1-5 Print sample pages menu
Printer settings page
Select this command to print the printer settings page PCL font page
7-1-6 Change status monitor settings menu
7-1-7 Change printer port
7-2 DOS Status Monitor
7-2-1 Using the Status Monitor
7-2-2 Unloading the Status Monitor
Printer Options
Order Code
Feature
8-1 Options
Option
8-2 500 - Sheet Feeder
8-2-1 Installing the 500 - Sheet Feeder
116 Chapter
4 Make sure the printer is fully seated on the feeder
Fasten the two feeder joints onto the front of the printer as
Remove the 250-sheet standard cassette completely, then pull
the 500-sheet cassette until the two feeder joint areas on the
front of the printer are clearly visible
118 Chapter
sheet paper cassette. Finally, plug the power cord back into the
printer as well as the wall outlet, then turn on the power
Push back the 500-sheet paper cassette and re-insert the
out the 500-sheet cassette until the two feeder joint areas on
8-2-2 Removing the 500 - sheet feeder
While pinching the two feeder joints as shown below, unfasten
them from the rear of the printer
While pinching the two feeder joints as shown below, unfasten
them from the front of the printer
sheet paper cassette
Lift the printer up and away from the paper feeder
1 Turn the printer off
8-3 Installing the Network Interface Card
thumb screws that fasten the side cover with a screw driver
pull it up and outward as shown in the diagram
At the back of the printer, use a screw driver to loosen the
Grip the panel as shown and lift the panel off the notches, and
Slide the side cover off
Remove the interface cover
10 Connectboard. the other side of the connector cable to the control
9 Connect the connector cable to the network interface card
124 Chapter
the side cover
Reinstall the side cover as follows
Use the supplied screws to secure the network interface card to
the interface plate
126 Chapter
Connect the power cord to the back of the printer
Switch on the printer
Close the top cover and push the paper tray back in
8-4 Memory Kit 16MB
8-4-1 SIMM module configuration
128 Chapter
8-4-2
pull it up and outward as shown in the diagram
At the back of the printer, loosen the thumb screws that fasten
the side cover with a screwdriver
7 Slide the side cover off
10 Insert the SIMM into the socket at a 45 degree angle
Locate the SIMM socket as shown in the diagram. Install the
DRAM SIMM in this socket
9 Hold the SIMM with the notch on the left
Switch on the printer
Connect the power cord to the back of the printer
Close the top cover and push the paper tray back in
2 ➀ Pull the center grip to open the large extension, then
8-5 Installing the face-up tray
Insert the three tabs on the face-up tray into the openings on
the rear end of the printer
Maintenance
9-1-1 Handling the Laser Printer cartridge
9-1 Laser Printer Cartridge
9-1-2 Storing the Laser Printer cartridge
9-1-3 Redistributing the toner
fully into the guide channels until it clicks into place. Use the
Hold the Laser Printer cartridge as shown below and shake it
seven to eight times to free the toner
Hold the Laser Printer cartridge as shown below and insert it
outlet and from the printer
Press the power switch to the O position to turn off the printer
Then disconnect the power cord from the grounded power
9-1-4 Replacing the Laser Printer cartridge
138 Chapter
Drum shutter
Hold the Laser Printer cartridge as shown below and shake it
140 Chapter
8 Close the top cover
Hold the Laser Printer cartridge as shown below and insert it
fully into the guide channels until it clicks into place. Use the
9-2-1 Cleaning the ROS Mirror
9-2 Cleaning the Printer
Then disconnect the power cord from the grounded power
9-3 Relocating the Printer
the paper deck
Press the power switch to the O position to turn off the printer
Page
back into the face up tray
Flip to close the small extension and push the large extension
144 Chapter
Detach the face-up tray from the rear of the printer
Pack this printer and its accessories into the original boxes
Maintenance
Troubleshooting
10-1 Clearing Paper Jams
Look for a sheet of paper protruding approximately 1 to 1 1/2
Reinstall the Laser Printer cartridge Close the top cover
10-1-1 Jam before reaching Laser Printer cartridge
1 Open the top cover and remove the Laser Printer cartridge
10-1-2 Jam after leaving Laser Printer cartridge
Close the top cover
Reinstall the Laser Printer cartridge
Firmly but carefully pull the sheet of paper out of the fuser and
out of the printer
152 Chapter
10-1-3 Jam at the paper exit
jammed or partially fed paper
4 Reinstall the face-up tray
If paper was fed from the multi-sheet bypass feeder, remove all
papers from the multi-sheet bypass feeder tray, including any
9-2 Cleaning the Printer
10-2 Print Quality Problems
Possible
Description
Media
9-1-4 Replacing the
Laser Printer cartridge
3-1 Selecting Print
Laser Printer cartridge
9-1-4 Replacing the
Laser Printer cartridge
9-1-4 Replacing the
9-1-4 Replacing the
9-2 Cleaning the Printer
3-1 Selecting Print
Media
The top cover will not shut
10-3 Other Problems
If the problems mentioned below occur, take the recommended actions
Remove and reinstall the Laser Printer cartridge
In the USA and Canada
10-4 Servicing your Printer
Appendices
Appendices
Specifications DocuPrint P12
Specifications
Specifications DocuPrint P12
Signal Name
Pin Configuration
Port A Parallel Pin Configuration
Signal Name
Warranty
Warranty
How is replacement obtained?
Hardware Warranty and Product Support for your Xerox Docuprint P12
Three Year Limited Hardware Warranty
If you have a problem with your unit
Service after your three-year warranty expires
What the warranty does not cover
Replacement and repair are not your only remedies
No other warranty or guarantee is made by Xerox
Index
Index
Index
Page
Watermark Options
Testing the Printer
Watermark Options dialog