Page
Color imageRUNNER C3200 Sending Guide
Manuals for the Machine
Network Quick Start Guide
Fax Driver Installation and Instructions
How This Manual Is Organized
Appendix
Contents
Basic Scanning Features
Special Scanning Features
Receiving Documents
Customizing Communications Settings
Sending Documents
Checking/Changing the Send/Receive Status
System Settings Table -2 Communications Settings
Storing/Editing Address Book Settings
System Manager Settings
Viii
Printing Communication Reports
Troubleshooting
Appendix
Glossary -12 Index
Symbols Used in This Manual
How To Use This Manual
Keys Used in This Manual
Press Address Book/Server
Displays Used in This Manual
Press this key for operation Xii
Abbreviations Used in This Manual
Illustrations Used in This Manual
Xiii
Trademarks
Legal Notices
Xiv
Copyright
Disclaimers
Xvi
Introduction to Sending Functions
File Formats for Every Need
What This Machine Can Do
Diverse Sending Methods
Inbox Fax Mail File Server
Instant Address Search with Ldap
Flexible Scan Features
Preview Function
Originals Send
Memory RX Inbox Lock Print Send
Receiving I-Faxes in Memory
Automatic Forwarding
Confidential Fax Inbox
Overview of the Color imageRUNNER C3200
Original Inbox Scan Fax Mail File Server Fax *1 Group
Send Basic Features Screen
Introduction to Sending Functions
Scan Settings Screen
Chapter
Things You Must Do Before Using This Machine
Registering the Sending Record
Setting the Display Language
Setting the Current Date and Time
12Things You Must Do Before Using This Machine
If you are setting the Time Zone
If you are setting Daylight Saving Time
Press OK
Press Additional Functions Communications Settings
Registering Sender Names
Introduction to Sending Functions
Enter the senders name press OK
Registering the Units Name
Press Unit Name
Enter a name press OK
Introduction to Sending Functions
Flow of Sending Operations
If the message You must insert a control card. appears
Press Send
Place your originals
Specify the destinations
If a destination is stored in the Address Book
If a destination is not stored in the Address Book
If a destination is stored in a One-Touch Button
If a destination is stored in a Favorites Button
If you want to specify a destination using a server
Press the Scan Settings drop-down list select a scan setting
Press Send Settings enter the send settings press Done
Press the File Format drop-down list select a file format
TIFF/JPEG
Introduction to Sending Functions
Press Start
If you want to cancel sending, press Stop
If Department ID Management is set, press ID
Platen Glass
Placing Originals
Feeder
Orientation
Vertical Placement Horizontal Placement Feeder
Vertical Placement Horizontal Placement
Platen Glass
Lift the feeder/platen cover
Platen Glass
Place your originals face down
Gently close the feeder/platen cover
Introduction to Sending Functions
Adjust the slide guides to fit the size of your originals
Feeder DADF-K1 Optional
Original Set Indicator
Using the Touch Panel Display
Canceling a Job
Remove your originals
Using the Stop Key
Press Stop
Using the System Monitor Screen
Press System Monitor Press Send
Press Status Select the job to be canceled press Cancel
Press Yes
Press Done
Basic Sending Methods
Using the Address Book
Specifying Destinations
Select the desired destination from the Address Book
Select the destination press OK
Using the New Address Tab
Press New Address E-mail
Press E-mail Address
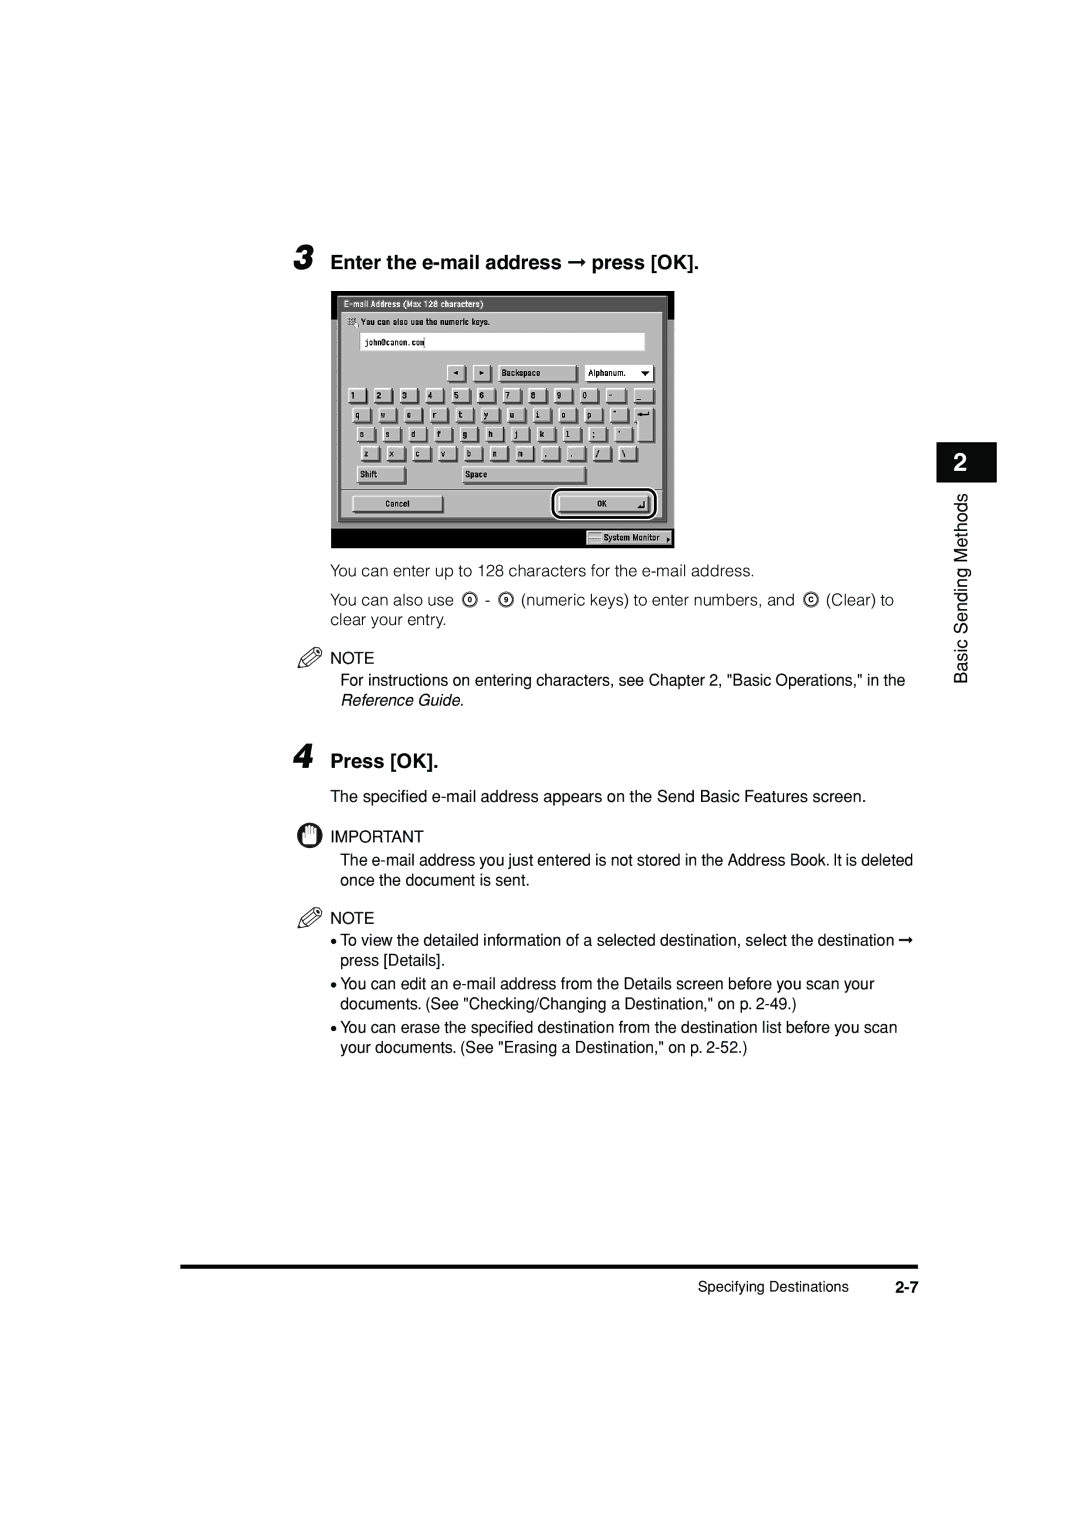
Enter the e-mail address press OK
Specifying an I-Fax Address
Press New Address I-Fax
Press the Mode drop-down list select Simple or Full
Press I-Fax Address
Enter the I-Fax address press OK
Specify the receiving conditions of the destination press OK
Select On or Off for Send Via Server
Specifying a File Server
Using the Browse Key Windows SMB
Using the Keyboard
Using the Browse Key NetWare IPX
Press Host Name
Enter the host name press OK
Press File Path
Enter the file path press OK
Press User
Enter the user name press OK
Press Password
Enter a password press OK
11 Confirm your settings press OK
Press the Protocol drop-down list select Windows SMB
Press Browse
Select the desired workgroup press Down
Select the desired file server press Down
24Specifying Destinations
Confirm your settings press OK
Confirm your settings press OK
Press New Address File
Basic Sending Methods
Select the desired NDS tree press Down
Enter your user name and network password
30Specifying Destinations
Basic Sending Methods
10 Confirm your settings press OK
Specifying a User Inbox
Basic Sending Methods
Using the One-Touch Buttons
Press One-touch Buttons
Select the desired One-touch Button
One-Touch Button Number
Using the Favorites Buttons
Press Favorites Buttons
Select the desired Favorites Button
Using a Server
Specify the search criteria
To use Simple Search
To use Detailed Search
Search Category
Search Condition
Basic Sending Methods
Press Start Searching
If the screen below is displayed
46Specifying Destinations
Super G3 FAX Board is installed
Read the displayed message press OK
48Specifying Destinations
Checking/Changing a Destination
Select the destination press Details
If necessary, check or change the destinations information
If the destination is obtained via a server
If the destination is a group address
Select the destination to be erased
Erasing a Destination
Press Erase
Basic Scanning Features
Selecting a Scan Mode
Place your originals specify the destination
Press the Scan Settings drop-down list select a scan mode
4Selecting a Scan Mode
Scan Settings
Two-Sided Originals
Select the type of original press OK
Press the Scan Settings drop-down list press Option
Document Size
Press Document Size Select Select the document size
If you want to scan a standard document size
If you want to scan a nonstandard document size
If you want to scan a registered document size
Press Done OK
Registering the Specified Document Size
Press Other Size Press Register Size
Press Cancel Done Cancel
Resolution
You can specify the resolution before scanning the original
16Scan Settings
Scan Exposure and Original Type Settings
Manual Exposure Adjustment
Press or to adjust the scanning exposure press OK
Photo Mode
Text/Photo Mode
Text Mode
Original Type
As little moiré effect as possible
Automatic Exposure Adjustment
Press a OK
Changing Color Modes
Automatic Color Selection Full Color/Grayscale
Color Selection
Automatic Color Selection Full Color/Black-and-White
Press Start
Full Color
Press the color selection drop-down list press Full Color
Grayscale
Black-and-White
32Changing Color Modes
Special Scanning Features
Two-Page Separation
Press Special Features Press Two-page Separation
4Two-Page Separation
Book Frame Erase
Frame Erase
Original Frame Erase
Binding Erase
Press Special Features Frame Erase
Original Frame Erase
If you want to set the same width for all four borders
Select the original size press OK
Press Done OK
Book Frame Erase
If you want to set the same width for all four borders
12Frame Erase
Binding Erase
14Frame Erase
Press or + to set the frame erase width press OK
16Frame Erase
Different Size Originals
Press Special Features Different Size Originals
Job Build
Job Build
Press Start
If the original is two-sided
After the last batch of originals is scanned, press Done
Low
Adjusting the Contrast Sharpness
High
Adjusting the Contrast Sharpness
26Adjusting the Contrast Sharpness
Remove Background
Image Quality Adjustment
Remove Background
Prevent Bleeding
28Image Quality Adjustment
Press Remove Background
Press OK Done OK
Press a Special Features Image Qty Adjustment
Prevent Bleeding
Press Prevent Bleed-thru
Press Start
User Preset Keys
Storing Scan Settings
Specify the scan settings that you want to store
Press Store/Erase
User Preset Key
Icon Color Mode Resolution
If you select a key without settings
If you select a key that already has settings stored in it
Naming a User Preset Key
Select a user preset key to name press Register Name
Erasing Scan Settings
To cancel erasing the settings, press No
42User Preset Keys
Sending Documents
Sending Methods
Sending an E-Mail Message
Press Send Doc. Name
4Sending Methods
Sending Documents
Press Message Enter the message body text press OK
Press Reply-to Select the reply-to address
8Sending Methods
Sending Documents
Press Senders Names TTI Select a senders name press OK
Display returns to the Send Basic Features screen
Color/Black-and-White and Black-and-White color modes
Press Start
Sending an I-Fax
Sending Documents
Press Subject Enter the subject of your I-fax press OK
Press Message Enter the message body text press OK
18Sending Methods
Sending Documents
20Sending Methods
Press Senders Names TTI Select a senders name press OK
22Sending Methods
Sending a Job to a File Server
24Sending Methods
Example 2003041020300000002.tif 2003041020300000002.jpg
26Sending Methods
Press Start
Sending a Job to a User Inbox
Press Send Doc. Name
30Sending Methods
Delaying a Send Job
Press Delayed Send Enter the send time using numeric keys
Press OK Done
Press Start
Previewing Originals
Place your originals specify the destination press Preview
Press or to specify the page that you want to verify
Verify the images press Start Send
Job Done Notice
38Job Done Notice
Select the destination press OK
40Job Done Notice
Job Recall
Place your originals press Recall
42Job Recall
Receiving Documents
Receiving Print Jobs
Receiving Print, Fax, and I-Fax Documents
Receiving I-Fax and Fax Documents
Receiving Documents
Setting the Memory Lock Mode
Document is printed
Memory RX Inbox Settings
Press
Press Communications Settings
Press Memory RX Inbox Settings
Receiving Documents
Press Memory RX Inbox Settings Use I-Fax Memory Lock
Storing Received I-Fax Documents in Memory
Memory Lock Start Time Settings
Select On or Off press OK
10Receiving Print, Fax, and I-Fax Documents
If you select Everyday
If you select Select Days
If you select Off
Memory Lock End Time Settings
Press Memory RX Inbox Settings Memory Lock End Time
Select Everyday, Select Days, or Off
16Receiving Print, Fax, and I-Fax Documents
If you select Off
Press Forwarding Settings
Forwarding Received Documents
Erasing Received Documents
Press Mail Box Select Memory RX Inbox or Conf. Fax Inbox
Receiving Documents
Display returns to the Inbox Selection screen
Available Paper Sizes
Available Paper Sizes for Received Documents
24Available Paper Sizes
Checking/Changing Send/Receive Status
Checking Send Job Details
Checking/Changing the Status of Send Jobs
Press System Monitor
Press Send Select Status or Log
4Checking/Changing the Status of Send Jobs
If you select a job with only one destination in Status
If you select a job with multiple destinations in Status
If you select a job in Log
Changing the Destination
Press System Monitor Send
Press Status
If there is only one destination
Select the destination that you want to change
If there are multiple destinations
Change the destination
Resending a Job
12Checking/Changing the Status of Send Jobs
Select the destination to resend the job to
If there are multiple destinations for same sending method
Printing the Send Job Status/Log
Press Print List
16Checking/Changing the Status of Send Jobs
Checking/Changing the Status of Receive Jobs
Checking Receive Job Details
Press Receive
Printing the Receive Job Log
Press System Monitor Receive
To cancel printing, press No Activity Report RX is printed
Checking the Arrival of an I-Fax
Press Checking RX of I-Fax Jobs
Checking the Status of Jobs That Have Been Forwarded
Press Forwarding Status
Checking/Changing the Send/Receive Status
24Checking/Changing the Status of Receive Jobs
Customizing Communications Settings
Common Settings
Communications Settings Table
Settings Applicable TX Settings
Common Settings Table
Settings Applicable RX Settings
Automatic Document Deletion
Press Erase Failed TX
Jpeg Compression Ratio for Color Send Jobs
Press Jpeg Compression Ratio
Select High Ratio, Normal, or Low Ratio press OK
Errors
Handling Documents That Fail to Be Forwarded
Select Always Print, Store/Print, or Off press OK
Number of Retry Attempts
Press or until Retry Times appears press Retry
Press or + to set the number of Retry Times press OK
Standard Send Settings
Press the Scanning Mode drop-down list select a scan mode
14Standard Send Settings
Favorites Buttons
Specify the send settings that you want to register
Registering a Favorites Button
16Favorites Buttons
Press Store
Naming a Favorites Button
Press Name
Erasing a Favorites Button
Press Yes
22Favorites Buttons
Customizing Communications Settings
Image level when the Text/Photo or Photo mode is selected
Select Data Size Priority, Normal, or Image Priority
Customizing Communications Settings
Initial Send Screen Display
Initial Send Screen Display
Printing the TX Terminal ID
Press or until TX Terminal ID appears press TX
Select On or Off
Outside
Original Area Inside
Original
Press OK Selected mode is set
Gamma Value for Color Send Jobs
34Gamma Value for Color Send Jobs
Initializing TX Settings
36Initializing TX Settings
Two-Sided Printing
Press Two-sided Print Select On or Off press OK
Received Data Original Output 11 x
Paper Drawer Selection
Received Data Original Output
Ltrr
Selected mode is set
Reducing a Received Document
Press Receive Reduction
If you select On
Image is reduced in the vertical direction only
If you select Off
Printing Footer Information on a Received Document
Press Received Page Footer Select On or Off press OK
On 1 Log
Press 2 On 1 Log
On 1 Log
502 On 1 Log
Storing/Editing Address Book Settings
Address Book Settings Table
Settings Applicable
Fax
About the Address Book
Mail
File
Group
Storing New Addresses
Additional Functions Address Book Settings
Mail Addresses
6Storing New Addresses
Press Name Enter a name for the e-mail address press OK
Press E-mail Address enter the e-mail address press OK
If Access Number Management is set to On
Finish storing the address
If Access Number Management is set to Off
Fax Addresses
Press Register New Address Press I-Fax Press Name
Enter a name for the I-fax address press OK
Press the Mode drop-down list select Simple or Full
Press I-Fax Address enter the I-fax address press OK
Select On or Off for Send Via Server
A4/LTR
Finish storing the address
18Storing New Addresses
File Server Addresses
Press Register New Address Press File Press Name
Enter a name for the file server address press OK
Internet Information Server 4.0 under Windows NT Server
Set Host Name, File Path, User, and Password
24Storing New Addresses
Group Addresses
Press Register New Address Press Group Press Name
Enter a name for the group address press OK
Select Address Book or Store In Usr Inbox
Storing/Editing Address Book Settings
30Storing New Addresses
If you select Store In Usr Inbox
To erase a destination
Finish storing the address
Address Obtained via a Server
Press Register New Address Press Search on Server
36Storing New Addresses
Search by organization name
That you entered
Search criteria
40Storing New Addresses
If the screen below is displayed
42Storing New Addresses
Super G3 FAX Board is installed
Store the selected destination
If only one destination is selected
Storing/Editing Address Book Settings
If multiple destinations are selected
Storing/Editing Address Book Settings
48Storing New Addresses
Storing/Editing Address Book Settings
Editing Address Details
Select the destination to be changed
Editing Address Details
Storing/Editing Address Book Settings
Edit the address details press OK
Erasing Addresses
Erasing Addresses
56Erasing Addresses
Press Yes
Naming an Address Book
Select a subaddress book to name press Register Name
Name of the Address Book is set
Storing/Editing One-Touch Buttons
Using numeric keys
Select E-mail, I-Fax, File, Group, or Search on Server
If you select E-mail
Storing/Editing Address Book Settings
If you select I-Fax
Storing/Editing Address Book Settings
You to receive a delivery confirmation message telling you
Storing/Editing Address Book Settings
68Storing/Editing One-Touch Buttons
Storing/Editing Address Book Settings
70Storing/Editing One-Touch Buttons
If you select File
72Storing/Editing One-Touch Buttons
If you select Group
74Storing/Editing One-Touch Buttons
Storing/Editing Address Book Settings
If you select Search on Server
Storing/Editing Address Book Settings
78Storing/Editing One-Touch Buttons
Name, fax number, organization, or organizational unit
80Storing/Editing One-Touch Buttons
Storing/Editing Address Book Settings
82Storing/Editing One-Touch Buttons
Storing/Editing Address Book Settings
84Storing/Editing One-Touch Buttons
Storing/Editing Address Book Settings
86Storing/Editing One-Touch Buttons
Erasing One-Touch Buttons
88Erasing One-Touch Buttons
Storing/Editing Address Book Settings
90Erasing One-Touch Buttons
System Manager Settings
10-1
System Settings
System Settings Table
Settings Applicable Communications
System Settings Table
10-3
Communications Settings
Mail/I-Fax Settings
10-5
Press E-mail/I-Fax Settings
Set the Maximum Data Size For Sending
Press Subject Enter the default subject press OK
10-7
Set the Full Mode TX Timeout
Select On or Off for Print MDN/DSN on Receipt
Select On or Off for Use Send Via Server press OK
Select On or Off for Always send notice for RX errors
10-9
10-10Communications Settings
10-11
10-12Communications Settings
10-13
10-14Communications Settings
10-15
10-16Communications Settings
10-17
10-18Communications Settings
10-19
10-20Communications Settings
10-21
Manage/Access to Address Book
Address Book Password
10-23
Access Number Management
Press Access Number Management
10-25
Forwarding Settings
Storing Forwarding Settings
10-27
10-28Forwarding Settings
10-29
Set the forwarding conditions
10-31
Fax Number Subaddress Password
10-33
Relay function
10-35
10-36Forwarding Settings
10-37
If you select Conf. Fax Inbox
Enter the name of the document press OK
10-39
Press Forwarding Time Select Everyday, Select Days, or Off
10-41
10-42Forwarding Settings
10-43
Tiff
10-45
10-46Forwarding Settings
10-47
Select whether to check Notice Only for Errors
10-49
Press Forward w/o Conditions
Press Forwarding Destination
10-51
Select the forwarding destination
10-53
10-54Forwarding Settings
10-55
System Manager Settings
10-57
10-58Forwarding Settings
10-59
Checking/Changing Forwarding Settings
Select whether to check Notice Only for Errors press OK
Check or change the forwarding settings press OK
10-61
You can set whether received documents are forwarded
Erasing Forwarding Settings
10-63
Printing Forwarding Settings
10-65
Ldap Server Settings
Registering an Ldap Server
Ldap Server Settings
Enter the server name press OK
Press Server Address
Enter the servers address press OK
Press Location to Start Search
Enter the location to start searching press OK
Press Port Number enter the port number using numeric keys
Select On or Off for Use SSL Secure Socket Layer
Numeric keys press Next
Select Do not use, Use, or Use security auth
If Do not use is selected
If Use is selected
ISO
If you are using Novell NetWare 5.1 NDS or later
10-76LDAP Server Settings
If Use security auth. is selected
10-78LDAP Server Settings
System Manager Settings
Changing an Ldap Server Setting
Change the necessary settings press Next
Deleting an Ldap Server
Select the Ldap server that you want to erase press Erase
Printing Ldap Server Settings
You can print out the Ldap server settings
To cancel printing, press No Ldap Server List is printed
Printing Communication Reports
11-1
Settings Applicable Send
Report Settings Table
Settings
Print List
Send TX Report
Specifying Report Settings
Additional Functions Report Settings
11-3
11-4Specifying Report Settings
Activity Report
If you select For Error Only or On
11-5
Press Activity Report Select On or Off for Auto Print
Select On or Off for Daily Activity Report Time
11-7
11-8Specifying Report Settings
Address Book List
Printing Lists
11-9
Press Send under Print List
Users Data List
11-11
Press Users Data List Press Yes
Troubleshooting12
12-1
When Problems Occur
Sending Documents
12-3
12-4When Problems Occur
12-5
12-6When Problems Occur
Other Situations
12-7
Error Messages
Self-Diagnostic Display
12-9
Cannot connect to the specified IP address/port
12-11
List of Error Codes without Messages
Reference Guide
12-13
An Inbox, in the Mail Box Guide
12-15
12-16Error Messages
12-17
Using a TCP/IP Network, in the Network Guide
12-19
Confirm that the POP server is functioning normally
12-21
Documents exceeded the mail server capacity
12-23
Remedy Reserve the jobs again, if necessary
Questions & Answers
12-25
Troubleshooting
12-27
12-28Questions & Answers
Appendix
13-1
Report and List Samples
Send Job List
PGS
13-3
DEPT. ID
13-5
Activity Report TX/RX
Result
Forwarding Conditions List
13-7
Login Information USE User
Registered Ldap Server List
Destination Name
13-9
13-10Report and List Samples
For Error only
13-11
Confidential Fax Inbox
Glossary
Ascii code
DNS server Dpi
Fax Internet Protocol IP
File server
IP address
NetBEUI
Memory Lock
Memory RX Inbox
NetWare
Senders Name
RX Password
Protocol
Subaddress
Subaddress Books
SMB
Index
Numerics
Index
What happens when documents are received
Remove background Sending an I-Fax,5-14 Report settings