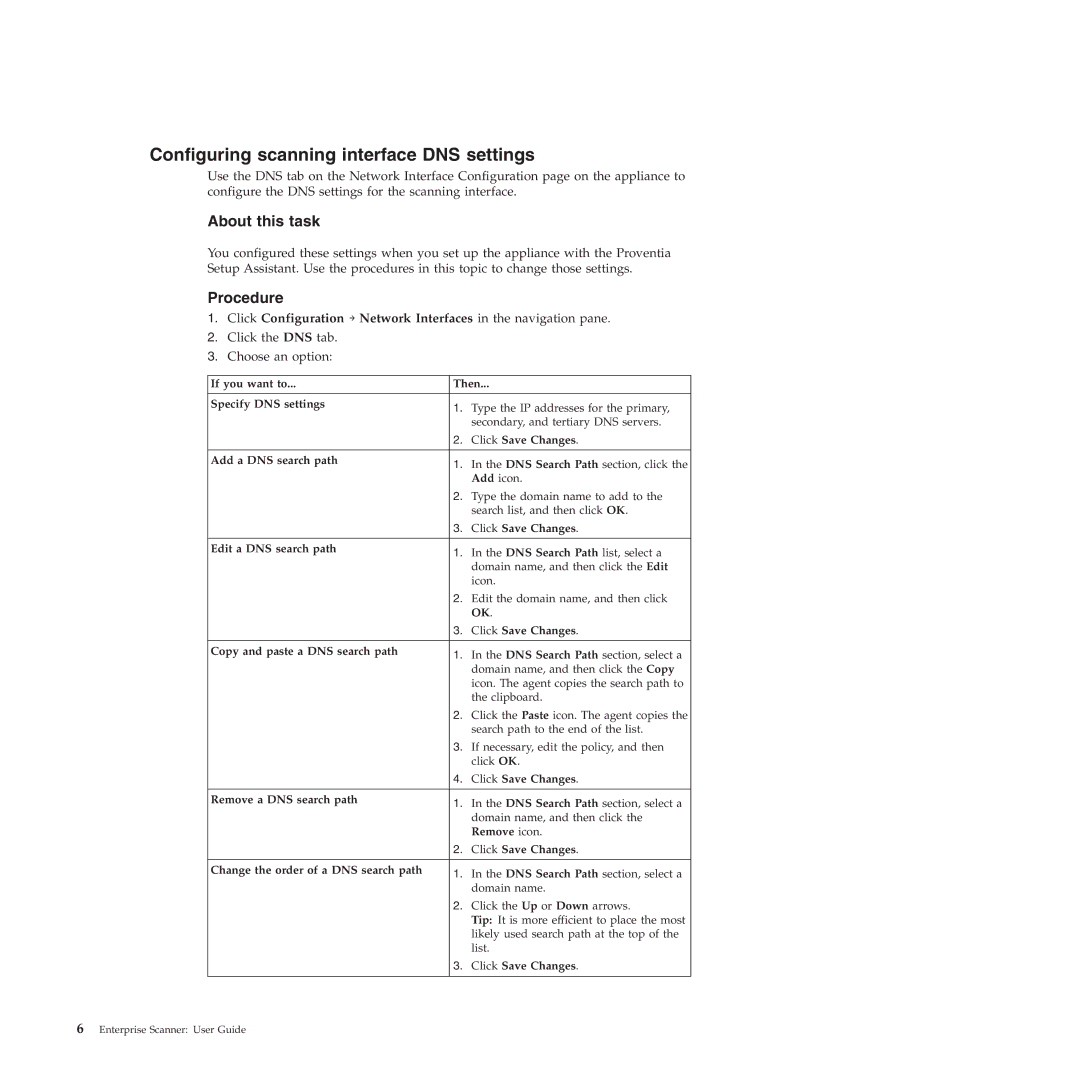
Configuring scanning interface DNS settings
Use the DNS tab on the Network Interface Configuration page on the appliance to configure the DNS settings for the scanning interface.
About this task
You configured these settings when you set up the appliance with the Proventia Setup Assistant. Use the procedures in this topic to change those settings.
Procedure
1.Click Configuration → Network Interfaces in the navigation pane.
2.Click the DNS tab.
3.Choose an option:
If you want to... | Then... | |
|
|
|
Specify DNS settings | 1. | Type the IP addresses for the primary, |
| ||
|
| secondary, and tertiary DNS servers. |
| 2. | Click Save Changes. |
|
|
|
Add a DNS search path | 1. | In the DNS Search Path section, click the |
| ||
|
| Add icon. |
| 2. | Type the domain name to add to the |
|
| search list, and then click OK. |
| 3. | Click Save Changes. |
|
|
|
Edit a DNS search path | 1. | In the DNS Search Path list, select a |
| ||
|
| domain name, and then click the Edit |
|
| icon. |
| 2. | Edit the domain name, and then click |
|
| OK. |
| 3. | Click Save Changes. |
|
|
|
Copy and paste a DNS search path | 1. | In the DNS Search Path section, select a |
| ||
|
| domain name, and then click the Copy |
|
| icon. The agent copies the search path to |
|
| the clipboard. |
| 2. | Click the Paste icon. The agent copies the |
|
| search path to the end of the list. |
| 3. | If necessary, edit the policy, and then |
|
| click OK. |
| 4. | Click Save Changes. |
|
|
|
Remove a DNS search path | 1. | In the DNS Search Path section, select a |
| ||
|
| domain name, and then click the |
|
| Remove icon. |
| 2. | Click Save Changes. |
|
|
|
Change the order of a DNS search path | 1. | In the DNS Search Path section, select a |
| ||
|
| domain name. |
| 2. | Click the Up or Down arrows. |
|
| Tip: It is more efficient to place the most |
|
| likely used search path at the top of the |
|
| list. |
| 3. | Click Save Changes. |
|
|
|