DVD Camcorder
Βιντεοκάμερα DVD
Key features of your DVD camcorder
Προειδοποιήσεις για την ασφάλεια
Safety warnings
Precautions
Προφυλάξεις
Make a backup of important recorded data
Before Using this Camcorder
Recorded contents cannot be compensated for
Προτου Χρησιμοποιησετε Αυτη ΤΗ Βιντεοκαμερα
Σημειωσεισ Σχετικα ΜΕ ΤΑ Εμπορικα Σηματα
Marks Beside Headings
Συμβολα Πλαϊ ΣΕ Επικεφαλιδεσ
Σχετικα ΜΕ Αυτο ΤΟ Εγχειριδιο Χρησησ
Important Note
Precautions when using
Σημαντικη Σημειωση
Do not expose the DVD camcorder to soot or steam
Do not use an optional 3 1/2 inch8cm CD lens cleaner
Do not use the DVD camcorder near TV or radio
Do not use the DVD camcorder near corrosive gas
Contents
Περιεχόμενα
Using the Menu
Connection
Printing Photo
Διασυνδεση USB
Πληροφοριεσ
Troubleshooting
Συντηρηση ΚΑΙ
Αντιμετωπιση
Δυνατότητες
When recording movie images on a DVD disc
Εισαγωγή στις βασικές
Για την εγγραφή ταινιών σε ένα δίσκο DVD
Εγγραφή ταινιών ή φωτογραφιών σελίδες
Recording the movie or photo images pages
συνεχίζεται
Ολοκληρωμένος
Function of the Finalised disc depends on the disc type
Finalised
RWFinalised
ΤΙ Περιλαμβανεται ΣΤΗ Συσκευασια ΤΗΣ Βιντεοκαμερασ DVD
What is Included with Your DVD Camcorder
Getting to know your DVD camcorder
Καλώδιο AV
Front and Right View Εμπροσ ΚΑΙ Δεξια ΟΨΗ
Camcorder Βιντεοκάμερας DVD
Παρουσίαση της
Left Side and Bottom View Αριστερη ΚΑΙ Κατω ΟΨΗ
Πισω ΚΑΙ Επανω ΟΨΗ
Mode button / Mode indicator Movie /Photo mode
Rear and TOP View
Σκόπευτρο Μοχλός ζουμ W/T Κουμπί Photo Ρυθμιστικό εστίασης
Remote Control Τηλεχειριστηριο
Προετοιμασία
Using the Accessories Χρηση ΤΩΝ Προσθετων Εξαρτηματων
Preparation
Holding the DVD camcorder Κράτημα της βιντεοκάμερας DVD
Precautions regarding the button type battery
Iinstalling the BUTTON-TYPE Battery
Installing the button-type battery in the remote control
Τοποθέτηση της μπαταρίας τύπου κουμπιού στο τηλεχειριστήριο
Preparationπροετοιμασία
Connecting a Power Source Συνδεση ΣΕ Πηγη Ρευματοσ
To charge the battery pack
Για να φορτίσετε τη μπαταρία
About the battery life
About battery packs
Maintaining the battery pack
Σχετικά με τις μπαταρίες
Power switch
Charging the battery pack
Charging indicator
Φόρτιση της μπαταρίας
Τύπος
Continuous recording time without zoom
Χρόνος συνεχούς εγγραφής χωρίς ζουμ
Κάρτα μνήμης Δίσκος DVD
Malfunction
Using the DVD camcorder with the AC power adaptor
Χρήση της βιντεοκάμερας DVD με το τροφοδοτικό AC
10 δευτερόλεπτα. σελίδα
Basic DVD Camcorder Operation
Βασικέσ Λειτουργίεσ ΤΗΣ Βιντεοκάμερασ DVD
Preparation Προετοιμασία
Screen Indicators Ενδειξεισ Οθονησ
Movie record mode
Τρόπος λειτουργίας εγγραφής ταινίας
Control Storage media
Movie play mode
Λειτουργία αναπαραγωγής ταινίας
Μέσο αποθήκευσης
Photo record mode
Τρόπος λειτουργίας εγγραφής φωτογραφίας
LCD screen menu OSD
Photo play mode
Φωτογραφίας
Ενδείξεις μενού στην οθόνη LCD
ICHECK Button
Switching the information display mode
Checking the remaining battery and recording capacity
Πληροφοριών
Χρηση ΤΗΣ Ενισχυσησ Οθονησ LCD
Using the LCD Screen Χρηση ΤΗΣ Οθονησ LCD
Adjusting the LCD screen Ρύθμιση της οθόνης LCD
LCD
Using the Viewfinder
Χρηση ΤΟΥ Σκοπευτρου
Αρχικη Ρυθμιση Γλωσσα OSD ΚΑΙ Ημερομηνια ΚΑΙ ΩΡΑ
Initial Setting OSD Language & Date and Time
Της οθόνης
Επιλογή της γλώσσας των ενδείξεων επί
Ρύθμιση ημερομηνίας και ώρας
Setting the date and time
Turning the date and time display on/off
Touch Date/Time Set Πατήστε το Date/Time Set
Επιλογη ΤΟΥ Μεσου Αποθηκευσησ
Before recording Πριν από την εγγραφή
Selecting the Storage Media
Selecting the desired storage
Επιλογή μιας κατάλληλης κάρτας μνήμης
Selecting a suitable memory card
Label-pasting portion
Terminals
Usable memory cards
Protection
Before recording
Error Low Speed Card
Σημειώσεις για τη χρήση
Pickup lens
Inserting a disc
Τοποθέτηση ενός δίσκου
Εμφανίζεται το μενού ρύθμισης μέσου αποθήκευσης
Κατά τη χρήση ενός νέου δίσκου διαμόρφωση νέου δίσκου
When using a new disc formatting a new disc
When a DVD-RW disc is formatted
Removing a disc
Recordable number of photo images
Recordable time and number of images
Recordable time for movie images
Αριθμός φωτογραφιών που μπορείτε να εγγράψετε
ICHECK button. page
To check the remaining memory capacity
Για να ελέγξτε την υπολειπόμενη χωρητικότητα μνήμης
ICHECK
Εγγραφη Ταινιων
Recordingεγγραφή
Recording Movie Images
Press the Recording start/stop button
Εγγραφή
Recording
Το μέγεθος της εγγεγραμμένης εικόνας είναι
Μνήμη και σε μια κάρτα μνήμης
Taking Photo Images
Ληψη Φωτογραφιων
Photo image is taken only in the 43 aspect ratio as
Unavailable buttons during Easy Q operation
Movie record mode
Recording Εγγραφή
Κουμπιά που δεν είναι διαθέσιμα κατά τη λειτουργία Easy Q
Capturing Still Images During Movie Image Playback
Αναπαραγωγής
To zoom out
Zooming Χρηση ΤΟΥ Ζουμ
To zoom Για μεγέθυνση
Σμίκρυνση
Μεταβαση ΣΕ Τροπο Λειτουργιασ Αναπαραγωγησ
Changing the Playback Mode
Playback Αναπαραγωγή
Them in various ways
Αναπαραγωγής
Playbackαναπαραγωγή
Playing Movie Images Αναπαραγωγη Ταινιων
Press Display
Adjusting the volume
Προσαρμογή της έντασης του ήχου
Viewing Photo Images
Play mode Buttonto set the Play mode
Αργή αναπαραγωγή
To see next or previous image
To view a slide show
Για προβολή μιας ακολουθίας φωτογραφιών
Για προβολή της επόμενης ή της προηγούμενης εικόνας
Σύνδεση
Connecting to a TV Συνδεση ΣΕ ΜΙΑ Τηλεοραση
Connection
Viewing on TV screen
DVD/HDD
Image display depending on TV screen ratio
Dubbing to VCRs or DVD/HDD recorders
Recording ratio Wide 169 TV
Handling Menu and Quick Menu
Using the menu items
Μενού
Χειρισμοσ ΤΟΥ Μενου ΚΑΙ ΤΟΥ Γρηγορου Μενου
Με χρήση του κουμπιού αφής Μενού
When using the Menu tab
When using the Q.MENU button
Με χρήση του κουμπιού Q.MENU
Movie
Menu Items Στοιχεια Μενου
Recording menu items
Στοιχεία μενού εγγραφής
Ρύθμιση στοιχείων μενού
Setting menu items
Στοιχεία μενού αναπαραγωγής
Playback menu items
Recording menu items
Χρήση των στοιχείων του μενού
Quick Menu Items
Στοιχεια Γρηγορου Μενου
Scene ModeAE
Scene Mode AE
Recording Menu Items
Στοιχεια Μενου Εγγραφησ
White Balance
Setting white balance manually
Set White Balance indicator is displayed
Ρύθμιση της ισορροπίας λευκού μη αυτόματα
Tab to
Setting the exposure manually
Exposure
Exposure value can be set between 0
Anti-ShakeHIS
Contents
Disables the function
By camcorder-shake, particularly at high Magnification
Digital Effect
Focus
Nearer subject Farther subject
Aperture value
Shutter
Shutter speed can be set to 1/50, 1/120, 1/250, 1/500
Wide
Quality
Minimises wind noise or other noise while Recording
Wind Cut
Back Light
Φόντου
Record a clear image in a dark location without
Disables the function
Nite
Sacrificing colour with the LED light
Digital Zoom
Zooming zone appears when you select the zooming level
Περιοχή ζουμ εμφανίζεται όταν επιλέξετε το επίπεδο ζουμ
Resolution
Review
Play Option
Playback Menu Item
Στοιχεια Μενου Αναπαραγωγησ
Date/Time Set
File No
LCD Control
Format
Settings Contents Memory
Storage Info
Ρυθμίσεις Περιεχόμενα Memory
Shutter Sound
Auto Power Off
Beep Sound
Remote
USB Connect
Default Set
TV Display
Language
Touch X displayed on the screen with a round tip of pen
To cancel calibration, touch Return tab
Calibration
Repeat the three times
Το Protect
Delete
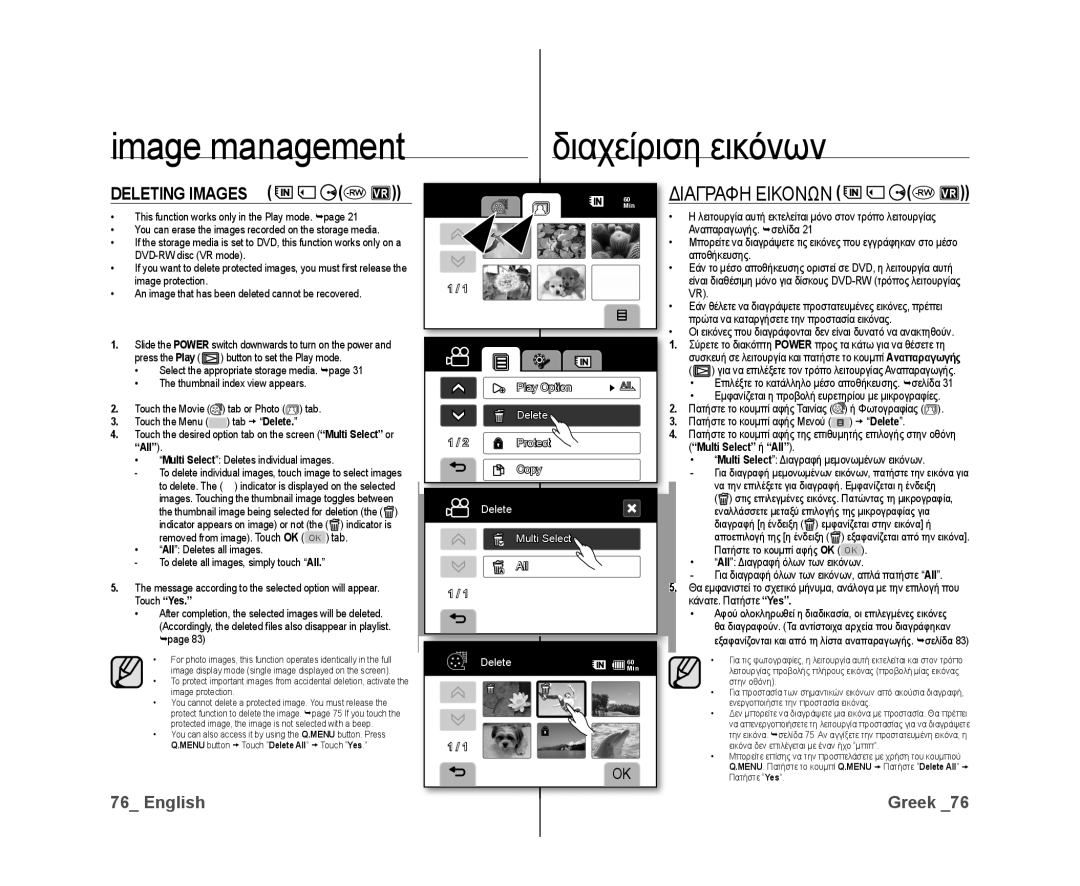
Image management
Deleting Images -RWVR
Multi Select ή All
Μνημη
Αντιγραφη Εικονων ΑΠΟ ΤΗΝ Ενσωματωμενη
Editing movie images
Rwvr
Συνενωση ΔΥΟ Ταινιων
Combining TWO Movie Images
Rwvr
Combine
Playlist
Editing movie images
Επεξεργασία ταινιών
Λιστα Αναπαραγωγησ
Creating the Playlist
Δημιουργία Λίστασ Αναπαραγωγήσ
Αλλαγη ΤΗΣ Σειρασ ΤΩΝ Ταινιών ΣΕ ΜΙΑ
Editing movie images Επεξεργασία ταινιών
Λίστα Αναπαραγωγήσ
Arrange
RW VR
Deleting Movie Images from a Playlist
Διαγραφη Ταινιων ΑΠΟ ΜΙΑ Λιστα
Delete
Copying Playlists from the BUILT-IN
Memory
ΑΠΟ ΤΗΝ Ενσωματωμενη Μνημη
Disc Information
Disc management
Πληροφοριεσ Δισκου -RW +RW -R +R DL
Free Space
Διαμορφωση Δισκου
Disc management Διαχείριση δίσκων
Disc Format
Touch Disc Manage, then touch Disc Format
Disc Finalisation
Ολοκληρωση Δισκου
Playing back on a PC with a DVD drive
Ναπαραγωγή σε έναν υπολογιστή με μονάδα DVD
Υσκευή αναπαραγωγής/εγγραφής DVD
To playback DVD-RW discs recorded in VR mode
Αναπαραγωγή ενός ολοκληρωμένου δίσκου σε μια
To playback a disc
Το κουμπί αφής επάνω
Disc Unfinalisation
Καταργηση Ολοκληρωσησ Δισκου
Πατήστε το Unfinalise
Reset All
Reset All Κατάργηση της σήμανσης εκτύπωσης. Πατήστε
Printing photo images
Ορισμός του αριθμού αντιγράφων που θα εκτυπωθούν
Setting the number of copies to print
Direct Printing with a Pictbridge
Επιλέξετε τον αριθμό των εκτυπώσεων
PictBridge menu Μενού PictBridge
To print using the Dpof setting
Ια εκτύπωση με χρήση της ρύθμισης Dpof
System Requirements
CyberLink PowerDirector
USB interface Διασύνδεση USB
Απαιτησεισ Συστηματοσ
Before you begin
Installing the CyberLink PowerDirector
Εγκατασταση ΤΟΥ CyberLink PowerDirector
Προτού αρχίσετε
USB interface
Αποσύνδεση του καλωδίου USB
Connecting the USB Cable Συνδεση ΤΟΥ Καλωδιου USB
Disconnecting the USB cable
Mass Storage. σελίδα
Viewing the Contents of Storage Media
Movie image file Ρχείο ταινίας
Image configuration file
Ρχείο διαμόρφωσης εικόνας
Photo image file Ρχείο φωτογραφίας
Editing images on the PC
Use the CyberLink PowerDirector
Transferring Files from the DVD Camcorder to Your PC
Επεξεργασία εικόνων στον υπολογιστή
Maintenance
Maintenance & additional information
Συντηρηση
Additional Information
Προσθετεσ Πληροφοριεσ
Οθόνη LCD
Battery packs
LCD screen
Μπαταρίες
Φόρτιση της ενσωματωμένης επαναφορτιζόμενης μπαταρίας
On charging the built-in rechargeable battery
Disc-type description
Περιγραφή τύπων δίσκου
Using Your DVD Camcorder Abroad
Χρήση ΤΗΣ Βιντεοκάμερασ DVD ΣΤΟ Εξωτερικό
Power source
Troubleshooting
Troubleshooting
Αντιμετωπιση Προβληματων
Delete unnecessary files on
Message Informs that Action
PictBridge
Μήνυμα Πληροφορία Ενέργεια
Symptoms and solutions
Συμπτώματα και λύσεις
Δίσκοι
Discs
Εγγραφή
Symptom Explanation/Solution
Σύμπτωμα Επεξήγηση/Λύση
Press Recording Start/Stop
Set Shutter Sound to On
Κουμπί Έναρξης/διακοπής
Playback on your DVD camcorder
Adjusting the image during recording
SymptomExplanation/Solution
Ρύθμιση της εικόνας κατά τη διάρκεια της εγγραφής
Αναπαραγωγή σε άλλες συσκευές τηλεόραση κ.λπ
Connecting/Dubbing with other devices TV, DVD player, etc
Playback on other devices TV, etc
ΣύμπτωμαΕπεξήγηση/Λύση
Connecting to a computer
Σύνδεση σε υπολογιστή
Γενικές λειτουργίες
Overall operations
Menu
Μενού
Model Name VP-DX10/VP-DX10H
Specifications
Προδιαγραφές
Ονομα Μοντελου VP-DX10/VP-DX10H
Τηλ
FOURLlS Trade Α.Ε.Β.Ε
Κρυονερίου 112 145 68 Κρυονέρι, Αττικής
Fourlis Trade Α.Ε.Β.Ε
Please contact the Samsung customer care centre
Επικοινωνία με τη
Wide Samsung παγκοσμίως
Επικοινωνήστε με το κέντρο εξυπηρέτησης πελατών της Samsung
RoHS compliant Συμβατότητα με την οδηγία RoHS
Το προϊόν μας πληροί τον Περιορισμό της χρήσης συγκεκριμένων