WS 2000 Wireless Switch
System Reference
72E-67701-01 Rev A March
Patents
Copyright
Features
Table of Contents
Chapter
Overview
System Administration
Advanced Configuration
Retail Use Cases
Chapter
A Field Office Example
Appendix A. Sample Configuration File
Index
Chapter
Chapter 1. Overview
WS 2000 Wireless Switch System Reference Guide
About this Document
Document Conventions
Wireless LAN WLAN Security
Management of Access Ports
System Overview
Firewall Security
Hardware Overview
Technical Specifications
Physical Specifications
Cell Controller Services
Operating System OS Services
Power Specifications
Environmental Specifications
Gateway Services
802.11b Support
Chapter 2. Features
802.11a Support
Access Ports
WS 2000 Wireless Switch Firewall
Gateway Services
Access Policies
Administration Management
SNMP Management Support
Layer 3 Routing
DHCP Client and Server
Overview
WEP 128 104-bit Key
802.1x with RADIUS Authentication
WEP 64 40-bit key
Kerberos Authentication
802.1x with Shared Key Authentication
KeyGuard-MCM Support
Wireless Protected Access WPA
Set up Communication to the Switch
Installing the Switch
Chapter 3. Getting Started
Getting Started Overview
4. Log in using “admin” as the username and “symbol” as the password
1. Select System Configuration -- WS-2000 Access from the left menu
Changing the Administrator Password
Security
Step 1 Configure the LAN Interface
Configuring the Switch
Address
Defining the Subnets
Network
Interfaces
Step 2 Configure Subnets
The DHCP Configuration
Advanced DHCP Settings
Communicating with the Outside World
Step 3 Configure the WAN Interface
Setting Up Point-to-Point over Ethernet PPPoE Communication
Step 4 Enable Wireless LANs WLANs
Wireless Summary Area
Access Port Adoption
Step 5 Configure WLANs
Step 6 Configure WLAN Security
802.1x EAP Authentication
Setting the Authentication Method
Configuring WEP Encryption
Setting the Encryption Method
Kerberos Authentication
Configuring WPA-TKIP
6. Select either the ASCII Passphrase or 128-bit Key radio button
No Encryption
KeyGuard-MCM
Mobile Unit Access Control List ACL
Step 7 Configure Access Ports
Radio type-This field indicates the wireless protocol that the Access Port follows. The WS 2000 Wireless Switch supports 802.11b and 802.11 a/b dual-radio Access Ports
Placement
Step 8 Configure Subnet Access
Power Level
Name
The Access Exception Area
The Access Overview Table
1. Click in a cell of the table that represents the subnet-to-subnet or subnet-to-WAN relationship to define. All access rules if any are defined appear in the table in the lower-half of the screen
5. Click the Apply button to save changes
WLAN-How to Configure Advanced Settings
Chapter 4. Advanced Configuration
WLAN-Setting Default Access Port Settings
5. Check the Antenna Diversity checkbox to enable Antenna Diversity if the Access Port has an external antenna. Antenna Diversity should only be enabled if the Access Port has two matching external antennas
DTIM Period
8. Set the beacon values as indicated in the table below
Beacon Interval
WLAN-Advanced Access Port Settings
WS 2000 Wireless Switch 1.0 Date of last Revision March
WLAN-Advanced Access Port Settings
Copyright 2004 Symbol Technologies, Inc. All Rights Reserved
DTIM Period
9. Set the beacon values as indicated in the table below
Beacon Interval
Gateway-How to Configure Network Address Translation NAT
2. For each of the addresses, the select the NAT type
Always On Firewall Filters
Gateway-How to Configure the WS 2000 Firewall
SYN Flood Attack Check
Configurable Firewall Filters
Source Routing Check
Winnuke Attack Check
MIME Flood Attack Check
Gateway-How to Configure Static Routes
No RIP
Setting the RIP Configuration
Defining Routes
Security-How to Configure 802.1x EAP Authentication
3. Click the 802.1x EAP Configuration button to display a sub-screen for specific authentication settings
16. Click the Apply button to save changes
Security-How to Configure Kerberos Authentication
Security-How to Specify a Network Time Protocol NTP Server
Switch Settings
Chapter 5. System Administration
WS 2000 Wireless Switch LED Functions
Overview
1. Select System Configuration -- System Settings from the left menu
Changing the Name of the Switch
1. Select System Configuration -- System Settings from the left menu
Change the Location and Country Settings of the WS
Location field
1. Select System Configuration -- System Settings from the left menu
How to Restart the WS 2000 Wireless Switch
Updating the WS 2000 Wireless Switch’s Firmware
Performing the Firmware Update
Checking for and Downloading Firmware updates
Exporting and Importing Wireless Switch Settings
System Configuration
To Export Settings to a Local File
To Import or Export Settings to an FTP Site
To Import Settings to a Local File
2. Select System Configuration -- System Settings from the left menu
How to Restore Default Configuration Settings
3. Set the properties for the port as indicated below
How to Configure SNMP Traps
Remote Administration
Setting the SNMP Version Configuration
Setting Up SNMP v1/v2c Community Definitions
Setting Up SNMP v3 Community Definitions
Setting the Trap Configuration
Setting Up the Access Control List
AP Traps
SNMP Traps
3. Check the traps to enable
MU Traps
Setting the Trap Configuration for SNMP v1/v2c
Setting the Trap Configuration for SNMP
Configure Administrator Access
Configure Management Access
Setup AirBEAM Software Access
Access Port Statistics
Changing the Administrator and Manager Passwords
Statistics and Logs
General Access Port Information
Associated Mobile Units
Received and Transmitted Tables
Subnet Statistics
The Information portion of the Subnet Stats screen displays general information about the subnet
Interfaces
WAN Statistics
Description
Received Field
Transmitted
Description
Viewing the Log on the Switch
Setting Up and Viewing the System Log
Setting Up a Log Server
Background
Chapter 6. Retail Use Cases
The Plan
Contacting the Wireless Switch
Configuring the System Settings
Entering the Basic System Settings
Setting Access Control
The IP Address Plan
Configuring the Subnets
Configuring POS Subnet
Configuring the Printer Subnet
Retail Use Cases
Copyright 2004 Symbol Technologies, Inc. All Rights Reserved
WS 2000 Wireless Switch 1.0 Date of last Revision March
Configuring the Cafe Subnet
Clarisa clicks Advanced DHCP Server and enters the DNS server IP addresses. The Default Gateway is fine. However, Clarisa expects the cafe patrons to come and go frequently, so she reduces the IP address lease time to 1800 seconds. This means that a DHCP client mobile unit will give up its IP address if it is inactive on the network for more than half an hour. This seems about right for the usage patterns that she expects for the cafe. If she gets complaints, she will bump it to an hour
Configuring the WAN Interface
Configuring Network Address Translation NAT
After she makes this selection a new button appears, labeled 1 to Many Mappings. She selects the 1 to Many Mappings button
Inspecting the Firewall
Configuring the Access Ports
Setting Access Port Defaults
Naming the POS Access Port
Configuring the Printer Access Port
Configuring the Cafe Access Port
Associating the Access Ports to the WLANs
Configuring the Cafe WLAN
Configuring the WLANs
Configuring the Printer WLAN
Configuring the POS WLAN
Setting Subnet Access
For the POS subnet and the Printer subnet, she selects Allow all protocols when going to the WAN, the POS subnet, and the Printer subnet
Configuring the Clients
Testing Connections
Background
Chapter 7. A Field Office Example
The Plan
Each WS 2000 WLAN has exactly one security policy, where a security policy is defined as a user authentication method and a data encryption method. Because each WLAN can have one and only one security policy, WLAN configuration is usually defined by the security needs of the installation. If two groups of users require different security policies, then they must associate to the WS 2000 through different WLANs. See the Retail Use Case for an example of an installation where different security needs drive the need for separate WLANs
To begin configuration of the switch, Leo sets up a communication link to the switch. Leo starts with a direct network link between his laptop and the switch, plugging the cable into one of the local, non-WAN, ports. The switch defaults to having all the LAN ports on the first subnet and that subnet having an IP address of 192.168.0.1. So, as far as this connection is concerned, the switch comes up with an initial IP address of 192.168.0.1. He sets his laptop to have an IP address of 192.168.0.2 and a netmask of 255.255.255.0. He also sets the gateway IP address to be 192.168.0.1, the WS 2000’s IP address
Configuring the System Settings
Contacting the Wireless Switch
Leo launches his web browser and enters “http//192.168.0.1/” as the URL. He logs in using “admin” for the username and “symbol” as the password
Entering the Basic System Settings
Setting Access Control
Leo then changes the switch passwords from the default to something relatively secure, something with letters, numbers, and punctuation marks in it
Configuring the Engineering LAN
Configuring the LAN
He also selects the option This interface is a DHCP server. Choosing this DHCP option means that the switch will pick IP addresses from the Address Assignment Range and assign them to network clients on this subnet, as needed
A Field Office Example
Copyright 2004 Symbol Technologies, Inc. All Rights Reserved
WS 2000 Wireless Switch 1.0 Date of last Revision March
Configuring the Sales Subnet
Configuring the WAN
The next step is to set up the network address translations NAT
Setting Up Network Address Translation
The next step is to configure the firewall
Adopting Access Ports
Confirm Firewall Configuration
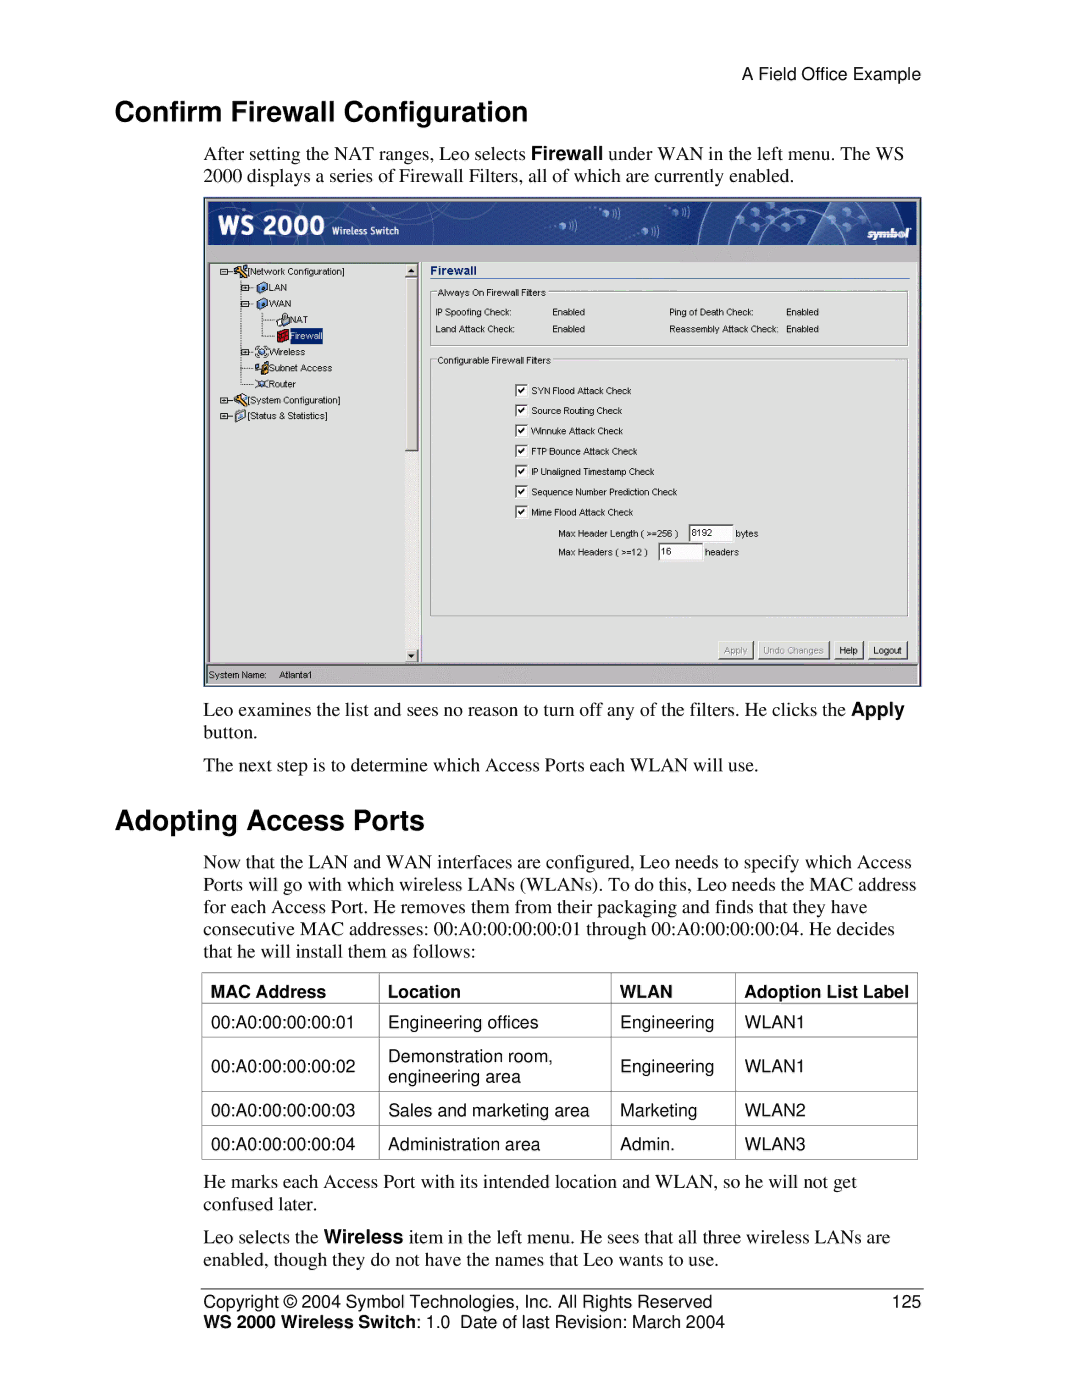
Leo clicks the Apply button to save his changes
Configuring the WLANs
Security
Leo clicks the OK button to save the 802.1x EAP settings
Leo clicks the OK button to save his WPA-TKIP settings, then the Apply button to confirm the WLAN configuration
Configuring the Access Ports
He does not change the Antenna Diversity setting, Short Preamble setting, the RTS Threshold, or the Beacon Settings. These parameters control some of the broadcast mechanics of an 802.11 communication between mobile units and Access Ports. In most cases, there is no reason to change them. He clicks Apply to save his choices
He clicks the Apply button to save his changes
Leo clicks Apply to save his changes
Leo clicks the Apply button to save the changes for the administration Access Port
Configuring Subnet Access
Installing the Access Ports and Testing
WS2000 Configuration Command Script System Firmware Version
Appendix A. Sample Configuration File
Config menu
WS2000 menu
SNMP v1/v2c configuration delete v1v2c all
SNMP ACL configuration delete acl all
SNMP v1/v2c trap configuration delete v1v2c all
SNMP v3 trap configuration delete v3 all
WLAN 2 configuration
WLAN 1 configuration set mode 1 enable
WLAN 3 configuration set mode 3 disable
Default 802.11 A radio configuration set reg A in/out 149
Access Port configuration
Default 802.11 B radio configuration set reg B in/out 1
LAN configuration network
Port To Subnet Map configuration set port 1 s1
enc-passwd 8e57
LAN DHCP configuration network
WAN configuration
NAT configuration
Firewall configuration set syn enable
Inbound NAT configuration
Outbound 1-To-Many NAT configuration set outb map s1
Subnet map configuration network
Router configuration network
WS 2000 Wireless Switch 1.0 Date of last Revision March
Sample Configuration File
Copyright 2004 Symbol Technologies, Inc. All Rights Reserved
example use cases
Index
physical specifications
operating system services
power specifications
See NAT
Routing information Protocol
WS 2000 Wireless Switch 1.0 Date of last Revision March
Copyright 2004 Symbol Technologies, Inc. All Rights Reserved
configuring printer
configuring security