Setting System Options | User Guide |
|
|
Camera Tab Options
Use the Setup Camera dialog to view and modify properties for each camera— e.g. define a name, flip the display orientation, and adjust the image quality. You will find the default image settings work for most conditions. However, adjusting these options when conditions require is easy and straightforward.
Launch the Camera Setup Dialog
From the main Command Center screen click the SETUP button and choose the Camera tab to modify the camera settings:
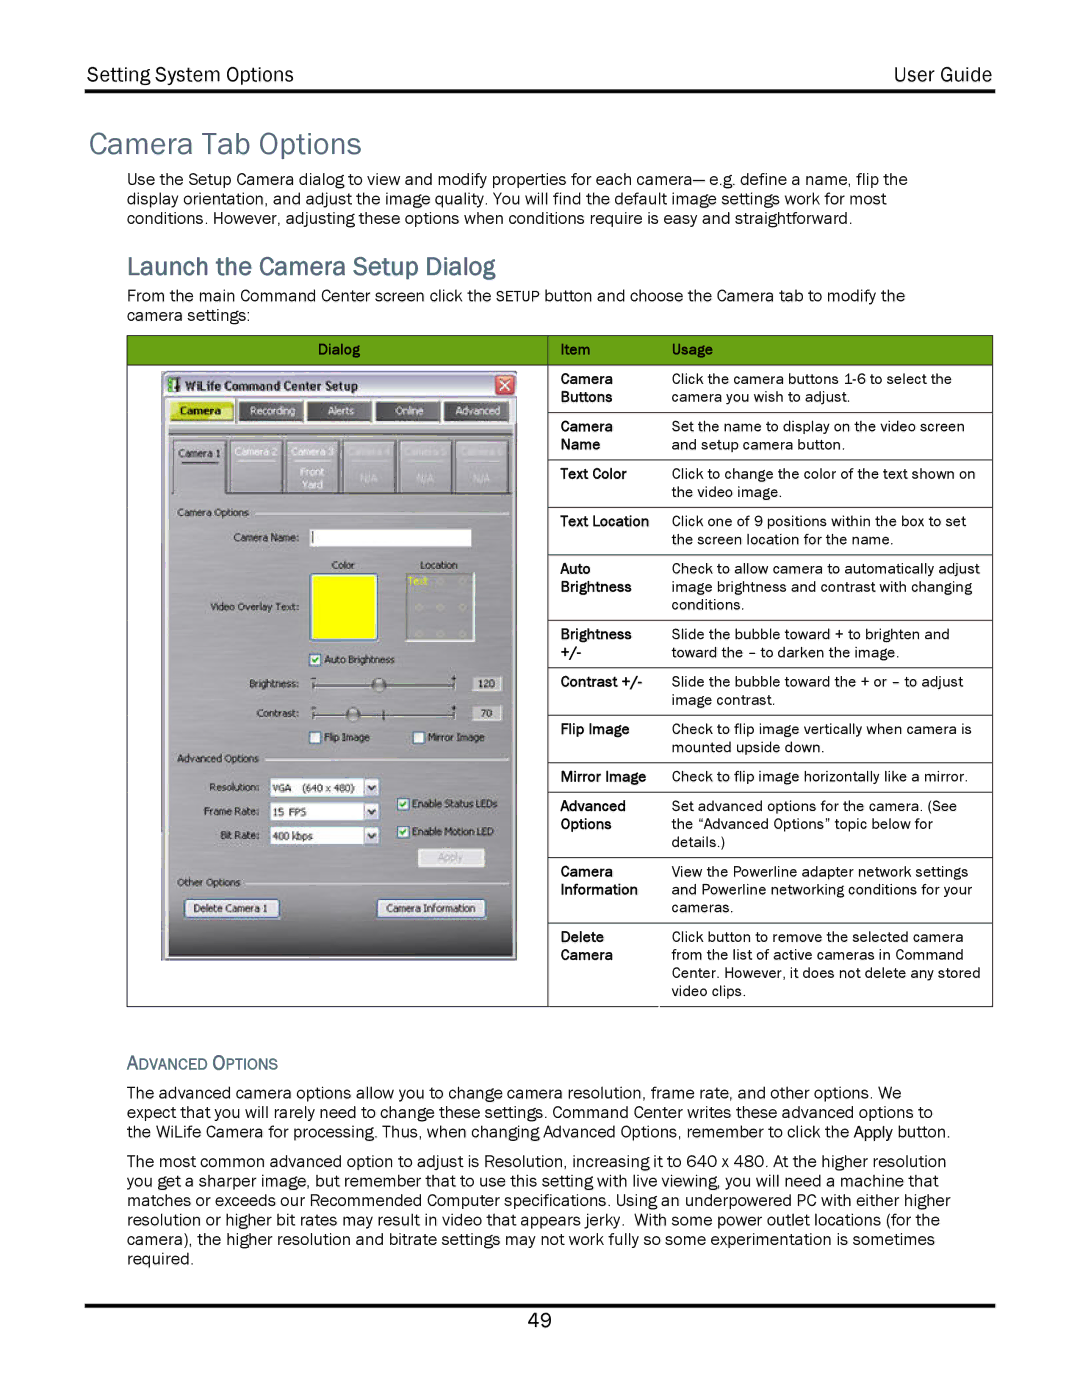
Dialog | Item | Usage |
|
|
|
| Camera | Click the camera buttons |
| Buttons | camera you wish to adjust. |
|
|
|
| Camera | Set the name to display on the video screen |
| Name | and setup camera button. |
|
|
|
| Text Color | Click to change the color of the text shown on |
|
| the video image. |
|
|
|
| Text Location | Click one of 9 positions within the box to set |
|
| the screen location for the name. |
|
|
|
| Auto | Check to allow camera to automatically adjust |
| Brightness | image brightness and contrast with changing |
|
| conditions. |
|
|
|
| Brightness | Slide the bubble toward + to brighten and |
| +/- | toward the – to darken the image. |
|
|
|
| Contrast +/- | Slide the bubble toward the + or – to adjust |
|
| image contrast. |
|
|
|
| Flip Image | Check to flip image vertically when camera is |
|
| mounted upside down. |
|
|
|
| Mirror Image | Check to flip image horizontally like a mirror. |
|
|
|
| Advanced | Set advanced options for the camera. (See |
| Options | the “Advanced Options” topic below for |
|
| details.) |
|
|
|
| Camera | View the Powerline adapter network settings |
| Information | and Powerline networking conditions for your |
|
| cameras. |
|
|
|
| Delete | Click button to remove the selected camera |
| Camera | from the list of active cameras in Command |
|
| Center. However, it does not delete any stored |
|
| video clips. |
|
|
|
ADVANCED OPTIONS
The advanced camera options allow you to change camera resolution, frame rate, and other options. We expect that you will rarely need to change these settings. Command Center writes these advanced options to the WiLife Camera for processing. Thus, when changing Advanced Options, remember to click the Apply button.
The most common advanced option to adjust is Resolution, increasing it to 640 x 480. At the higher resolution you get a sharper image, but remember that to use this setting with live viewing, you will need a machine that matches or exceeds our Recommended Computer specifications. Using an underpowered PC with either higher resolution or higher bit rates may result in video that appears jerky. With some power outlet locations (for the camera), the higher resolution and bitrate settings may not work fully so some experimentation is sometimes required.
49