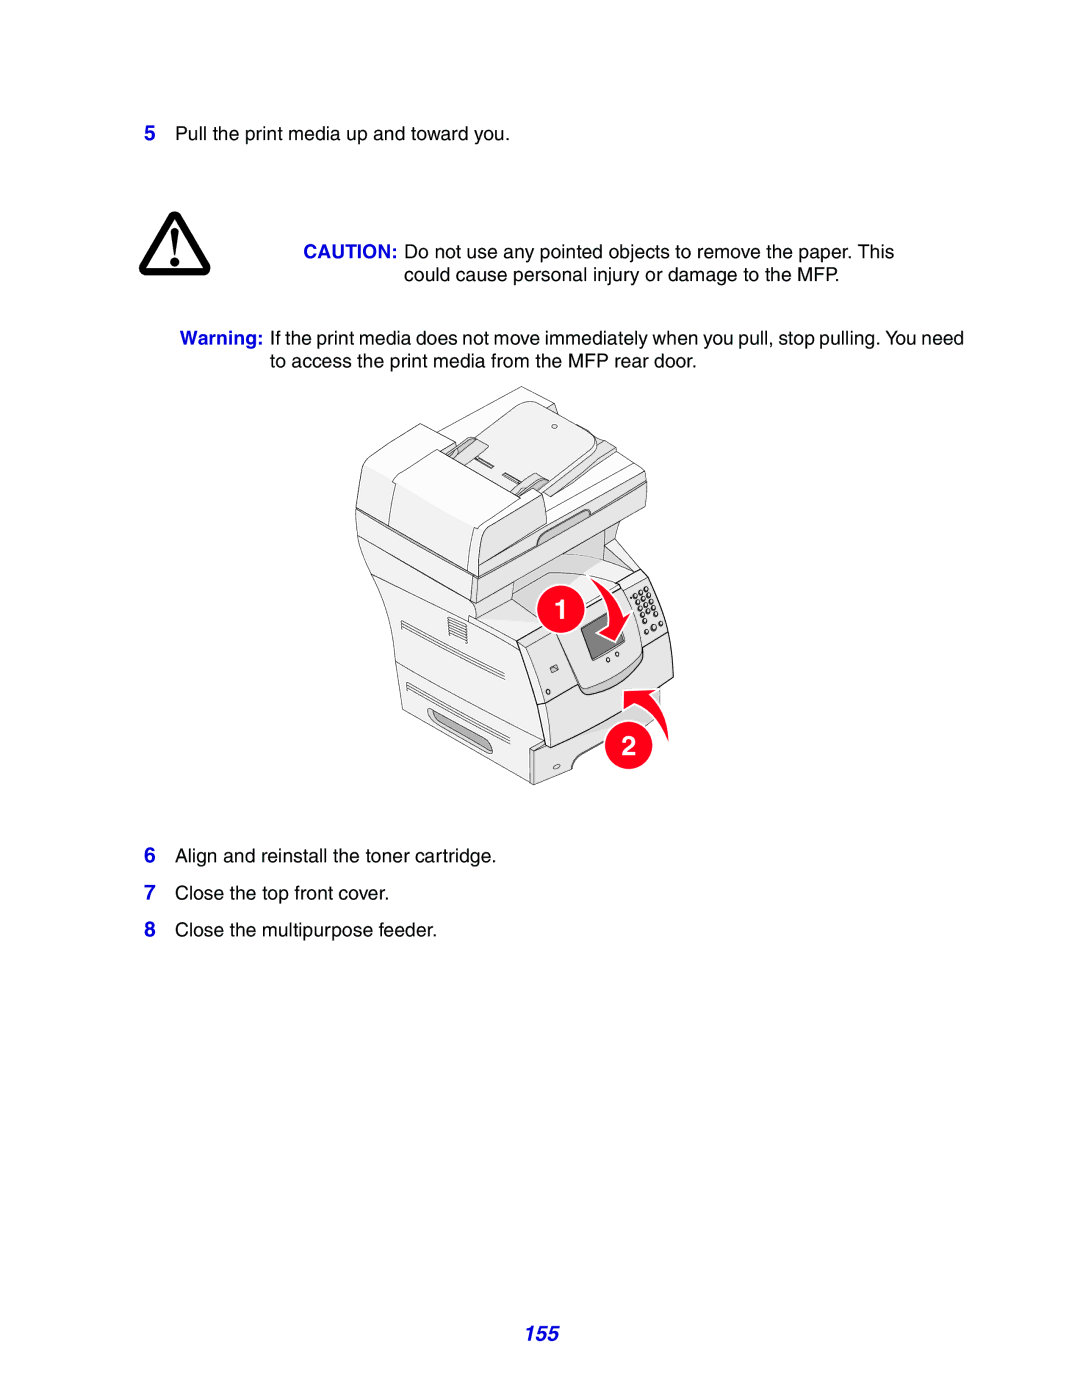
User’s Guide
X642e Laser MFP
UNITED STATES GOVERNMENT RIGHTS
Safety information
Edition May
Trademarks
Static sensitivity notice
Mercury statement
Chapter 2 Copying
Contents
Chapter 1 Learning about the MFP
Chapter 5 FTP
Chapter 3 E-mail
Chapter 4 Faxing
Chapter 7 Printing
Chapter 9 Installing and removing options
Chapter 6 Scanning to a PC or USB flash memory device
Chapter 8 Understanding paper and specialty media guidelines
Chapter 12 Clearing jams
Chapter 11 Administrative support
Chapter 13 Troubleshooting
Chapter 10 Understanding the MFP
Waste from Electrical and Electronic Equipment WEEE directive
Notices
Index
Identifying the MFP
1 Learning about the MFP
Models
Basic functions of the scanner
Using the scanner
Automatic document feeder and scanner glass flatbed
Control panel
Configured models
Scanner
Standard output bin
Understanding the MFP control panel
Function
Callout
Control panel item
Start
USB direct interface
print cartridge
Home screen and Home screen buttons
Other buttons may appear on the Home screen. They are
column. For illustrations of the up and down arrow buttons, see
column. Each touch of the down arrow accesses one job in the
Information on touch-screen buttons
Sides Duplex
Using the LCD touch-screen buttons
Sample screen one
Copy
Copy from Letter 8.5 x 11 in Executive 7.25 x 10.5 in
Sample screen three
Displaying 1-4/5
Back
Touch the up arrow to move up to the next item in a list, such as
Information on touch-screen buttons
Touch the right scroll increase button to scroll to another value
This is a selected radio button. Touch a radio button to select it
Back
Other touch-screen buttons
Features
Reports
Menus
Settings
Paper Menu
Quick copy
2 Copying
Understanding the copy screens and options
Using the scanner glass flatbed
Multiple page copying
Holding your finger on an arrow makes a continuous increment
Page
Copying to letterhead
Copying from one size to another
Making transparencies
8 Touch Scan Next or Done
Making copies using media from a selected tray
Copying photographs
6 Touch Photograph
Copying mixed-sized media
Reducing and enlarging copies
Setting the duplex option
Setting collation options
Adjusting copy quality
6 Touch Paper Saver
Setting paper saving options
Placing separator sheets between copies
5 Touch Separator Sheets
While the document is in the ADF
Canceling a copy job
Placing the date and time at the top of each page
Placing an overlay message on each page
Copy tips
While copying pages using the scanner glass flatbed
When the pages are being printed
3 E-mail
4 Touch E-mail It
Using a shortcut number
Using the address book
Entering an e-mail address
5 Touch E-mail It
E-mailing to a profile
Adding e-mail subject and message information
2 Touch Held Jobs 3 Touch Profiles
6 Touch E-mail It
Changing the output file type
E-mailing color documents
6 Touch E-mail It
10 Touch E-mail It
3 Click E-mail Destination Setup
Creating an e-mail shortcut
From a computer
From the MFP
Canceling an e-mail
2 Click Configuration 3 Click E-mail/FTP Settings
Creating an e-mail profile
Understanding e-mail options
2 Click Configuration 3 Click E-mail/FTP Settings
E-mail server setup
Address book setup
4 Click Email Server Setup
E-mail tips
4 Faxing
Sending a fax
Using fax destination shortcuts
Sending faxes from a computer
From a computer
3 Click Fax Shortcut Setup
Creating shortcuts
4 Touch Save as Shortcut
From the MFP
Understanding fax options
Adjusting the Darkness setting
Changing the fax resolution
Sending a fax at a later time
6 Touch Advanced Options 7 Touch Delayed Send
While the original documents are still scanning
Cancel an outgoing fax
1 Touch Cancel Jobs
Fax tips
5 Touch Station Name
Fax setup
Performing manual fax setup
2 Touch Settings 3 Touch Fax Settings 4 Touch General Fax Settings
3 Click Fax Settings 4 Click Fax Job Log or Fax Call Log
Performing browser fax setup
2 Click Configuration
4 Click Configuration
Using the address book
5 FTP
Entering the FTP address
Using a shortcut number
From a computer
3 Click FTP Shortcut Setup
Using the address book
Creating shortcuts
4 Touch Save as Shortcut
FTP options
From the MFP
FTP tips
6 Scanningdevice to a PC or USB flash memory
Create a scan to PC profile
2 Click Scan Profile 3 Click Create Scan Profile
9 Return to your computer to view your file
8 Review the instructions on the Scan to PC screen
Understanding scan to PC options
3 Touch Scan to USB drive
Scanning to a USB flash memory device
Scanning tips
Sending a job to print
7 Printing
Printing from a USB flash memory device
Canceling a job from the MFP control panel
Canceling a print job
Canceling a job from the desktop
Canceling a job from the MFP control panel
Canceling a job from a computer running Windows
Canceling a job from the taskbar
Canceling a print job from a computer running Mac OS
Printing the menu settings page
Printing a network setup page
Canceling a job from a Macintosh computer
Printing a confidential job
Printing a font sample list
Printing a directory list
Printing confidential and held jobs
At the MFP 1 Touch Held Jobs
Windows
Macintosh
2 In the Copies & Pages or General pop-up menu, select Job Routing
Reserve Print
Printing and deleting held jobs
Entering a Personal Identification Number PIN
Verify Print
2 In the Copies & Pages or General pop-up menu, select Job Routing
Repeat Print
Windows
Macintosh
Windows
Printing on specialty media
At the MFP 1 Touch Held Jobs
Mac OS a Select File Æ Page Setup
c Select File Æ Print
d Select File Æ Print
Loading standard trays and optional trays
Size indicators
Print side facing up for duplex printing
5 Place the print media in the tray
Print side facing down for simplex single-sided printing
Duplex
7 Insert the tray into the MFP
Simplex
7 Touch Paper Type
Setting the Paper Type and Paper Size
Loading the multipurpose feeder
3 Touch Paper Menu 4 Touch Paper Size
To load print media
Loading letterhead or preprinted paper
Loading paper, transparencies, or envelopes
Simplex single sided
Closing the multipurpose feeder
Loading the 2000-sheet drawer
Elevator button
To load the 2000-sheet drawer
4 Close the loading door
Loading the envelope feeder
4 Flex a stack of envelopes back and forth, and then straighten the edges on a level surface. Press down the corners to flatten them
7 Lower the envelope weight to touch the stack
Linking trays
Supported print media Selecting print media Storing print media
Print media sizes Print media types Print media weights
Understanding paper and specialty 8 media guidelines
Supported print media
Legend - indicates support
Print media sizes
Dimensions
Print media size
Other Envelope1
Print media sizescontinued
C5 Envelope
162 x 229 mm 6.38 x 9.01 in
500-sheet drawer
Print media types
Print media
250-sheet drawer
Print media weights
Print media weightscontinued
Grain short is preferred for papers over 135 g/m2
Print media weightscontinued
Paper
Paper characteristics
Weight
Selecting print media
Unacceptable paper for the ADF
Transparencies
Envelopes
Labels
Card stock
Avoiding jams
Storing print media
Do not remove trays during a print job
Order of installation
9 Installing and removing options
Installing input options
MFP CAUTION The MFP requires three people to lift it safely
Decals
Installing a 250-sheet or 500-sheet drawer
Square hole Tab Round peg
Installing a duplex unit
Tab Square hole Round peg
Installing memory or option cards
2 Push both release latches, and open the top front cover
Accessing the MFP system board
1 Push the release latch, and lower the multipurpose feeder
4 Loosen, but do not remove, the six screws on the shield
3 Press both side door latches, and open the side door
5 Slide the shield to the right, and then remove it
6 Set the shield aside
Option card connector
Flash and firmware card connectors
Memory card connector
Installation
Installing or removing a memory card
Removal
Connector Flash memory or firmware card
Installing or removing a flash memory or firmware card
Installation
Removal
Installing an option card
4 Close the side door 5 Close the top front cover
Replacing the shield
1 Align the keyholes on the shield with the screws on the frame
2 Slide the shield down onto the screws 3 Tighten the screws
Storing supplies
10 Understanding the MFP
Touch any button to
Determining the status of supplies
Ready. 88 Toner low
Ordering a print cartridge
Conserving supplies
Ordering supplies
Designed for use only in Asia Pacific Region
Declared yield value in accordance with ISO/IEC
Designed for use only in the USA and Canada
Designed for use only in Europe, Middle East, and Africa
For the Asia Pacific Region4
1 Declared yield value in accordance with ISO/IEC
2 Designed for use only in the USA and Canada
5 Designed for use only in Latin America
40X0100 110
Ordering a maintenance kit
X642e
40X0102 100
Ordering pick rollers
Ordering a label fuser cleaner
Ordering charge rolls
Ordering a transfer roller
2 Follow the instructions on the computer screen
Recycling Lexmark products
To return Lexmark products to Lexmark for recycling
6 Touch the down arrow until Automatic Scanner Registration appears
Cleaning the scanner glass flatbed and backing material
Scanner registration
7 Touch Automatic Scanner Registration
10 Touch Exit Configuration Menu
Preparing the MFP for shipment
Moving the MFP
Moving the MFP within the office
11 Administrativesupport
Adjusting control panel brightness
Brightness
3 Touch Settings 4 Touch General Settings
Adjusting screen timeout
Adjusting Power Saver
Configuring the MFP
2 Click Configuration
Setting Password Protect for the menus
Restricting Function Access
3 Touch Settings
5 Select Always On for Held Fax Mode
Setting a password before printing received faxes
5 Click Function Access
3 Under Default Settings, click Fax Settings Æ Analog Fax Setup
5 Click Create/Change Advanced Password
Setting security using the Embedded Web Server EWS
Setting the Advanced Password
4 Click Create/Change Password
2 Click Configuration
Using the secure EWS
Supporting SNMPv3 Simple Network Management Protocol version
2 Click Configuration
Supporting IPSec Internet Protocol Security
Disabling SNMPv1 and SNMPv2
2 Click Configuration
6 Click Submit
4 Click Certificate Management
Using 802.1x Authentication
4 Click TCP/IP Port Access
Disabling ports and protocols
2 Click Configuration
Confidential Print Setup
4 Click 802.1x Authentication
4 Click Confidential Print Setup
3 Click Configuration
Using the restricted server list function
Identifying jams
12 Clearing jams
Path and locations
Access doors and trays
Doors and trays
250 Paper Jam Check MP Feeder
Understanding jam messages
Clearing jams
5 Touch Continue 260 Paper Jam Check Env Feeder
3 Flex and stack the envelopes
7 Touch Continue
4 Load the envelope feeder 5 Adjust the guide
6 Lower the envelope weight
2 Open the duplex tray To remove the media, pull up
23x and 24x jams
1 Open the MFP paper tray, and remove any jammed media
3 Open any optional trays beginning at the top, and remove any jammed media
Elevator button
5 Touch Continue
200 and 201 Paper Jam Remove Cartridge
8 Close the multipurpose feeder
6 Align and reinstall the toner cartridge 7 Close the top front cover
5 Pull the print media up and toward you
202 Paper Jam Open Rear Door
9 Touch Continue
5 Touch Continue
3 Remove the jammed media 4 Close the rear door
Depending on the media location, pull the media either up or down
23x Paper Jam Open Duplex Rear Door
4 Touch Continue
1 Open the duplex rear door 2 Remove the jammed media
1 2 3 4 5 6 7 8 0 #
Clearing ADF Jams
290, 291, 292, and 294 Scanner Jams
1 2 3 4 5 6 7 8 0 #
Checking an unresponsive MFP
13 Troubleshooting
Understanding MFP messages
Online technical support
Printing multiple language PDFs
Solving printing problems
Cause
Symptom
Solution
Cause
Symptom
Solution
Solving fax problems
Solving copy quality problems
Solving scan quality problems
Touch Caller ID
Solving option problems
Action
See Solving 2000-sheet drawer problems
Option
Solution
Solving 2000-sheet drawer problems
Problem
See the Menus and Messages Guide for more
Solving paper feed problems
See the Card Stock & Label Guide available on our
Continue
Page
Printing the print quality test pages
Print quality troubleshooting
4 Touch Print Quality Pages 5 Touch Exit Configuration Menu
Printing the print defects guide
paper and specialty media guidelines for more details
Solving print quality problems
Action
Problem
Action
Problem
Page
The Quality menu control panel options can be adjusted to help improve print quality
Part
Notices
Conventions
Electronic emission notices
European Community EC directives conformity
Industry Canada compliance statement
Avis de conformité aux normes de l’industrie du Canada
German
CCC EMC notice
Radio interference notice
Japanese VCCI notice Korean MIC statement BSMI EMC notice
Part
REN for this product is part of the product identifier that has the format USAAAEQ##TXXXX. The digits represented by ## are the REN without a decimal point for example, 03 is a REN of 0.3. For earlier products, the REN is shown separately on the label
Notice to users of the Canadian telephone network
Other telecommunications notices
South Africa telecommunications notice
Using this product in Germany
Using this product in Switzerland
Notice to users of the New Zealand telephone network
Physical address
Noise emission levels
German GS mark notice Model X642e
Mailing address
LUOKAN 1 LASERLAITE
ENERGY STAR
Waste from Electrical and Electronic Equipment WEEE directive
Laser advisory label
Hot surface notice
Laser notice
Numerics
Index
Page
Page
Card Stock & Label Guide