Understanding jam messages
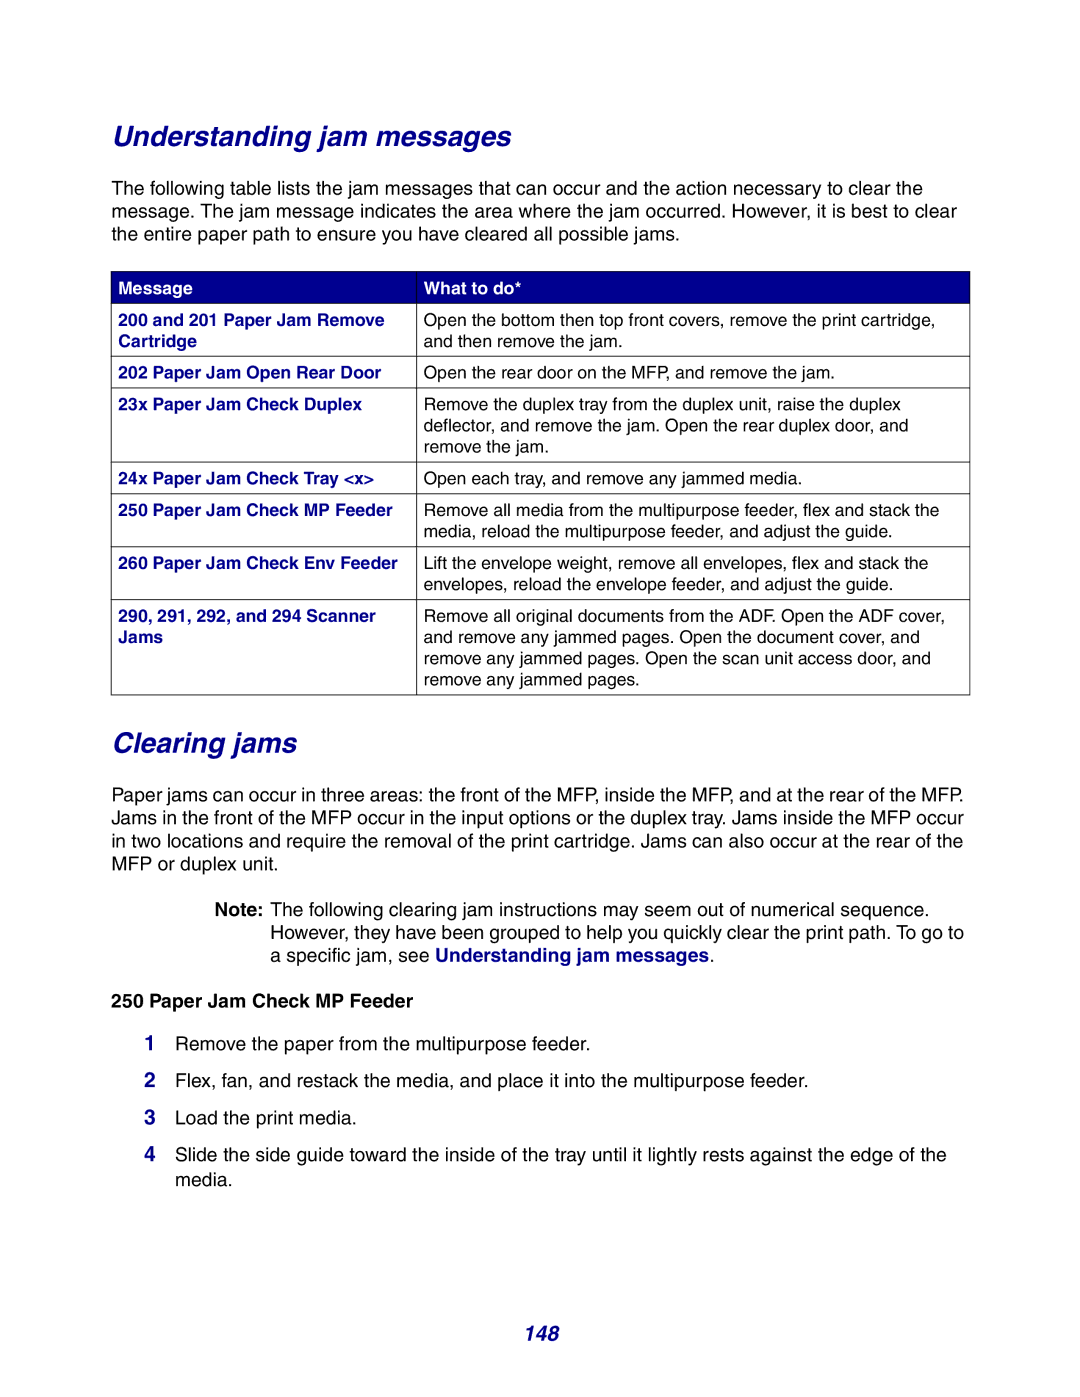
The following table lists the jam messages that can occur and the action necessary to clear the message. The jam message indicates the area where the jam occurred. However, it is best to clear the entire paper path to ensure you have cleared all possible jams.
Message | What to do* |
200 and 201 Paper Jam Remove | Open the bottom then top front covers, remove the print cartridge, |
Cartridge | and then remove the jam. |
|
|
202 Paper Jam Open Rear Door | Open the rear door on the MFP, and remove the jam. |
|
|
23x Paper Jam Check Duplex | Remove the duplex tray from the duplex unit, raise the duplex |
| deflector, and remove the jam. Open the rear duplex door, and |
| remove the jam. |
|
|
24x Paper Jam Check Tray <x> | Open each tray, and remove any jammed media. |
|
|
250 Paper Jam Check MP Feeder | Remove all media from the multipurpose feeder, flex and stack the |
| media, reload the multipurpose feeder, and adjust the guide. |
|
|
260 Paper Jam Check Env Feeder | Lift the envelope weight, remove all envelopes, flex and stack the |
| envelopes, reload the envelope feeder, and adjust the guide. |
|
|
290, 291, 292, and 294 Scanner | Remove all original documents from the ADF. Open the ADF cover, |
Jams | and remove any jammed pages. Open the document cover, and |
| remove any jammed pages. Open the scan unit access door, and |
| remove any jammed pages. |
|
|
Clearing jams
Paper jams can occur in three areas: the front of the MFP, inside the MFP, and at the rear of the MFP. Jams in the front of the MFP occur in the input options or the duplex tray. Jams inside the MFP occur in two locations and require the removal of the print cartridge. Jams can also occur at the rear of the MFP or duplex unit.
Note: The following clearing jam instructions may seem out of numerical sequence. However, they have been grouped to help you quickly clear the print path. To go to a specific jam, see Understanding jam messages.
250 Paper Jam Check MP Feeder
1Remove the paper from the multipurpose feeder.
2Flex, fan, and restack the media, and place it into the multipurpose feeder.
3Load the print media.
4Slide the side guide toward the inside of the tray until it lightly rests against the edge of the media.
