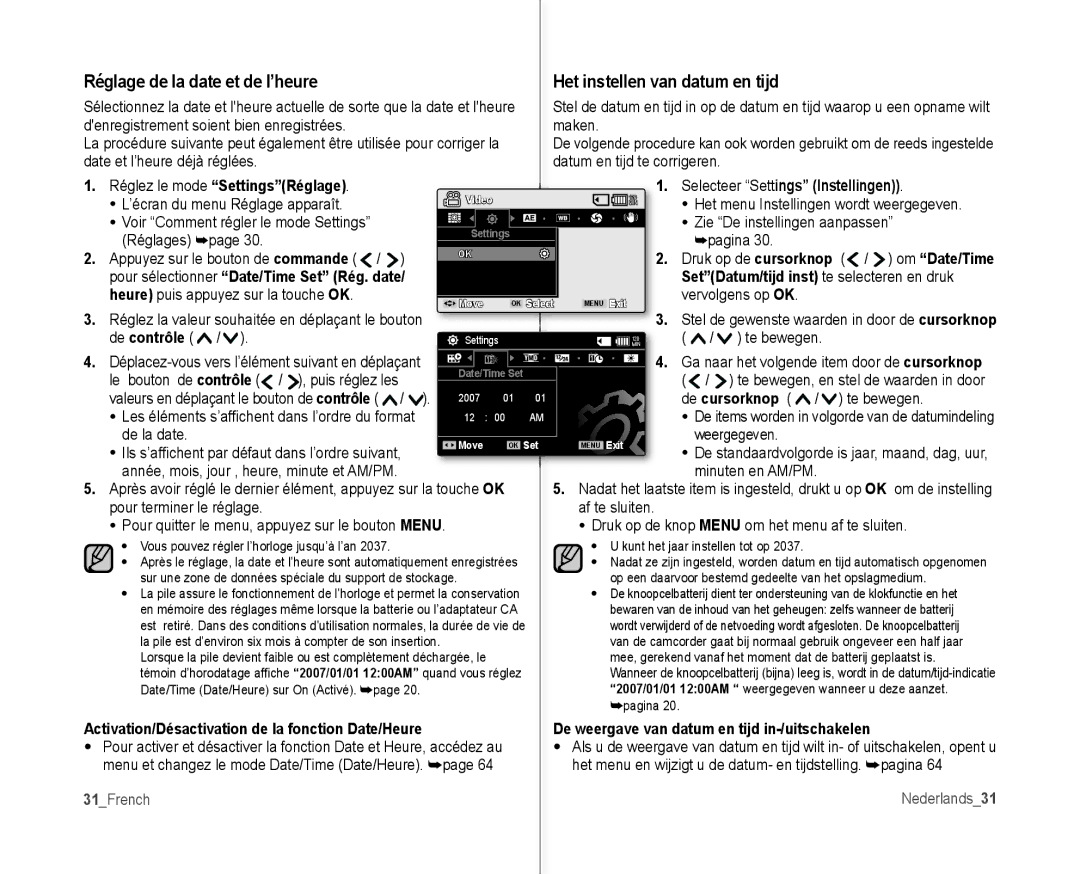
Réglage de la date et de l’heure

Het instellen van datum en tijd

Sélectionnez la date et l'heure actuelle de sorte que la date et l'heure

Stel de datum en tijd in op de datum en tijd waarop u een opname wilt

d'enregistrement soient bien enregistrées.

maken.

La procédure suivante peut également être utilisée pour corriger la

De volgende procedure kan ook worden gebruikt om de reeds ingestelde

date et l’heure déjà réglées.

datum en tijd te corrigeren.

1.

Réglez le mode “Settings”(Réglage).


Video


1.

Selecteer “Settings” (Instellingen)).


L’écran du menu Réglage apparaît.


120

Het menu Instellingen wordt weergegeven.


MIN


Voir “Comment régler le mode Settings”


Settings


Zie “De instellingen aanpassen”


(Réglages) page 30.


pagina 30.


OK


2.

Appuyez sur le bouton de commande (

/

)


.

Druk op de cursorknop (

/

) om “Date/Time


pour sélectionner “Date/Time Set” (Rég. date/


Set”(Datum/tijd inst) te selecteren en druk


heure) puis appuyez sur la touche OK.


Move

OK Select

MENU Exit

vervolgens op OK.


3. Réglez la valeur souhaitée en déplaçant le bouton


. Stel de gewenste waarden in door de cursorknop

de contrôle (

/ ).

Settings


120

(

/

) te bewegen.


MIN

4. Déplacez-vous vers l’élément suivant en déplaçant

Date/Time Set


.

Ga naar het volgende item door de cursorknop

le bouton de contrôle ( / ), puis réglez les


(

/ ) te bewegen, en stel de waarden in door


valeurs en déplaçant le bouton de contrôle ( / ).

2007

01

01


de cursorknop (

/ ) te bewegen.

Les éléments s’affi chent dans l’ordre du format

12 :

00

AM


De items worden in volgorde van de datumindeling

de la date.


Move

OK

Set

MENU Exit


weergegeven.


Ils s’affi chent par défaut dans l’ordre suivant,

De standaardvolgorde is jaar, maand, dag, uur,


année, mois, jour , heure, minute et AM/PM.


minuten en AM/PM.

5. Après avoir réglé le dernier élément, appuyez sur la touche OK


5. Nadat het laatste item is ingesteld, drukt u op OK om de instelling

pour terminer le réglage.


af te sluiten.


Pour quitter le menu, appuyez sur le bouton MENU.


Druk op de knop MENU om het menu af te sluiten.

• Vous pouvez régler l’horloge jusqu’à l’an 2037.


• U kunt het jaar instellen tot op 2037.


• Après le réglage, la date et l’heure sont automatiquement enregistrées


• Nadat ze zijn ingesteld, worden datum en tijd automatisch opgenomen

sur une zone de données spéciale du support de stockage.


op een daarvoor bestemd gedeelte van het opslagmedium.

• La pile assure le fonctionnement de l’horloge et permet la conservation


• De knoopcelbatterij dient ter ondersteuning van de klokfunctie en het

en mémoire des réglages même lorsque la batterie ou l’adaptateur CA


bewaren van de inhoud van het geheugen: zelfs wanneer de batterij

est retiré. Dans des conditions d’utilisation normales, la durée de vie de

wordt verwijderd of de netvoeding wordt afgesloten. De knoopcelbatterij

la pile est d’environ six mois à compter de son insertion.


van de camcorder gaat bij normaal gebruik ongeveer een half jaar

Lorsque la pile devient faible ou est complètement déchargée, le


mee, gerekend vanaf het moment dat de batterij geplaatst is.

témoin d’horodatage affi che “2007/01/01 12:00AM” quand vous réglez


Wanneer de knoopcelbatterij (bijna) leeg is, wordt in de datum/tijd-indicatie

Date/Time (Date/Heure) sur On (Activé). page 20.


“2007/01/01 12:00AM “ weergegeven wanneer u deze aanzet.


pagina 20.


Activation/Désactivation de la fonction Date/Heure


De weergave van datum en tijd in-/uitschakelen

• Pour activer et désactiver la fonction Date et Heure, accédez au


• Als u de weergave van datum en tijd wilt in- of uitschakelen, opent u

menu et changez le mode Date/Time (Date/Heure). page 64


het menu en wijzigt u de datum- en tijdstelling. pagina 64

31_French


Nederlands_31

Page 37
Image 37
Samsung VP-MX10/XEF, VP-MX10H/XEF De contrôle, De cursorknop, De weergave van datum en tijd in-/uitschakelen, 31French

VP-MX10AH/XEF, VP-MX10H/XEF, VP-MX10AU/XEF, VP-MX10/XEF specifications

The Samsung VP-MX10 series, including models VP-MX10/XEF, VP-MX10H/XEF, VP-MX10AH/XEF, and VP-MX10AU/XEF, is a versatile line of camcorders that caters to both amateur and semi-professional videographers. Known for their user-friendly design and reliable performance, these camcorders provide an excellent combination of features and technologies tailored to capture life's moments with clarity and ease.

One of the standout features of the VP-MX10 series is the high-quality image sensor, which enables users to record in 720p HD resolution. This ensures that videos are vibrant and detailed, allowing for a more immersive viewing experience. The camcorders also incorporate Samsung's advanced optical zoom technology, providing up to 34x optical zoom capabilities. This feature is particularly beneficial for capturing distant subjects without sacrificing image quality, making it ideal for events, wildlife, and sports.

Another significant characteristic of the VP-MX10 series is its intelligent stabilizer system. This technology helps to minimize camera shake, producing smooth and steady footage even when recording in motion or at full zoom. Coupled with the automatic face detection feature, the camcorders ensure that subjects are always in focus, enhancing both the composition and quality of the recorded video.

The VP-MX10 series is designed with convenience in mind. It features a 2.7-inch TFT LCD display that swivels out for easy framing and monitoring while recording. This touch-screen interface allows for intuitive navigation of settings and playback options. Additionally, the camcorders support SD and SDHC memory cards, providing ample storage for extended recording sessions.

Further enhancing the user experience, these camcorders also come equipped with a variety of shooting modes, including night mode for low-light situations, allowing for versatile usage in different environments. The built-in microphone and speaker ensure that sound quality matches the visual clarity, enabling users to capture the full essence of their recordings.

In conclusion, the Samsung VP-MX10 series represents a strong choice for those looking to document their experiences with a reliable and feature-rich camcorder. With its combination of HD recording capabilities, advanced optical zoom, image stabilization, and user-friendly interface, it remains a favored option for both casual users and budding filmmakers alike.