18.3. Archiving from the Playback Screen
Use this method to archive while viewing the playback screen. Insert the DVD to be archived into the Digital Video Recorder or connect the USB flash memory to the Digital Video Recorder.
1.While playing back recorded images, press the Pause key at the point where archiving is to begin. Then press the Menu key.
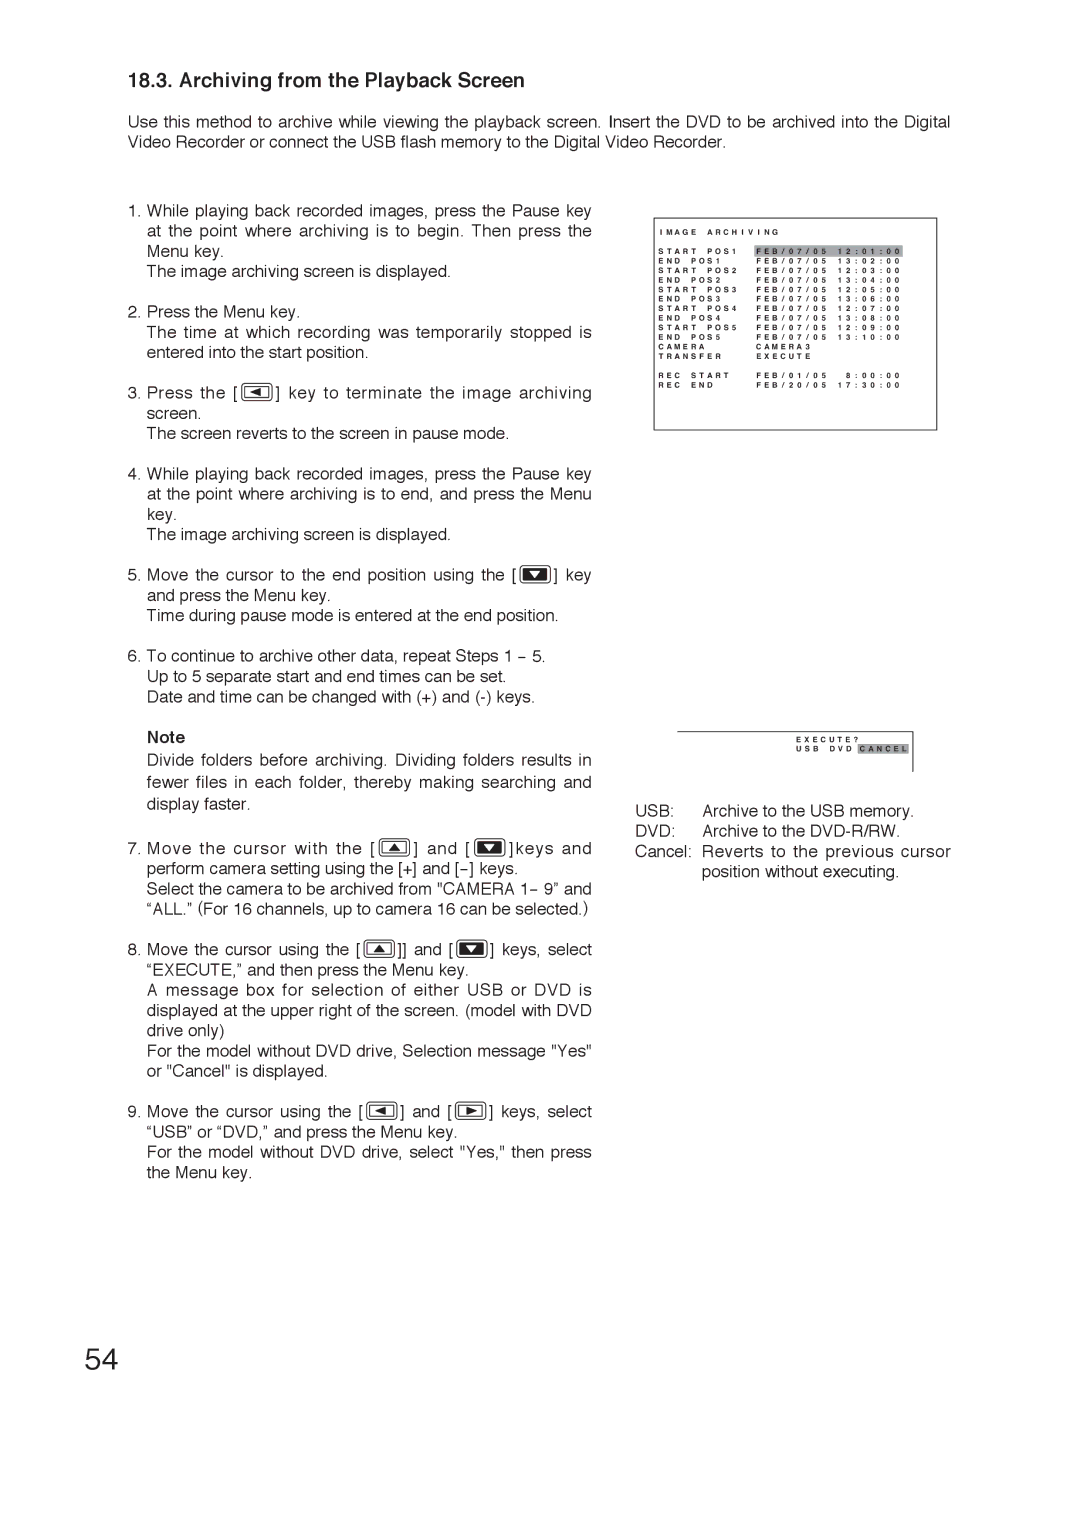
The image archiving screen is displayed.
2.Press the Menu key.
The time at which recording was temporarily stopped is entered into the start position.
3.Press the [ ![]() ] key to terminate the image archiving screen.
] key to terminate the image archiving screen.
The screen reverts to the screen in pause mode.
4.While playing back recorded images, press the Pause key at the point where archiving is to end, and press the Menu key.
The image archiving screen is displayed.
5.Move the cursor to the end position using the [ ![]() ] key and press the Menu key.
] key and press the Menu key.
Time during pause mode is entered at the end position.
6.To continue to archive other data, repeat Steps 1 - 5. Up to 5 separate start and end times can be set. Date and time can be changed with (+) and
Note
Divide folders before archiving. Dividing folders results in fewer files in each folder, thereby making searching and display faster.
7.Move the cursor with the [ ![]() ] and [
] and [ ![]() ]keys and perform camera setting using the [+] and
]keys and perform camera setting using the [+] and
Select the camera to be archived from "CAMERA 1- 9” and “ALL.” (For 16 channels, up to camera 16 can be selected.)
8.Move the cursor using the [ ![]() ]] and [
]] and [ ![]() ] keys, select “EXECUTE,” and then press the Menu key.
] keys, select “EXECUTE,” and then press the Menu key.
A message box for selection of either USB or DVD is displayed at the upper right of the screen. (model with DVD drive only)
For the model without DVD drive, Selection message "Yes" or "Cancel" is displayed.
9.Move the cursor using the [ ![]() ] and [
] and [ ![]() ] keys, select “USB” or “DVD,” and press the Menu key.
] keys, select “USB” or “DVD,” and press the Menu key.
For the model without DVD drive, select "Yes," then press the Menu key.
I M A G E A R C H I V I N G |
|
|
|
|
|
|
|
|
|
| ||||||||||||||||
S T A R T P O S 1 |
|
|
|
|
|
|
|
|
| 7 |
|
|
|
|
| 1 2 : |
|
| 1 | : |
|
|
|
| ||
F |
| E |
| B | / | / | ||||||||||||||||||||
|
|
| 0 | 0 | 0 | 0 | 0 | |||||||||||||||||||
|
|
|
|
| 5 | |||||||||||||||||||||
E N D P O S 1 | F E B / 0 7 / 0 5 1 3 | : | 0 2 | : 0 0 | ||||||||||||||||||||||
S T A R T P O S 2 | F E B / 0 7 / 0 5 1 2 | : | 0 3 | : 0 0 | ||||||||||||||||||||||
E N D P O S 2 | F E B / 0 7 / 0 5 1 3 | : | 0 4 | : 0 0 | ||||||||||||||||||||||
S T A R T P O S 3 | F E B / 0 7 / 0 5 1 2 | : | 0 5 | : 0 0 | ||||||||||||||||||||||
E N D P O S 3 | F E B / 0 7 / 0 5 1 3 | : | 0 6 | : 0 0 | ||||||||||||||||||||||
S T A R T P O S 4 | F E B / 0 7 / 0 5 1 2 | : | 0 7 | : 0 0 | ||||||||||||||||||||||
E N D P O S 4 | F E B / 0 7 / 0 5 1 3 | : | 0 8 | : 0 0 | ||||||||||||||||||||||
S T A R T P O S 5 | F E B / 0 7 / 0 5 1 2 | : | 0 9 | : 0 0 | ||||||||||||||||||||||
E N D P O S 5 | F E B / 0 7 / 0 5 1 3 | : | 1 0 | : 0 0 | ||||||||||||||||||||||
C A M E R A | C A M E R A 3 |
|
|
|
|
|
|
|
|
|
| |||||||||||||||
T R A N S F E R | E X E C U T E |
|
|
|
|
|
|
|
|
|
| |||||||||||||||
R E C S T A R T | F E B / 0 1 / 0 5 | 8 : 0 0 : 0 0 | ||||||||||||||||||||||||
R E C E N D | F E B / 2 0 / 0 5 1 7 : | 3 0 | : 0 0 | |||||||||||||||||||||||
E X E C U T E ?
U S B D V D C A N C E L
USB: Archive to the USB memory.
DVD: Archive to the
Cancel: Reverts to the previous cursor position without executing.
54