Use
Page
Use
Copyright information
Contents
Managing and maintaining the printer
Overview Clearing jams
Service and support
Index
Where to look for information
Setting up the printer
Using the printer
Accessory guides
User guide
Online Help
Printer basics
Overview
Printer features and benefits
See RIP Once on
Models 80 MB RAM
MB RAM MHz processor Megahertz MHz processor
Connecting to networks or additional devices
Be installed
Optional tray and feeder units can be installed
Two EIO enhanced input/output slots for
Printer configurations
MB RAM, expandable up to 416 MB
One 100-sheet tray and two 500-sheet trays
For network connection friend
Printer parts and locations
Front view, tray 1 open
Front view, tray 1 closed
Rear view
Accessories and supplies
678
Locking and unlocking optional accessories
Moving the printer
Ordering through service or support providers
Ordering information
Ordering directly through the embedded Web server
To order directly through the embedded Web server
Ordering directly through the printer software
Part numbers
To order directly through the printer software
Details link
Sdram Dimm dual inline
Memory module
Flash Dimm
Font Dimm
Printer maintenance kit
HP LaserJet 4200/4300 series
Part number Description or use Where available
Print cartridges
HP LaserJet paper
HP LaserJet Soft Gloss paper
HP Office paper
HP Office recycled paper
HP Premium Choice LaserJet paper
HP’s brightest LaserJet paper. Expect
HP LaserJet tough paper
HP Printing paper
HP LaserJet transparencies
Control panel layout
Control panel lights
Button Function
Using the printer Help ? system
Control panel buttons
To print a control panel menu map
To change a control panel setting
Printing and changing control panel menus
Accessory lights
Light Meaning for accessory
Printer software
Windows 95, 98, Me Windows NT Windows 2000, XP Mac OS
Printer drivers
Operating system PCL 6 PCL 5e PPDs
Select the right printer driver for your needs
Network administrators
Software for Windows-based computers
Gain access to the Windows printer driver
Printer driver Help
Software for Macintosh computers
PPDs
PDEs
HP LaserJet Utility
Enww
HP Jetdirect Printer Installer for Unix
Printing tasks
Selecting the output bin
Printing to the top standard output bin
Printing to the rear output bin
Printing to the optional stacker or stapler/stacker
Tray 1 duplex All other trays duplex Sided
Orientation of paper when a stapler is installed
Tray 1 single-sided All other trays Single-sided
To select the stapler in the software Mac
Stapling documents
To select the stapler in the software Windows
To select the stapler at the control panel
Loading staples
To load staples
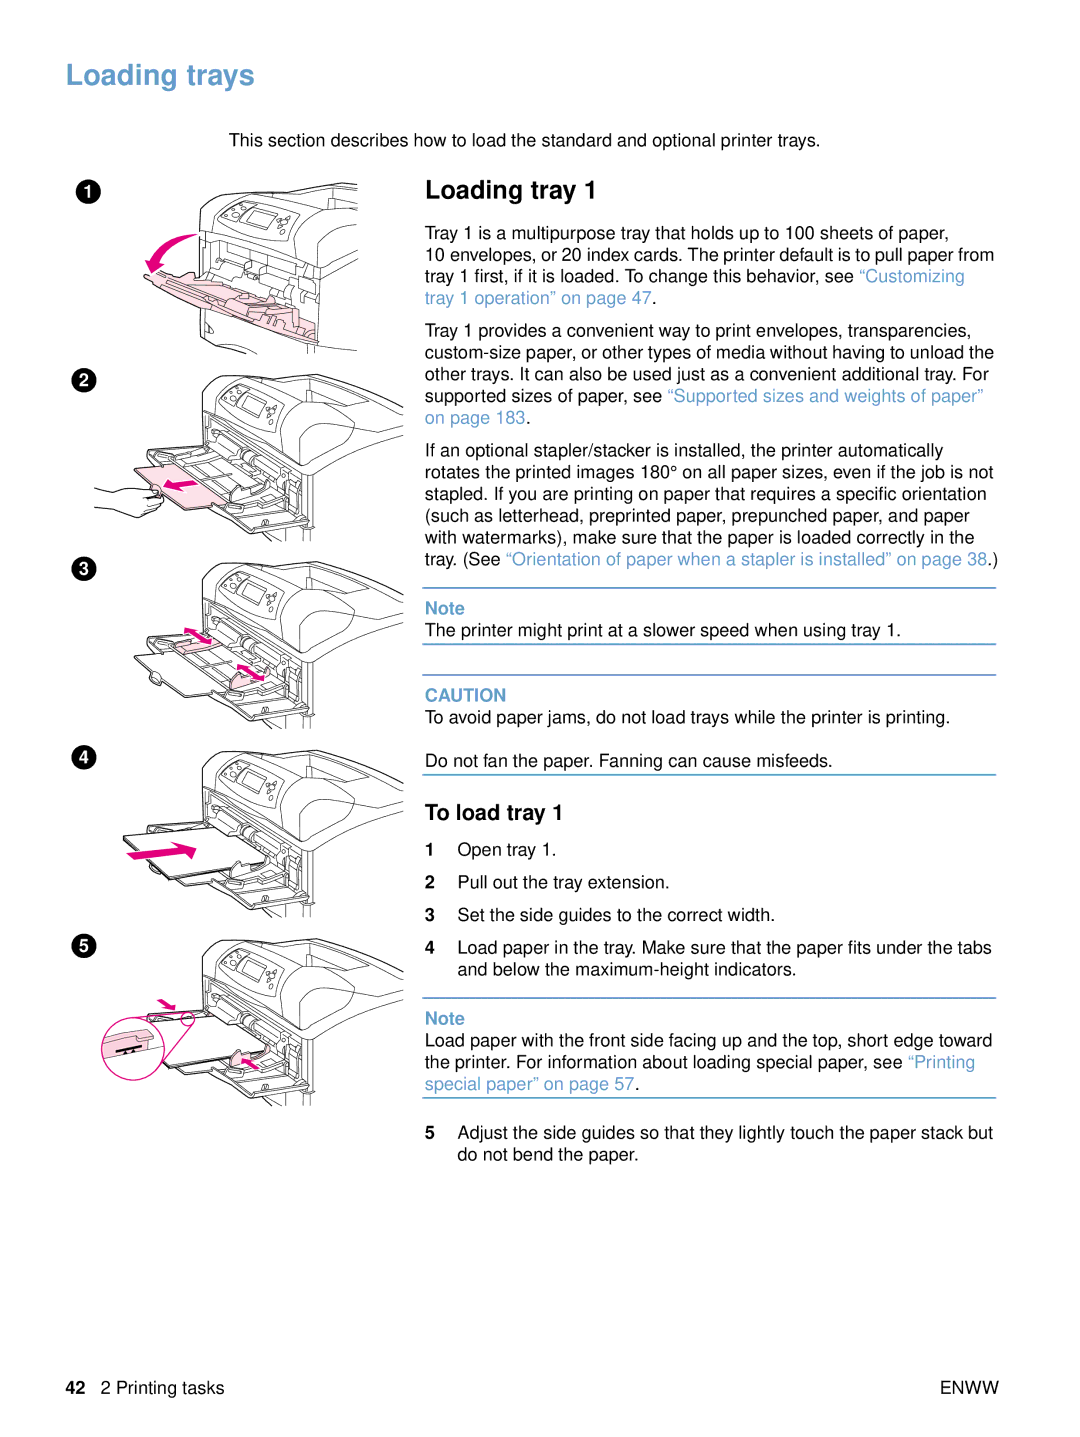
To load tray
Loading trays
Loading tray
Loading tray 2 or an optional 500-sheet tray
To load tray 2 or an optional 500-sheet tray
Enww
Loading an optional 1,500-sheet tray
To load an optional 1,500-sheet tray
Selecting which tray is used for printing
Understanding tray order
Setting Explanation
Customizing tray 1 operation
SIZE=ANY on the Paper Handling menu
Paper locking trays on
Printing by type and size of paper locking trays
To print by type and size of paper
Supported types of paper on
Customizing tray 1 operation on
Manually feeding paper from tray
Manual Feed Prompt on
Selecting the correct fuser mode
Printing envelopes
Loading envelopes in tray
To load envelopes in tray
Feeding envelopes automatically optional envelope feeder
Installing the optional envelope feeder
To install the optional envelope feeder
Removing the optional envelope feeder
To remove the optional envelope feeder
Feeder
To load envelopes in the optional envelope feeder
Printing special paper
Do not
Printing labels
Output bin on
Printing transparencies
Printing letterhead, prepunched, or preprinted paper
Single-sided
On paper with a special finish on
Orientation for tray
Printing on paper with a special finish
Weight and sizes
Tray Minimum size Maximum size Supported weights
Printing small sizes, custom sizes, or heavy paper
Guidelines for heavy paper
Front edge Feed short Edge first Side edge
Setting custom paper sizes
To set custom paper sizes
Optional duplexer installed Optional duplexer removed
Printing both sides of paper optional duplexer
Guidelines for printing both sides of paper
All other trays
Orientation of paper for duplexing
Tray
Layout options for printing both sides of paper
Long-edge portrait
Long-edge landscape
Are read continuously from top to bottom
Using printer driver features
Saving printer setup information Quick Sets
Collating mopying
Fit to
Printing a watermark Printing on a different first
Using job-storage features
Quick copying a job
To print copies of a stored job
Memory. See Ordering information on
Deleting a quick copy job
Proofing and holding a job
To delete a quick copy job
To print the remaining copies of a held job
Deleting a held job
Printing a private job
To delete a held job
To specify a private job
Deleting a private job
To delete a private job
Storing a print job
Deleting a stored job
To store a print job
To print a stored job
Managing and maintaining the printer
Replacing the stapler unit on
Updating embedded Web servers for multiple printers
Using the embedded Web server
Gaining access to the embedded Web server
Viewing embedded Web server pages
Information pages
Settings pages
Configuring e-mail alerts
For See the following section
Managing the print cartridge
To check the supply level using the embedded Web server
To check the supply level using the printer software
To check the supply levels in HP Web Jetadmin
Checking the supply level
When the cartridge is low on toner
When the cartridge is out of toner or drum life
Print-cartridge interaction shaking
Cartridge Low and Cartridge Out conditions
Checking the printer configuration
Configuration
Menu map
To print a menu map
To print a configuration page at the control panel
Using the embedded Web server on
Supplies status
Supplies status
To print a supplies status page at the control panel
Programs, see Selecting PCL 6 and PCL 5e fonts on
PS or PCL font list
To print a PS or PCL font list
Cleaning the printer
Do not use ammonia-based cleaners on or around the printer
Cleaning the inside of the printer
To clean the inside of the printer
To run the cleaning page manually
Cleaning the fuser
Running the cleaning page manually
Running the cleaning page automatically
To run the cleaning page automatically
Or Supplies status page on page 85 for details
Performing preventative maintenance
To reset the maintenance-kit counter
To remove and replace the stapler unit
Replacing the stapler unit
Removing and replacing the stapler unit
Replacing the stapler unit
94 3 Managing and maintaining the printer
Correcting print-quality problems on
Determining printer problems on
Clearing jams on
Understanding printer
Clearing jams
Jam locations
Clearing jams from the top-cover and print-cartridge areas
To clear jams from the top-cover and print-cartridge areas
Enww
To clear jams from the optional envelope feeder
To clear jams from tray 2 or an optional 500-sheet tray
Clearing jams from the trays
To clear jams from tray
To clear jams from the optional 1,500-sheet tray
Clearing jams from the optional duplexer
To clear jams from the optional duplexer
Clearing jams from the output areas
To clear jams from the output areas
Clearing jams from the fuser area
To clear jams from the fuser area
Enww
Clearing jams from the optional stacker or stapler/stacker
To clear staple jams from the optional stapler/stacker
If paper jams occur frequently, try the following
Clean the printer. See Cleaning the printer on
Solving repeated paper jams
If a message persists
Using the printer online Help system
Understanding printer messages
Explanation or recommended action
Control panel messages
Message
Control panel. See Paper Handling menu on
Was installed. See Part numbers on
Message Explanation or recommended action
Dimm that caused the error
With the air sensor or power supply
Alternates with To resolve problems with the power supply
Printing error occurred
Support on
Changed. See Configuration page on
Getting support on
Devices on
Configuration page at the control panel on
Card or mass storage device optional hard disk on
Tray 2 or an optional 500-sheet tray on
Or mass storage device optional hard disk on
HP Web Jetadmin software Help for more information
Envelope size Load the correct size in the feeder
To select one
Flash Dimm is full
Size in Configure Device menu on
Tray, see Loading trays on
Contacting the HP fraud hotline on
Remove paper. See Clearing jams from the fuser area on
RAM Disk File System is Full
Description of Tray 1 Type on
SeeInstalling EIO cards or mass storage devices on
Mopy disk error messages
Disk error Number Error description Solution
Accessory lights
Light Explanation and solution
Replacing accessories or accessory components
Correcting print-quality problems
Specks
Light print partial
Light print entire
Specifications on
Dropouts
Lines
Gray background
Toner smear
Loose toner
Repeating defects
Also see Loose toner on
Repeating image
Misformed characters
Skew
Curl or wave
Wrinkles or creases
Vertical white lines
Tire tracks
White spots on black
Scattered lines
Blurred print
Determining printer problems
Troubleshooting flowchart
Does the control panel display read READY?
Macintosh users on
Can you print a configuration page?
See Configuration page on
Cartridge Troubleshooting flowchart again
Printer control panel display
Can you print from a program?
Panel display, see Understanding printer messages on
Auto . See Personality on
Right printer driver for your needs on
Check that you are using the proper printer
Go to Correcting print-quality problems on
Does the job print as expected?
Go to step
Go to Understanding Printer messages on
Troubleshooting flowchart for Macintosh users
OS 9 or Print Center
If the Chooser or Print
Chooser OS 9 or Print Center OS
Select Print
Background on
Background Printing
See Selecting an alternate PPD on HP LaserJet Utility on
Selecting an alternate PPD
Renaming the printer
Click Select PPD
Center
Troubleshooting the optional hard disk
Printer does not
Optional hard disk needs to be replaced
Optional hard disk
Troubleshooting PS errors
Configuration page on
Communicating with an optional HP Jetdirect print server
142 4 Problem solving
Introduction
Ordering parts and supplies
Parts
Related documentation and software
Contacting HP
Getting support
Technical support websites
Telephone support
Contacting the HP fraud hotline
Obtaining extended service and support
HP service agreements HP SupportPacks
Warranty information
Hewlett-Packard limited warranty statement
HP Product Duration of Warranty
Guidelines for repacking the printer
Limited warranty for print-cartridge life
Installing memory on
Service information form
What Needs to be DONE? Attach a separate sheet if necessary
HP software license terms
Control panel menus
Understanding the menus
Retrieve Job menu
Values Explanation
Configuration on
Information menu
Information, see Supplies status page on
More information, see PS or PCL font list on
Paper Handling menu
Operation on
Currently loaded in the specified tray, where N is
Where N is the number of the tray
This item appears only if an optional tray is installed
Optional feeder device that is installed
After the Y Dimension value is selected, a summary
Sets the measurement of the length of the paper
Measurement from front to back in the tray
Screen appears. This screen contains feedback that
Configure Device menu
Printing submenu
PCL submenu
Print Quality submenu
On page 130 and Blurred print on
Quality papers. See Scattered lines on
Blurred print on page 130. HP recommends
Running the cleaning page manually on
Cleaning page manually on
System Setup submenu
Powersave on
For more information, see Cartridge Low and Cartridge
Out conditions on
Control panel on
Output Setup submenu
Printer control panel, see To select the stapler at
Submenu
Resets submenu
Maintenance on page 91 . To order the printer
Maintenance kit, see Ordering information on
System Setup submenu on
Diagnostics menu
Service menu
Enww
Printer memory and expansion
Installing memory
To install memory
Installing memory
Saving resources permanent resources
Checking memory installation
To check memory installation
Installing EIO cards or mass storage devices
To install EIO cards or mass storage devices
Enww
Commands can be used to change printer default settings
PCL 6 and PCL 5e
Lowercase l Uppercase O Number one
Understanding PCL 6 and PCL 5e printer command syntax
Combining escape sequences
Symbol set Point size
Entering escape characters
Selecting PCL 6 and PCL 5e fonts
DOS program Entry What appears
Others
Common PCL 6 and PCL 5e printer commands
Function Command Options #
Cursor
Specifications
Paper specifications on Printer specifications on
Paper specifications
By 9.0 inch 20 to 28 lb Envelope 176 by 250 mm
Supported sizes and weights of paper
By 8.7 inch 75 to 105 g/m2 Envelope 162 by 229 mm Envelopes
Tray 1 supported sizes and weights
176 by 250 mm By 9.8 inch
110 by 220 mm Envelopes By 8.7 inch 20 to 28 lb
162 by 229 mm By 9.0 inch
Stacker or stacker part of stapler/stacker only
Stapler part of stapler/stacker only4
Guidelines for using paper
Symptom Problem with paper Solution
Print-quality problems on page 124
Supported types of paper
Types of thermography
Paper weight equivalence table
100
Labels
Transparencies
Label construction
To print transparencies, see Printing transparencies on
Envelopes
Card stock guidelines
Card stock and heavy paper
Card stock construction
Printer specifications
Physical dimensions
Electrical specifications
Printer weight without print cartridge
Environmental specifications
General specifications
Acoustic emissions
Declared per ISO
Description HP LaserJet
Enww
Regulatory information
FCC regulations
Environmental product stewardship program
Material Safety Data Sheet For more information
Paper
Material restrictions
Returns Non-U.S. returns
Canadian DOC regulations
Declarations of Conformity
Declaration of Conformity
EMI statement Korea Vcci statement Japan
Safety statements
Laser safety statement U.S
Laser statement Finland
Luokan 1 laserlaite Klass 1 Laser Apparat
Varoitus
Varning
Index
Enww
Enww
See also trays
Enww
Enww
160 Part numbers Printing on Troubleshooting 133
Enww
Enww
Unix
Enww
Enww
Page
Copyright 2002 Hewlett-Packard Company