360
Welcome …
Trademarks
Copyright
Energy saving
Before using your Muratec fax machine
Where to set up your fax machine
Power requirements General Precautions
Plug in the power cord
Do not put furniture or equipment on the power cord
Storing and handling toner and drum cartridges
This page intentionally blank
Welcome to your Muratec fax machine
Find your serial number and write it down
Table of Contents
Changing the default settings
Just in case …
Appendix and index
Getting star ted
Packaging contents
Parts of your machine
Cord plugs into a wall telephone jack
Control Panel Overview
Cursor Keys
Message report
Power tips
Setting up
Pick an installation spot
Installing the printing supplies
Attach the paper-handling parts
Loading paper
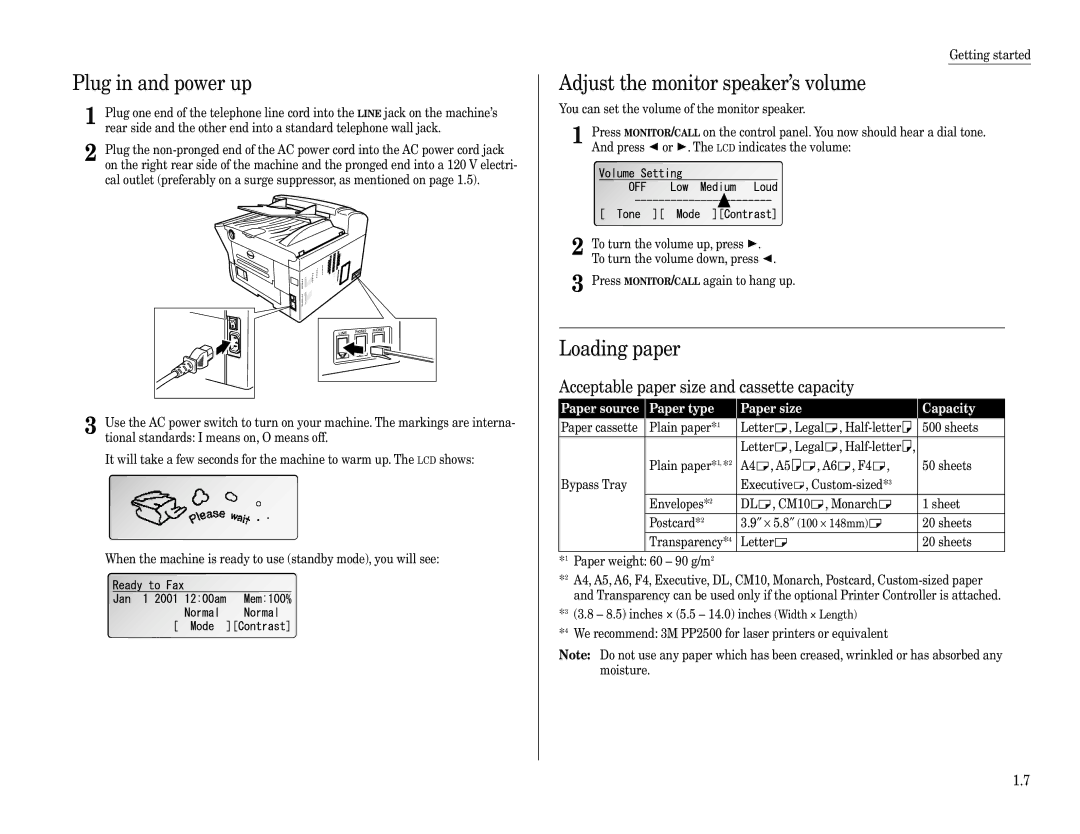
Plug in and power up
Adjust the monitor speaker’s volume
Acceptable paper size and cassette capacity
Loading paper in paper cassette
Setting of the Paper Size
Loading paper in bypass tray
Operating tips
Symbol and terms
How to operate the machine
To press 0 zero, 1, 2, 3, 4, 5, 6, 7, 8, 9, # or
Cancel Enter
Searching the functions using the cursor key
Entering characters
Using numeric keypad to enter characters
Canceling characters
To change upper/lower case
Function table
01.TCP/IP
Erase Department TimeList
PC-FAX
Getting started
Entering initial settings
EasyStart Initial settings
Clearing stored settings
Getting started
Page
Page
This page intentionally blank
Basic Operations
Sending faxes
Guidelines
Memory transmission
Quick memory transmission
Memory overflow message
Real time transmission Non-memory transmission
Sending a fax
Sending a fax using MONITOR/CALL key or a handset
… or …
Automatically fax redialing
To redial a voice call manually using the optional handset
Redialing
Redialing manually
Reviewing or canceling commands
To see your machine’s stored commands or to cancel them
Reviewing or canceling parts of a broadcast
View the result of fax transaction
Printing a delayed command list
Printing a stored document
Printing all result of daily fax transactions
Reception modes
Receiving faxes
Answering calls manually
Use it if
If the paper runs out while fax reception
How to select the fax reception mode
Using an answering machine with your fax machine
Out-of-paper reception
Changing the reduction ratio
Using the bypass tray
Making copies
Press MENU, 2, 3, 0, 2, Enter
If the paper runs out while copying
If the memory overflow occurred at the first
If the memory overflow occurred at the second page or later
Using your fax machine as a phone
Attaching an optional handset
Attaching a second phone
Advanced Features
Autodialer
Autodialer basics
Using one-touch keys
Entering or changing a one-touch number
Erasing a one-touch number
Printing a list of one-touch numbers
One-touch fax dialing
One-touch phone dialing
Using speed-dial numbers
Entering or changing a speed-dial number
Erasing a speed-dial number
Printing a list of speed-dial numbers
Fax dialing via speed-dial
Phoning via speed-dial
Call group dialing
Entering or changing a call group
Erasing a call group
Send a fax via call group
Printing a call group directory
If it was a fax call …
EasyDial directory dialing
If an EasyDial call fails
If it was a regular phone call …
Delayed broadcasting
Broadcasting
Reviewing or canceling parts of a broadcast
Delayed transmission
Setting up a delayed transmission
Batch transmission
Creating or modifying a batch box
Printing a list of stored batch documents
Printing a list of batch boxes
Storing a document for batch transmission
Printing a document stored in a batch box
Erasing a document stored in a batch box
Erasing an empty batch box
Being polled
Polling
Regular polling
Press MENU, 4, 1, 0, 1, Enter
Printing a stored polling document
Erasing a stored polling document
Setting the Soft Key
Soft keys
Special features
Macro keys
Programming the Macro key
Changing the title of the Macro key
Storing fax documents with the Macro key
Printing lists using the Macro key
Copying with the Macro key
Fax dialing with the Macro key
Using the Fax & Copy function
Setting the speed for Macros
Setting the Fax & Copy function
Fax & Copy
Printing an activity journal manually
Setting the journal and the report
Automatic printing of the activity journal
Department code see
Setting the printing order of the activity journal
Setting the report TCR
Fax Message From
Cover
Entering the cover page message
OneLine + distinctive ring detection
Turning the cover page on
Printing the cover
Faxing/receiving first, then talking
Talking first, then sending a fax
Talking first, then receiving a fax
Responding to a call request
Power of QuadAccess
Code Boxes
Code an introduction
Elements of an F-Code box
To create or modify an F-Code box
If you chose Security
Page
If you chose Bulletin
If you chose Relay
Printing a list of documents stored in your F-Code boxes
Using a bulletin box
Printing a list of F-Code boxes
Storing a document
Printing a document stored in a bulletin box
Erasing a document stored in a bulletin box
Using a security box
Printing a document you receive
Using a relay box
Erasing an empty F-Code box
Code transmission and polling
Code transmission
Code polling
Using the power of programmable one-touch keys
Programming a delayed transmission
Programmable one-touch keys
Page
Programming a broadcast
Programming regular polling
Programming an F-Code transmission
Programming F-Code polling
Programming a batch transmission
Programming printouts
Programming a document storage operation
Fax dialing with programmable one-touch
Printing a list of your programmable one-touch keys
Erasing a programmable one-touch key
Security reception
Security features
Passcode
Activating security reception
Press MENU, 4, 3, 0, 4, Enter
Masking the PIN
Autodialing while using the PIN mask
If you chose Mode 1 the PIN goes
Activating the PIN mask
If you’ve specified Mode 1 use star power
Dialing from the numeric keypad while using the PIN mask
If you chose Mode 2 as you autodial, load the code
If you’ve specified Mode 2 the machine guides you
Setting Block Junk Fax
Performing batch transmission while using the PIN mask
If you’ve specified Mode 1 or Mode
Clearing a number from the blocked numbers list
Printing a list of the blocked numbers
Entering a department code
Using department codes
Turning the department code setting on and off
Clearing a department code
Printing the department time list
Sending a fax using a department code
Turning department code protection on and off
Clearing the department time list
Changing the default settings
Settings for transmission
Scan settings
Setting ECM
Default setting on
TTI transmission
Settings for reception
Print settings
Default setting OFF
Setting the number of rings
Default setting 2 times
Image Rotation
Default setting 2 seconds
Settings for dialing
Changing redial settings
Changing the dialing pause length
Settings for copying
Print margin
Copy print settings
To adjust the copy print settings
Bypass Tray priority
Settings for operation
Setting the silent mode
Adjusting the machine’s clock
Setting Sleep mode Energy saving mode
Setting paper source
Setting 2-bin tray Option
Printing your settings
This page intentionally blank
Just in case …
Clearing paper jams
If an original document jams
To remove the document
If a printout jams inside your machine
Print quality problems
Printouts have toner smudges
Printouts have irregularities
Printouts have white and/or black lines
Printouts have white spots
Troubleshooting
Alarm
LCD error messages
Memory Overflow
No Command Stored
Invalid Protect Passcode
Keep These Pages?
No Toner Cartridge
Please Call Service
No Report
Not Allowed in Macro
Kinds of error codes
Errors
Error reports
Specific errors
Reception errors
Transmission errors
What error messages can mean
Check Message printouts
Caring for your fax machine
Cleaning tips
Corrective cleaning
Curing frequent jams in the ADF
Cleaning the LED print head
If you have unsatisfactory printout quality
General questions
Common questions
We’re here to help you
Sending faxes
Reports
Polling
Receiving faxes
Working with your answering machine
How your fax machine works
Glossary
Answering machine See TAD
Location ID See Station ID
Military format See 24-hour format
REN See Ringer equivalence number
Appendix and index
Specifications
Appendix and index
Operating Environment
Regulatory information
Limited warranty
Obligations
Exclusions
Index
DRD distinctive ring detection
Receiving Answering calls manually Reception modes
AI.7
This page intentionally blank
Muratec America, Inc
MAI order number OMF360