5SCREEN SET
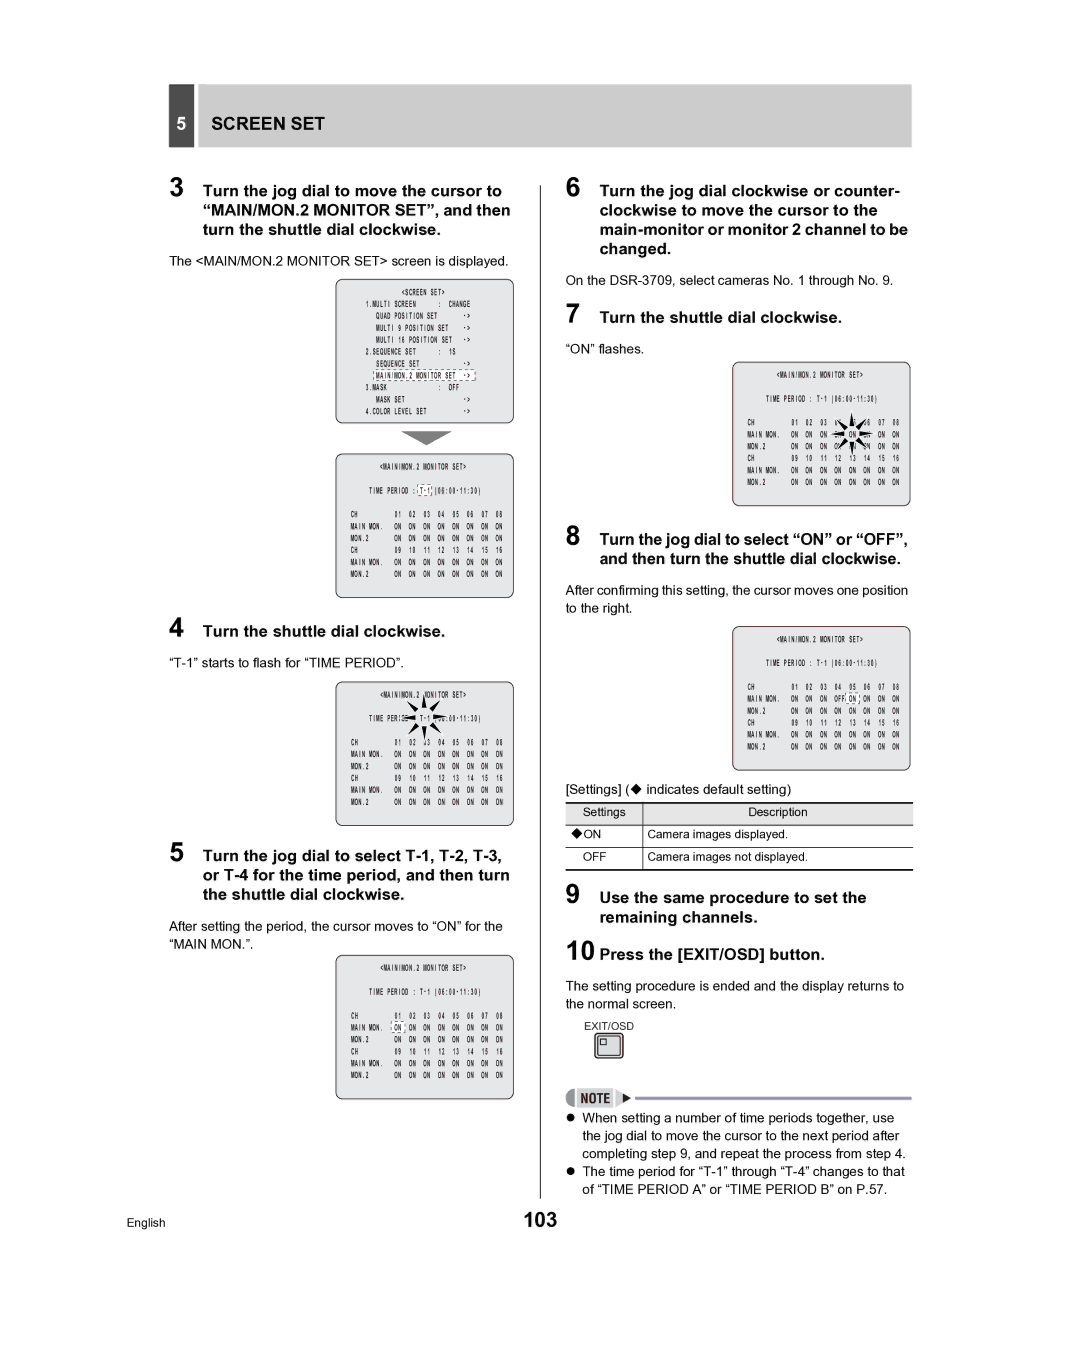
3 Turn the jog dial to move the cursor to “MAIN/MON.2 MONITOR SET”, and then turn the shuttle dial clockwise.
The <MAIN/MON.2 MONITOR SET> screen is displayed.
|
| <SCREEN SET> |
|
|
|
| ||||
1.MULTI SCREEN |
| : | CHANGE |
|
| |||||
| QUAD POSITION SET |
|
|
| ||||||
| MULTI 9 | POSITION SET |
|
| ||||||
| MULTI 16 POSITION SET |
|
| |||||||
2.SEQUENCE SET |
| : | 1S |
|
|
| ||||
| SEQUENCE SET |
|
|
|
|
| ||||
| MAIN/MON.2 MONITOR SET |
|
| |||||||
3.MASK |
|
|
|
| : | OFF |
|
|
| |
| MASK SET |
|
|
|
|
| ||||
4.COLOR LEVEL SET |
|
|
|
| ||||||
| <MAIN/MON.2 MONITOR SET> |
|
| |||||||
|
| |||||||||
TIME PERIOD : |
| |||||||||
CH | 01 | 02 |
| 03 | 04 | 05 | 06 | 07 | 08 | |
MAIN MON. | ON | ON | ON | ON | ON | ON | ON | ON | ||
MON.2 | ON | ON | ON | ON | ON | ON | ON | ON | ||
CH | 09 | 10 |
| 11 | 12 | 13 | 14 | 15 | 16 | |
MAIN MON. | ON | ON | ON | ON | ON | ON | ON | ON | ||
MON.2 | ON | ON | ON | ON | ON | ON | ON | ON | ||
4 Turn the shuttle dial clockwise.
“T-1” starts to flash for “TIME PERIOD”.
<MAIN/MON.2 MONITOR SET> |
|
| ||||||
TIME PERIOD : |
| |||||||
CH | 01 | 02 | 03 | 04 | 05 | 06 | 07 | 08 |
MAIN MON. | ON | ON | ON | ON | ON | ON | ON | ON |
MON.2 | ON | ON | ON | ON | ON | ON | ON | ON |
CH | 09 | 10 | 11 | 12 | 13 | 14 | 15 | 16 |
MAIN MON. | ON | ON | ON | ON | ON | ON | ON | ON |
MON.2 | ON | ON | ON | ON | ON | ON | ON | ON |
5 Turn the jog dial to select
After setting the period, the cursor moves to “ON” for the “MAIN MON.”.
<MAIN/MON.2 MONITOR SET> |
|
| ||||||
TIME PERIOD : |
| |||||||
CH | 01 | 02 | 03 | 04 | 05 | 06 | 07 | 08 |
|
|
|
|
|
|
|
|
|
MAIN MON. | ON | ON | ON | ON | ON | ON | ON | ON |
MON.2 | ON | ON | ON | ON | ON | ON | ON | ON |
CH | 09 | 10 | 11 | 12 | 13 | 14 | 15 | 16 |
MAIN MON. | ON | ON | ON | ON | ON | ON | ON | ON |
MON.2 | ON | ON | ON | ON | ON | ON | ON | ON |
6 Turn the jog dial clockwise or counter- clockwise to move the cursor to the
On the
7 Turn the shuttle dial clockwise.
“ON” flashes.
<MAIN/MON.2 MONITOR SET> |
|
| ||||||
TIME PERIOD : |
| |||||||
CH | 01 | 02 | 03 |
| 05 |
| 07 | 08 |
MAIN MON. | ON | ON | ON | ON | ON | ON | ON | ON |
MON.2 | ON | ON | ON |
| ON |
| ON | ON |
CH | 09 | 10 | 11 | 12 | 13 | 14 | 15 | 16 |
MAIN MON. | ON | ON | ON | ON | ON | ON | ON | ON |
MON.2 | ON | ON | ON | ON | ON | ON | ON | ON |
8 Turn the jog dial to select “ON” or “OFF”, and then turn the shuttle dial clockwise.
After confirming this setting, the cursor moves one position to the right.
<MAIN/MON.2 MONITOR SET> |
|
| ||||||
TIME PERIOD : |
| |||||||
CH | 01 | 02 | 03 | 04 | 05 | 06 | 07 | 08 |
MAIN MON. | ON | ON | ON | OFF | ON | ON | ON | ON |
MON.2 | ON | ON | ON | ON | ON | ON | ON | ON |
CH | 09 | 10 | 11 | 12 | 13 | 14 | 15 | 16 |
MAIN MON. | ON | ON | ON | ON | ON | ON | ON | ON |
MON.2 | ON | ON | ON | ON | ON | ON | ON | ON |
[Settings] ( indicates default setting)
Settings | Description |
ON | Camera images displayed. |
OFF | Camera images not displayed. |
9 Use the same procedure to set the remaining channels.
10 Press the [EXIT/OSD] button.
The setting procedure is ended and the display returns to the normal screen.
EXIT/OSD
zWhen setting a number of time periods together, use the jog dial to move the cursor to the next period after completing step 9, and repeat the process from step 4.
zThe time period for
English | 103 |