3RECORD SET
Total capacity following hard disk expansion.
When “MIRRORING” (JP.93) is set using “4. HDD SET”, the total capacity display will change as follows.
zIf “MIRRORING” is “OFF”, the capacity for
zIf “MIRRORING” is “ON”, the capacity of the smallest
zThe setting for the archive area cannot be modified directly.
When changes are made for the normal recording area or the alarm recording area, automatic settings will be made within a maximum range of 10 GB.
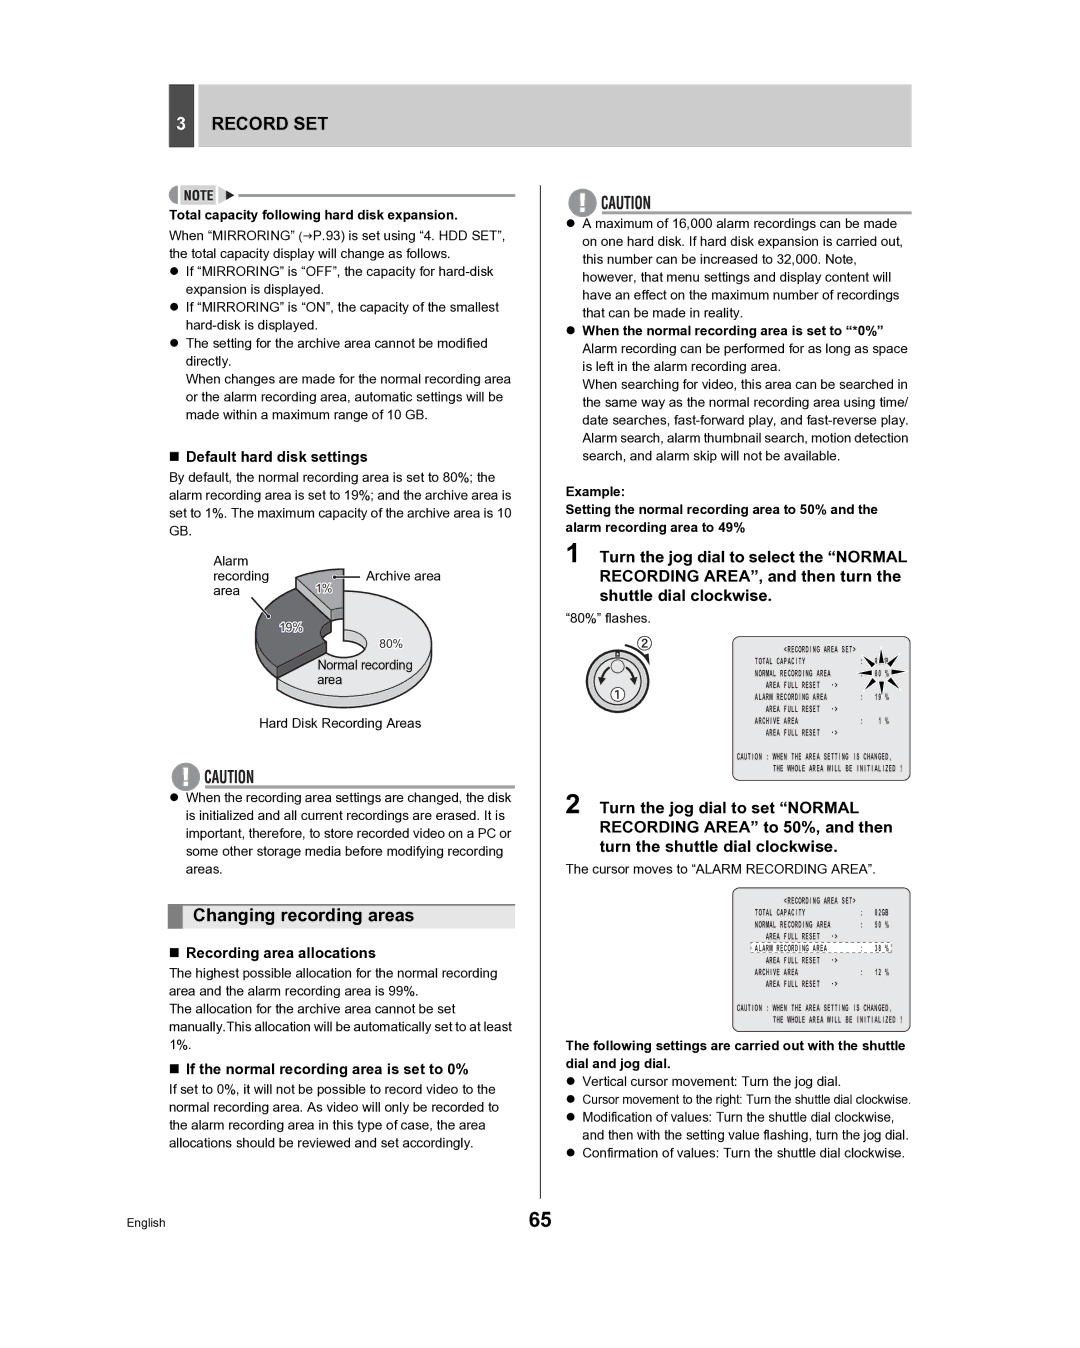
Default hard disk settings
By default, the normal recording area is set to 80%; the alarm recording area is set to 19%; and the archive area is set to 1%. The maximum capacity of the archive area is 10 GB.
Alarm |
|
recording | Archive area |
area | 1% |
19%
80%
Normal recording area
Hard Disk Recording Areas
zWhen the recording area settings are changed, the disk is initialized and all current recordings are erased. It is important, therefore, to store recorded video on a PC or some other storage media before modifying recording areas.
Changing recording areas
Recording area allocations
The highest possible allocation for the normal recording area and the alarm recording area is 99%.
The allocation for the archive area cannot be set manually.This allocation will be automatically set to at least 1%.
If the normal recording area is set to 0%
If set to 0%, it will not be possible to record video to the normal recording area. As video will only be recorded to the alarm recording area in this type of case, the area allocations should be reviewed and set accordingly.
zA maximum of 16,000 alarm recordings can be made on one hard disk. If hard disk expansion is carried out, this number can be increased to 32,000. Note, however, that menu settings and display content will have an effect on the maximum number of recordings that can be made in reality.
zWhen the normal recording area is set to “*0%” Alarm recording can be performed for as long as space is left in the alarm recording area.
When searching for video, this area can be searched in the same way as the normal recording area using time/ date searches,
Example:
Setting the normal recording area to 50% and the alarm recording area to 49%
1 Turn the jog dial to select the “NORMAL RECORDING AREA”, and then turn the shuttle dial clockwise.
“80%” flashes.
<RECORDING AREA SET> |
|
|
| |
TOTAL CAPACITY |
| : | 82GB | |
NORMAL RECORDING AREA | : | 80 | % | |
AREA FULL RESET |
|
|
| |
ALARM RECORDING AREA |
| : | 19 | % |
AREA FULL RESET |
|
|
| |
ARCHIVE AREA |
| : | 1 | % |
AREA FULL RESET |
|
|
| |
CAUTION : WHEN THE AREA SETTING IS CHANGED,
THE WHOLE AREA WILL BE INITIALIZED !
2 Turn the jog dial to set “NORMAL RECORDING AREA” to 50%, and then turn the shuttle dial clockwise.
The cursor moves to “ALARM RECORDING AREA”.
<RECORDING AREA SET> |
|
|
| |
TOTAL CAPACITY |
| : | 82GB | |
NORMAL RECORDING AREA | : | 50 | % | |
AREA FULL RESET |
|
|
| |
ALARM RECORDING AREA |
| : | 38 | % |
AREA FULL RESET |
|
|
| |
ARCHIVE AREA |
| : | 12 | % |
AREA FULL RESET |
|
|
| |
CAUTION : WHEN THE AREA SETTING IS CHANGED,
THE WHOLE AREA WILL BE INITIALIZED !
The following settings are carried out with the shuttle dial and jog dial.
zVertical cursor movement: Turn the jog dial.
zCursor movement to the right: Turn the shuttle dial clockwise.
zModification of values: Turn the shuttle dial clockwise, and then with the setting value flashing, turn the jog dial.
zConfirmation of values: Turn the shuttle dial clockwise.
English | 65 |