3RECORD SET
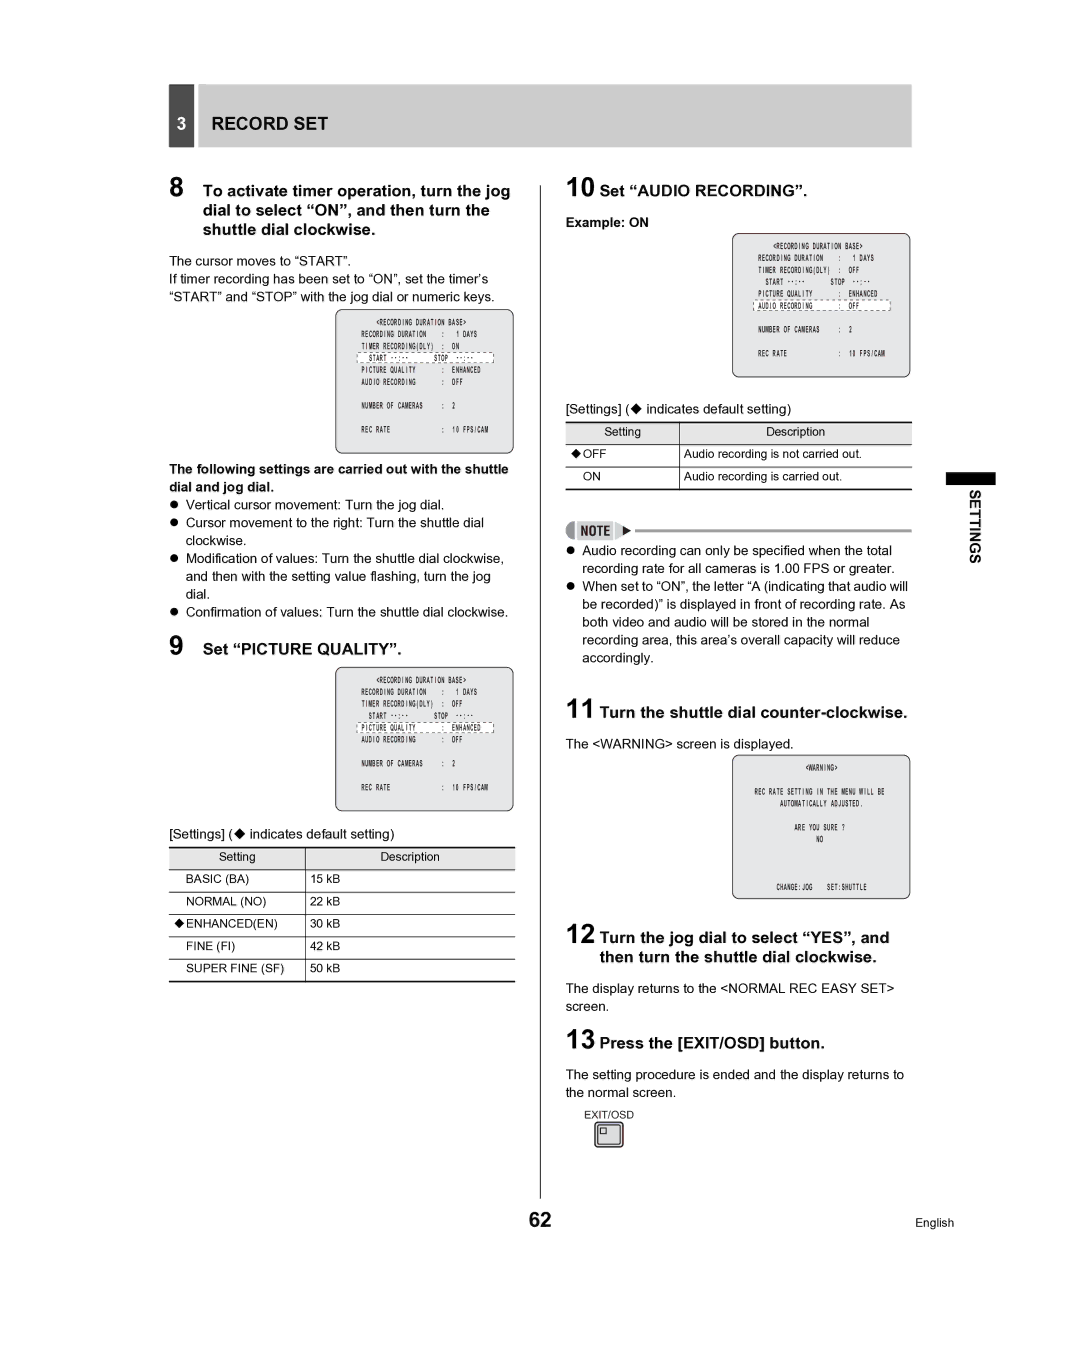
8 To activate timer operation, turn the jog dial to select “ON”, and then turn the shuttle dial clockwise.
The cursor moves to “START”.
If timer recording has been set to “ON”, set the timer’s “START” and “STOP” with the jog dial or numeric keys.
<RECORDING DURATION BASE>
RECORDING DURATION | : | 1 | DAYS |
TIMER RECORDING(DLY) : | ON |
| |
START | STOP | ||
PICTURE QUALITY | : | ENHANCED | |
AUDIO RECORDING | : | OFF | |
NUMBER OF CAMERAS | : | 2 |
|
REC RATE | : | 10 | FPS/CAM |
The following settings are carried out with the shuttle dial and jog dial.
zVertical cursor movement: Turn the jog dial.
zCursor movement to the right: Turn the shuttle dial clockwise.
zModification of values: Turn the shuttle dial clockwise, and then with the setting value flashing, turn the jog dial.
zConfirmation of values: Turn the shuttle dial clockwise.
9 Set “PICTURE QUALITY”.
<RECORDING DURATION BASE>
RECORDING DURATION | : | 1 DAYS |
TIMER RECORDING(DLY) : | OFF | |
START | STOP | |
|
|
|
PICTURE QUALITY | : | ENHANCED |
AUDIO RECORDING | : | OFF |
NUMBER OF CAMERAS | : | 2 |
REC RATE | : | 10 FPS/CAM |
[Settings] ( indicates default setting)
Setting | Description |
|
|
BASIC (BA) | 15 kB |
|
|
NORMAL (NO) | 22 kB |
|
|
ENHANCED(EN) | 30 kB |
|
|
FINE (FI) | 42 kB |
|
|
SUPER FINE (SF) | 50 kB |
|
|
10 Set “AUDIO RECORDING”.
Example: ON
<RECORDING DURATION BASE>
RECORDING DURATION | : | 1 DAYS |
TIMER RECORDING(DLY) : | OFF | |
START | STOP | |
PICTURE QUALITY | : | ENHANCED |
AUDIO RECORDING | : | OFF |
NUMBER OF CAMERAS | : | 2 |
REC RATE | : | 10 FPS/CAM |
[Settings] ( indicates default setting)
Setting | Description |
OFF | Audio recording is not carried out. |
ON | Audio recording is carried out. |
zAudio recording can only be specified when the total recording rate for all cameras is 1.00 FPS or greater.
zWhen set to “ON”, the letter “A (indicating that audio will be recorded)” is displayed in front of recording rate. As both video and audio will be stored in the normal recording area, this area’s overall capacity will reduce accordingly.
11 Turn the shuttle dial counter-clockwise.
The <WARNING> screen is displayed.
<WARNING>
REC RATE SETTING IN THE MENU WILL BE
AUTOMATICALLY ADJUSTED.
ARE YOU SURE ?
NO
CHANGE:JOG SET:SHUTTLE
12 Turn the jog dial to select “YES”, and then turn the shuttle dial clockwise.
The display returns to the <NORMAL REC EASY SET> screen.
13 Press the [EXIT/OSD] button.
The setting procedure is ended and the display returns to the normal screen.
EXIT/OSD
SETTINGS
62 | English |
