2NAMES AND FUNCTIONS OF PARTS
DSR-3716
1 |
POWER |
2 3 4
FULL | ALARM FULL | LOCK |
5
ALARM
8 | 7 | 9 | 12 | 13 | 14 | 24 |
|
|
|
|
|
|
| 15 | 16 | 17 |
|
|
|
|
|
|
|
| MENU | EXIT/OSD | PLAY/STOP | SHUTTLE |
|
|
|
|
|
|
| JOG | E | N |
| 25 | |||
|
|
|
|
| R |
| T | |||
|
|
|
|
|
|
| ||||
|
|
|
|
| A |
|
|
| ||
|
|
|
|
| E |
|
|
| E | |
|
|
|
|
| L |
|
|
| R | |
|
|
|
|
| C |
|
|
|
| |
|
|
| MENU | ENTER | AF |
|
|
|
|
|
| FUNC. |
| ZOOM | SEARCH | STILL |
|
|
|
|
|
|
|
|
|
|
|
|
|
| CARD | |
|
|
|
|
|
|
|
|
|
|
27 | AUDIO | 1 | 2 | 3 | 4 | 5 | 6 |
OUT |
|
|
|
|
|
| |
|
|
|
|
|
|
| |
28 | VIDEO | 9 | 10 | 11 | 12 | 13 | 14 |
| |||||||
29 | USB |
|
|
|
|
|
|
78
15 16
QUAD | MULTI |
| IRIS |
SEQUENCE COPY SHUTTLE HOLD
PRESET | AUTO PAN |
|
|
|
|
|
MON 2 | PLUS |
|
|
|
|
|
|
|
| FOCUS |
|
|
|
| REC/STOP | TIMER | ALARM |
|
|
|
SEQUENCE | TOUR |
|
|
| MENU | 26 |
|
|
| RESET | |||
|
|
|
|
| EJECT | |
|
|
| ZOOM/I/FO | PAN |
| |
| 18 | 19 |
|
|
|
|
6
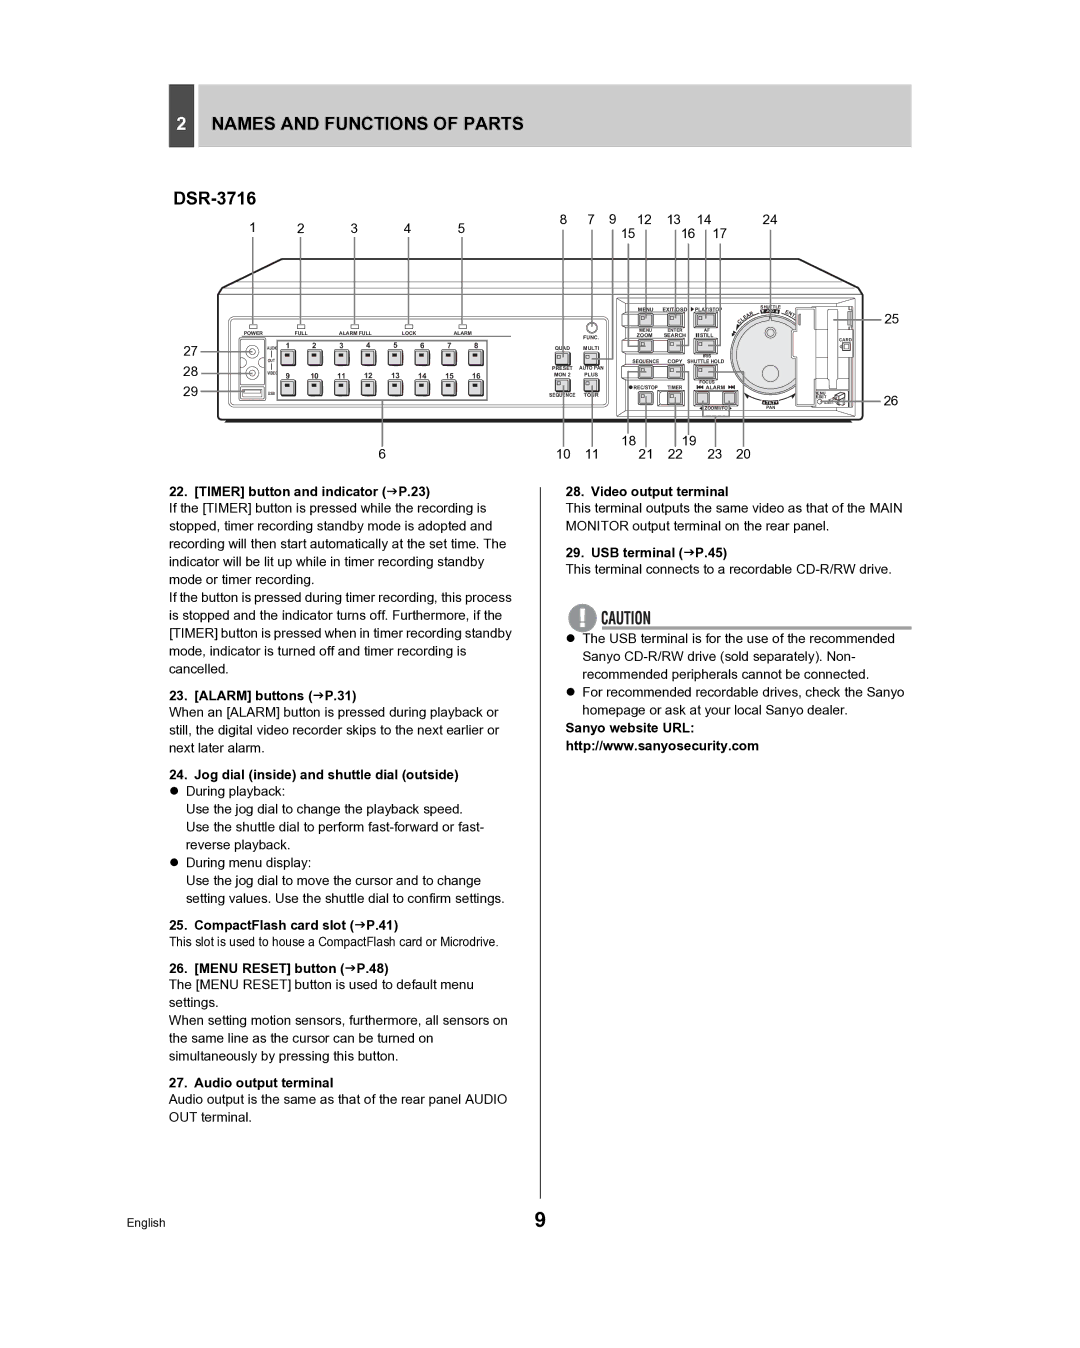
22. [TIMER] button and indicator (JP.23)
If the [TIMER] button is pressed while the recording is stopped, timer recording standby mode is adopted and recording will then start automatically at the set time. The indicator will be lit up while in timer recording standby mode or timer recording.
If the button is pressed during timer recording, this process is stopped and the indicator turns off. Furthermore, if the [TIMER] button is pressed when in timer recording standby mode, indicator is turned off and timer recording is cancelled.
23. [ALARM] buttons (JP.31)
When an [ALARM] button is pressed during playback or still, the digital video recorder skips to the next earlier or next later alarm.
24.Jog dial (inside) and shuttle dial (outside) z During playback:
Use the jog dial to change the playback speed. Use the shuttle dial to perform
z During menu display:
Use the jog dial to move the cursor and to change setting values. Use the shuttle dial to confirm settings.
25.CompactFlash card slot (JP.41)
This slot is used to house a CompactFlash card or Microdrive.
26. [MENU RESET] button (JP.48)
The [MENU RESET] button is used to default menu settings.
When setting motion sensors, furthermore, all sensors on the same line as the cursor can be turned on simultaneously by pressing this button.
27. Audio output terminal
Audio output is the same as that of the rear panel AUDIO OUT terminal.
10 | 11 | 21 | 22 | 23 | 20 |
28. Video output terminal
This terminal outputs the same video as that of the MAIN MONITOR output terminal on the rear panel.
29. USB terminal (JP.45)
This terminal connects to a recordable CD-R/RW drive.
zThe USB terminal is for the use of the recommended Sanyo
zFor recommended recordable drives, check the Sanyo homepage or ask at your local Sanyo dealer.
Sanyo website URL:
http://www.sanyosecurity.com
English | 9 |