Adjusting the Lens
Iris Adjustments
Iris ring
|
| T | A |
|
RET | W | M | IRIS | |
|
| Instant automatic | ||
|
|
| ||
|
|
|
| |
|
|
|
| iris button |
|
|
|
| Iris selector |
ZEBRA switch
A.IRIS MODE switch
Product | Lens number |
Fujinon: | 1 |
A12X6.8 BRM |
|
Canon: |
|
Fujinon: A10X4.8 BEVM/BERD, A15X8 | 2 |
BERM/BERD, A16X9 BERM, A20X8 |
|
BEVM/BERD, A19X8.7 BERM, A19X8.7 |
|
BRM |
|
Canon: J9aX5.2B IRS/IAS, J15aX8B IRS/ |
|
IAS |
|
Canon: J21aX7.8B IRS/IAS, YJ18X9B | 3 |
IRS |
|
Set up the data with Sony dealer. | 4 |
If you use the lens that is not mentioned above, set the lens number as follows:
•When using a lens without an extender, set it to 1.
•When using a lens with an extender, set it to 2.
•When using a lens with a ratio converter, set it to 2.
You can also ask a Sony dealer more precise settings according to your lens. In this case, set it to 4.
For more information, refer to the operating instructions for the lens (or consult the lens maker).
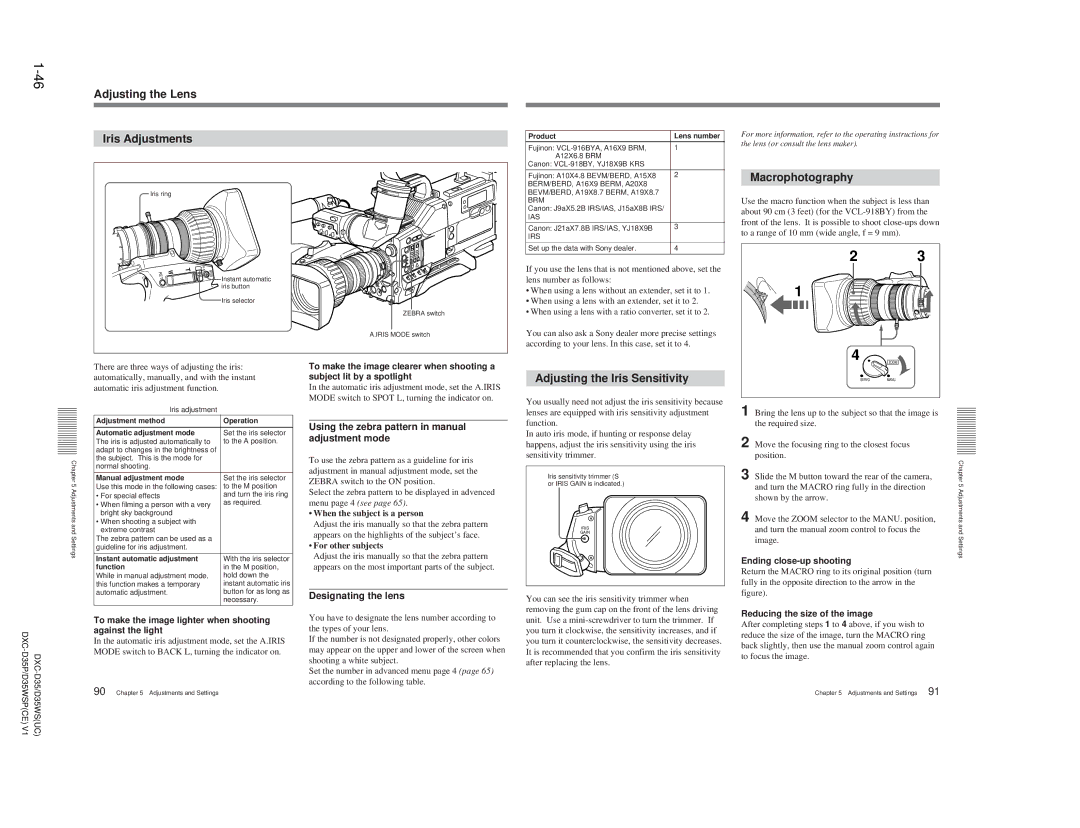
Macrophotography
Use the macro function when the subject is less than about 90 cm (3 feet) (for the
2 3
1
4
There are three ways of adjusting the iris: automatically, manually, and with the instant automatic iris adjustment function.
To make the image clearer when shooting a subject lit by a spotlight
In the automatic iris adjustment mode, set the A.IRIS MODE switch to SPOT L, turning the indicator on.
Adjusting the Iris Sensitivity
You usually need not adjust the iris sensitivity because
![]() ZOOM
ZOOM
SERVOMANU.
Chapter 5 Adjustments and Settings
Iris adjustment
Adjustment method
Automatic adjustment mode
The iris is adjusted automatically to adapt to changes in the brightness of the subject. This is the mode for normal shooting.
Manual adjustment mode
Use this mode in the following cases:
•For special effects
•When filming a person with a very bright sky background
•When shooting a subject with extreme contrast
The zebra pattern can be used as a guideline for iris adjustment.
Instant automatic adjustment function
While in manual adjustment mode, this function makes a temporary automatic adjustment.
Operation
Set the iris selector to the A position.
Set the iris selector to the M position and turn the iris ring as required.
With the iris selector in the M position, hold down the instant automatic iris button for as long as necessary.
Using the zebra pattern in manual adjustment mode
To use the zebra pattern as a guideline for iris adjustment in manual adjustment mode, set the ZEBRA switch to the ON position.
Select the zebra pattern to be displayed in advenced menu page 4 (see page 65).
•When the subject is a person
Adjust the iris manually so that the zebra pattern appears on the highlights of the subject’s face.
•For other subjects
Adjust the iris manually so that the zebra pattern appears on the most important parts of the subject.
Designating the lens
lenses are equipped with iris sensitivity adjustment function.
In auto iris mode, if hunting or response delay happens, adjust the iris sensitivity using the iris sensitivity trimmer.
Iris sensitivity trimmer (S or IRIS GAIN is indicated.)
IRIS
GAIN
You can see the iris sensitivity trimmer when removing the gum cap on the front of the lens driving
1 Bring the lens up to the subject so that the image is the required size.
2 Move the focusing ring to the closest focus position.
3 Slide the M button toward the rear of the camera, and turn the MACRO ring fully in the direction shown by the arrow.
4 Move the ZOOM selector to the MANU. position, and turn the manual zoom control to focus the image.
Ending close-up shooting
Return the MACRO ring to its original position (turn fully in the opposite direction to the arrow in the figure).
Chapter 5 Adjustments and Settings
To make the image lighter when shooting against the light
In the automatic iris adjustment mode, set the A.IRIS MODE switch to BACK L, turning the indicator on.
90 | Chapter 5 Adjustments and Settings |
You have to designate the lens number according to the types of your lens.
If the number is not designated properly, other colors may appear on the upper and lower of the screen when shooting a white subject.
Set the number in advanced menu page 4 (page 65) according to the following table.
unit. Use a
Reducing the size of the image
After completing steps 1 to 4 above, if you wish to reduce the size of the image, turn the MACRO ring back slightly, then use the manual zoom control again to focus the image.
Chapter 5 Adjustments and Settings | 91 |