ClipLink Operation Flow
Data Generated When Shooting
How to record ClipLink log data
Cue point time codes
This type of data is especially useful when shooting
V1 |
The following describes the kinds of data that is generated when using the ClipLink function.
Index Pictures
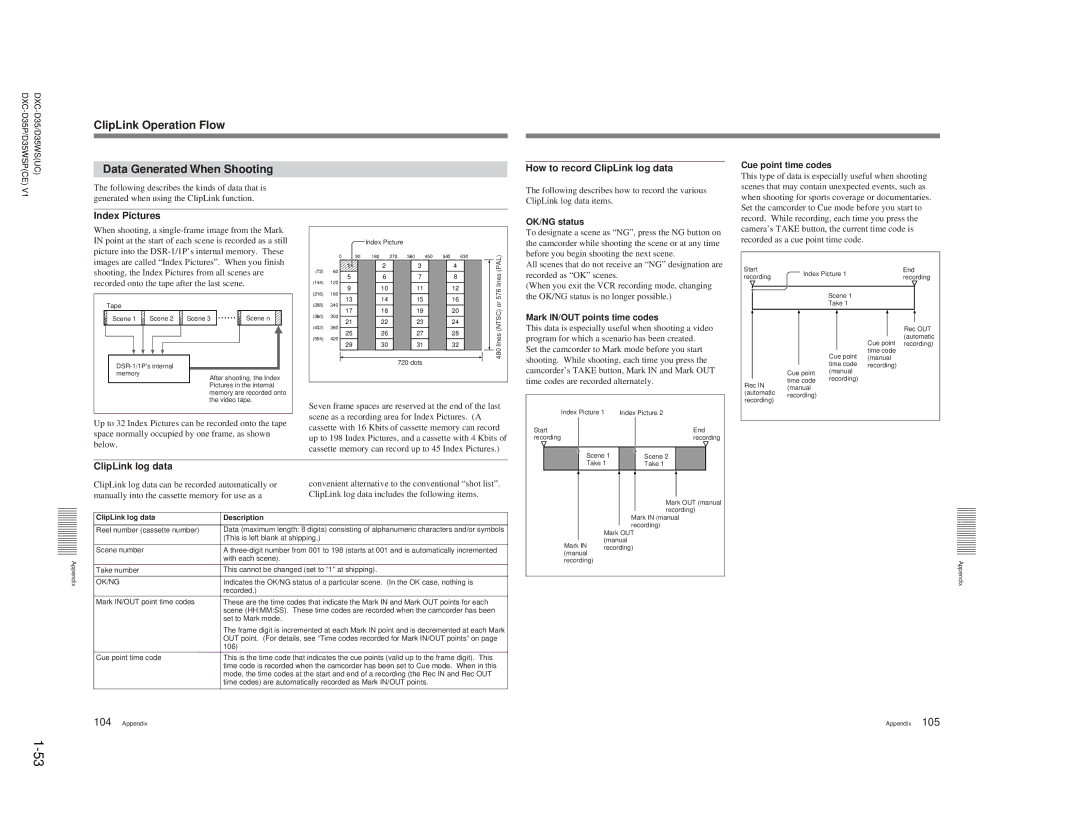
When shooting, a
Tape |
|
|
|
Scene 1 | Scene 2 | Scene 3 | Scene n |
memory
After shooting, the Index Pictures in the internal memory are recorded onto the video tape.
Up to 32 Index Pictures can be recorded onto the tape space normally occupied by one frame, as shown below.
Index Picture
| 0 | 90 | 180 | 270 | 360 | 450 | 540 | 630 | (PAL) |
(72) | 60 | 1 |
| 2 |
| 3 | 4 |
| |
5 |
| 6 |
| 7 | 8 |
| lines | ||
(144) | 120 |
|
|
| |||||
9 |
| 10 |
| 11 | 12 |
|
| ||
(216) | 180 |
|
|
| 576 | ||||
13 |
| 14 |
| 15 | 16 |
| |||
(288) | 240 |
|
|
| or | ||||
17 |
| 18 |
| 19 | 20 |
| |||
(432) | 360 |
|
|
| (NTSC) | ||||
(360) | 300 | 21 |
| 22 |
| 23 | 24 |
|
|
|
|
|
|
|
| ||||
(504) | 420 | 25 |
| 26 |
| 27 | 28 |
| lines |
29 |
| 30 |
| 31 | 32 |
| |||
|
|
|
|
|
|
|
|
| 480 |
720 dots
Seven frame spaces are reserved at the end of the last scene as a recording area for Index Pictures. (A cassette with 16 Kbits of cassette memory can record up to 198 Index Pictures, and a cassette with 4 Kbits of cassette memory can record up to 45 Index Pictures.)
The following describes how to record the various ClipLink log data items.
OK/NG status
To designate a scene as “NG”, press the NG button on the camcorder while shooting the scene or at any time before you begin shooting the next scene.
All scenes that do not receive an “NG” designation are recorded as “OK” scenes.
(When you exit the VCR recording mode, changing the OK/NG status is no longer possible.)
Mark IN/OUT points time codes
This data is especially useful when shooting a video program for which a scenario has been created.
Set the camcorder to Mark mode before you start shooting. While shooting, each time you press the camcorder’s TAKE button, Mark IN and Mark OUT time codes are recorded alternately.
Index Picture 1 | Index Picture 2 | |
Start |
| End |
recording |
| recording |
Scene 1 |
| Scene 2 |
| ||
scenes that may contain unexpected events, such as when shooting for sports coverage or documentaries. Set the camcorder to Cue mode before you start to record. While recording, each time you press the camera’s TAKE button, the current time code is recorded as a cue point time code.
Start | Index Picture 1 |
| End | |||
recording |
| recording | ||||
|
|
|
| |||
|
| Scene 1 |
|
|
| |
|
| Take 1 |
|
|
| |
|
|
|
|
|
| |
|
|
|
|
|
|
|
|
|
|
|
| Rec OUT | |
|
|
|
|
| (automatic | |
|
|
|
| Cue point recording) | ||
|
| Cue point | time code | |||
|
| (manual | ||||
|
| time code | recording) | |||
| Cue point | (manual |
|
|
| |
| recording) |
|
|
| ||
Rec IN | time code |
|
|
| ||
(manual |
|
|
|
|
| |
(automatic |
|
|
|
|
| |
recording) |
|
|
|
|
| |
recording) |
|
|
|
|
| |
|
|
|
|
|
| |
ClipLink log data
ClipLink log data can be recorded automatically or | convenient alternative to the conventional “shot list”. |
manually into the cassette memory for use as a | ClipLink log data includes the following items. |
Take 1 | Take 1 | |
|
| |
|
|
|
| Mark OUT (manual | |
| recording) | |
| ||
Appendix
ClipLink log data
Reel number (cassette number)
Scene number
Take number
OK/NG
Mark IN/OUT point time codes
Cue point time code
Description
Data (maximum length: 8 digits) consisting of alphanumeric characters and/or symbols (This is left blank at shipping.)
A
This cannot be changed (set to “1” at shipping).
Indicates the OK/NG status of a particular scene. (In the OK case, nothing is recorded.)
These are the time codes that indicate the Mark IN and Mark OUT points for each scene (HH:MM:SS). These time codes are recorded when the camcorder has been set to Mark mode.
The frame digit is incremented at each Mark IN point and is decremented at each Mark OUT point. (For details, see “Time codes recorded for Mark IN/OUT points” on page 106)
This is the time code that indicates the cue points (valid up to the frame digit). This time code is recorded when the camcorder has been set to Cue mode. When in this mode, the time codes at the start and end of a recording (the Rec IN and Rec OUT time codes) are automatically recorded as Mark IN/OUT points.
| Mark IN (manual |
| recording) |
| Mark OUT |
Mark IN | (manual |
recording) | |
(manual |
|
recording)
Appendix
104 Appendix
Appendix 105
