Model 100AH Sulfur Dioxide Analyzer High Level
SAN DIEGO, CA TOLL-FREE FAX TEL Mail api-sales@teledyne.com
Safety Messages
Table of Contents
Optional Hardware and Software
Maintenance
10-1
11 M100AH Spare Parts List
List of Figures
Vii
List of Tables
Viii
Front Panel Warning Messages
Intentionally Blank
HOW to USE this Manual
Intentionally Blank
Installation
Getting Started
Electrical and Pneumatic Connections
Page
Removal of Shipping Screws
Rear Panel
Rear Panel Pneumatic Recommendations
Initial Operation
Step Number Action Comment
RNGE-SET
M100AH is now ready to measure sample gas
Front Panel
Assembly Layout
Final Test and Calibration Values
Test Values Observed Units Nominal Range Reference Section
Electric Test & Optic Test
Optic Test
SO2 Range Spare Test Output
Factory Installed Options Option Installed
Measured Flows
Intentionally Blank
PPM RMS
SPECIFICATIONS, Agency APPROVALS, Warranty
Specifications
Warranty
Warranty Policy 02024c
Terms and Conditions
Intentionally Blank
M100AH SO2 Analyzer
Principle of Operation
M100AH Sulfur Dioxide Analyzer
Instrument Description
Sensor Module, Reaction Cell, Detector
Pneumatic Sensor Board
Computer Hardware and Software
4 V/F Board
Front Panel
Mode Meaning
System Modes Display
Front Panel Display
Status LEDs
Power Supply Module
Power Switch
Pneumatic System
Front Panel Status LEDs
I/O Hardware Interface
1 RS-232 Interface
RS-232 Pin Assignments
1.2 RS-232 Diagnostic Procedures
1.1 RS-232 Connection Examples
Status Output Interface
Status Output Pin Assignments
Output #
Definition Condition
Interfacing Contact Closure I/O
Contact Closure Control Input Interface
Intentionally Blank
Software Features
Index To Front Panel Menus
Sample Menu
Sample Menu
M100AH Sample Menu Structure
M100AH Setup Menu Structure
Set-Up Menu
M100AH Menu Structure Setup Menu #2
Setup Menu #2 Level Description Reference Section
M100AH Menu Structure Setup Menu #3
Setup Menu #3 Level Description Reference Section
Sample Mode
Test Functions
Sample Flow
Time
2 CAL, CALS, CALZ, Calibration Functions
2.1 CAL, CALS, Calz
Zero
Span
2.4 SO2 Cal Concentration
Formula Values
Set-Up Mode
Configuration Information CFG
Automatic Calibration AutoCal
Data Acquisition System DAS
Page
Press PREV/NEXT
Step Action Comment Press SETUP-DAS
3.2 RS-232 Reporting
Range Menu
Single Range
Auto Range
Dual Ranges
Concentration Units
Password Enable
Diagnostic Mode
Calibrate, Setup Passwords
Time of Day Clock
Variables Menu Vars
Intentionally Blank
Mode Description Reference Section
Optional Hardware and Software
Rack Mount Options
Zero/Span Valves
Autocal Setup Zero/Span Valves
Setup Automatic Zero/Span Calibration
Default Description
Mmddyy
OFF
Mode ZERO-HI Timer Enable on
Mode Zero Timer Enable on
4-20 mA, Isolated Current Loop Output
RS-232 Interface
Setting Up the RS-232 Interface
Setup from the Front Panel
Decimal Value Description
Security Feature
RS-232 Port Setup Front Panel
Key Function
RS-232 Switching From Terminal Mode to Computer Mode
Protocol of Port Communication
Entering Commands in Terminal Mode
RS-232 Terminal Mode Editing Keys
First Character Message Type
Command Summary
RS-232 Interface Command Types
RS-232 Command Summary
Commands Definition
Security Features Definition
Terminal Mode Editing Keys Definition
Computer Mode Editing Keys Definition
Name Message Description
Test Commands and Messages
RS-232 Test Messages
RS-232 Warning Messages
Clear ALL
Message Description
Calibration Commands and Messages
RS-232 Calibration Messages
10 RS-232 Calibration Commands
Command Description
Diagnostic Commands and Messages
11 RS-232 Diagnostic Command Summary
DAS Commands and Reports
12 RS-232 DAS Commands
RS-232 DAS Commands
Compactverbose
Data Report Format
13 RS-232 Operating Modes
Variables Commands and Messages
Mode Description
Config 2 = SBC40 CPU
Intentionally Blank
Section Type of Cal or Check Description
Calibration and ZERO/SPAN Checks
Types of Zero/Span Checks and Calibrations
Model 100AH Calibration Setup
Entr
Enter Expected Span Gas Concentration Procedure
CAL-CONC
Manual Zero Calibration Procedure Z/S Valves
Manual Span Calibration Procedure Z/S Valves
Use of Zero/Span Valves with Remote Contact Closure
Automatic Zero/Span Check
Dynamic Zero/Span Calibration
Z/S Valves Mode with Remote Contact Closure
Ext Zero CC Ext Low Span CC Ext High Span CC Operation
Step Action Comment
Calibration Quality
Calibration Quality Check
Calibration Gases
Intentionally Blank
Maintenance
Maintenance Schedule
Preventative Maintenance Schedule
Maintenance Interval Reference Section
Replacing the Sample Particulate Filter
Replacing the Particulate Filter
Cleaning Orifice and Orifice Filter
Replacing the Pump Scrubber
Cleaning the Reaction Cell
Pneumatic Line Inspection
Reaction Cell
Pneumatic Diagram
Leak Check Procedure
Light Leak Check Procedure
Eprom Replacement Procedure
DIAGNOSTIC, Troubleshooting
10-1
10-2
Operation Verification M100AH Diagnostic Techniques
Fault Diagnosis with Test Variables
Test Functions
10-3
Samp FL
10-4
Pres
10-5
10-6
Lamp Ratio
STR LGT
DRK PMT
10-7
DRK LMP
10-8
Time
Fault Diagnosis with Warning Messages
Front Panel Warning Messages
10-9
Sample Flow
10-10
Fault Diagnosis using Diagnostic Mode
10-11
10-12
Summary of Diagnostic Modes
Diag Mode Description
10-13
10.1.3.1 Signal I/O Diagnostic Diagnostic Mode Signal I/O
Signal
Signal Control Description
10-14
10-15
Electric Test
10-16
10-17
Optic Test
Analog Out Step Test
10.1.4 M100AH Internal Variables
DAC Calibration
10.1.3.6 RS-232 Port Test
10-18
10-19
Name Units Default Value Description Range
Model 100AH Variables
Test Channel Analog Output
Test Channel Output
10-20
Name Description Scaled Range
Factory Calibration Procedure Quick Cal
10-21
10-22
Electric Test ET Procedure
Optic Test OT Procedure
10-23
Performance Problems
AC Power Check
10-24
Flow Check
No Response to Sample Gas
10-25
Negative Concentration Display
Excessive Noise
10-26
Unstable Span
Unstable Zero
10-27
Inability to Span
Inability to Zero
Non-Linear Response
Slow Response
Analog Output Doesnt Agree with Display Concentration
10-28
10-29
Electronic Subsystem Troubleshooting and Adjustments
Computer, Display, Keyboard
Single Board Computer
10-30
CPU Board Jumper Settings 10-31
Front Panel Keyboard
10-32
Voltage/Frequency V/F Board
10-33
10-34
10.3.2.1 ADC/DAC Calibration Procedure
10-35
Changing Output Voltage Ranges
10-36
V/F Board Dip Switch Settings 10-37
10-38
Temperature Amplifier Section
Status/Temp Board
10-39
Display Brownout
Status Output Lines, External Contact Closures
10.3.3.4 4-20 mA Current Output
10-40
Module Description
Power Supply Module Subassemblies
10-41
Power Supply Module Layout 10-42
Electrical Block Diagram 10-43
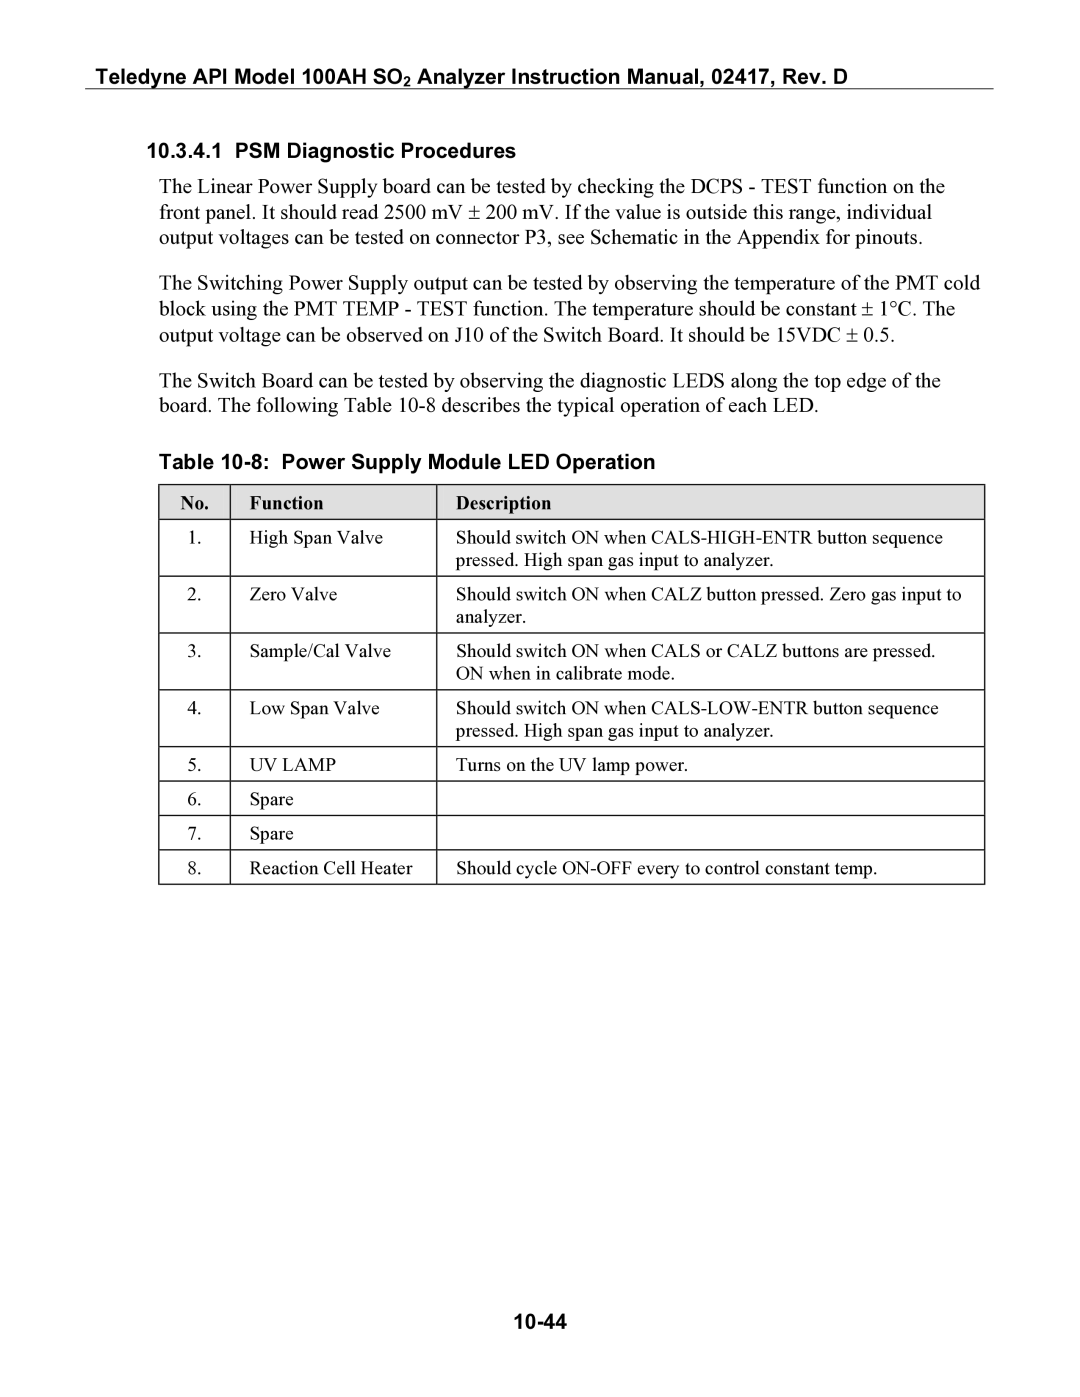
PSM Diagnostic Procedures
Power Supply Module LED Operation
10-44
Function Description
Flow/Pressure Sensor
10-45
Pressure/Flow Sensor 10-46
SO2 Sensor Module 10-47
SO2 Sensor Module 10-48
10-49
Reaction Cell Temp
Preamp Board
PMT Cooler
10-50
PMT Cooler Subsystem 10-51
Hvps High Voltage Power Supply
10-52
High Voltage Power Supply 10-53
Optical Sensor Module Troubleshooting
UV Lamp Adjust or Replacement
10.4.1 PMT
10-54
To adjust the beam splitter assembly
10-55
Pneumatic System Troubleshooting
Leak Check
Pump
10.5.3 Z/S Valves
11-1
11 M100AH Spare Parts List
Teledyne API M100AH Spare Parts List
11-2
Model 100AH Level 1 Spares Kit
Teledyne API M100AH Level 1 Spares Kit
Teledyne API M100AH 47 mm Expendables Kit
11-3
11-4
Replace Quarterly
Appendix a Maintenance Schedule for M100AH
Particulate Replace Weekly AS Needed Filter Element
Intentionally Blank
Appendix B Electrical Schematics
Part Number Name
Intentionally Blank