Manuals
/
ADTRAN
/
Computer Equipment
/
Network Card
ADTRAN
810 Plus
manual
10-6 61200266L1-1
Models:
810 Plus
1
130
188
188
Download
188 pages
59 Kb
127
128
129
130
131
132
133
134
Troubleshooting
Install
Signaling Support
Password
» Factory Default System
Symbols Numerics
Warranty
Configuration Keystrokes
Remote Access
» Syslog Setup
Page 130
Image 130
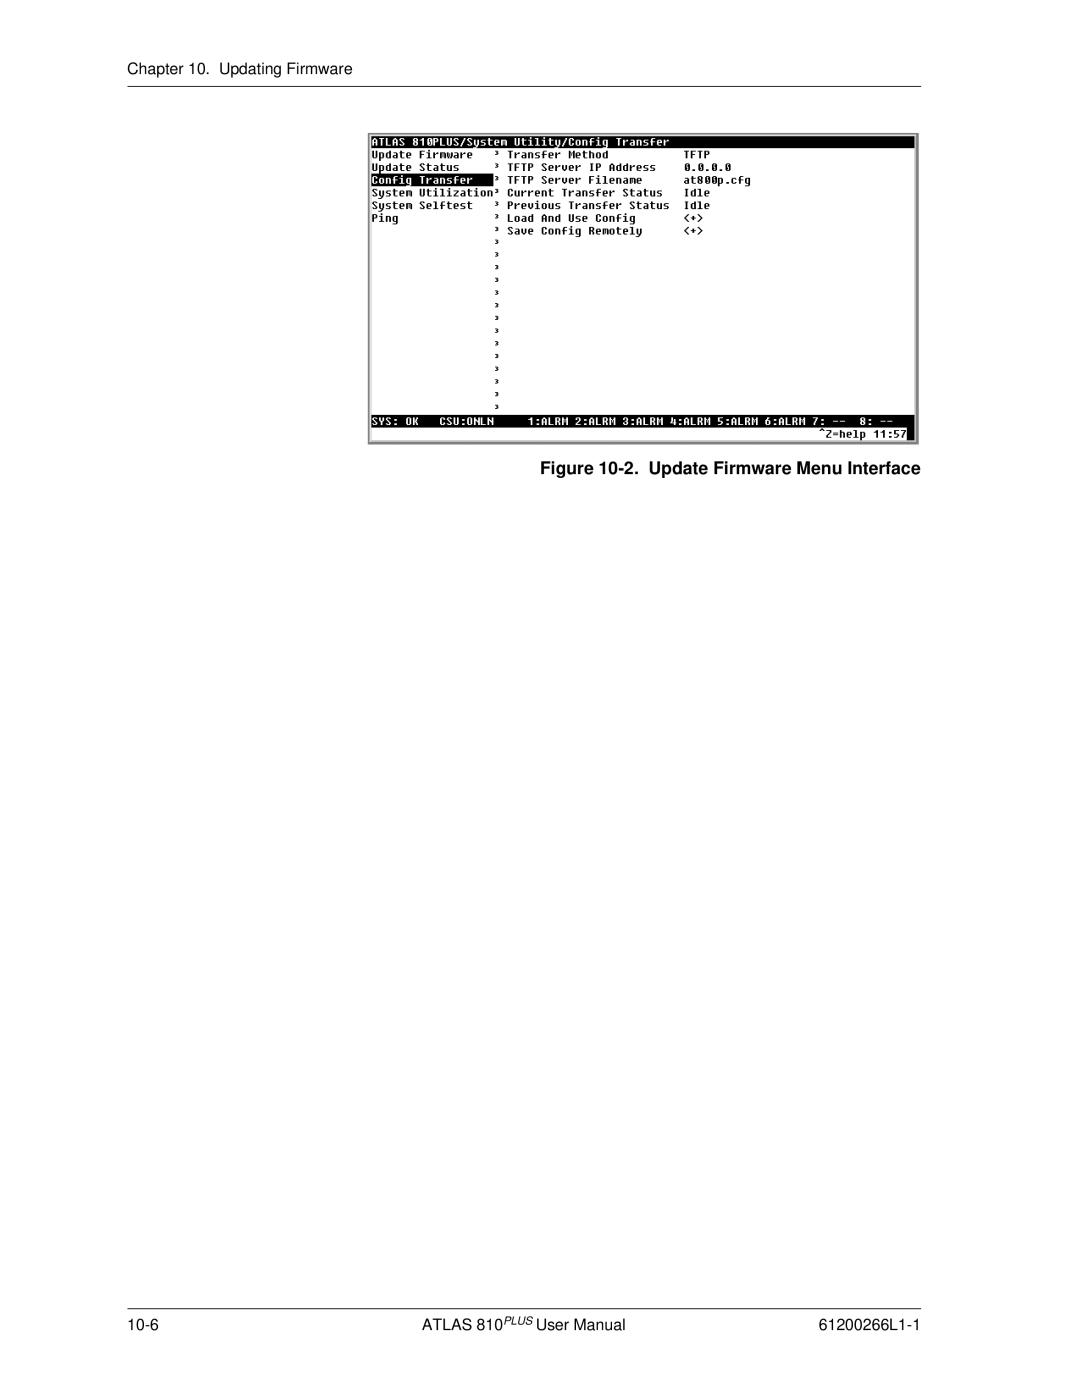
Chapter 10. Updating Firmware
Figure
10-2.
Update Firmware Menu Interface
10-6
ATLAS 810
PLUS
User Manual
61200266L1-1
Page 129
Page 131
Page 130
Image 130
Page 129
Page 131
Contents
$7/$6ýåìí3/86
Trademarks
Faxback Document Line
Adtran Year 2000 Y2K Readiness Disclosure
Product Matrix Mail
Y2K Project Line
Service Type
04DU9-ISN RJ-48C
Affidavit Requirements for Connection to Digital Services
Page
Canadian Equipment Limitations
Reference Information
Introduction
Getting Started
Working with the Atlas 810PLUS
Page
Page
Table of Contents
Using the Front Panel
Modules Terminal Menu
Updating Firmware 10-1
12-1
Xvi
List of Figures
List of Figures
List of Tables
List of Tables
Product Overview
Introduction
Atlas 810PLUS Base Unit
Frame Relay
Point-to-Point Circuit
Dedicated and Switched Connection Maps in a Single Platform
Signaling Conversion for Maximum Interoperability
Digital Access Cross-Connect System Dacs
Flexible Network Management and Maintainability
T1 Bandwidth Manager
WAN Overbooking
Software Upgrade
Atlas 810PLUS Features
Configuration and Management
Signaling Support
Dedicated Connection Maps
Switched Connection Maps
Testing
Performance Monitoring
Introduction
Check the Power Connection
Installation
Contents of Adtran Shipments
Inspect the Adtran Shipment
DC Powered Unit
AC Powered Unit
Grounding Instructions
RJ-48C
Review the Rear Panel Design
Connection Port
Tion Port
Control/Chain In Port
RJ-48C Connec
Blank panel covering an Unused option slot
Connection
Control/Chain Out Port
Control/Chain In Pinout
Control/Chain Out Pinout
Ethernet 10BaseT Connection
Ethernet 10BaseT Pinout
Alarm Relay Connector Pinout Name Description
Alarm Relay Connection
Mon
Receive data from the network
Network Connection
Network Pinout
Send data toward the network
Install ANY Option Modules POWER-UP
Option Slots
Installation
Operation
Using the Terminal Menu
Using VT-100 Terminal Emulation
Overview
Instructions for Defining the IP Address
Atlas 810PLUS / System Config / Ethernet port / IP Address
Step Action
Using T-WATCH PRO
Using Telnet
Starting a Telnet Session
Operation
ACO Switch
Using the Front Panel
System LED
Front Panel Leds
Craft Port
Craft Port Pinout
Atlas 810PLUS Front Panel Description
Feature Description Controller Status LEDs
ACO Switch
Module Slot Numbers
Controller Status
LED Descriptions
For these LEDs This color light Indicates that System
Module Status
Terminal Menu Window
Navigating the Terminal Menu
Menu Path
To move Press one of these keys
Window Panes
Window Pane Navigation
Right Window Pane Notation
Moving through the Menus
Additional Terminal Menu Window Features
Navigating Using the Keyboard Keys
To do this Press this key
Session Management Keystrokes
To do this Press this
Configuration Keystrokes
Getting Help
Navigating the Terminal Menu
Selecting the Appropriate Menu
Terminal Menu and System Control
Security Levels
» Submenus
Password Security Levels
Menus
Rights
» System Name
» Startup Mode
» Installed Memory
» System Location
System Status
» Boot ROM Rev
» Event Log
» Ethernet Port
» System Alarms
» Clear System Event Log
» System Timing
» Chain Port Tx
» Chain Port Signal
Leads
Bytes
System Config
» Primary Timing Source » Backup Timing Source
» Max Telnet Sessions
» Chain Port
»» Traps Destination
»» Authen Trap
Transmission
Community
Terminal Menu and System Control
» Syslog Setup
» Real Time Clock
Select the first column õíô and press
To delete a password
Select the first column õíô and press D
Instructions for Changing Passwords Step Action
» Licenses
» Alarm Relay
» Bonding Config
»» Call Stagger
System Utility
» Update Firmware
»» Module Slot
Tftp Server IP Address
»» Module Type
»» Transfer Method
Tftp Server Filename »» Restart Schedule
» Update Status
» Config Transfer
»» Tftp Server IP
Server in Tftp Server IP Address
»» Save Config
Remotely
»» Selftest Run
This event Logs this result
»» Count
»» Timeout
» Ping
»» Size
» Factory Default System
»» Start/Stop
Terminal Menu and System Control
Modules Terminal Menu
Modules
» Type
» Alarm
» Slt
» Menu
» Status
» State
» Rev
Alarm Types
Modules Menu Quad T1/PRI
»» Sig Status
»» DS0 Alarms
»» DS0 Status
»» Performance Curr
Frame
»» Performance 15 Min
Port Name
Code
Line
»» Test
Loc LB
Payld
Modules Terminal Menu
Dedicated Maps Terminal Menu
»» Sub-submenus
» Auto » Maps
Activate MAP
Current MAP Create / Edit Maps
» # » Map Name » Sort TO/FROM » Connects
DS0 Selection
»» From Config
»» from Slt
DS0 Available
See also the trunk conditioning example on
» Activate Time
Example 1 Setting Trunk Conditioning
From Config option
» Enbl Day
Example 2 Creating a Dedicated Map
Designing the Dedicated Map for Example
Configuration / Frame / ESF
Configuring the Ports for Example
Instructions for Configuring the Ports
Connections and Ports Name Atlas 810PLUS Port DS0s
Defining the Connections for Example
Instructions for Defining Data Connections
Instructions for Defining Voice Connections
Completed Dedicated Map
Dial Plan Terminal Menu
Dial Plan Menu
Dial Plan Menu Tree
» Port/PEP
Network Term
» Slot/Svc
» Sig
$ =
3... =
» Out#Rej
» Ifce Config
»» Reject Number
» In#Accept
$ rejects all long distance calls, but only for this User
» Area Code
» End of Number Timeout
Global Param
» Nbr Complete
»» # »» Pattern
» Number Type Templates
» Automatic Routeback Rejection
»» # »» Prefix »» Pattern »» Number Typ
Quad T1/PRI Module Network Termination/PRI
Interface Configurations
»» Switch Type
»» First DS0
Isdn National pref
Conversion
As dialed
Isdn Subscriber
Quad T1/PRI Module Network Termination/NFAS
Interfaces
Quad T1/PRI Module Network Termination/RBS
» Secondary
» Slot, Port
Digits
»» Signaling Method
»» DS0s Available
SW56
»» Trunk Number
» Network Specific Facility Voice
Quad T1/PRI Module User Termination/PRI
» Strip MSD
» Network Specific Facility Data
» ID Number
Quad T1/PRI Module User Termination/NFAS
» Source ID
DS0s
Quad T1/PRI Module User Termination/RBS
»» Direct Inward Dialing Did Digits Transferred
»» Strip MSD
Quad Nx56/64 Module User Termination
Octal BRI Module Network Termination
Octal BRI Module User Termination
Calls D64, D56, Audio, Speech
Creating Dial PLANS-EXAMPLES
Understanding Dial Plan Configurations
Example 1 Pstn Connection Dial Plan Configuration
Network
Example 2 Point-to-Point Connection Dial Plan Configuration
Example 3 Remote Access and Video Conferencing Dial Plan
Instructions for Configuring the Ports for Example
Instructions for Setting Up the Dial Plan for Example
Network Terminations
Type of provided BRI switch
User Equipment PRI
Phone #s
BRI type
Setting PRI a Global Param
User Terminations
PRI type
Setting PRI B Global Param Step Action
Setting PRI C Global Param Step Action
Setting User Term Connections
Completed Network Map
Completed User Map
Dial Plan Terminal Menu
Xmodem Firmware Updates
Updating Firmware
Select System Utility / Update Firmware see Figure
Updating Firmware using Xmodem
Instructions for Updating Firmware Using Xmodem
Same type, select All Modules of a Type from Module Slot
Successfully
Instructions for Updating Firmware Using Xmodem Step Action
To update additional modules, begin at and repeat this
Process
Instructions for Updating Firmware Using Tftp
Tftp Firmware Updates
Updating Firmware using Tftp
Select System Utility / Update Firmware see -2 on
Tftp Upload Messages
Message Meaning
10-6 61200266L1-1
Basic Components
Snmp Management
Snmp
Network Manager
Trap Destination List
Configuring a Trap Destination List via Terminal Menu
Snmp Traps
Trap Destination List IP Address Community Trap Filtering
Standard Traps
Filtering Disabling Traps
Trap Name Severity Description
DS1 Traps
DS1 Alarm Traps
Alarm Severity Description
DS1 Snmp Traps
DS1 Current Alert Snmp Traps
Current Alert Severity Description
Total Alert Traps
Total Alert Severity Description
Adtran Utilities
Syslog Host Daemon
SysLog GUI
Port
Menu Bar
File Display
» Properties
Help
Telnet Utility
Set Facility Filters dialog box
Host Name
Telnet Menu Tree
» Connect
Session
Menu
» Disconnect
Options
Capture
VT-100 Utility
» File Transfer
»» Ascii Cfg Files
» Refresh Screen
Provides the options Transmit Wakeup and Transmit Refresh
Tftp Server
Tftp Server Interface Menu Tree
Print LOG
Server
Status Field
Meter Field
Saving the Current Configuration to a Tftp Server
LOG Field
Successful Transfer
Retrieving the Configuration from a Tftp Server
Unsuccessful Transfer
Move to the Load And Use Config button and press Enter to
Upload a configuration file
Saved configuration you wish to load. Enter the complete
Request
Appendix a System Event Logging
Table A-1. System Event
Table A-2. Switchboard Events
Event Category Console Log String
Table A-3. Nx 56/64 Events
Table A-4. Time Events
Table A-5. Ethernet Events
Table A-4. Time Events Category Console Log String
Table A-6. Isdn Events
Isdn Cause Codes
Event Category Console Log String
Major 100
Table A-7. Isdn Cause Code Events Category
Major 127
Major 103
Major 102
Cause Code LOG Entries
Major 111
Major 101
Table A-8. Cause Code Log Entry Location Designations
Appendix A. System Event Logging
Appendix B Troubleshooting
Modules seated improperly, module failure
Misconfiguration, improper cabling
Misconfiguration
Product Support Information
Appendix C Warranty and Technical Support Information
Warranty and Customer Service
Pre-sales Inquiries and Applications Support
Repair and Return
Appendix D Acronyms and Abbreviations
Snmp
Glossary
Async-232 Module
Dedicated bandwidth
E1 circuit
Leased line
Remote Access
Telco
Xmodem
Appendix E. Glossary
Symbols Numerics
Index
CTS
DCD
Index-4
LBO
Index-6
PRI
RMA C-2
61200266L1-1 Index-9
Tftp
61200266L1-1 Index-11
Index Index-12
Post-Sale Support
Presales Inquiries and Applications Support
Repair and Return
Top
Page
Image
Contents