|
| BIOS CONFIGURATION | |
|
|
|
|
|
|
|
|
|
|
|
|
| Step | Action |
|
|
|
|
|
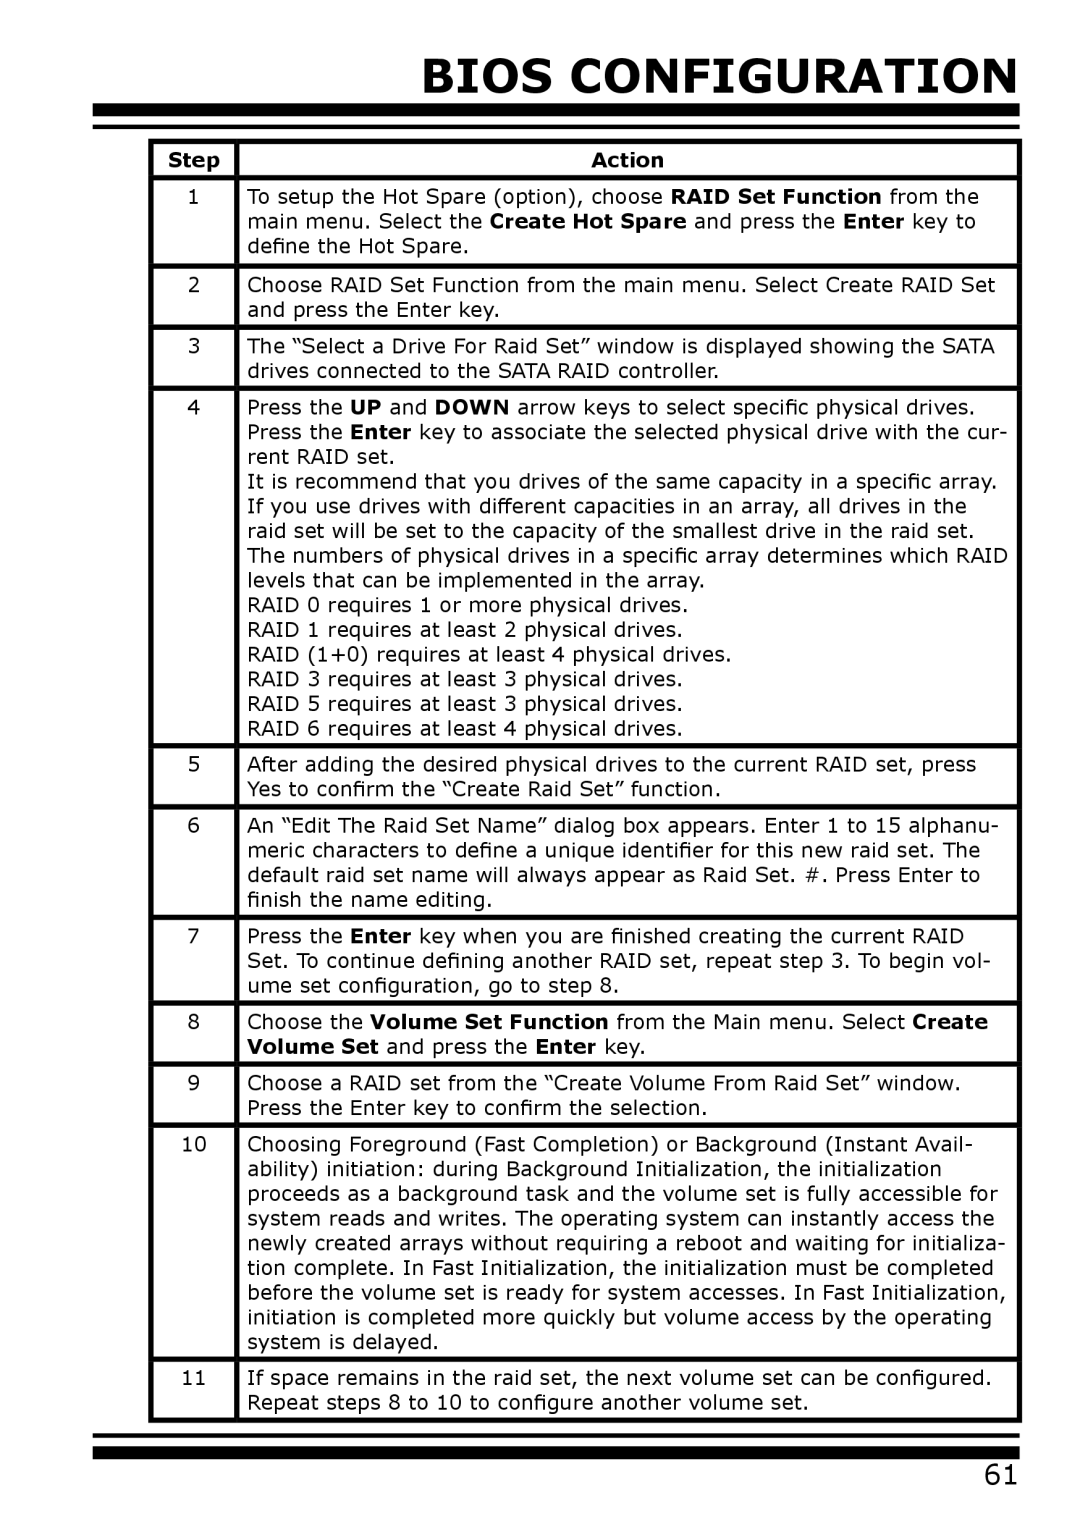
| 1 | To setup the Hot Spare (option), choose RAID Set Function from the |
|
|
| main menu. Select the Create Hot Spare and press the Enter key to |
|
|
| define the Hot Spare. |
|
|
|
|
|
| 2 | Choose RAID Set Function from the main menu. Select Create RAID Set |
|
|
| and press the Enter key. |
|
|
|
|
|
| 3 | The “Select a Drive For Raid Set” window is displayed showing the SATA |
|
|
| drives connected to the SATA RAID controller. |
|
|
|
|
|
| 4 | Press the UP and DOWN arrow keys to select specific physical drives. |
|
|
| Press the Enter key to associate the selected physical drive with the cur- |
|
|
| rent RAID set. |
|
|
| It is recommend that you drives of the same capacity in a specific array. |
|
|
| If you use drives with different capacities in an array, all drives in the |
|
|
| raid set will be set to the capacity of the smallest drive in the raid set. |
|
|
| The numbers of physical drives in a specific array determines which RAID |
|
|
| levels that can be implemented in the array. |
|
|
| RAID 0 requires 1 or more physical drives. |
|
|
| RAID 1 requires at least 2 physical drives. |
|
|
| RAID (1+0) requires at least 4 physical drives. |
|
|
| RAID 3 requires at least 3 physical drives. |
|
|
| RAID 5 requires at least 3 physical drives. |
|
|
| RAID 6 requires at least 4 physical drives. |
|
| 5 | After adding the desired physical drives to the current RAID set, press |
|
|
| Yes to confirm the “Create Raid Set” function. |
|
|
|
|
|
| 6 | An “Edit The Raid Set Name” dialog box appears. Enter 1 to 15 alphanu- |
|
|
| meric characters to define a unique identifier for this new raid set. The |
|
|
| default raid set name will always appear as Raid Set. #. Press Enter to |
|
|
| finish the name editing. |
|
|
|
|
|
| 7 | Press the Enter key when you are finished creating the current RAID |
|
|
| Set. To continue defining another RAID set, repeat step 3. To begin vol- |
|
|
| ume set configuration, go to step 8. |
|
|
|
|
|
| 8 | Choose the Volume Set Function from the Main menu. Select Create |
|
|
| Volume Set and press the Enter key. |
|
|
|
|
|
| 9 | Choose a RAID set from the “Create Volume From Raid Set” window. |
|
|
| Press the Enter key to confirm the selection. |
|
|
|
|
|
| 10 | Choosing Foreground (Fast Completion) or Background (Instant Avail- |
|
|
| ability) initiation: during Background Initialization, the initialization |
|
|
| proceeds as a background task and the volume set is fully accessible for |
|
|
| system reads and writes. The operating system can instantly access the |
|
|
| newly created arrays without requiring a reboot and waiting for initializa- |
|
|
| tion complete. In Fast Initialization, the initialization must be completed |
|
|
| before the volume set is ready for system accesses. In Fast Initialization, |
|
|
| initiation is completed more quickly but volume access by the operating |
|
|
| system is delayed. |
|
|
|
|
|
| 11 | If space remains in the raid set, the next volume set can be configured. |
|
|
| Repeat steps 8 to 10 to configure another volume set. |
|
|
|
|
|
|
|
|
|
61