Complete Hardware Guide for EX8208 Ethernet Switches
USA
Software License
END User License Agreement
Page
Page
Table of Contents
Chapter Component Specifications
Part Planning for Switch Installation
Chapter Installing the Switch 125
Part Removing the Switch and Switch Components
Part Switch and Component Maintenance
Part Troubleshooting Switch Components
Part Returning Hardware
Part Safety Information
Chapter Compliance Information 307
Part Compliance Information
List of Figures
EX8208 Switch
Installing an EX8208 Switch in a Four-Post Rack
Power Cord Retainer in an AC Power Supply 174
Location of the Serial Number ID Label on the SRE Module 249
List of Tables
EX8208 Switch Component Power Requirements
Power Reserved for the Chassis
Page
How to Use This Guide
About This Topic Collection
List of EX Series Guides for Junos OS Release
Software Topic Collections
Title Description
Downloading Software
Icon Meaning Description
Documentation Symbols Key
Text and Syntax Conventions Description
Examples
Text and Syntax Conventions Description Examples
Documentation Feedback
Requesting Technical Support
Self-Help Online Tools and Resources
Opening a Case with Jtac
Switch and Components Overview and Specifications
Page
EX8208 Switch Overview
EX8208 Switch Hardware Overview
Software
EX8208 Switch
Chassis Physical Specifications
Routing Engines and Switch Fabric
Line Cards
Cooling System
Power Supplies
EX8208 Switch Configurations
Switch Configuration Configuration Components
EX8208 Switch Hardware Configurations
EX8208 Switch Hardware Configurations
Chassis Physical Specifications of an EX8208 Switch
Physical Specifications of the EX8208 Switch Chassis
DescriptionValue
EX8208 Switch
Hardware Components That Provide Redundancy
Switch Fabric Redundancy
Routing Engine and Control Redundancy for EX8208 Switches
Switch Fabric Redundancy for EX8208 Switches
Routing Engine and Control Redundancy
Slot Numbering for an EX8208 Switch
Slot Numbering for an EX8208 Switch
Slot Label Components Accepted in Slot
SRE0
Slot Numbering for an EX8208 Switch
PSU
Slot Numbering for the Power Supply Slots
Complete Hardware Guide for EX8208 Ethernet Switches
Component Descriptions
LCD Panel in an EX8200 Switch
LCD Panel Modes
LCD Panel in an EX8200 Switch
LCD Panel Menu Options for the EX8200 Switch
LCD Panel Menus
Menu Description
LCD Panel Menu Options for the EX8200 Switch
LCD Panel Menu Options for the EX8200 Switch
Chassis Status LEDs in an EX8200 Switch
Chassis Status LEDs in an EX8200 Switch
LED Label Description Color State and Description
Field-Replaceable Units in an EX8208 Switch
FRUs in an EX8208 Switch
Type
Complete Hardware Guide for EX8208 Ethernet Switches
SRE Module in an EX8208 Switch
SRE Module LEDs in an EX8208 Switch
LEDs on the Management Port on an EX8200 Switch
Management Port LEDs in EX8200 Switches
Link/Activity LED on the Management Port on EX8200 Switches
Switch Fabric SF Module in an EX8208 Switch
Status LED on the Management Port on EX8200 Switches
Color State and Description
SF Module LEDs in an EX8208 Switch
LED Description Color State and Description
Port SFP+ Line Card in an EX8200 Switch
Port SFP+ Line Card
40-port SFP+ Line Card
Port SFP Line Card in an EX8200 Switch
48-port SFP Line Card
Port RJ-45 Line Card in an EX8200 Switch
48-port RJ-45 Line Card
Line Card LEDs in an EX8200 Switch
Status LEDs on a 40-port SFP+ Line Card
Status LEDs on Line Cards for EX8200 Switches
Network Port LEDs on an 8-port SFP+ Line Card
Network Port LEDs in an EX8200 Switch
Network Port LEDs on a 48-port SFP Line Card
LED ADM
LCD Indicator State, Color, and Description
LED DPX
LED SPD
AC Power Supply Description
AC Power Supply in an EX8200 Switch
AC Power Supply
+1 Redundancy Configuration of AC Power Supplies
+N Redundancy Configuration of AC Power Supplies
Complete Hardware Guide for EX8208 Ethernet Switches
Component Descriptions
AC Power Supply LEDs on an EX8200 Switch
AC Power Supply LEDs in an EX8200 Switch
State
Power Supply LEDs on EX8200 Switches
Input OK
Output OK
EX8216 switches support 3000 W DC power supplies
DC Power Supply in an EX8200 Switch
DC Power Supply
DC Power Supply LEDs in an EX8200 Switch
State Description
DC Power Supply LEDs in EX8200 Switches
OUT OK
Fan Tray for an EX8208 Switch
Cooling System and Airflow in an EX8208 Switch
Airflow Through the EX8208 Switch Chassis
Backplane in an EX8208 Switch
Page
USB Port Specifications for an EX Series Switch
Component Specifications
Pin Signal Description
EX Series Switches Console Port Connector Pinout Information
TRP1
TRP1+
TRP2+
TRP3+
Networks for your EX Series switch
Optical Interface Support in EX8200 Switches
EX-SFP-10GE-USR
Ethernet Standard Specifications
MMF
OM1 OM3
Fddi OM1 OM2 OM3
EX-SFP-10GE-SR
FDDI/OM1 OM2 OM3
EX-SFP-10GE-LRM
SMF
EX-SFP-10GE-LR
EX-SFP-10GE-ER
EX-SFP-1GE-T
EX-SFP-1GE-SX
EX-SFP-1GE-LX
EX-SFP-1GE-LH
EX-SFP-10GE-USR
EX-SFP-10GE-SR
EX-SFP-10GE-LRM
EX-SFP-10GE-LR
EX-SFP-10GE-ER
EX-SFP-1GE-T
EX-SFP-1GE-SX
EX-SFP-1FE-FX
EX-SFP-1GE-LX
EX-SFP-1FE-LX
EX-SFP-1GE-LX40K
EX-SFP-1FE-LX40K
1000Base-LH also Model Number
EX-SFP-1FE-LH
SFP+ Direct Attach Cables for EX Series Switches
Cable Specifications
Model Specification
SFP+ Direct Attach Cable Specifications
SFP+ Direct Attach Cable Specifications
Standards Supported by These Cables
Grounding Cable and Lug Specifications for EX8200 Switches
Grounding Cable Lug For an EX8208 Switch
Planning for Switch Installation
Page
Site Preparation Checklist
Site Preparation Checklist for an EX8200 Switch
Site Preparation
Item or Task
Rack or Cabinet
Item or Task For More Information Performed By Date
Cables
General Site Guidelines for EX Series Switches
Site Electrical Wiring Guidelines for EX Series Switches
Site Electrical Wiring Guidelines
Site Wiring Factor Guidelines
DescriptionTolerance
EX Series Switch Environmental Tolerances
EX Series Switch Environmental Tolerances
Rack and Cabinet Requirements
Rack Requirements for an EX8208 Switch
Rack Requirement Guidelines
Rack Requirements and Specifications for an EX8208 Switch
Installing an EX8208 Switch in a Four-Post Rack
Cabinet Requirement Guidelines for the EX8208 Switch
Cabinet Requirements and Specifications for an EX8208 Switch
Hardware Maintenance for an EX8208 Switch on
102 Copyright 2010, Juniper Networks, Inc
Copyright 2010, Juniper Networks, Inc 103
Page
Cable Requirements
Cables Connecting the EX8200 Switch to Management Devices
Attenuation and Dispersion in Fiber-Optic Cable
Signal Loss in Multimode and Single-Mode Fiber-Optic Cable
Cable Requirements
Page
AC Power Specifications for EX8200 Switches
Planning Power Requirements
ItemSpecifications
DC Power Specifications for EX8200 Switches
Power Requirements for EX8208 Switch Components
EX8208 Switch Component Power Requirements
Components Power Requirements Watts
AC Power Cord Specifications for an EX8200 Switch
AC Power Cord Specifications for an EX8200 Switch
Country/Region Electrical Specifications Plug Standards
CEE 7
AC Plug Types
Power Cable Warning Japanese
Calculating Power Requirements for an EX8208 Switch
Chassis Component Base Configuration RedundantConfiguration
Chassis Component Base Configuration Redundant Configuration
Copyright 2010, Juniper Networks, Inc 117
Power Reserved for the Chassis
Copyright 2010, Juniper Networks, Inc 119
Calculating the EX8200 Switch Fiber-Optic Cable Power Budget
Estimated Values for Factors Causing Link Loss
Link-Loss Factor Estimated Link-Loss Value
Sample LL Calculation Values
122
Installing and Connecting the Switch and Switch Components
Page
Installing and Connecting an EX8208 Switch
Installing the Switch
Unpacking an EX8200 Switch
Pallet Fastener
Unpacking an EX8208 Switch
Unpacking an EX8216 Switch
Parts List for Different EX8208 Switch Configurations
Parts Inventory Packing List for an EX8208 Switch
Component Quantity
Accessory Box Parts List
132 Copyright 2010, Juniper Networks, Inc
Copyright 2010, Juniper Networks, Inc 133
Adjustable Mounting Brackets for Four-Post Rack Installation
Copyright 2010, Juniper Networks, Inc 135
136 Copyright 2010, Juniper Networks, Inc
Installing the Power Cord Tray in a Four-Post Rack
Mounting an EX8208 Switch on a Rack or Cabinet
Copyright 2010, Juniper Networks, Inc 139
140 Copyright 2010, Juniper Networks, Inc
Copyright 2010, Juniper Networks, Inc 141
Installing the EX8208 Switch Chassis Using a Mechanical Lift
Copyright 2010, Juniper Networks, Inc 143
144 Copyright 2010, Juniper Networks, Inc
Copyright 2010, Juniper Networks, Inc 145
146 Copyright 2010, Juniper Networks, Inc
Copyright 2010, Juniper Networks, Inc 147
Page
Installing and Removing EX8208 Switch Hardware Components
Installing Switch Components
Installing an AC Power Supply in an EX8200 Switch
Installing Switch Components
Installing an AC Power Supply in an EX8200 Switch
Installing a DC Power Supply in an EX8200 Switch
Copyright 2010, Juniper Networks, Inc 153
Installing a DC Power Supply in an EX8200 Switch
Installing a Fan Tray in an EX8208 Switch
Installing a Fan Tray in an EX8208 Switch
Installing an SRE Module in an EX8208 Switch
156 Copyright 2010, Juniper Networks, Inc
Installing an SRE Module in an EX8208 Switch
Installing an SF Module in an EX8208 Switch
158 Copyright 2010, Juniper Networks, Inc
Installing an SF Module in an EX8208 Switch
Unpacking a Line Card Used in an EX8200 Switch
Unpacking a Line Card Used in an EX8200 Switch
Installing a Line Card in an EX8200 Switch
Location of the ESD Point on an EX8200 Switch Chassis
Closed and Open Positions of the 2-in. Ejector Lever
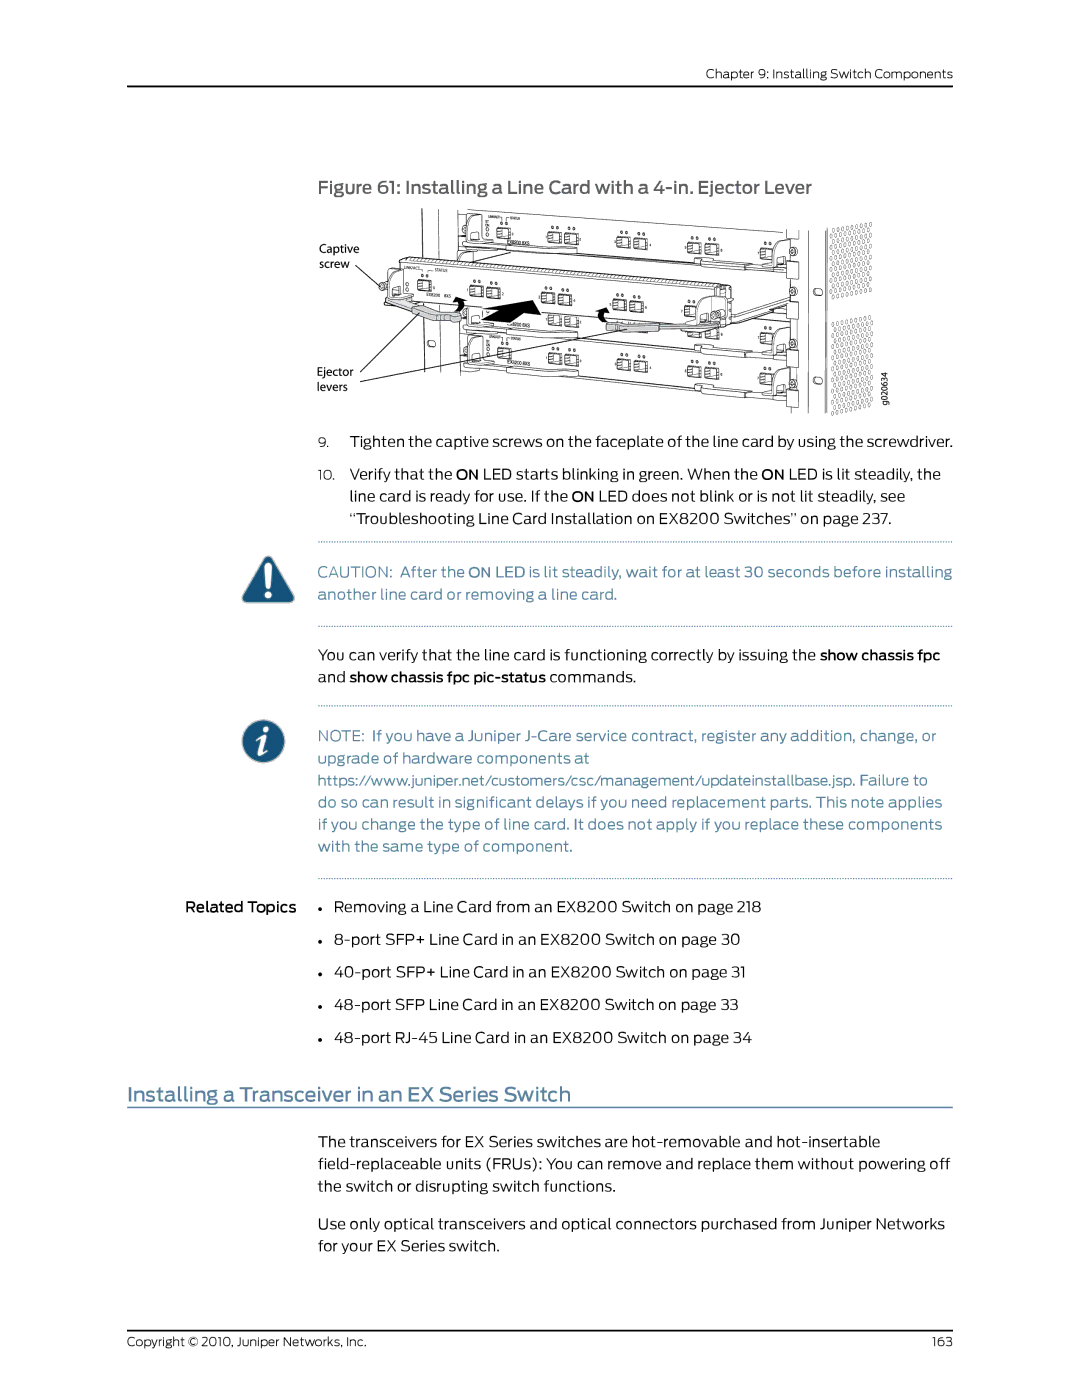
Installing a Line Card with a 4-in. Ejector Lever
Installing a Transceiver in an EX Series Switch
164 Copyright 2010, Juniper Networks, Inc
Installing a Transceiver in an EX Series Switch
Connecting a Fiber-Optic Cable to an EX Series Switch
Transceiver
Connecting Earth Ground to an EX Series Switch
Connecting the Switch
Connecting Earth Ground to an EX2200 or EX3200 Switch
Connecting Earth Ground to an EX4200 Switch
Connecting Earth Ground to an EX4500 Switch
Connecting Earth Ground to an EX8208 Switch
Connecting Earth Ground to an EX8216 Switch
Connecting AC Power to an EX8200 Switch
Power Cord Retainer in an AC Power Supply
Connecting the Power Supply Cord to an EX8200 Switch
Connecting DC Power to an EX8200 Switch
176 Copyright 2010, Juniper Networks, Inc
Copyright 2010, Juniper Networks, Inc 177
178 Copyright 2010, Juniper Networks, Inc
Connecting the Power Supply Cables to an EX8200 Switch
Powering On an EX8200 Switch
Flip the Enable Switch to the on position
Connecting an EX Series Switch to a Management Console
Ethernet Cable Connector
Setting the Serial Console Speed for the Switch
Connecting an EX Series Switch to a Modem
Configuring the Modem
Port Settings
Connecting the Modem to the Console Port
Port Settings Value
186 Copyright 2010, Juniper Networks, Inc
Copyright 2010, Juniper Networks, Inc 187
Management PC
EX8200 Switch Default Configuration
Performing Initial Configuration
Connecting and Configuring an EX Series Switch CLI Procedure
Performing Initial Configuration
192 Copyright 2010, Juniper Networks, Inc
LCD Panel in an EX3200, EX4200, EX4500, or EX8200 Switch
194 Copyright 2010, Juniper Networks, Inc
Copyright 2010, Juniper Networks, Inc 195
Page
Removing the Switch on Removing Switch Components on
Removing the Switch and Switch Components
Page
Powering Off an EX8200 Switch
Removing the Switch
200 Copyright 2010, Juniper Networks, Inc
Removing an EX8208 Switch from a Rack or Cabinet
202 Copyright 2010, Juniper Networks, Inc
Removing an EX8208 Switch Chassis Using a Mechanical Lift
204 Copyright 2010, Juniper Networks, Inc
Copyright 2010, Juniper Networks, Inc 205
206 Copyright 2010, Juniper Networks, Inc
Removing an AC Power Supply from an EX8200 Switch
Removing Switch Components
208 Copyright 2010, Juniper Networks, Inc
Removing an AC Power Supply from an EX8200 Switch
Removing a DC Power Supply from an EX8200 Switch
Remove the Plastic Cable Cover
Removing a DC Power Supply from an EX8200 Switch
Removing a Fan Tray from an EX8208 Switch
212
Removing a Fan Tray from an EX8208 Switch
Taking the SRE Module Offline in an EX8208 Switch
Taking an SRE Module Offline in a Switch With One SRE Module
Removing an SRE Module from an EX8208 Switch
Removing an SRE Module from an EX8208 Switch
Taking the SF Module Offline in an EX8208 Switch
Removing an SF Module from an EX8208 Switch
Removing an SF Module from an EX8208 Switch
Removing a Line Card from an EX8200 Switch
User@switch request chassis fpc slot slot-numberoffline
Removing a Line Card with a 2-in. Ejector Lever
Disconnecting a Fiber-Optic Cable from an EX Series Switch
Removing a Transceiver from an EX Series Switch
Removing a Transceiver from an EX Series Switch
224 Copyright 2010, Juniper Networks, Inc
Routine Maintenance on
Switch and Component Maintenance
Page
Handling and Storing Line Cards in EX8200 Switches
Routine Maintenance
Holding a Line Card
Do Not Grasp the Connector Edge
Storing a Line Card
Maintaining Fiber-Optic Cables in EX Series Switches
Maintaining Line Card Cables in EX8200 Switches
232 Copyright 2010, Juniper Networks, Inc
Removing a Battery from an EX8208 Switch for Recycling
Location of the CR2032 Battery in an SRE Module
Troubleshooting Switch Components on
Troubleshooting Switch Components
Page
Troubleshooting Line Card Installation on EX8200 Switches
238 Copyright 2010, Juniper Networks, Inc
Returning Hardware
Returning the Switch or Switch Components on
Page
Returning the Switch or Switch Components
Listing the Switch and Components Details with the CLI
Locating the Serial Number on an EX8200 Switch or Component
SFP+-10G-SR
SIB
Copyright 2010, Juniper Networks, Inc 245
Locating Serial Number ID Labels on FRU Components
Copyright 2010, Juniper Networks, Inc 247
248 Copyright 2010, Juniper Networks, Inc
Location of the Serial Number ID Label on the SRE Module
Location of the Serial Number ID Label on the RE Module
Copyright 2010, Juniper Networks, Inc 251
Serial number ID label
Copyright 2010, Juniper Networks, Inc 253
Packing an EX8200 Switch or Component
Packing an EX8200 Switch
256 Copyright 2010, Juniper Networks, Inc
Insert Pallet Fasteners in the Cardboard Box
Packing EX8200 Switch Components for Shipping
Packing an EX8200 Switch
Packing a Line Card Used in an EX8200 Switch
260 Copyright 2010, Juniper Networks, Inc
Safety Information
Page
General Safety Information
Definitions of Safety Warning Levels for EX Series Switches
Page
Fire Safety Requirements for EX Series Switches
Qualified Personnel Warning for EX Series Switches
Varning! Apparaten skall anslutas till jordat nätuttag
General Laser Safety Guidelines
Radiation and Laser Warnings
Class 1 Laser Product Warning
Laser Beam Warning
Class 1 LED Product Warning
Radiation and Laser Warnings
272 Copyright 2010, Juniper Networks, Inc
Copyright 2010, Juniper Networks, Inc 273
Page
Installation Instructions Warning for EX Series Switches
Installation and Maintenance Safety Information
Chassis Lifting Guidelines for EX8200 Switches
Ramp Warning for EX Series Switches
278 Copyright 2010, Juniper Networks, Inc
Copyright 2010, Juniper Networks, Inc 279
280 Copyright 2010, Juniper Networks, Inc
Copyright 2010, Juniper Networks, Inc 281
Grounded Equipment Warning for EX Series Switches
Battery Handling Warning
Jewelry Removal Warning
Lightning Activity Warning
Operating Temperature Warning
Page
Product Disposal Warning
Copyright 2010, Juniper Networks, Inc 289
Page
Power and Electrical Safety Information
292 Copyright 2010, Juniper Networks, Inc
Place a Component into an Antistatic Bag
AC Power Electrical Safety Guidelines for EX Series Switches
AC Power Disconnection Warning for EX Series Switches
DC Power Electrical Safety Guidelines for EX Series Switches
DC Power Disconnection Warning for EX Series Switches
298 Copyright 2010, Juniper Networks, Inc
DC Power Wiring Sequence Warning for EX Series Switches
300 Copyright 2010, Juniper Networks, Inc
DC Power Wiring Terminations Warning for EX Series Switches
TN Power Warning for EX Series Switches
Copyright 2010, Juniper Networks, Inc 303
Page
Compliance Information on
Compliance Information
Page
EMC
Agency Approvals for EX Series Switches
Canada
European Community
Japan
United States
Non-Regulatory Environmental Standards
FCC Part 15 Statement
Declaration of Conformity for EX8208 Switches