NCT 100T NCT 990T NCT 2000T
Mailnct@nct.hu
Contents
Intervention in the Course of Program Execution
Interruption and Restart of Automatic Operation
Page
Introduction
Conditions of Operation and Storage
Operator’s Panel
NC Control Panel Display Unit and Data Input Keyboard
Operator’s Panel
Action menu key
Data Input Keyboard
Screen menu key
Backspace
Keys PgUp
State of First Operation Mode Group
State of Second Operation Mode Group
PgDn
Interpolator State
Functional State of Automatic and Manual Data Input
Program Manipulation State
PLC State
Indication of Ready Status of Control
Machine Control Board
Operation mode selectors
Automatic Manual data input
Override switches
Switches modifying the conditions of program execution
Increment selectors
Block restart Block return Function lock
Movement, start and stop buttons
General Operating Knowledge
Screen Menu
Position
Offsets
Check
Program
Graphics
#100
Setting
Service
Action Menu
General Operating Knowledge
General Displaying Areas and Actions Executed on Them
Position Screens
Actions of Position Screens
Check Screens
Program Text Screen, Listing of Running Program
Function Screen, Subprogram and Macro Levels
Last and Active screens. G Codes and Compensations
Actions of sreens Program TEXT, FUNCTION, Last and Active
OPERATOR’S Panel Screen
Actions of OPERATOR’S Panel Screen
Key
Increment Actions Incr
Operation Modes Actions Modes
Axes Actions
Actions
Clear Relative Position Actions Clear Relpnt
Messages Screen
Directory Screen
Program Screens
Screens of actions executed on part programs
Actions of Directory Screen
Program Screens
View Screen
Actions of View Screen
Edit Screen
Actions of Edit Screen
Block Input Screen
Actions of Block Input Screen
Offsets Screens
Work Offsets Screen
Actions of Work Offsets Screen
Tool Offsets Screen
Keys This bar selects the offset register to be modified
Actions of Tool Offsets Screen
Offsets Screens
Work Offset Measure Screen
Actions of Work Offset Measure Screen
Tool Length Offset Measure Screen
Actions of Tool Length Offset Measure Screen
Relative Position Offsets Screen
Actions of Relative Position Offsets Screen
Graphic Position Screens
Graphic Parameters Screen
Actions of Graphic Parameters Screen Color Code
Draw Screen
Actions of Draw Screen
Graphic Position Screens
Setting Screens
Screen of Local Macro Variables #1-#33
Actions of Local Macro Variables #1-#33 Screen
Screen of Common Macro Variables #100-#199
Actions of Common Macro Variables #100-#199 Screen
Screen of Common Macro Variables #500-#599
Actions of Common Macro Variables #500-#599 Screen
Timer and Counter Screen
Actions of Timer Counter Screen
Tool POT Table Screen
Actions of Tool POT Table Screen
PLC Table Screen
Actions of PLC Table Screen
USER’S Parameters Screen User’s Params
Actions of USER’S Parameters Screen
Security Panel Screen
Generated code, or PLC key
Fix code, or PLC key
Below table contains the codes of the appropriate functions
Setting Screens
Editing Part Programs
Structure of Part Program
Beginning and end of program
Division of Edit Screen during Editing
Typing
Moving the cursor
Insert
Selected text is deleted by means of key del
Edit Actions Undo, Cut, Copy, Paste, Find and Replace
Editor Action Menu
File Actions Save, Save as
Edit
Editing part programs
Insert Condition Action Group
Insert Actions
Insert Miscellaneous Action Group
Insert Operation Action Group
Help
Switching Over Operation Modes
Tion menu key
Manual Reference Point Return Mode
Manual Operation Modes
Axis Selection
Types of Reference Point Return
Jog Mode
Feedrate Selection
Jog Mode
Incremental Jog Mode
Increment Selection
Incremental Jog Mode
Manual Handle Mode
Speed
Actions Executed in Manual Operation Modes
Single Block Operation
Work Zero Point Offset and Tool Length Offset Measurement
Work Zero Point Offset Measurement
Coordinate system to be measured can be selected after
Work Zero Point Offset Measurement
Work Zero Point Offset Measurement
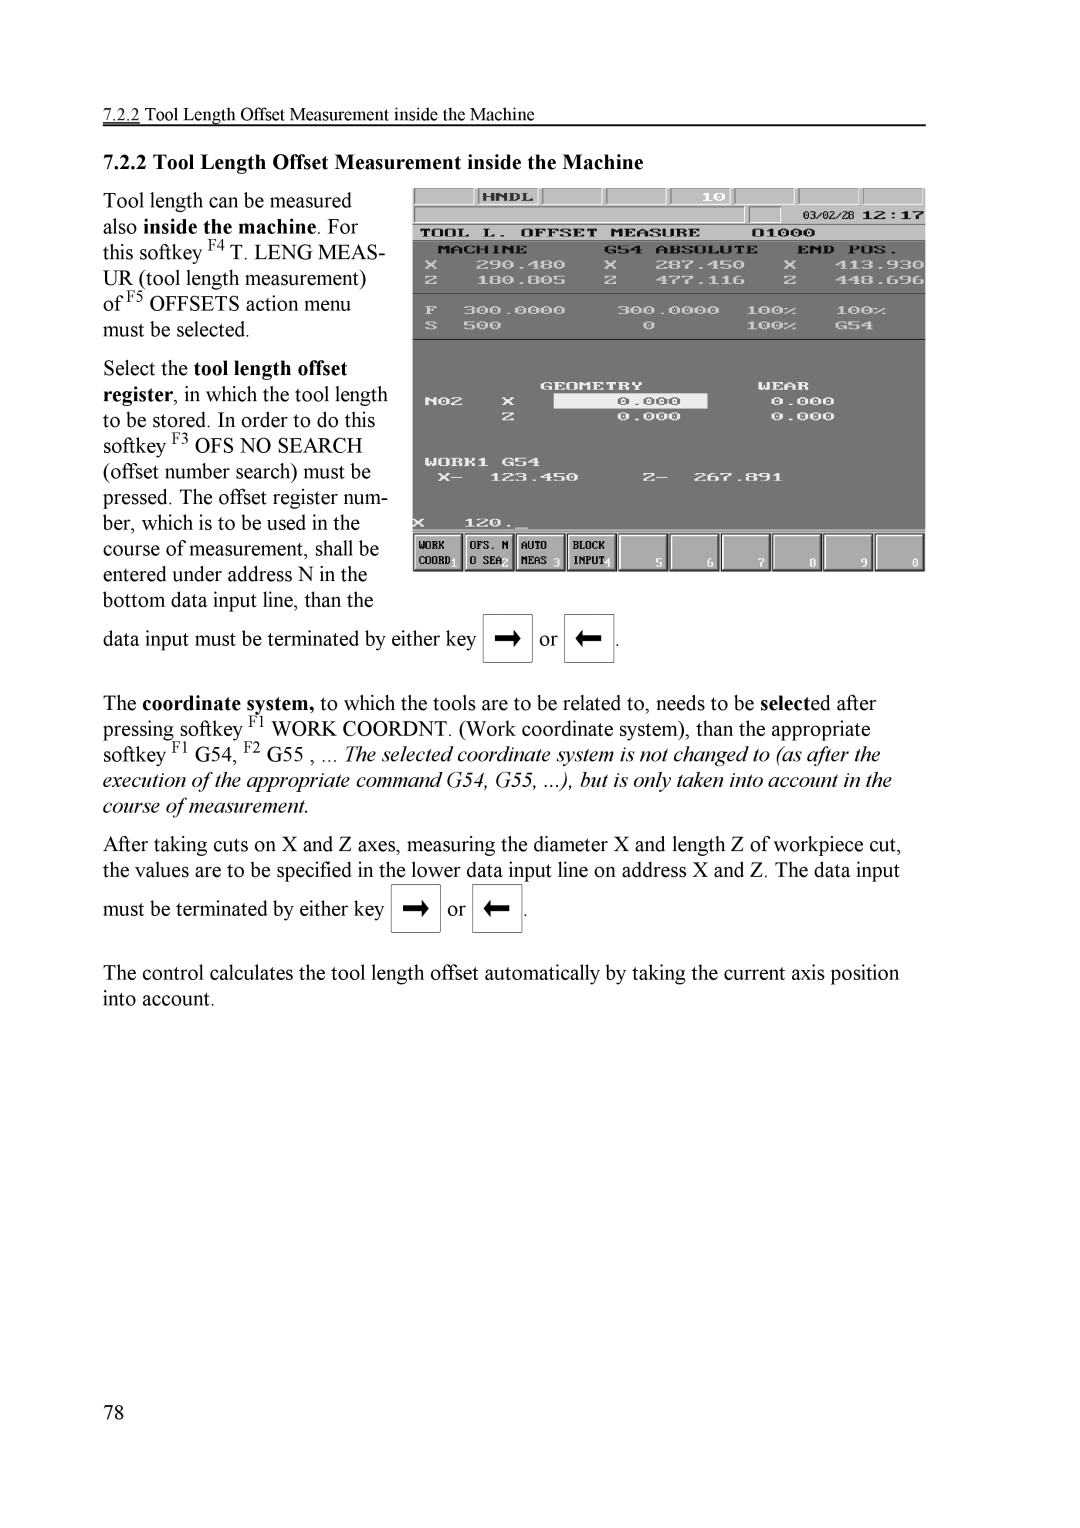
Tool Length Offset Measurement inside the Machine
Tool Length Offset Measurement inside the Machine
Automatic Tool Length Offset Measurement
CONTACTX+ Contactx CONTACTZ+
Calibrating Tool Offset Sensor
Calibrating the Sensor to the Coordinate System of Chuck
Procedure can also be applied for the other buttons
Calibrating the Sensor to Reference Point
Automatic Mode
Modes of Automatic Operation
Program Execution in DNC
Machining Start and Stop
Edit Mode
Editing Programs under Automatic Execution
Manual Data Input Mode
Differences between Automatic and Manual Data Input modes
Manual Data Input Mode
Override Switches
Feedrate Override Switch
Rapid Traverse Override Switch
Spindle Speed Override Switch
Override Switches
Starting Program Execution
Reset
Program Execution Start and Stop
Feed Stop
Programmed Stop M00
Conditional Stop M01
End of Program M02, M30
Intervention in the Course of Program Execution
Conditional Block Skip
Increasing Feedrate by Means of Rapid Traverse Jog Button
Rules of operation are as follows
Effect of intervention to coordinate system
Debugging the Part Program
Single Block Execution
Dry Run All Feedrates at High Speed
Function Lock
Machine Lock Function
Other Locking Possibilities
Axis Lock
Test Run
Interruption and Restart of Automatic Operation
Interruption of Automatic Operation
Restore Modal FUNCTIONS? N
Is displayed Y=yes. By pressing Shift key question
Unconditional Restart of Automatic Operation
Interrupting Single Blocks
Program No
Interrupting Canned Cycles
Interrupting Machining in Offset Mode
105
G41
Unconditional Restart of Automatic Operation
Return to Block Start Position in Automatic Mode
Automatic Operation Restart with Block Restart Condition
Automatic Operation Restart with Block Restart Condition
Automatic Operation Restart with Block Restart Condition
Block Restart
Automatic Mode Restart with Block Return Condition
Return to the Interruption Point in Automatic Operation
Cases of Return by Means of Condition Block Return
Automatic Mode Restart with Block Return Condition
When condition Block
Return
Automatic Operation Start after Block Search
If F4 Block Search action is selected after pressing action
Command Search
Number of Tool to be Change d T1
117
Other Functions M
Spindle Rotation Code M3
Coolant Code M8
Positions
Command Goto
Other Intervention Possibilities Before Start
Search for Interrupted Block
120
Local Message
Listing of Messages and their Codes
There may be two types of messages Local and global
Global Messages
Messages of custom macros
Listing of Global Messages
123
124
125
126
127
128
129
130
131
132
133
134
135
136
137
3103
138
3102
3104
139
140
141
142
143
Alphabetical index
ENCODERn 124
FEEDBACKn 124

![]() or
or ![]()
![]()
![]() or
or ![]()
![]()
